Increasing the dynamic range of photos
Correction 15 - increasing the dynamic range of the photo
Author: NON. Publication date: July 04, 2010. Category: Photo processing in Photoshop.
One great way to visually improve a photo is to increase its dynamic range. This Photoshop will show you how to give each element in a photo its appropriate dynamic range using the Levels .
Let's open the original photo. It's a beautiful location, but the photo is pretty lifeless. Let's fix the photo while working in Photoshop. The idea is this: we will select mountains, water and grass one by one and increase their dynamic range. As a result, our photo should sparkle with bright colors.
Let's create a copy of the original layer - Ctrl+J .
We need to highlight the mountains. To solve this problem, I chose the “ Rectilinear Lasso ” ( L ). You choose the tool with which you are comfortable working. We highlight the mountains. It is not necessary to make a very precise selection, since in subsequent steps we can easily correct this inaccuracy.
Call the “ Levels ” tool - Ctrl+L . As you can see from the histogram, there are gaps in its left and right parts.
Increasing the dynamic range of mountains. To do this, pull the left slider to the right, and the right slider, respectively, to the left. Move the middle slider a little to the right to darken the mountains a little.
We remove the selection - Ctrl + D and this is what we got.
Call “ Levels ” - Ctrl+L . As you can see, there is a gap on the left side.
Move the right slider to the left, and move the middle slider a little to the left.
Remove selection - Ctrl+D . This is what we got. As you can see, there are dark stripes along the edges of the banks that should not exist. Let's fix this shortcoming.
Select the Eraser ( E ). Set the brush hardness closer to zero.
Let's process the dark stripes along the edges of the river. This is what we got.
At the third stage of our correction, we will select the grass.
Call “ Levels ” again - Ctrl+L , move the sliders as in the first step.
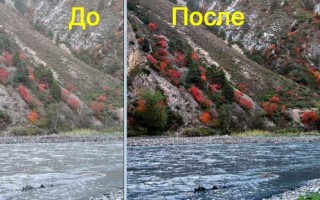
Here is our final image.
Compare the image before and after processing the photo in Photoshop . As you can see, in a very simple way you can achieve very impressive results.
If you don’t want to miss interesting lessons on photo processing, subscribe to the newsletter.
Dynamic range. Part 1
Instead of a beautiful sky in a sunset photo, did you end up with a white spot? Or maybe, on the contrary, you managed to capture the sunset, but there is only a black background below? Have you photographed a person in front of a window, and behind him a white veil has formed in the frame? It's time to figure out where these errors come from and how to fix them!
You've probably noticed that sometimes it is very difficult to show both the bright sun and dark details in a frame: either the sky turns out to be overexposed, or the lower part of the frame becomes too dark. Why is this happening? The fact is that the camera is capable of perceiving a limited range of brightness. We're talking about dynamic range. In the days of photographic film, this concept was called “photographic latitude.”
Lack of dynamic range in the frame: the sky is “lost”, replaced by a white spot.
The sky is preserved, all details are included in the dynamic range.
When is dynamic range most likely to be lacking?
In practice, photographers are constantly faced with the problem of insufficient dynamic range. First of all, it will be noticeable when shooting contrasting scenes.
A classic example is shooting at sunset. It will not be so easy to capture both the bright sun and the shaded areas at the bottom of the frame, the ground. The lack of range is also felt when photographing in backlit conditions (for example, if you are shooting indoors in front of a window).
All areas that are not included in the dynamic range in the image appear either too light or dark and lack all details. This, of course, leads to a loss of image quality and technical defects.
Some examples of high dynamic range scenes:
Almost any landscape
Some city sketches
Taking pictures with the Moon; night shooting in the city
Portraits in backlight
What is the dynamic range of a camera? How to measure it?
So, dynamic range (DR) is a characteristic of a camera that is responsible for the range of brightness it can show in one frame. Typically, manufacturers do not indicate this parameter in the technical specifications of the camera. However, it can be measured by looking at how much detail in the dark and light areas of the frame a particular camera can convey.
Compare: a smartphone camera has a narrow dynamic range, while a Nikon D810 DSLR has a wide one.
A shot taken with a smartphone camera. Details are lost in both light areas (sky) and dark areas (bushes). Instead, there are white and black spots in the photo. This is an example of narrow dynamic range.
A shot taken with a DSLR camera. Details are preserved both in light areas (all shades of the sky are visible) and in dark areas. This is an example of a fairly wide dynamic range.
In addition, there are special laboratories that measure the characteristics of cameras. For example, DXOmark, which has a lot of tested cameras in its database. Note that the specific testing of this laboratory is such that the dynamic range is measured at minimum ISO values. So, at higher ISO values, the picture may change somewhat.
Dynamic range is measured in exposure stops (EV). The more stops of exposure a camera can display in a photograph, the wider its dynamic range. For example, the Nikon D7200 has a dynamic range of 14.6 EV (according to DXOmark). This is an excellent result, however, it is worth noting that in general the dynamic range is usually higher in cameras with full-frame sensors, such as Nikon D610, Nikon D750, Nikon D810. But the dynamic range of compact cameras can be only 10 EV, and even less for smartphones.
Note that the potential of DSLR cameras (including their dynamic range) can only be assessed when working with RAW files. After all, many in-camera settings will affect JPEG images. For example, the camera can greatly increase the contrast of images, narrowing the dynamic range. On the other hand, many cameras can artificially expand it when shooting in JPEG, but more on that later.
How to lose dynamic range in a photo? Common mistakes
Even if a camera has a wide dynamic range, it doesn't guarantee that your photos will show all the detail in the dark and bright areas. Let's look at the main mistakes photographers make that lead to a significant reduction in dynamic range and poor detail elaboration.
- Exposure errors . Exposure errors are always fraught with the fact that either overexposed or “black” areas will appear in the photo. Even a wide dynamic range will not save a frame ruined by incorrect exposure.
Let's look at an example of a overexposed frame:
Theoretically, the dynamic range of the camera should have been enough for this scene, but there was a loss of detail in the bright areas of the frame (in the sky) due to incorrectly adjusted exposure. The frame turned out too bright.
The opposite situation is that the frame is underexposed and dark.
This time the details were lost in the dark areas of the frame.
- Processing errors . Rough processing of photos on a computer or the use of in-camera image processing filters can greatly reduce the dynamic range in your shots. Therefore, do not overuse excessive contrast enhancement, working with color saturation, exposure correction, etc.
Original frame: all details are preserved thanks to the wide DD and proper exposure of the image.
The photographer overdid it with processing - details in dark and light areas were lost.
We fit into the dynamic range
Often, even when shooting complex scenes with large differences in brightness, you don’t have to resort to any complex tricks to expand the dynamic range. You just need to wisely use what the camera can provide.
- Choose suitable shooting conditions . To get high-quality shots, you need to choose suitable lighting conditions. Often the photographer drives himself into conditions in which it is almost impossible to take a high-quality photograph. Instead of trying to capture a scene that is too contrasty, it's worth considering whether it might be better to choose a different angle, different time of shooting, or different lighting. For example, the sunset sky will balance in brightness with the earth after sunset. By the way, it’s not always worth taking the sun into the frame. Think about whether you can do without it. This way you will be able to avoid unnecessary overexposure. This also applies to shooting portraits in front of a window. It is enough to take a couple of steps from the window and shoot from the side of it - the bright window will not be overexposed, and beautiful side lighting will fall on your model.
When taking this photo, I did not include the rising Sun, which is located slightly to the right of the frame, in the composition. This way I saved myself from overexposure in the area of the solar disk.
When shooting a portrait outdoors, you don’t have to include the sun in the frame. The main thing is to get beautiful lighting from it.
Follow the exposure . As we have already said, in order to preserve maximum detail in a photograph, it must be exposed correctly. Pay attention to adjusting exposure settings, use appropriate metering methods and histograms. Also, always review the captured footage and check its brightness. If necessary, make takes lighter or darker so that you have plenty to choose from later.
Take photos in RAW . If you're shooting a complex scene, it's always better to have some wiggle room. The RAW format will provide you with a whole airfield, because absolutely all the information about the photo will be saved on the camera’s matrix. When processing, you can make the dark areas of the photo lighter or even slightly “stretch out” the details in the light areas of the frame. Please note that the RAW format allows you to lighten dark areas of the frame much better than darken light areas. Therefore, protecting the light areas of the image, photographers sometimes deliberately make frames darker than necessary, so that later during processing they can “pull out” the necessary details from the shadows. Almost any modern RAW converter can do this processing. Including Nikon Capture NX-D. We will prepare a special material on expanding the dynamic range with its help.
Shadows are “stretched out” in the RAW converter
In the next part of the lesson we will talk about the possibilities of expanding dynamic range. Some of them are hidden in the camera itself and are available to any photographer. Stay with us!
Dynamic Range Enhancement #1
In this lesson, I will tell you how to create the illusion of expanding the dynamic range in a photograph (in fact, in the final image, it, of course, does not expand, but simply redistributes the tonal range of individual areas). This is not HDR in the sense of the term, which is applied to pictures that have been hypertrophied by various detailing plug-ins. Such processing should be used where it is really necessary. For our picture there is no such need. We will work with standard Adobe Photoshop CS5 tools
To realize the effect of expanding the dynamic range, we need 3 images in JPEG format, taken with exposure bracketing of + 2 steps, or three images in TIFF or PSD format converted from one RAW file with different exposures. How to do this is described in the lesson “Camera Raw for Beginners #12”
You can, of course, draw out details in shadows and highlights at the stage of working in Adobe Camera Raw , but the fact is that the algorithms for the parameters Fill light and Exposure compensation , based on almost the same unsharp masking as the Unsharp Masking filter , are still imperfect and The output is not very good picture quality. In Photoshop, we can completely control the process, suppressing unwanted artifacts in a timely manner.
We upload our pictures into one file in Photoshop. You should get this sandwich of layers: the bottom layer is a picture with normal exposure, the second layer is a picture with exposure + 2 steps , the top layer is a picture with exposure - 2 steps .
Now turn off the visibility of the top two layers and look at the original picture with normal exposure. We see that there is a lack of detail in the shadows and highlights. Let's fix the situation.
First turn on the visibility of the layer +2EV and go to it. From this image we will take the details for the shadow areas. We will not use masks, but will use the layer style, or rather, the blending options. To do this, open the Layer Styles window. We are interested in the lower block with overlay tonal range controls (circled in red)
Then we divide the right slider, which is responsible for light tones, into two parts (to do this, hold down the ALT and drag the half of the slider with the mouse). Move half of the regulator to the extreme left position
Now the shadows in the image have become much lighter, and details have appeared in them. True, the image has become low-contrast, but we will fix this in the following steps.
Now turn on the visibility of the top layer
From this layer we will take the details for the light areas. Call up the layer styles window by double-clicking on the layer outside its name and thumbnail. Now we separate the left control for the top layer, which is responsible for dark tones, and move the half to the extreme right position.
We received a low-contrast image, but it contains information in both light and dark areas.
To make the image look good, we will use the HDR Toning . But first we need to create a duplicate of the image, since we will still need a structure with layers. A duplicate is created in the History
In this case, the image layers merge into the background layer, and the image itself may not look very beautiful. This is because the command applies default settings that are not appropriate for a particular image.
We need to increase detail and adjust the tonal range. In each specific case, the settings will be selected individually. For this image they turned out like this
The image itself began to look much better, but there is one unpleasant moment - halos around contrasting objects on a uniform background (foliage, lights and wires). This is very clearly visible in the image fragment at 100% scale.
Let's get rid of these artifacts. To do this, let's go to the picture with layers, create a new empty layer on top of the others and apply the External channel . We will select a duplicate image as the source, and the overlay channel will be RGB. Now our image, to which we applied the HDR Toning , appears on this layer.
Let's give this layer the name Dark (meaning halos), and set the blending mode to Darken
Then duplicate the layer, call it Light (all the same halos), change the blending mode to Light Replacement . Reduce the opacity of this layer until the visibility of the light halos is reduced to an acceptable level. It is best to control this process at 100% image scale. Below I have presented two images in comparison for clarity.
Now duplicate the top layer again, set the blending mode to Normal and opacity to 100%. Then we will create a mask on it.
Using a black brush with 100% opacity, paint over the areas on the layer mask where you want to get rid of ghosting. This is the area of the sky. Its color may change slightly, but this is not a big deal.
Now let's switch the image to LAB , allowing layers to be flattened. Then create a Curves . Again, the curves will vary in each case. For this image, I slightly increased the contrast of the brightness channel and increased the steepness of the curves of channels a and b . As a result, the image acquired contrast and saturation. While maintaining all the details.
The result is this picture:
In principle, we can stop there. If you want to increase local contrast, you can do it as follows: create a layer from the flattened image on top. To do this, press the key combination CTRL+ALT+SHIFT+E.
Then apply the Unsharp Mask , but with a small effect value and a large radius value. Dan Margulis calls this method HIRALOAM.
We obtain an image with enhanced local contrast.
Now we change the opacity of the top layer to taste, switch the image back to RGB mode and save.
Expansion of "dynamic range"
Why do you need to expand the dynamic range? In order to clearly see as many details as possible in light and dark areas. The human eye is capable of this without much difficulty, but unfortunately there is no camera matrix.
Here is an example of such a photograph and an example of what can be done from it in 10 minutes of work in Photoshop:
PS full-size screenshots are located under the thumbnails.
The end result does not claim to be a “masterpiece” and was deliberately made a little “more than necessary” in order to show what can be achieved.
Minimum of what is needed: one RAW file (as in this case)
It is advisable to have: several RAW files with different exposures (-2EV, 0EV, +2EV)
What software was used: LightRoom 3.6, Photoshop CS5, plugins from Nik Software: Color Efex Pro4 and Define 2.0
I will describe it step by step:
1) Primary processing of the original in LightRoom using the Beginning (which I wrote about in this article ) - setting White Balance to Auto , slightly increasing sharpness and saturation, slightly reducing noise and correcting optical distortions of the lens. The full “picture” of how the preset works is shown here
2) Next, a virtual copy of the processed frame is made in LightRoom . Right-click on the original and select the option Create Virtual Copy . the copy (by moving the Exposure to the left) until the sky gets a decent look. For a copy, you can move the White Balance a little to the left to give the sky a bluer tint. the original until all the buildings are clearly visible. On the contrary, you can darken the original and lighten the copy - there is no difference. Now select both frames and open them in Photoshop as Layers .
3) Place a light layer on top, a dark layer on the bottom. Click on the light layer ( 1 ), select the Magic Wand tool ( 2 ), Add to Selection ( 3 ), Tolerance 20% ( 4 ) and start clicking on the most exposed areas of the sky.
When all areas are selected, you can zoom in and check small areas that may not have been captured.
When the selection is finished, press the add mask button while holding down the Alt - this will fill with black . Without Alt the unselected will be filled with black .
4) We enlarge the image so that the places where the mask “worked” can be clearly seen.
Here you can clearly see that the mask has clear boundaries, which we would not really like, since the “leakage” of one layer into another is too rough. To correct this situation, you need to “soften” . Right-click on the mask and select the Refine Mask .
5) Try to specify the same parameters as mine. If you are not satisfied with the result of “softening” the mask, then try your settings in the settings
It is advisable to place the final result ( Output To New Layer with Layer Mask ) so that the original mask remains unchanged, in case of a second attempt at “softening”.
6) Now the result of the “percolation” of the top layer is more pleasant
7) If you find some areas that you forgot to select in step 3 , then click on the mask, select a soft brush, color black (or white, depending on what you want to do: black - do not show the area of the top layer; white - show), the size is not very large so that you can carefully draw the parts, Opacity 40-60% and we begin to draw.
8) If you click on the mask Alt key pressed , the mask itself will be shown in the main window.
It will be clearly visible which parts are well drawn and which are not. To return, click on the mask again while holding down the Alt .
9) Next, you can slightly darken very light areas of the houses by choosing a large brush size and Opacity of 10-20%. After that my mask looked like this:
10) When you are “finished” with the mask and you are happy with the overall look, then you need to combine all the layers into one. To do this, go to the Layer and select the Flatten Image .
11) At this stage, you can save the finished result, which will look like this
It turned out better than it was... isn't it?
12) If you have plugins installed from Nik Software , such as Color Efex Pro4 and Define 2.0 , then you can go further... Launch Color Efex Pro4 and select Tonal Contrast
Move the sliders until you like the result displayed on the right inside the plugin. Contrast Type is preferably Fine , but if you want cooler results, try other options from this menu. In this example, I set the sliders to almost maximum to show the “power” of Tonal Contrast . Click OK and get a new layer - the result of Tonal Contrast 's work.
13) If you look at the screenshot in step 9 , you will see that in the upper right corner it is slightly sloppily “smeared” with white. At step 10 , this “smudge” is almost not noticeable, but after processing the image in Tonal Contrast, this “smudge” comes out
We monitor the image for similar “jambs” and cure this problem with the Clone Stamp .
14) Often a “side effect” of Tonal Contrast is increased noise , especially if Standard or Strong . Noises are suppressed very well using the Dfine 2.0
15) The result of the plugin can be assessed by turning off the top layer by clicking on the “eye” , this will be especially visible when any area is greatly enlarged
If you are satisfied with the result of the noise reduction, then once again we combine all the layers into one and save the finished result. The saved file will be automatically imported into LightRoom , from where it can be exported to JPEG and posted on the Internet.
For not very complex photographs, it takes me 5-10 minutes for all this work. More complex options, where there are a lot of “tricky” elements, require much more time... sometimes 20-30 minutes... but you can get a good result.
Here is the original again, as it was at the very beginning, and what version I got after the steps described above:
And for comparison, the options obtained in step 11 (before applying plugins from Nik Software ) and after them:
And my final version, which looks more or less natural without going off scale with the sliders in Color Efex Pro
If someone wants to share their options for “expanding the dynamic range,” write in the comments (or better yet, make a similar article, I (and everyone else) will be happy to read it and take note of the proposed moves).
If you have any comments or tips on how to improve/simplify achieving the final result, write and we’ll discuss
Well, as a “snack”, a couple of my photographs obtained this way
It seems to have worked out well. The first photo (the Town Hall building in Hamburg) was also taken from 1 frame; the second (Shanghai Airport Terminal) is made of 3 frames (-2EV, 0EV, +2EV)
If you liked my article and want to say “thank you” , then click on the emoticon:
Thank you already said once
Artificially increasing the dynamic range of an image.
|
|