Lightroom's Secret Weapon: The Radial Filter and How to Use It
Lightroom's Secret Weapon: The Radial Filter and How to Use It
With the release of Lightroom 5 , Adobe included a very useful tool called the Radial Filter. However, its name did not really indicate what this tool can do, so there are still many users who have not discovered how useful and powerful it is. Further improvements made in Lightroom 6 make it possible to edit the effect later using the Brush tool.
The working process
Common image editing practice is to make general edits first. These are the ones that affect the entire image. Some examples of such settings are:
- Exposition
- White balance
- Contrast
- White and black dots
- Sharpness
- Definition
- Shadows and Lights
After the general settings are made, you can move on to local ones. These changes only apply to a small part of the image. They can be made to add some shine to the image or to eliminate shortcomings. These changes should be subtle and layered very delicately. They don't have to be obvious, but when you're done and compare the before and after images, the improvement should be noticeable.
What is the Radial Filter used for in Lightroom?
The Radial Filter can be applied to add highlights to certain areas or sharpen the main subject, brighten or darken areas, or add custom vignetting. Lots of little touches to take the final image to the next level.
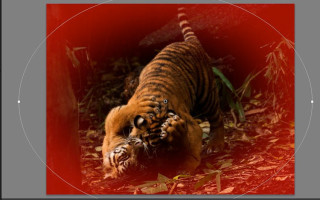
As an example, I'll take an image of two tiger cubs taken at Melbourne Zoo in 2010. Their enclosure was very dark and shadowy, so the original RAW file is very dark. The image was edited in Lightroom 6 and all necessary general adjustments were applied. Now it's ready for some local edits using the Radial Filter.
Where to find a Radial Filter and how to use it
The Radial filter is located in the right panel of the Corrections module. Below the histogram there are six icons that represent different tools. The fifth circle with a dot in the center is the Radial filter.
When you click on the button for the Radial Filter (you can also use the keyboard shortcut Shift+M), a panel will open with all the options available for this tool.
Adding and setting up a filter
If you click and drag slightly to the side, an ellipse shape will appear with a central button and four control points. Release the mouse when the shape is the desired size. The radial filter only offers a round ellipse shape, but it has enough flexibility as you can change the size and, by pulling down, turn the circle into a narrow oval.
By clicking and dragging the center button, you can move the filter to the part of the image you want to edit. Use control points to change the size and shape of the ellipse.
What area does it affect?
By default, Lightroom sets the editing area OUTSIDE the ellipse. If you want to edit INSIDE the ellipse, check the Invert Mask box in the panel.
If you check the Show selected mask overlay checkbox, the color red will appear. This is very useful so you can see where Lightroom will apply the effect and how strong it will be.
Note: If you don't see a colored overlay like the red one shown here, press O on your keyboard for "overlay." By holding shift and pressing O, you can change its color.
Note: Always press Close and Done (or Shift+M on your keyboard) once you are done editing a particular button to clearly see the edited image.
Using the Radial Filter to Edit an Image
In the example image, the goal is to draw attention to the cubs by working in the ready and paw areas (they are not 100% sharp due to low light and movement during the fight).
Adding an off-center vignette around the edges
First we add vignetting to darken the distracting elements at the edges of the frame and bring the focus to the cubs.
Since they are not in the very center of the image, the regular vignette tool will not work. The Radial Filter is useful here because you can add vignetting with the focus on an off-center subject and not be limited to the middle of the frame.
For a vignette, Mask Inversion should not be checked since the effect is applied outside the ellipse.
Add a Radial Filter and make the shape large enough - if necessary, you can make the ellipse larger than the image itself. Invert the mask and lower the exposure until the edges are dark enough.
Feather filter
Lightroom has set the default Feather value to 50, which is quite high, too high for this image, so let's lower the value. Be careful not to go too far and make the border visible.
There is still a bright patch of foliage on the right side of the image. So we add another long Radial filter and lower the exposure a little.
There is no set value for this tool, you need to try and find what works. The good news is that this edit is non-destructive (the image hasn't been permanently changed), so you can delete it and start over, or change the settings of one or all of the filters as many times as needed.
Adjusting the hue of a selected area
To the left there is a bright patch of foliage that sticks out from behind a tree trunk. We create a new Radial filter of a size suitable for this area and give it a shape using control points.
Invert the mask and lower the exposure a little. This time, click and drag the bottom control point to the right until the ellipse tilts slightly to the left and is better aligned with the line of the barrel.
Adding focus to an object
Now it's time to add some brightness and focus to the cubs. Add a new Radial Filter that covers the area of the illuminated side of the head and paws, and increase the exposure a little. Here the sunlight falls naturally, so it needs to be brightened. Be careful to only add the effect to the light areas of the image, as it will look a little weird if the dark area is unnaturally bright.
Now is a good time to say that you may have to make a LOT of small adjustments to areas of different shapes. It's tedious and time-consuming work, but you'll get better results if you take the time to edit this way.
The next step is to add definition to the side of the face and paw where the light hits. Create a new Radial filter with the size, shape and slope appropriate for the area and invert the mask. Add a little definition, and since this image isn't sharp enough, a little more sharpening. Be careful with these tools as it is very easy to overdo this effect.
Vignetting has darkened the center area, so let's add some brightness. Create a Radial Filter to cover the area around the cubs and increase the exposure a little. We also increase the clarity and saturation in a very small amount.
Comparison before and after
Let's stop here and compare the BEFORE image with just the general settings and the AFTER image with a few specific applications of the Radial Filter.
First we have a finished image with all the points to add the Radial Filter.
Then we have the BEFORE image.
Finally, the AFTER image with both global and local adjustments made using the Radial Filter.
Conclusion
As you can see, careful application of the Radial Filter can make many subtle changes to an image and bring the focus to the subject. It can also be used to further highlight an object and give it definition.
The radial filter is a universal tool that is very easy to get used to. The limited form does create some difficulty in learning how to apply it to your work for best results, but it offers a high level of control and impact.
How to Use the Radial Filter in Lightroom
Introduction
Hello! In this article I will show you how to use the Radial filter in Lightroom for RAW development. How to use this tool to quickly and conveniently adjust individual areas of an image for highlights and colors. Working with such a filter in Lightroom significantly speeds up the process of processing such photos, where the difference between overexposed and underexposed areas of the image is large.
The filter must be used when an attempt at a standard effect on the entire photo, by adjusting highlights and shadows with the parameters Exposure, Highlights, Shadows, etc., does not give the desired result - areas that you would not like to change are affected, volume is lost, etc.
Definition
A radial filter in Lightroom is a local area of image processing during RAW development. Round or ellipse.
The ellipse, radius, and location of this area are specified by the user. Next, local image processing parameters come into force, which work within a given area or, vice versa, exclusively outside it.
Photo for experiment
For a visual representation of the filter’s operation, I chose this photo (1). Radial filters helped me process it. Here the trees in the background and the area around them are too bright, and, at the same time, the dark bench.
The standard processing path when applying adjustments to shadows, highlights, exposure, blacks, etc. It doesn’t help to cover the whole image at once. The image becomes unnatural. Volume and depth are lost. The texture of some surfaces deteriorates.
This is exactly the case when local adjustments were needed, which are provided by the radial filter technology in Lightroom
First steps
First, let's make a global edit - reduce the exposure of the entire image, focusing on the tree on the right, in the foreground.
At the same time, the bench and the area around it were completely drowned in shadow.
Enabling the Radial Filter
Now we will use the technology of local corrections - radial filters. Pay attention to (screenshot 4). The white circle in the row of tools is the button to enable this filter. Click on it. We will be provided with a list of parameters that work with the radial filter. Also surrounded by a red frame. If you do not see this list, expand it. It opens with a white arrow pointing down.
Filter inversion and feathering
Scroll down the entire list of local filter options. You will see two options: Feather and Invert. Feather is feathering - how blurry the border of processing of the selected area is. It is used to ensure that locally processed areas do not contrast with the rest of the image at the junction with a sharp transition. The transition from one processing (local) to another (global general processing) should be smooth. Therefore, we will leave the Feather Parameter as it is – 50.
But the Invert parameter needs to be enabled - check the box. Otherwise, everything that is outside the filter will be processed. We need just the opposite - image processing exclusively within the filter area.
Installing a filter on an image
After you click on the white circle, you can immediately click on the image. Or pre-set processing parameters and then click on the image. Doesn't matter.
Click on the image in the center of the bench. We see that Lightroom is showing us that the Radial filter is turned on, and displaying the borders. By dragging the center point with the mouse, I corrected the location of the filter. By pulling the square markers on the border, I established the ellipse of the impact area.
Let's use adjustments
Now that the area is selected and the Invert option is enabled, simply increase the exposure and temperature (Exposure, Temp). Please note the changes. The temperature had to be “warmed” a little so that the bench and the area around it would fit into the overall picture in terms of temperature. Although it should not be left “warm” enough. Since, according to the laws of physics and visual perception, objects in the shadow are perceived with cold shades, against the background of bright areas outside the shadow.
Adding another filter to photo processing
If you click on the white circle again, the program will add another filter to the image. In this case, the old filter will remain and its treatments will continue to operate. The old filter is displayed as a small gray circle.
By adding another filter to the background trees, I also reduced the exposure in that area.
Returning to global processing
By clicking on the white circle, we return to global processing. The circle became pale.
Returning to the Basic section, I make the usual adjustments for such scenes. I change the contrast, exposure, shadows, highlights... I weaken the color saturation.
Final color edits
Also, in global processing, I decided to adjust the hue of the yellows to the orange area and weaken the saturation of the greens. All this works on the entire image on top of the radial filter processing.
Result
Here's what I came up with. Although the process is detailed, working with the Radial Filter in Lightroom is quick and easy. With skill, they allow you to fix difficult spots in your photos in a matter of seconds. Don’t forget that the system for processing and developing RAW images in Lightroom is non-destructive. You can always change any processing parameter, including the parameter in the radial filter, if it is used in your specific photo. The RAW file always remains untouched. Now you know how to use the Radial Filter in LightRoom.
I wish you successful processing! Thanks for reading the article!
Bright room
Lightroom video tutorials
Lightroom 5 beta. Radial filter
Download this video (for non-commercial use)
Lesson text:
In Lightroom 5 beta, the range of local correction tools has been expanded with a radial filter. The same could be done with a regular brush (Adjustment Brush) in previous versions. Let's say you take a giant brush, paint over everything, then change it to an eraser by holding down ALT and clicking where you need to make the center.
Setting up a radial filter
However, with the new radial filter it is more convenient to do this: click on the filter icon or, as we see from the tooltip, press SHIFT+M. Now click where you want to make the center of the filter and, without releasing the mouse button, drag to create an oval. If you pull more down than up, the oval will end up elongated from top to bottom. And vice versa.
I'll reset the filter settings by double-clicking on the word Effects. And for clarity, I'll just lower the exposure a little. By default, the effects apply to the area outside the oval. This setting can be changed by checking Invert Mask. The degree of smoothness of the effect growth can be adjusted, if necessary, using Feather, blur. As always in Lightroom, you can go back and change the strength and nature of the effect at any time, as well as add another or remove this effect - whatever you want. Editing does not change the original files, so the quality does not deteriorate due to a large number of alterations.
As always with Lightroom's local tools, you can change the size, shape, and position of the effect area. Special “grippers” along the edges allow you to stretch or contract the area, and the central “gripper” is used for movement. If you have an oval, you can turn it at any place on the border of the effect, except for the “grabs”.
Radial Filter Shortcuts
Now a little about the keys. I'll remove this filter for now. If you drag the mouse while holding down the ALT key, the oval will be drawn not from the center, but from corner to corner, if that is more convenient for someone. I'll delete... If we hold SHIFT we will always get a perfect circle. And these keys can be combined. That is, if we hold SHIFT and ALT, we will draw a perfect circle from corner to corner.
Next, double-clicking anywhere inside the filter while holding CTRL will result in the oval taking up the maximum area of the photo from edge to edge, which is often necessary. Or, if there is no filter yet, then simply double-click anywhere on the photo with the CTRL key.
Tilt-Shift in Lightroom 5 using the Radial Filter
One of the most common effects when processing photographs is Tilt-Shift, or, to put it simply, blur. Some semblance of this effect can be achieved using a radial filter. I must say that I actually went to Photoshop for this effect, because it’s very inconvenient for me personally to do it with a brush. I'll reset the settings again for blur, just push Sharpness and sharpness all the way to the left. A weak blur has appeared that clearly does not suit me, it needs to be strengthened. To do this, I simply copy the radial filter as many times as necessary to achieve the desired blur. I do this by dragging the effect a short distance while holding down the CTRL and ALT keys. Of course, different settings can be applied to each copy. For example, I'll do an inversion on one copy. Now the effect spreads in reverse inside the oval. And on the contrary, I will increase Sharpness. Additionally, I can add other settings to my effect to suit my tastes.
The H key allows you to hide all auxiliary elements, as in all local tools. And you can see the picture without distracting details.
With a radial filter everything seems to be the same. In the next video on SvetlayaKomnata we will see what kind of new brush has appeared in Lightroom 5.
Use the Radial Filter tool
The background or elements surrounding the primary object of your photograph can distract the viewer. To draw attention to the focal point, you can create a vignette effect. The Radial Filter tool enables you to create multiple, off-center, vignetted areas to highlight specific portions of a photograph.
With the Radial Filter tool, you can make local adjustments with an elliptical mask. You can use the Radial Filter tool to draw an elliptical area around the subject, and choose to reduce the exposure, saturation, and sharpness of the portions outside the selected mask.
Press Shift + M to toggle the Radial Filter tool.
Video tutorial: The Radial Filter tool
Apply a Radial Filter to enhance a photo
In the Develop module, select the Radial Filter tool from the toolstrip.
The Whites and Blacks sliders are available only in Lightroom CC 2015.1
Do one of the following:
- To create a Radial Filter , click and drag the mouse across the region of interest. This will draw an elliptical shape, which determines the area that is either affected or excluded from the adjustments you perform.
- To edit an existing Radial Filter , click any of the gray handles on the photo.
While drawing, press Shift to constrain the Radial Filter to a circle.
To determine what area of the photo is modified, select or clear the Invert Mask checkbox. The checkbox, by default, is not selected.
- Invert Mask not selected (default): Changing any setting affects the image region outside the marquee area.
- Invert Mask selected : Changing any setting affects the image region inside the marquee area.
Adjust the size (w >Radial Filter added. Select a filter, and:
- Click and drag the center of the filter to move and reposition it.
- Hover the pointer any of the four filter handles, and when the pointer icon changes, click and drag to change the size of the filter.
- Hover the pointer close to the edge of the filter, and when the pointer icon changes, click and drag the edge of the filter to change the orientation.
Use the adjustment sl >Feather slider to adjust the visual falloff of the applied adjustment.
Repeat steps 2 through 5 to continue adding or editing filters.
Click Reset , to remove all the Radial Filters applied to your image.
Keyboard shortcuts and modifiers for the Radial Filter tool
New adjustments
- Press and hold Shift + drag, to create an adjustment that is constrained to a circle.
Editing adjustments
- While dragging one of the four handles to resize an adjustment, press and hold the Shift key, to preserve the aspect ratio of the adjustment shape.
Deleting adjustments
- While an adjustment is selected, press the Delete key to delete the adjustment.
Adjustments with maximum coverage
- Press Command/Control and double-click an empty area , to create an adjustment that is centered and covers the cropped image area.
- Press Command/Control and double-click within an existing adjustment, to expand that adjustment to cover the cropped image area.
- Double-click without pressing the Cmd/Ctrl key commits and dismisses the Radial Filter tool.
Applying filters in Lightroom
The Lightroom program includes two filters in its functionality - gradient and radial, which will be useful for changing the distribution of tone, light, shadows across image fragments. Let's look at an example of using filters in Lightroom.
Gradient filter in Lightroom
Our source file has this initial appearance (saved in jpeg format for clarity, and we will work with an image in raw format).
On the toolbar, as shown by the arrow, select “Gradient Filter” or by pressing the M key.
We will have guides that can be stretched, rotated, etc. with the mouse (instead of the cursor there will be a pen).
The upper left corner, as shown by the arrow, will be subject to correction. On the right, the green outline shows the parameters that have changed. In particular: they made the temperature more greenish; we shifted the exposure, which added brightness to the image; eliminated the lights.
When increasing the “Light” parameter, the following happens:
If you reduce the “Exposure” parameter as much as possible, you get the following:
When you increase the “Shadows” parameter and other parameters, as indicated in the figure, the image takes on the following appearance:
When the hue changes, the tonality of the image fragment changes. Why a fragment and not the whole image? Because we are working in the “Gradient Filter” mode.
We apply the changes made in the filter by clicking on the “Done” button under the work area.
Radial filter in Lightroom
We resort to the “Radial filter”. We set some changes in the area highlighted with a green stroke.
Click “Finish” again. If you don’t like any changes, you can cancel each action taken in the “Edit” - “Undo” tab.
Apply the “Gradient Filter” again and complement the changes with a small correction of tonality, highlights, and shadows.
Apply the filter by clicking “Finish”.
Let's use the Adjustment Brush tool.
Using the left mouse button, we place a mark on the image that will assign changes to a specific area of the image. We increase the “Exposure”, which will give a brightness effect and thanks to the brush it will be applied in the selected place.
We perform these manipulations with other flowers.
Using the parameters in the “Camera Calibration” section, you can adjust the individual image tone, in this case it was green.
To give clarity and sharpness to the image, you need to use the “Clarity” parameter.
You can add sharpness, while eliminating noise or, on the contrary, enhancing it, if the task requires it. You can make the details of the image more expressive.
After processing, the image began to look like this:
Lightroom's Secret Weapon: The Radial Filter and How to Use it
.
Back when Lightroom 5 was released, Adobe included an extremely useful tool called the Radial Filter. However, the name wasn't particularly clear about what it could do, so many people still have yet to find how useful and powerful it can be. Further improvements were added in Lightroom 6, with the ability to further edit the effect of the tool with the Brush function.
Workflow process
A generally accepted practice when editing images, is that you do your global adjustments first. These are the ones that affect the whole image at once. Some examples of adjustments that you might use are:
- Exposure
- White Balance
- Contrast
- White or Black Point
- Sharpness
- Clarity
- Shadows and Highlights
Once the global adjustments are done, then the local adjustments can be made. These are changes made to only a small part of the image. They may be to add final polish to the image or to fix some blemishes. These changes should be subtle and layered on with a delicate touch. It should not be obvious that they have been made, but when you are finished and compare the before and after image, there should be some improvement visible.
How the Radial Filter fits in
This is where the Radial Filter can be used, adding in areas of highlight or clarity to the key subject, brightening or darkening areas, or adding a custom vignette. Lots of little touches to take your final image to the next level.
My example image is a shot of a couple tiger cubs taken at Melbourne Zoo in 2010. It was very dark and shaded in their enclosure so the original RAW images are very dark. This image has been edited in Lightroom 6 to apply all the required global adjustments. It is now ready to have some localized tweaks added with the Radial Filter.
WHERE TO FIND THE RADIAL FILTER AND HOW TO USE IT
The Radial Filter lives in the right panel of the Develop Module. Under the histogram are six shapes that link to different tools. The round circle with a dot in the center at the fifth position from the left is the Radial Filter.
When you click on the button for the Radial Filter (you can also use the keyboard shortcut Shift+M to open the Radial Filter), a panel opens up with all the editing choices available for this tool.
Adding and adjusting the filter
If you click on your image and drag the mouse out a bit, a roundish ellipse shape will form with a center button and four control handles. Let go of the mouse when the shape is roughly the size you want it. The Radial Filter only offers a roundish ellipse shape but it has a lot of flexibility with changing the size and squashing it down to be a narrow oval shape instead of a circle.
Clicking and dragging on the center button allows you to move the filter to the part of the image you want to edit. Use the control handles to change the size and also the shape of the ellipse.
Which area is affected
By default, Lightroom sets the editing area to OUTSIDE the ellipse. If you want to edit INSIDE the area, tick the Invert Mask box on the Panel.
The red color shows up if you have Show Selected Mask Overlay ticked. It is handy to see where Lightroom will apply the effect and how much feathering you need to use.
NOTE: if you do not see a colored overlay like the red one shown here, hit the O keyboard shortcut for “overlay”. Holding shift and tapping O will change the color of the overlay.
Note: Always click Close or Done (or the keyboard shortcut Shift+M again) once you are finished editing a particular button so you can see the edited image clearly.
USING THE RADIAL FILTER TO EDIT AN IMAGE
In the example image the aim is to bring attention to the tiger cubs, adding some tweaks around the head and paws area (it's not 100% sharp due to the low light and the movement while they were wrestling).
Add an off-center edge vignette
First, we add a vignette to darken the distracting elements on the edge of the frame and bring the focus to the cubs.
Because they are not in the absolute center of the image, the usual post-crop vignette tool will not work. This is where the Radial Filter is so useful, as you can add a vignette with the focus an off-centre subject rather than being limited to the middle of the frame.
The vignette needs to have Invert Mask NOT ticked, as the effect goes on the outside of the ellipse.
Add the Radial Filter and adjust the shape to be quite large – you can make the ellipse bigger than the actual image if necessary. Invert the mask and bring the exposure down just enough to darken the edges of the frame.
Feather the filter
Lightroom has a default feather setting of 50 which is quite a lot, too much for this image, so adjust the feather down. Be careful not to go too far as a harsh edge will become visible.
The right-hand edge of the image still has a bright spot of foliage. So add another long Radial Filter and bring the exposure down a little bit.
There are no set numbers of how much to edit with this tool, you will need to experiment and go with what feels right. The good news is these are all non-destructive edits (the image is not permanently changed) so you can remove them all and start again, or change the settings on one or all of them, as many times as necessary.
Tone control on select areas
There is a bright spot of foliage on the left-hand side, just sticking out from behind the tree trunk. Create a new Radial Filter just big enough to cover the right area and shape with the control handles.
Invert the mask and bring the exposure down a bit. This time, click and drag on the bottom control handle and drag to the right until the ellipse tilts back to the left a bit and aligns better with the line of the tree trunk.
Add focus on the subject
Now it is time to add some brightness and focus to the tiger cubs. Add a new Radial Filter to cover the area on the bright side of the head and paws and bring up the exposure a tiny amount. That is where the sunlight is naturally falling, so that is the area that needs brightening. Be careful to add light effects only to the lighter parts of the image as it can look a bit odd if a darker area is unnaturally bright.
Now is a good time to mention that you may have to make LOTS of little adjustments to cover areas with different shapes. It is fiddly and takes time, but you will get a better result if you take the time to edit that way.
Adding some clarity to the side of the face and paw in the sunlight is the next step. Create a new Radial Filter with size, shape and tilt to match the area and invert the mask. Add some clarity, and because this image is not quite sharp, just a little bit of sharpness. Be careful with these tools, as it is easy to go too far and get obvious effects.
The vignettes have darkened the overall area in the middle a bit much so let's add some brightness. Add a Radial Filter to cover the area around the cubs and tweak the exposure up a small amount. Also, increase clarity and saturation a very small amount.
Before and after comparison
Let's stop there and compare the BEFORE image with global adjustments only to the AFTER image with several specific applications of the Radial Filter.
First, we have the finished image with all the dots for the different individual Radial Filters added.
Then we have the BEFORE image.
Finally the AFTER image with both global, and local edits applied with the Radial Filter.
CONCLUSION
As you can see, careful use of the Radial Filter can add many small subtle changes to an image, and bring the focus to the subject. It can also be used to further enhance the subject and give it extra punch and vibrancy.
The Radial Filter is a very capable tool that can take a bit of time to get used to. The limited shape has some challenges to learn how to work with it to get the best effect but it gives you a lot of power and control too.
Do you have any other tips for using the Radial Filter? Please share in the comments below.
How to Use the New Radial Filter in Lightroom 5
In June, Adobe announced a new version of Adobe Photoshop Lightroom 5, and the first thing I did after installing it on my computer was to study it in search of innovations. There are changes, new tools and opportunities have appeared. In this article, we'll talk about a new split editing tool called the Radial Filter.
The radial filter allows you to draw an ellipse on the image around the editable area of the photograph, and allows for separate retouching inside and outside the selected area. This is a very powerful tool for working with the highlights and shadows of an image.
We work with a radial filter.
To switch to the radial filter mode, you need to click the fifth button on the toolbar with the image of a circle with a dot inside, or press the key combination Shift + M. A tool palette will open on the right side of the panel, very similar to the good old Adjustment Brush tool ( Adjustment Brush), only without sliders for adjusting the brush itself. Let me make a reservation right away that the tool palette shown in the image is for the 2012 processor.
When using hotkeys, do not confuse this with simply pressing the letter M, which will open the "Graduated Filter" tool.
Using the Radial Tool Filter
The next photo is of my son enjoying a summer day at the pool. And to give the photo some punch, I'm going to use a radial filter, and to be precise, I'm going to make the water a little darker and add a little bit of blue to the water. We will change the exposure and white balance. All this should highlight the main subject of the photograph, making it visually lighter and warmer.
1. Select the Radial Filter tool and draw an ellipse around the main object of the photo. Start drawing from the center of the image, and then move the ellipse as needed.
2. If necessary, you can rotate the ellipse around its center. To do this, move the mouse cursor to the outer edge of the ellipse until the cursor changes its appearance to the now familiar rotation indicator. And then press the left mouse button and rotate.
3. Apply the necessary settings. In this particular example, I lowered the white balance to give the water a deeper blue hue, and increased the contrast to bring out the reflections in the water. All this makes my photography more interesting.
4. The Feather tool allows you to maintain the naturalness of the photo. Smooth transitions blur the boundaries, and it is already difficult to determine whether there was an adjustment in Photoshop or the photo was originally like this. By default the slider is set at 50, but after experimenting I found that I personally like it at 85 or somewhere around that. But at the same time, you may have to increase the radius of the ellipse, since the blur penetrates deep into the selected area.
Inverting a mask
Everything is simple here, there is an Invert Mask checkbox. When unchecked, all changes are applied to the outside of the selection. When the checkbox is enabled, all changes will be applied to the inner selection area. Please note that if you need to apply different settings both inside and outside, you will have to use two different radial filters.
To see what came first and what you turned your photo into, just toggle the switch in the lower left corner of the Radial Filter tool palette.
Conclusion
That's all the tricks of working with this tool. By changing exposure, contrast and white balance, and sharpening around the main character or on the main character in the photo, you can direct your viewer's eye exactly where you want it to go. And my simple example, I hope, has given you something to think about where and when you can use this tool. See you again on the pages of our website.