Photoshop tutorial. How to Add Sunlight to a Photo
Photoshop tutorial. How to Add Sunlight to a Photo
I really love photographing during golden hour. For portrait photo shoots, I also book the same time, because the light becomes soft and beautiful. There's one thing I especially like to do when I'm processing images. This is adding a reflection of the sun to portraits and landscapes. I like to use Photoshop to recreate a scene that ideally would exist in real life.
I added sun highlights to this portrait to create depth.
It's hard to overstate the effect of sun reflections, but it really makes a big difference, especially if you love the cinematic style of photography. This is a great way to add color and depth to your images.
Analyze your image first
The process of adding a solar glow is overall very simple, just two steps and a few minutes. The hardest part, however, is getting a realistic result. You need to analyze your image before doing anything. Start by determining the position of the sun and how light and shadow envelop your subject.
In the image below I added the sun's reflection to the left, but before doing this I noticed that the light was falling on the Taj Mahal from the left and the shadows were on the right side of the monument. If I had placed the sun highlight on the right, the result would have been unnatural because the highlights and shadows did not match the light direction of my sun glow. Try to take into account the location, direction and intensity of the light.
This is another example of an image I took with a GoPro. I added a reflection of the sun to the right, since that's where the sun was actually located. We're not trying to recreate another sun, we're just enhancing it with color and more intensity.
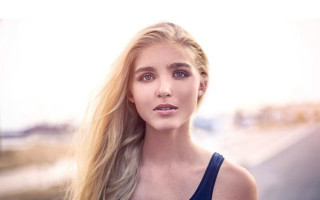
In this portrait I added a glow to the left of the model. The result looks realistic because you can see the orange reflection of the sun spreading and illuminating the model's hair, but her face is not affected.
How to Create and Add a Sun Flare in Photoshop
Adding a sun glow in Photoshop is actually very easy. Open your file in Photoshop and create a new empty layer. The next step is to analyze where to place the sun's glare and how strong it will be. In this case, I want to place the glow in the top right and make it quite intense. The sun was in that place, but I don't quite like the way it looked. I want to make the reflection more vibrant and intense.
Select tool and color
Next you need to select the Brush tool with opacity and press 100%. Make sure to select a soft brush with 0% hardness. I usually choose a custom sunglow color using the color code #fd9424, but there are other ways to choose a color.
You can select the Eyedropper Tool and set a color from the image by pressing "I" on your keyboard or selecting from the toolbar on the left (the selected color will automatically be set in your palette). Or, after creating the sunshine, you can create a Hue/Saturation adjustment layer that affects only that layer, and adjust it until you find the right color.
Adding a highlight
To create the highlight, first make one stroke with the brush (just press once). Make sure the brush is large enough. Your image should look similar to this:
Next, change to Blend Mode for the current layer (containing the brush strokes). The default blend mode is Normal, you should change it to Screen. This blend mode by definition will invert both layers, multiply them, and invert the result. When you do this, your solar glow will become brighter and blend into the sky.
Transformation
The next step is to select the highlight layer and press CTRL/CMD+T to transform it (resize it). A small window will appear and you need to drag the corners to make it bigger. The size depends on your image and the desired effect. If you make the glow very large, the effect will spread throughout the entire image and lighten the shadows.
Using a brush on a new layer is really very convenient as you have full control. You can change the position, color, brightness and saturation of your glow at any time by creating an adjustment layer that affects only that layer.
If you think the effect is too strong, you can reduce the layer's opacity, and if it's not strong enough, you can duplicate the layer. Always remember to keep the effect subtle, otherwise it will look unrealistic. We're just trying to create the scene by taking into account how the light works.
Your turn
Now it's your turn to try adding a sun flare to one of your photos using Photoshop.
LiveInternetLiveInternet
—Categories
- Miscellaneous entries (98)
- MILKphoto (47)
- I photograph people (39)
- This is interesting (21)
- Other photos (20)
- Reviews, reviews (7)
- Step by step (3)
- I draw (2)
- Interesting authors (1)
—Search by diary
—Subscription by email
—Statistics
How to add sun to a photo. Lesson
Thursday, March 07, 2013 17:10 + to quote book
So I decided to make my own master class. It is very simple, designed for people just learning Photoshop. I tried to make everything very clear so that any teapot could figure it out)
Sometimes this happens: it seems like a good photo, but something is missing. For example, the sun flooding the free edge. And now I will show you how to “fill” a space with sunlight. I’ll say right away: I always do this when I want to add some kind of light. Maybe someone knows another way, more beautiful, but for me it’s simple and convenient to go this way .
So, we will need:
– Any version of Photoshop (I have CS3);
– Hands (you can even have crooked ones).
The result I got was this:
We open through Photoshop the photo to which we want to add light.
Let's create a new layer on which we will “shed” the rays: click the icon at the bottom of the layers panel. Everything is shown in the picture)
On the side we have a toolbar. Below we see two squares: black and white. Click on white and select any bright color similar to the sun:
Select the “bucket” with a fill on the toolbar, right-click the mouse and change the “bucket” to a gradient. We carefully make sure that a circular gradient (radial) is selected so that our rays illuminate the photo smoothly and naturally. We can see the gradient mode in the second line from the top:
Let's make sure that the active layer is our new one, and in no case is the layer with the photo itself. The active layer is shown in dark gray (in the layers panel on the right).
Now we need to make sure that the yellow color is at the top and the black color is at the bottom. To do this, click the arrow above the black and yellow squares. (If you don’t understand, I indicated everything in the picture =))
Select the “gradient” tool, and with the left mouse button held down, drag it from the place in the photo where you want to see the brightest light to the place where the light should dissipate. For example, I wanted to lighten the upper right corner. To do this, I extended the gradient from the very corner down, almost to the place where the girl is sitting.
Don't be alarmed that everything has turned black) That's how it should be. To make this blackness disappear, change the layer blending mode to Screen. This is done like this: in the layers panel we see a window with the word Normal. Click the arrow next to the window and select Screen from the list that opens.
Voila! Now our photo looks much better. But that is not all.
To make our light look more natural, let's change its transparency. Move the Opacity slider next to the layer blending modes.
Personally, I was satisfied with the result of 70%.
Now we can say with confidence that our photo has become more sunny, summery and cheerful!
This effect can be used for more than just adding sunlight. In the same way you can create fog and simply beautiful color effects. For example, if you create many layers and draw multi-colored gradients of different diameters on each one, you can make any “bland” photo much more interesting. Below I will show what will come of it.
And if you are not very happy with the color of your “sun”, you can adjust it by pressing ctrl+U and playing with the sliders. For example, like this:
And now, the promised photo with color gradients:
Tip: if your “light” obscures the subject (person, animal) – take the “Eraser” tool with a transparency of about 15-20 and go through the places where the light should not fall. This will help your photo become even more expressive.
And if you're doing a lot of gradients, don't forget to change the mode of EACH layer to screen.
OK it's all over Now! I hope you found it clear and interesting) This is the simplest lesson I could do. Again, this was written for absolute beginners in Photoshop.
| Categories: | Various entries Step by step |
Tags: photoshop photography photoshop processing sun light how to make it beautiful master class lesson effects master class gradient photoshop for beginners how to add light to a photo how to add sun how to process
Cited 2 times
Liked by: 4 users
How to Create a Beautiful Evening Sunlight Effect in Photoshop
Using literally a couple of simple steps, you can create a beautiful evening sunlight effect in Photoshop that will certainly decorate your picture. True, in order for the effect to look harmonious, you need to choose a suitable photo in which there is already a sunset. For the experiment, I selected a photo of a girl against the backdrop of the setting sun.
First, I’ll enhance the sunlight by applying a gradient fill on a new layer. Gradient Tool (G), in hand, in the Options Bar, set it to Radial.
By double-clicking on the gradient stretcher, I call up the properties selection dialog. I'll set a three-color gradient from white through orange to red. Hex color code: #ffffff; #ffa200; #ff0000
I'll fill the layer with this gradient, but it doesn't look much like the light of the setting sun; to make it more believable, I'll create a mask for this layer. Using a round selection (M) we will create the area of the future sun, now using the corresponding button at the bottom of the layers palette we will create a mask.
I’ll change the layer’s blending mode to “Screen” and use the Gaussian blur filter applied to the layer mask to get rid of sharp edges.
At this point, the work on creating the “new evening sun ” is almost complete. If necessary, you can move it to a new location, or work with the dimensions using the Ctrl+T key combination. In this case, you need to break the connection between the layer and the mask so that you can freely transform it. To do this, just click on the chain icon between the mask and the layer.
Toning pictures
The next processing step will be toning the picture in accordance with the colors of the “new evening sun”. This can be done in several ways, one of them is described in this post. In this case, I will proceed as follows: Above the background, I will create a corr. layer of curves and in each channel I will perform color correction manipulations. Strengthening red and green and slightly weakening blue from the middle part of the tonal range.
Invert the mask of this layer (Ctrl+I). Using a soft brush, read about the settings here, with reduced opacity, show the resulting tint with varying degrees of intensity, my version is in front of you.
Now I’ll balance the entire picture by color using, not surprisingly, “Color Balance”, which I’ll create using the “Adjustments” panel as the top layer. In the Ton list, I will select “Mid” Midtones. Using the color sliders, I will slightly increase the red and green levels, and also decrease the blue levels of the colors.
After making this correction, you may need to balance the previously made settings; it is convenient to do this by changing the opacity parameter for the layers. The sunset effect layer may require transformation of both the mask and the gradient together separately or alternately, use the “magic keys” Ctrl+T
Processing shadow areas
There's literally just the final touch left to get a realistic picture of evening lighting. It consists of adding blue color to the shadow areas of the image, I think it will look great. Using the button at the bottom of the “Layers” palette, create a solid fill layer “Solid Color” in the color picker palette, “Color Picker” set the color to dark blue
I will change the blending mode of this layer to “Lighten” so that the effect is corrected in the shadow areas of the photo. If necessary, you can easily change the selected color by calling the “Color Picker” again or reduce the strength of the layer by adjusting the “Opacity” parameter. As a result of this operation, I got the following picture:
That's all for today, I hope this method of image processing will find application in your practice.
Related Posts
Be sure to check out similar posts, you may find answers to your questions there.
Teeth whitening in photo without a dentist
Create a retro photo in a few seconds
Setting the black and white points - increasing the contrast in the photo