Lightroom lesson. How to Make Expressive Freckles in Lightroom
How to highlight freckles in a portrait when editing in Lightroom
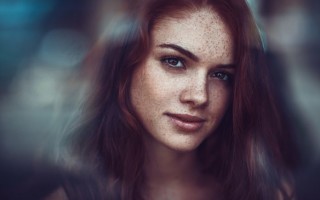
How to make a portrait more impressive with freckles.
Freckles are dark spots on the skin. That is, in order to highlight them, you need to increase the contrast between the light part (skin) and the dark part (freckles).
Let's take a piece cut from a raw photograph taken at the correct exposure. The higher the skin exposure, the less noticeable the freckles (dark areas are underexposed).
Therefore, first of all, you need to adjust the exposure - the entire photo or only in the desired part (using a brush), depending on how the image turned out as a whole. Reduce Exposure and Highlights - this will make the skin texture more noticeable:
You can then increase the Contrast, but remember that this will also increase the Saturation, so the latter will need to be reduced later:
You can also use the Tone Curve tool for more precise processing. Click on the circle in the upper left corner of the tool - this way, as you move the tool across the image, you will see how the curve changes.
Move the cursor to the lightest part of the skin, click on it and move the cursor up - the tone curve will also creep up. Then move the cursor to the dark part (freckle), click on it and move the cursor down. As you already understand, this increases the contrast between fair skin and dark freckles. After this, you may need to reduce the saturation.
In this example, I specifically set the settings to maximum to demonstrate how this tool works:
If you're working with a black and white image, you can try reducing the red and orange channels to make even more freckles visible.
I usually don't use Clarity when working with freckles because I don't like the results it produces, but if you're happy with it, you can experiment with it too.
As a conclusion, we can say that the desired effect can be achieved using Photoshop - use layer masks (to apply adjustments only to the skin and not the entire image) or the Lumosity blend mode (it does not affect saturation).
The author of this tutorial is a French photographer with the nickname PortraitsBySam. He shoots in the studio or outdoors, his characters always look natural and natural. His work, done in a distinctive style, often appears at the top of the “Popular” section on the 500px website.
Lightroom lesson. How to Make Expressive Freckles in Lightroom
In this Lightroom tutorial I want to share a combination of small techniques that can be used to highlight freckles. These techniques can be combined or mixed to create results depending on your goals - soft and lovely freckles or deep ones.
To understand how to deal with freckles, it is first important to recognize the obvious but important thing that each freckle is a small area that is darker in color than the rest of your skin tone; They are usually more noticeable in the summer, but remain on the skin all year round. Since freckles are darker areas, the idea is to increase the contrast between the light skin tone and the dark (freckles) to make them stand out.
Here's part of a raw, properly exposed photo in the studio:
The first thing you should know is that the more your skin is exposed, the less visible your freckles will be.
So first you can underexpose the skin in Lightroom overall or locally (with a brush) depending on the rest of the image by lowering the exposure and highlights. This will give the skin a more visible texture:
You can then increase the contrast, but remember that this will affect the saturation, so it will need to be lowered.
You can also use the Curves tool in Lightroom to make more precise adjustments to your image. In the top left corner of your curve, click on the tool there and then moving it around the image will show where you are currently on the curve.
You can move your cursor to the lightest part of the skin, click, and then move your cursor up. Thus the curve will move upward.
Then you move the cursor in the picture to the dark part of the skin (freckles), click and move the cursor down. This will move the curve down.
As you've probably already figured out, this will increase the contrast between the lighter areas of your skin and your freckles. Once you increase the contrast, it is likely that you will need to reduce the saturation again. I've deliberately chosen extreme settings here to show you the power of this tool on freckles:
If you're working with a black and white image, you can reduce the values in the red and orange channels to bring out even more freckles:
As a rule, I don't use definition to highlight freckles as I usually don't like the results, but those who like this option can experiment.
As a final note, this technique can also be used in Photoshop to achieve more precise results by using a layer mask (to apply adjustments only to the skin rather than across the entire image) and a Luminosity blend mode (which will not affect the saturation).
These are the techniques you can start with, but there are certainly many more (dodge and burn, for example...might be a topic for a future article).
Lightroom and its features. We create fabulous nature photos
When I discovered the possibilities of the Lighrtoom program, I was simply delighted. This is a brilliant creation, thanks to which I simply could not tear myself away from the camera. Because from simple, cloudy and boring photographs, I got pictures.
In this lesson I want to teach you how to work in the Lightroom program and share my experience in achieving beautiful results.
Initially, I never gravitated toward natural colors. I have always been inspired by works that turn out fabulous, bright and expressive in color. Here's a little of what I've been filming over the years:
During the entire filming, I learned the main thing. The best source for turning them into something beautiful and fabulous is obtained in cloudy weather. Cloudy colors are much more receptive to changing and achieving a beautiful color. Sunny ones most often do not come out as beautiful as we would like. At least for me.
Remember the rule: - we shoot only on a cloudy day or in the shadows, where there is no direct sunlight. Photos look best in the rain. And exactly when it rains. Only for this you need equipment protection. There are many ways to do this, here is one of them:
And so, let's go and take pictures in cloudy weather, something beautiful:
These are the colors that are usually ideal for applying presets to them in Lightroom. I’ll tell you what presets are further.
We go to the group https://vk.com/ilovelightroom and download from there all the presets that we like. Each preset is located under example photos:
And add them to Lightroom:
You will see a gallery of presets:
You can, of course, create your own. But it's faster. In fact, by downloading presets from the Internet and changing their settings, you can create your own presets that no one else has. So feel free to download and apply them to your works.
Now the fun begins, and these are the capabilities of Lightroom. What does the lightroom program provide and the use of presets in it. See for yourself, I’ll make a selection here of the best of what I got:
As you can see, you can fantasize endlessly. A simple photo can become much more expressive and beautiful with just one click in Lightroom. So download Lightroom, download the presets and apply them to your work.
Of all the things I did, I like the first option:
You can open it in Photoshop and apply some filters. Improve the overall picture:
But this is a matter of taste. I hope the lesson was useful to you. All the best!
Lessons on photo processing in Lightroom for beginners! And many of my examples of FS))
Since girls on different threads often ask questions about photo processing in LR and FS, I decided to collect everything in one post, which will be updated as questions arise. I studied myself and continue to study to this day, I often return to lessons again and again and every time I discover something new for myself! I hope they won’t ban me for so many useful links))
- Lightroom from A to Z from Evgeny Bulatov. Starting from cataloging and ending with reviews of new versions. Highly recommend for beginners!
- Video course on Lightroom from Kirill Doroshenko in a bright room. In the lessons you can clearly see all the examples of manipulations; he explains clearly and understandably.
svetlayakomnata.ru/
- Presets for Lightroom (read about what presets are, how to install and use them in the lessons of Evgeny Bulatov). Presets can be downloaded by typing “download preset” into the search engine.
- Another very useful site with lessons on HR from Alexey Svetlakov
lightroom.ru/photoshop/
- For those who shoot in raw (raw) format (and it is better to shoot in it) there is a very good video course from Alexander Kiselev “Frying raw”, watch all (!) lessons.
youtube.com/channel/UCGD6iIesiwcY068NC_gD8DA
The program (30-day version) can be downloaded from the official website completely free of charge! Download, try and understand whether you need it or not!
It seems that I have given the main links, I will update them as questions arise... I wish everyone good luck and beautiful pictures!
PS: I’ll make a selection on processing in FS a little later)
An example of my processing in LR, not a classic of course, but in this photo I needed such a color scheme) maybe later I’ll add more complex options with correcting overexposure, blackouts, blur, etc., if I have time to make collages.
Another example, here LR + FS. LR tinting, FS removed shadows from the face and neck, unnecessary elements “sticking out of the head”, a stick behind the back, etc.
Well, a few “before after” collages, express pampering from baby photoshopper competitions))
these drawings are imitation pencil in FS
here it was necessary to make Alena the Snow Queen)
high-quality image restoration
it was a trash task
collage made from this:
and there was another one like that
from the competition “COLOR THE CINEMA!”
These were fun competitions, it’s nice to remember)) I’ll try to do serious ones in the near future.