Create a realistic starry sky. Photoshop lesson
Starry sky in Photoshop
Starry skies are a great way to add an interesting element to your photos or digital drawings. It may surprise you, but they are very easy to create in Photoshop. Although most of the steps are repeated and they are quite simple in themselves, I will still dwell on each of them so that you have a good understanding of what is happening.

Step 1
Open Photoshop and create a document with dimensions of 2500px by 1600px and a resolution of 150px per inch. Make the background white.

Step 2. Fill with black
From the Edit , select Fill . Select Color from the Use tab. Set it to absolute black (#000000) and click OK.

Step 3: Create Noise
From the Filter menu, select Noise – Add Noise. Set the quantity to 100%. Select Gaussian . Monochrome box and click OK.

Step 4: Duplicate the Layer
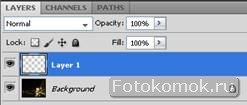
Select the background layer in the layers panel and duplicate the layer (Right click – Duplicate layer or Ctrl/Cmd + J). Hide the new layer (click on the eye icon).

Step 5. Fog the first (background) layer
Select the first (background) layer. From the Filter menu, select Blur Gaussian blur. In the radius line, enter 0.5px and click OK.

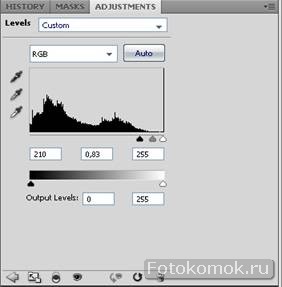
Step 6: Create Small Stars
From the Image , select Adjustment – Levels. In Input Levels, enter 200, 0.42, 255. Click OK.

Step 7: Create Big Stars
Select and enable/show the first (top layer). From the Filter menu, select Blur Gaussian blur. In the radius line, enter 2px and click OK.

Step 8. Adjusting the levels of large stars
From the Image , select Adjustment – Levels. In Input Levels, enter 170, 1, 172. Click OK.

Step 9: Add More Blur
From the Filter menu, select Blur Gaussian blur. Set the radius to 1px. Click OK.

Step 10 Select the big stars and create a new layer
At this stage we need to isolate the large stars and separate them from the black background. We do this using the Channels panel, select the stars, then delete the layer with the large stars, create a new transparent layer, and fill our selection (that is, the stars) with white.
With the top layer (big stars) selected, open the Channels panel. Click on the small circle at the bottom of the panel ( Load channel as selection). You may not see any difference at all, but Photoshop has loaded the stars as the selected area and we no longer need the layer.
In the layers panel, right-click on the layer and select Delete Layer. Create a new empty layer (click on the corresponding icon at the bottom of the layers panel). From the Edit , select Fill .
Select Color from the Use tab and set it to absolute white (#ffffff). This will paint the previously selected object (the big stars) white. Press Cmd/Ctrl + D to cancel the current selection.

Step 11: Add sparkle to the big stars
In the layers panel, double-click on the layer thumbnail to open the Layer style . Select Outer Glow and open the Outer Glow layer style to view its properties.
Select the color box and set it to White (#ffffff). In Blending mode, select Normal. Set the size to 10px and click OK.
In the layers panel, right-click on any of the layers and select Visible to, in fact, merge two layers into one.

Step 12. Create clouds
Of course, at this point you can be quite happy with the result and can use it to create scenes with the night sky, but with a little more work we will add variety to our stars and make them look less symmetrical and “computer-generated”.
Select White as your Foreground color (hold D to select the default color, then X to change background to foreground). Create a new layer (Ctrl/Cmd+Shift+N).
In the Filter section, select Render – Clouds. In the layers panel, change the blending mode to Color Dodge.
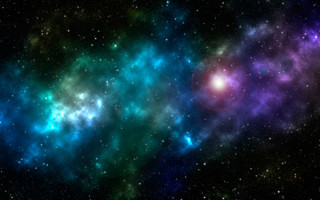
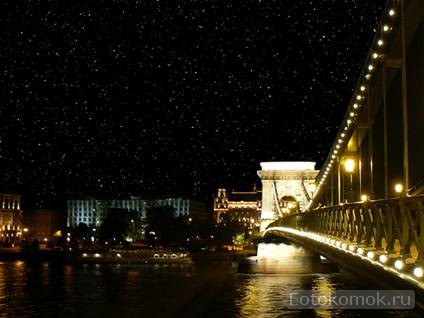
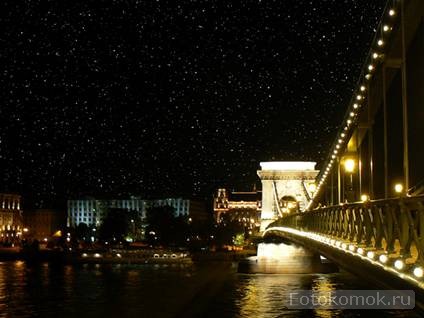
We have a very impressive night sky that we can use where necessary, and the clouds add realism to the image.

Step 13. Space dust
Let's move on to the next step, namely adding cosmic dust and galaxies in the distance to our starry sky, as shown in the final image. I repeat, all this is quite easy, but requires your personal approach depending on what result you want to get. In this process we will paint on a new layer, placing it between the stars and clouds layers.
Create a new layer between the background layer and the stars layer (select the background layer and press Cmd/Ctrl + Shift + N). Select a new layer and select the Brush tool ( B). Set the Opacity to 10%, Hardness to 0%, and Size to 450px.
Choose a pretty color (dark shades of blue and purple work well).
Draw a little around the entire perimeter of the image, creating celestial formations. Change the brush size to make it all look realistic. Repeat this process until you are satisfied with the result.
Adjust the layer opacity if necessary.
Step 14: Add Blur
Make sure the stardust layer is selected in the layers panel. From the Filter menu, select Blur Gaussian blur. Set the radius to 70px and click OK.


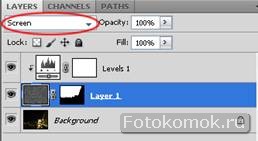
Step 16. Add a distant star/highlight
On top of all other layers, create a new layer (Cmd/Ctrl + Shift + N). . Select the new layer and from the Edit select Fill . Select black color and click OK. Change the blending mode to Screen .
From the Filter menu, select Render – Lens flare. Place the highlight as you wish. Set the brightness between 50% and 75%. Change the type to 35mm. Click OK.
Since the star is created on a new layer, you can easily delete the layer and start over if you're not happy with the result, or change the opacity to reduce the effect.

Step 17. Download the action
I created a Photoshop action to automate most of the steps (up to step 13), which takes a lot of the hassle out of the process of creating a beautiful starry sky.
Beauty from Outer Space, creation of a planet, starry sky in a photoshop lesson
Step 1 Stars in the sky. Create a new document and fill it with color #000000. Go to Filter -> Noise -> Add Noise (Filter -> Noise -> Add Noise) with the following values: Amount - 17 Gaussian Monochromatic Next go to Image -> Correction -> Levels ( Image -> Adjustments -> Levels): Input Levels - 99, 1.00, 175 Step 2 Cut out what you need from the next two images and paste it onto the created background. You can use the Eraser to make images softer.


Step 3 Bright border of the Earth. Make a copy of the Earth layer and change the Blend mode to Screen. We erase the bottom of the Earth, which will disappear behind the plain, and we get:

Step 4 Ctrl + click on the Earth layer to make a selection. Under this layer, create a new one and fill it with #FFFFFF color (the selection should remain when you create a new layer). Move the circle a little to the right and go to Filter -> Blur -> Gaussian Blur (Filter -> Blur -> Gaussian Blur) - Radius = 95 Pixels. And again we erase the excess.

Step 5 Create a new layer, fill it with #000000. We place it at the very top. Filter -> Rendering -> Lens Flare.

Blend mode – Lightening (screen).

Step 6 Create a new layer, press Shift + Ctrl + Alt + E, then Shift + Ctrl + U to make it black and white. Blend mode - Overlay. Filter -> Blur -> Radial Blur (Filter -> Blur -> Radial Blur)

Step 7 Create a new layer and add a brush to the image.

Step 8 Adjust the colors. Layer -> New Adjustment Layer -> Hue / Saturation (Layer -> new Adjustment layer -> Hue / Saturation).

Layer -> New Adjustment Layer -> Channel Mixer (Layer -> new Adjustment layer -> Channel Mixer).

Layer -> New Adjustment Layer -> Curves (Layer -> new Adjustment layer -> Curves).

Layer -> New Adjustment Layer -> Levels.


You can add more planets on top.

photoshop lesson, photoshop lessons, photoshop lesson
Starry sky in Photoshop
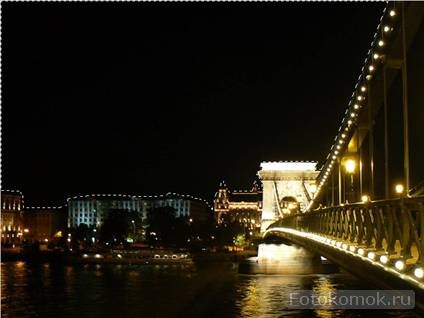
For romanticism and greater beauty in the photo of a city at night, especially in winter, sometimes there are not enough stars in the sky... today we will learn how to create it, the starry sky. Open the image where there are not enough stars File => Open, or Ctrl+O:

Let’s immediately create a new layer (Shift+Ctrl+N):
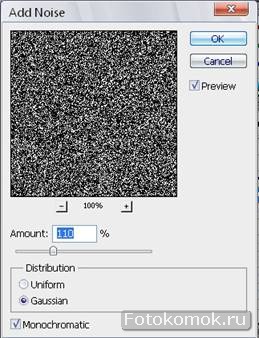
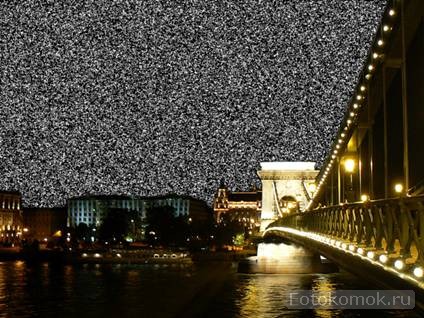
Fill the new layer with black and add noise. Go to the menu Filter=> Noise => Add Noise, in the dialog box set the amount to about 110%, check the boxes for Gaussian and Monochromatic:
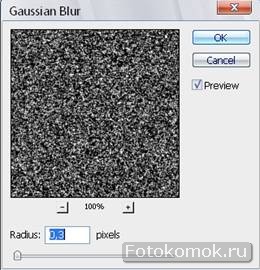
After we have added noise to our future layer with stars, we will blur it using the Gaussian Blur filter (Filter=> Blur=> Gaussian Blur). A 0.3 pixel radius will be enough:
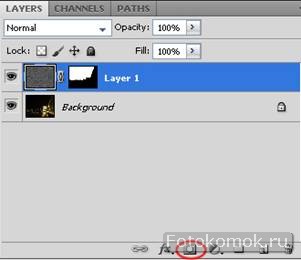
Next, move on to the background layer, and temporarily make the star layer invisible. Select the sky using Polygonal Lasso:
Now let's go back to the top layer. First, let's make it visible and create a quick layer mask:
And now we see that the lower part of the layer has been removed, under which the city is now visible:
Go ahead. Create an adjustment layer “Levels” (Layer=> New Adjustment Layer=> Levels):
Move the sliders approximately as in the picture below:
In the end it should look like this:
If at the end of the tutorial you are not satisfied with the result, you can correct the adjustment layer values at any time.
On the layer with stars, change the blending mode to Screen:
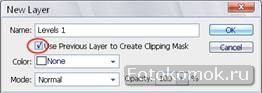
Let's create another adjustment layer to the star layer - Hue/Saturation. Go to the menu Layer=> New Adjustment Layer=> Hue/Saturation, don’t forget to check the “Use previous layer to create a clipping mask”. Move the new layer on top of the others and set the following Hue and Saturation values:
In this section, we have collected all the most interesting things that are not included in other categories of our site, so that you can practice with the best free lessons and plunge into the wonderful world of Photoshop.
The best drawing lessons for beginners and advanced artists will give you real moments of pleasure.
All lessons are done step by step to help you learn how to draw from scratch.
It's very simple: choose what you really like and enjoy drawing!
LESSONS
PHOTOSHOP
Now you have a great opportunity to draw and edit any images from anywhere in the world without having a graphics editor at hand.
"Photoshop Online" - Completely free!
Accessible from anywhere, does not require installation, lightweight, convenient and practical! To use “Photoshop online” click on the button.
Drawing Lessons » Drawing Miscellaneous »
How to draw a starry sky in SAI
Note:
- please note that I am not an expert in explaining certain topics
- I am showing my personal way of drawing a starry sky, on the Internet you can find many other drawing techniques
- this lesson is not intended for beginners in using SAI, so here you will not You will find detailed explanations of the tools used and additional screenshots.
The first step is to create a new canvas in SAI. Then fill it with the base color. Start applying some darker tones. You don’t need a lot, because they will still wash out and merge with each other. Three colors were enough for me 😀
Then use the Blur tool with a large diameter (large enough to achieve a good gradient).

Secondly, create a new layer and set its blending mode to Luminosity or Addition.
Make a selection around the stars and press Ctrl + C and Ctrl + to copy and paste the selection - for Microsoft, and for Mac use the keyboard shortcut Command + C and Command + V. You now have the two "pairs" of stars you just drew ! Notice that there is another new layer with stars. Set it to Luminosity/Addition mode too! All layers with stars must be in this mode.

Now you need to transform the stars using the Transform tool. Flip them horizontally (Horizontal flip), Transform (Transform), Rotate around an axis (Rotate)! 😀 They will, of course, lose quality, but they will be quite small and shiny. We will have so many stars that these shortcomings will not even be noticeable.
Combine these two “glowing” layers into one! It will also be in Luminosity mode.

Then repeat the previous steps!
Let's repeat their order: Draw the stars in the Luminosity or Addition layer mode - Copy and paste - transform the stars - merge the layers, after which you will have one layer with the stars - then copy and paste it again, into As a result, you will get another star layer!

It is very important to create new “bundles” or sets of stars, and not just one star that you endlessly transform and save.
-Draw at least 3 or 4 piles of stars by hand so there is some variety!

Keep copying and pasting them!
Well... a couple of effects!!
Create a new layer in Luminosity mode, this time we will apply colors.
I usually use a Pen tool with a low Opacity - about 3-60% - at a size of about 250 and with textures like scattering, noise, etc. (varying the intensity of the texture).
I almost forgot, you can also change the color of the stars by clicking the “Opacity Lock” button on the right. The most successful colors are shades of blue and orange.
Now just apply the color. I usually also use the Luminosity mode at this stage.

Paint some large stars on a separate layer. They will be special! ХD

And add glitter to the other Luminosity layer! Then take white and give them shape! You can also use the Blur tool to soften the white ends a little. I like the way it looks 😀


To make even more stars (you can never have too many >:D), go back to the Luminosity layer, where we have all the small stars, and copy and paste them, and set the resulting layer to (again) Luminosity mode ). Make them smaller and smaller and smaller. You may end up with a lot of star layers, but don't forget to combine them at the end!

I create star columns like this:
(copying and pasting segments)


If you want more glowing stars, you can use these steps too! 😀 They are fun to draw though. Now you will need to merge the previous "big stars" layer with a separate "glitter" layer. Then just copy and paste it. I don't recommend rotating this layer because the stars are quite large... but you can try:

Move them somewhere and reduce the Opacity of the layer! (and don’t forget about the Luminosiy XD mode).


These are the most basic principles of drawing a starry sky, but you don’t have to stop there!
How to create a starry sky in a photo
A recent lesson talked about how to photograph the moon and showed a photo of the moon with many stars in the background. It’s hard to get a picture like this, but you can cheat a little with Photoshop and add “artificial stars” to the photo. Let's start our Photoshop tutorial by looking at the original photo.

Undoubtedly, she is already good, but we need to “train on cats.” 🙂
So, load the photo into Photoshop and create a new layer above the photo.
Fill the new layer with black. This can be done from the Edit menu - Fill or with the Fill .
On the same layer (filled with black) we apply the Noise filter. Go to the menu Filter - Noise - Add Noise .
In the parameters of the generated noise we indicate 120% Gaussian distribution and check the box Monochrome . It turns out something like this:

Next you need to blur the created mixture of noise and black. To do this, go to the menu Filter - Blur - Gaussian Blur and select a radius of about 0.3 pixels.

Now comes the most delicate work - to separate the main objects and the earth from the sky. This can be done in several ways, but I prefer working with masks in Photoshop. There are many alternative options - lasso, selection by color, etc. The end of our efforts must be precisely the separation of the sky from everything else. Something like that:

Using a mask or creating a layer mask from a selection, the goal is to put a noise layer on the place where the sky is located in the original photo. Like this:

Now we need to significantly reduce the amount of noise in the image so that it begins to look like stars. To do this, select the noise layer and, while holding the ALT on your keyboard, create a new adjustment layer “Levels” above the noise layer.

If you held down the ALT button when creating the “Levels” adjustment layer, then this window will appear, where you need to check the box “Use the previous layer to create a clipping mask” .

Any adjustment layer allows you to change its properties; to get to these parameters, go to the Window and click on the item Correction . Now different parameters will appear in this window, depending on which adjustment layer we select in the layers panel.

To make stars out of noise, the sliders on the histogram of the Levels layer need to be moved to the right side of the histogram, like this:

The more the sliders are moved to the right, the fewer “stars in the sky” and the more believable everything looks.
To return the “city lights” to the photo, change the blending mode of the layer with stars to “Screen” .
Now it’s worth coloring the stars a little bluish, for which we create a “Hue/Saturation” (we do this in the same way as with the “Levels” layer, with the ALT button and a check mark (see above)).

the “Hue/Saturation” correction layer can be set as in the screenshot, i.e. check the Toning box, color tone is closer to blue, saturation 10-20%.
Create a realistic starry sky. Photoshop lesson

| PhotoShop Tutorials - Fantasy Night Sky |
| In this tutorial I'll show you how to draw cartoon clouds using Photoshop and a little Illustrator. |
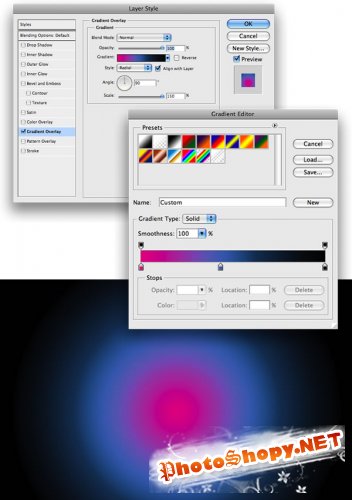
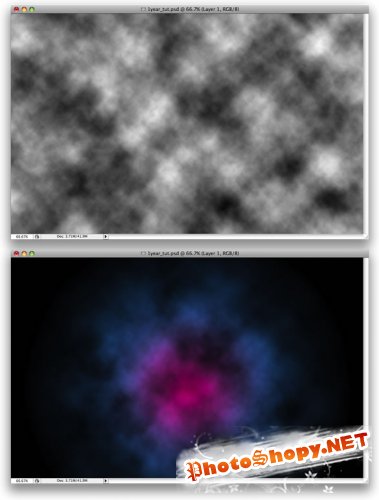
Create a new document (Ctrl+N). Double-click the background layer in the layers window to open the Layer Style window. Check the Gradient Overlay effect and set a radial gradient of three colors: pink, blue and black.
Create a new layer (Ctrl+Shift+N) and name it “Clouds”. Press D then X - this will give white in the foreground and black in the background. Perform a filter in the menu Filter>Render>Clouds (Filter>Render>Clouds), while holding Alt for a stronger effect. Set the blending mode of the cloud layer to Multiply (Blending Mode = Multiply).
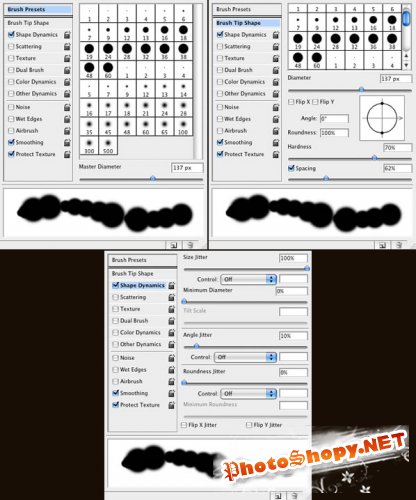
To create the clouds we will use the brush palette (Brush Engine – select the brush tool (B) and press F5). Set the brush options as shown below. The defining parameters for us are spacing and size. Once you've made your settings, save the brush. In the layer window, create a new folder (the “Create New Set” button) named “Cloud”.
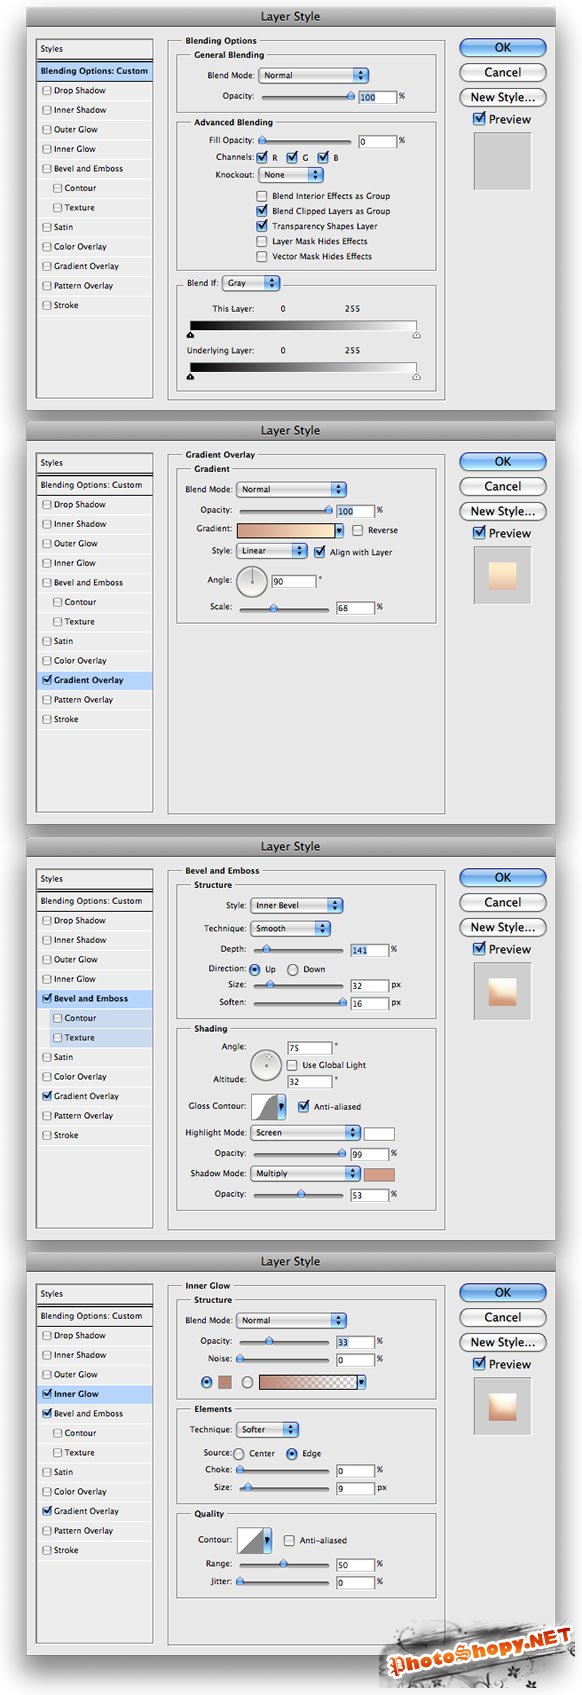
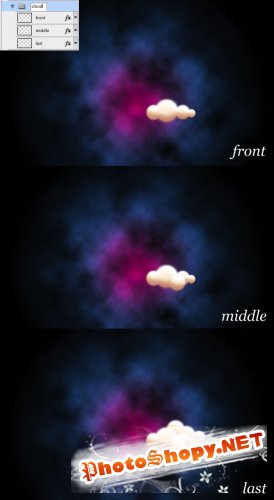
Now that we have our brush, let's create a cloud style. Create three new layers (Ctrl+Shift+N) and place them in the “Cloud” group, giving them names: “Front”, “Middle” and “Back”. Double-click on the "Front" layer to open the Layer Style window, select the Gradient Overlay, Bevel And Emboss and Inner Glow effects as shown in the pictures. Then copy the layer style (right-click on the layer in the layers window and select the “Copy Layer Style” command) and apply the style to the other two layers (right-click on each layer and select the “Paste Layer Style” command "/"Paste Layer Style").
Using the brush you created earlier, paint the clouds. Tip: A volume effect will be created if you arrange the layers as shown in the picture.
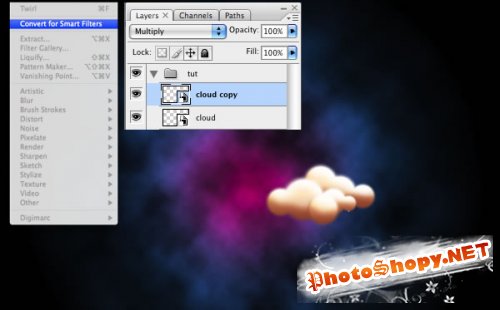
Once the cloud is drawn, select the Cloud layer group and convert it to a Smart Object. Duplicate the new layer and set the blending mode to Multiply. Merge the two layers into a group named "Cloud1".
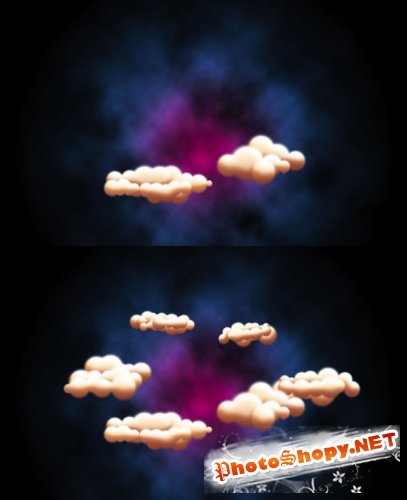
Repeat steps 4, 5 and 6. It is not necessary to re-set the effect layer styles - just copy the style from the already drawn cloud layer and paste it into a new layer. Create four new clouds and place them as shown in the picture.
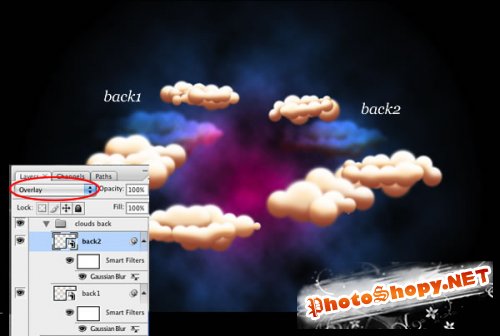
Select any group with clouds and convert it into a Smart Object. Set the blending mode to “Overlay”. Then duplicate this layer and group the two translucent layers. Name the group “Clouds in the background”.
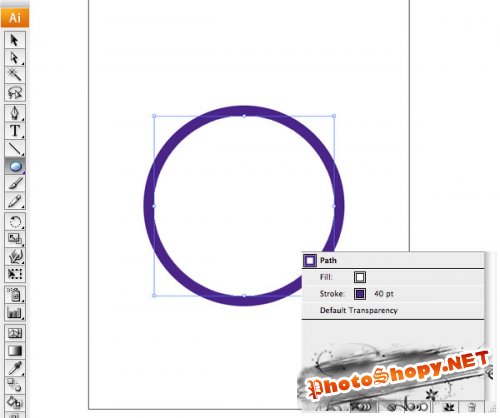
Step 9 - Rainbow in Illustrator
In Illustrator, select the Ellipse Tool (L) to draw a circle. Set the stroke weight to 40 pixels and the color to purple.
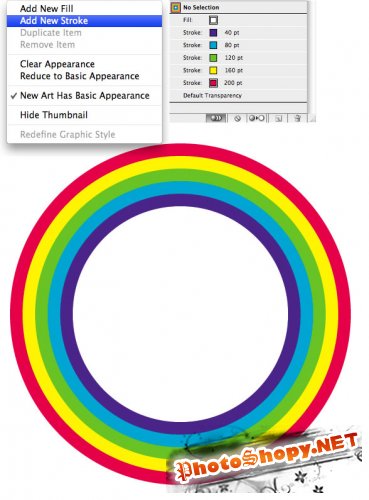
Add new circles by increasing the stroke thickness by 40 px: the purple circle is 40 px thick, the cyan circle is 80 px thick, the green circle is 120 px thick, the yellow circle is 160 px thick and the red circle is 200 px thick. Then copy the vector drawing and return to Photoshop.
In Photoshop, paste the vector in the “Paste As Pixels” mode. Then, using the Magic Wand Tool (W), select the white part in the center of the circle and delete it (Del key). Now convert the layer into a “smart object” and group it, name the group “Rainbow1”.
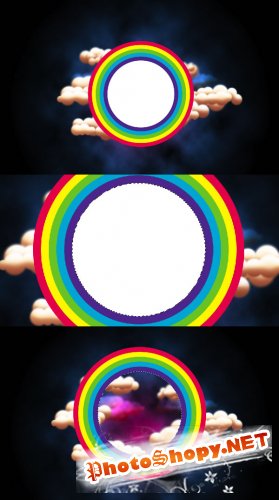
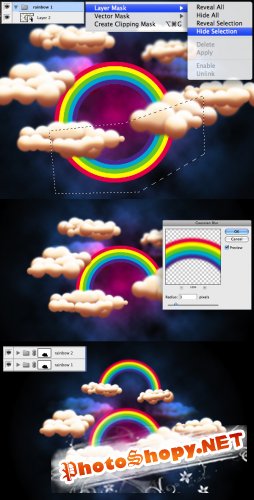
Place the rainbow between the two clouds and, using the Polygonal Lasso Tool (L), outline the part of the rainbow that you want to hide. Then select the group (not the layer) and use the menu command Layers>Layer Mask>Hide Selection (Layer>Layer Mask>Hide Selection) to hide the selected part of the rainbow. Then apply a filter from the menu: Filter>Blur>Gaussian Blur (Filter>Blur>Gaussian Blur) with a radius parameter of 3 pixels. After all this, duplicate the Rainbow1 group to create another rainbow and place it on another pair of clouds.
Create 4 new layers (Ctrl+Shift+N) and apply the same style to them that we used for the clouds. Select the Brush Tool (B) and create a new brush with the parameters shown in the pictures (press F5 for the Brush Palette). Then draw small clouds at the ends of the rainbows where they touch the larger clouds.

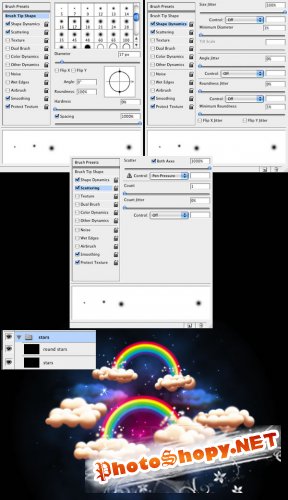
Create a new layer (Ctrl+Shift+N) located below the clouds and rainbows. Fill it with black (press D, then Alt+Delete) and set the Blending Mode to Color Dodge. Select your brush again and create a shape to paint the stars (see pictures).
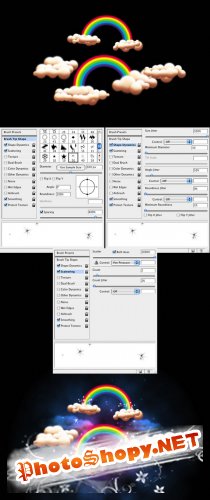
Repeat step 14, but this time work with a round shape instead of a star. Make your brush smaller and paint round stars.
In this tutorial we used mainly the brush and layer settings. It's incredible what you can create with these two simple tools! We drew clouds, but just change a few parameters to get a completely different effect.