Principles of working with flash and natural light
Principles of working with flash and natural light
Shooting in natural light, a flash can significantly improve the quality of a photograph, but using it incorrectly can only harm the image. To prevent this from happening, you need to know a few rules.
When photographing outdoors, the flash will help emphasize the naturalness and depth of the picture. The quality of natural light can be improved with flash. It's hard to disagree with the fact that the weather isn't always kind. Let's look at some features of shooting in natural light and with flash.
Basic principles of working with flash and natural light:
1) First of all, the exposure for natural light is determined;
2) In good natural light, the flash can be used to highlight shadows.
In fill light mode, it will make the shadows less harsh. 3) If there is not enough natural light, then the frame can be underexposed, and the deficiency can be corrected with flash. The correct setting will ensure good exposure.
All of the following examples will describe flash operation in TTL mode. This technology allows you to get the correct exposure much faster than manual mode. TTL is optimal for reportage photography and other types of photography in which you need to act quickly.
1. Using fill flash .
The exposure of light from the window is almost flawless. The light is well distributed throughout the frame, but the shadows are too deep and contrasty. The picture shows too clearly the fact that the light source is on the right. The left side of the photo is dark. Such construction of light and setting of models gives a big gap in the shadows.
To fill the shadows with light, you simply need to bounce the flash behind you. Please note that no additional lighting source is needed. You need soft light to softly highlight the shadows.
This example demonstrates the use of a flash pointed behind the photographer at the angle that should be filled in the photograph. If you look closely at the walls and ceiling, you can see a wide variety of colors, which the flash light naturally turned into. To further adjust the shades, you need to shoot in RAW.
2. Flash underexposure compensation
This photo was taken by bouncing flash off the walls of the church.
Camera settings: 1/125;
f2.8; ISO 1000 Shooting mode - manual;
Measurement is evaluative; Flash mode - TTL; exposure compensation - 0 Canon 1Dmk2N; Canon 70-200mm f2.8 IS
Let's look at the parameters used for this frame. To adjust the equipment for shooting a crucial moment, you need to take several test shots. In this case, you can experiment on guests. One shot was taken without flash, and the second was taken with flash. The optimal settings turned out to be: 1/125; f2.8; ISO 1000 .
Using the flash did not cast any hard shadows on the frame. Artificial lighting looks completely unobtrusive and makes the frame much better than a photo taken only in natural light. Proper use of flash can save many good shots that would otherwise be hopelessly poorly lit in natural light.
If you forgo the flash and shoot only in natural light, you will have to increase the shutter speed, which will blur the movements of people, or increase the ISO, which will lead to noise. In addition to all this, it is worth remembering that natural light is far from ideal. The flash will help correct lighting imperfections and take great shots.
Flash and Ambient Lighting
Ever since I started teaching the basics of portable lighting, I've constantly encountered a very interesting phenomenon: as soon as many photographers get their hands on a flash, they completely stop taking into account external lighting. “I took photos with flash!” - as if with a flash a person turns into a leering black grouse, and sees nothing else around...
One important thing to remember is that in most situations (excluding very dark places or studio settings), flash is at least the SECOND light source. Or even a third, fourth... And it doesn’t always have to be the main (drawing) source. In all cases, it is necessary to analyze what kind of light other than flash is available to us, how important it is in the idea, what is primary and what is secondary. In fact, it is not so often necessary to “interrupt the sun”, “shine against the streetlights”, etc.
I will devote many articles to this issue on the resource strobius.com.ua. And now I would like to turn to a companion from Canon, where he will give a very successful example of the combined use of flash and artificial lamp lighting.
Enhance the ambiance of your shot with auxiliary flash
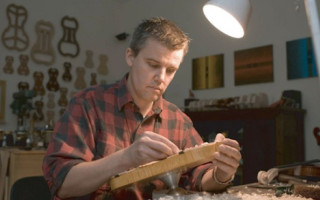
Captured birth of a masterpiece...
[blockquote]“When creating musical instruments, precision is more important than style, since music is perceived by the heart and ears, not by the eyes,” notes Edgar Russ. A true craftsman who began his apprenticeship in Cremona at the age of 18, Russ makes violins so coveted that customers have to wait at least two years. The essence of a violin maker's work has not changed much over the years. To earn the approval of passionate lovers, a violin maker must patiently carve beautiful curves from well-seasoned wood. In the photo above, the reflected light from the flash complements the incandescent light, allowing the hard work of the craftsman to be captured.[/blockquote]
Photographers can always choose between using flash as a primary ( key ) or secondary ( fill, background ) light source. When there is constant incandescent light, it is often best to use flash as a secondary light to maintain a natural, warm atmosphere. The light from the auxiliary ( fill ) flash can simply be reflected from the walls, ceiling or diffuser to soften it and complement the light from the lamp.
In such situations, determining the optimal flash exposure used to be a difficult task. However, modern system flashes can automatically determine the ideal flash exposure by metering exposure in ambient light and during the pre-flash (TTL) firing. This automatic simplicity allows the photographer to concentrate on creativity rather than technique.
Direct light (flash as main light source)
In the above photo the flash was used as the main light source. The subject's skin color is captured well, but the incandescent light is overexposed and her shadow is visible in the background. Additionally, the background is underexposed because there is not enough ambient lighting in the large workshop. ( And I’ll add on my own – the cut-off pattern on the face is completely absent, the photo has become flat; for the viewer, on a subconscious level, the front lighting is completely out of harmony with the light of the lamp - Strobius ).
Bounce lighting (flash as auxiliary light source)
The main photograph was shot using flash light bounced off the ceiling as a secondary lighting source. The use of an incandescent lamp as the main source of lighting allowed us to more naturally convey the concentration of the master. This is closer to how the scene is perceived through human eyes.
A little tip: when you install a flash on a camera, you get a light source that is not very beneficial from an artistic point of view. In this situation, either use reflective surfaces, or do not use the flash at all as the main (key) light. “Flash-in-your-face” (i.e., drawing with a flash on a camera with direct lighting) is only worth it if the external lighting is insufficient to obtain adequate shots, and photographs are absolutely necessary. Then, put aside the “artistic value of light design” and shoot the desired event, choosing interesting moments, angles and plans.
If there is enough external lighting, then the best option would be to use it as the main (key) light, and the flash on the camera as an auxiliary (fill or background) light.
Principles of working with flash and natural light
In order for the flash to look unobtrusive and not interrupt natural light, you need to learn several methods of working with it and use them wisely. Contrary to the claims of naturalists who do not recognize the use of artificial light in photography, flash can not only be invisible, but also improve the quality of natural light.
When shooting en plein air, this is what you need. It is needed to improve the quality of natural light, and not to interrupt it. In this article we will look at examples of photographs in which flash light is combined with natural light.
The basic method for working with natural light and flash is as follows:
1) Determine exposure for natural light;
2) If it is acceptable, highlight the shadows with flash.
This type of flash is called fill flash. In this case, it is not the main source of light, but only reduces the contrast. 3) Underexpose natural light if there is little of it, then compensate for the negative exposure with flash to get the correct exposure.
In the following examples, I used TTL flash because this technology can achieve the correct exposure faster than using manual flash. The mode is ideal for reportage photography and other types of photography where you need to act quickly.
1. Example of fill flash, natural light exposure is almost perfect.
In this portrait, the natural light is good, the exposure is correct, but the shadows are too deep. There is a light source to the right of the couple, but to the left the models are not illuminated. Because of this, there is a strong fall into the shadow.
By bouncing the flash behind me, I created a wide light source and got a soft light. I don't need flash to illuminate the models, I just need a little light to fill in the shadows.
The flash is reflected into the space behind me because I always bounce the flash at the angle I want the light to be at. As you can see in the photograph, the wall and ceiling are colored, so the light turned into a stray hue. In this case, you should always shoot in RAW and then adjust the hue.
2. Underexposing natural light and compensating for flash exposure
For this photo I bounced the flash off the wall of the church. The wall is large and the ceiling is high, but due to the vertical position of the camera, I still managed to bounce the flash into the wall on the left. I received an extensive light source that sufficiently illuminated the newlyweds.
I deliberately did not use a diffuser or point the flash upward at 45 degrees, as this would be an unfortunate angle of incidence of the light.
Camera parameters: 1/125 @ f2.8 @ 1000 iso
manual shooting mode - evaluative metering / TTL flash: exposure compensation 0
Canon 1Dmk2N; Canon 70-200mm f2.8 IS
Learn more about choosing options for this frame. I got the natural light exposure right before the bride and groom even walked down that aisle. I took a few test shots of the guests who were positioned on the left. First without flash, then with flash. So I chose 1/125 @ f2.8 @ 1000 ISO. When the bride and groom appeared in the frame, I was ready to shoot.
I also managed to take a few test shots of my parents with and without flash. The photo with flash is slightly edited in Photoshop for color balance, while the photo without flash is not processed at all. The exposure parameters remained the same; I did not change them during conversion.
Please note that the flash did not leave any hard shadows. It looks unobtrusive, much better than a shot with natural light. By using flash, I improved the quality of the light rather than just shrugging my shoulders and lamenting that natural light was a failure.
Using only natural light, I could set a slow shutter speed, but then the movement of people would be blurred. Or raise the ISO, but then you would have to suppress the noise. Plus, natural light isn't ideal. It looks much better in combination with flash. This is the best proof that using flash makes sense.
Pulsed light in the studio: how to work
Studio photography equipment
In the photo studio we have the opportunity to create the necessary character of lighting using light sources, light-forming attachments and reflectors (reflectors). Studio light sources are divided into pulsed and constant light.
Constant light sources are powerful halogen lamps that consume a lot of electricity and produce an insane amount of heat. Therefore, they are rarely used in photography, more often in filming.
Pulsed light sources (studio flashes) consist of two lamps, the flash lamp itself and a regular “pilot” light lamp (hereinafter referred to as “pilot”) of low power (about 300W). “Pilot” is necessary in order to evaluate the cut-off pattern, and its power is not enough for shooting. Pulse sources can be divided according to their design into two types: monoblocks and generators.
In a monoblock, the controls, flash lamp and “pilot” are made in one housing, which is mounted on a tripod and plugged into a power outlet. In the generator, control elements for several sources are placed in one housing, and the lamps themselves on tripods are connected to this housing with special wires. One of the conveniences of generators is the ability to quickly control the power of several sources at once. Generator devices are usually of a higher class and have better characteristics (power, pulse duration, recharge speed) than monoblocks. Accordingly, they are much more expensive than monoblocks.
Controls (main: pulse power, pilot power) may differ depending on the manufacturer of studio equipment and the model of the device. The power scale can also be discrete and expressed either in multiples or percentages of maximum power, or indicated in aperture numbers (stops). The power of pulsed studio light sources is indicated in Joules (J). For example: 150 J, 300 J, 500 J, 1000 J.
Manufacturers of professional studio photographic equipment that can be bought in Moscow: Hensel, Bowens, Broncolor, Profoto, Rekam, Prograph, Visatec, Multiblitz, Elinchrom, “Marco”, “Marco-Pro”, Prolinca, GuangBao, Falcon, Raylab. Light shaping attachments. Attachments are hanging structures that are attached to light sources through a mechanical connection (bayonet) and serve to change the nature of the light flux.
Character of light
Directional light (hard, sharp) is light that produces sharp transitions of light and shadow on an object and, in some cases, glare (example: spotlight, bright sun, any point light source).
Diffused light (soft, shadowless) - light emitted by a large surface, uniformly and equally illuminating the object, as a result of which there are no sharp shadows or glare (example: light from a window covered with a white curtain, reflected light from a light wall, cloudy cloudy weather - reflection of light from the clouds). Separation of nozzles according to the nature of light:
Directional light - tubes, “plates”, honeycombs, etc. Diffused light - umbrellas (sometimes reflective and translucent), soft boxes and their varieties, etc.
igor_gubarev
Igor Gubarev
On the websites of many children’s photographers you can find something like this: “I graduated from the photography academy and shoot only with natural light.” Moreover, this is clearly presented as an advantage. Apparently, it was there that they were explained that flash is evil, and therefore it simply should not be in a photographer’s arsenal. I also read an opinion that the flash distracts the child and he behaves unnaturally. I think if you shine the light directly on a child’s forehead, it will not only distract him, but also harm his health. But there are many ways to work with flash when models simply do not notice the impulses. Once I was filming a family with a one-year-old child in the studio and on frame 350 they said to me: “It’s so fun and interesting with you, but when are we going to take pictures?” The same thing happens when I work with very powerful pulsed light (up to 1500 J) to illuminate large rooms where performances or children's parties take place. The customer sometimes wonders whether it was worth maintaining and installing all this equipment if it still “doesn’t work.” But then he sees in photographs how it worked. Now let's go back to the beginning.
Or maybe, really, don’t bother and work only with natural light? When it exists, this is the best option, although it is not always possible to control its direction. Huge windows behind the children performing at the festival and a bunch of silhouette photographs are guaranteed. Only the customers may not understand this, but they were the ones who said that there would be plenty of light, and a flash would definitely not be required. Another option is when you have to shoot indoors where there are no windows or there is no sun outside the windows. In such cases, should I tell the client that I don’t shoot without natural light or consider fluorescent lamps as natural light while continuing to sneeze at the flash? This is possible, but why then do they produce flashes and monoblocks - professional photographer’s tools? Or maybe to expand creative freedom and make it possible to take high-quality photographs in any lighting conditions.
Shooting without the sun
There was no natural light here, plus the curtain and backdrop were made of velvet - a material that almost does not reflect light, and therefore would look like a black hole when shooting without additional lighting.
The foreground is illuminated by the impulse of a hensel Expert Pro 1000 monoblock (7″ reflector, ceiling diffuser), the background is illuminated by a hensel Expert Pro 500 (7″ reflector, curtains). The synchronization of these illuminators was carried out via a radio channel, which means that the pulse did NOT trigger the flashes of other photographers.
And here is the same backdrop (dark blue velvet). In the photo on the left it is not illuminated at all. In the photo on the right it is slightly backlit + backlight from the back to the right highlights the girl’s curls.
Shooting against the sun
Here, a flash is preferable to a light disk, since the reflector blinds the eyes of models, causing them to squint. When working with pulsed light (with light-shaping attachments), the model stands with her back to the sun with her eyes wide open, and the background is literally bathed in the sun’s rays. In addition, many kids are afraid of the reflector, and he, in turn, is afraid of the wind.
Nikon sb900 flash remote from the camera in the hands of an assistant, a silver umbrella for reflection.
Shooting without the sun and against the light , for example, against the backdrop of night illumination or architectural lighting. Without the backlight, we would end up with a silhouetted image of the family against a beautiful background.
Light from an external system flash through a diffuser.
The sun is behind thick clouds. There is enough light, but very loose, shadowless.
Here the flash light was used as a drawing light, forming a light-and-shadow pattern and increasing contrast. The flash from the golden umbrella (photo on the left) made it possible to deliberately unbalance the color temperature of the lighting of the subject and the background (to make the snow a cold shade).
In addition, pulsed light allows you to achieve a number of effects.
Freezing the subject when shooting at long shutter speeds. Long shutter speeds are necessary to achieve motion blur or background detail. The general principle is simple - the flash impulse is very short, and therefore the main clear study of the object occurs only during a small part of the shutter speed. The background is being processed the entire time the shutter is open - much longer than the pulse. As a rule, I always use rear curtain flash sync, i.e. The flash fires before the shutter closes. This allows a motion blur pattern to be created behind the subject, which clearly shows the viewer that the child was running forward and not moving in reverse, as it might appear when the curtain pulse is synchronized with the front curtain.
Coverage of specific subjects,
such as soap bubble shows or scientific experiments.
The scene was illuminated by backlight and side light from slave flashes.
It is also better to emphasize the texture of steam and water splashes with the backlight
of the slave flash.
Freezelighting or painting with light is also possible during reporting. If there are interesting light sources in the frame, and in addition they are moving, then it would be a sin not to show this play of light in process and dynamics. Long shutter speeds, a flash to draw people in the frame, and possibly various camera movements will help us with this, for example, torsion along the optical axis, zooming (changing the focal length of a zoom lens right in the process of creating a frame.
Shutter speed 1/10 sec., ISO 1600
The photo on the left was taken with a fixed camera, and to create the photo on the right, the camera had to be rotated around the optical axis, while simultaneously zooming the lens towards a wide angle (up to a focal length of 24 mm).
The sparks from the fire outlined their flight paths with light during the exposure time - 1/15 sec, and the flash on the right made the children clear and recognizable.
And here the shutter speed is even longer - 1/3 sec, but the children illuminated by the flash from the side are just as sharp and voluminous, and the light trails of the sparks are longer and more elaborate.
All this thinking about working with pulsed light does not mean that you should neglect natural light. Natural light can be very good
but the presence of pulsed illuminators in a photographer’s arsenal allows him to make his work more independent of weather factors and help make a photo session more diverse and interesting.
How to Mix Flash and Natural Light
Mixing natural light with flash is not an easy task. The fact is that for such shooting you need to rely on two different methods of working with light.
You may be the best studio photographer, but working with daylight can be overwhelming. If you shoot outdoors most of the time, flashes are likely to be rarely used in your work.
In fact, flash is often used in outdoor photography projects. It will allow you to get a clearly detailed blue sky, natural lighting of the environment and interesting illumination of the subject. Also, properly adjusted lighting during shooting will save a lot of time during post-processing.
Initially, you need to set up the camera so that the background and sky are as they should be in the picture. Once the angle is chosen and the camera is mounted on a tripod, adjust the shutter speed, aperture and ISO. The light sensitivity should not be high, somewhere between 100-400. The shutter speed is adjusted according to the lighting you have. Let's assume that values in the range of 1/30-1/125 are suitable for you. The aperture can be adjusted according to your artistic preferences. You can work in shutter priority mode. In this case, the camera will adjust the aperture itself.
1/100 sec, F/9, ISO 100. Here we have a deep blue sky and a silhouette of the model, perfect for what we need.
Now we can control the shutter speed to make the sky lighter or darker. If you see the sky starting to get too bright, go from 1/100 to 1/125. If too dark, change the shutter speed from 1/100 to 1/60.
Now you can take beautiful photos of a person's silhouette, but we want to use flash to highlight it. You can use any available flash and light modifiers to get the lighting you need. In this example, the flash is positioned above the model to the left. This way we managed to get side light.
1/100 sec, F/9, ISO 100, flash on the left side.
If the flash produces too much or too little illumination, then do not touch the camera settings. You need to work with adjusting the flash power.
If adjusting the flash power does not produce good results, then you will have to change the camera settings. A good place to start is by adjusting the ISO. It is not advisable to increase the value above 800. You can decrease it to the very minimum value. You can also try changing the aperture setting, but keep an eye on the depth of field. If you want a sharp background, like in the example, don't open the aperture too much. If the aperture does not allow you to get the desired brightness, move on to shutter speed. Don't make it too long, otherwise you risk blurring due to the movement of objects in the frame.
It's actually simple if you know how to work with your equipment. The only difficulty is finding the appropriate settings. Shooting outdoors requires more flash power than indoors.
A short list of steps for shooting outdoors with flash:
- Get the right exposure for background photography
- Add flash
- Adjust flash position and power
- Adjust the camera settings so that the foreground is properly lit (only if adjusting the flash brightness did not give the desired result)
Family photography with flash • part 2
Have you read “Family Photography with an Expensive Camera”? We talked about the fact that at home and outside there is often not enough light. Even for a professional camera and a fast lens. Let's consider four options for additional light: external on-camera flash, flash + synchronizer, cartridge flash lamps, mini-studio
Option one. External on-camera flash.
One of the techniques when shooting in low light conditions is to use the so-called “reporting” flash, with its location on the “hot shoe” of the camera. In other words, using it as an alternative to the built-in flash.
When attaching a flash to the camera, it is highly advisable not to point the light directly at the scene, but to use bounced light from the walls and ceiling, pointing the flash at an upward angle.
An even more effective result can be achieved if you use a small diffuser (often called a “burdock” or “spatula”) in conjunction with the flash, which will reflect the light and emphasize the main subject in the foreground. This technique can be optimized as much as possible by a small microlens diffuser, which is used in conjunction with a “burlap” and very delicately distributes the light.
This is the simplest technique and is used more often in dynamic shooting conditions, when the photographer has to move a lot and the scene being photographed is constantly changing. Just in case, let me remind you that pointing the flash upward is only effective indoors. When shooting on the street or other open spaces, this technique does not work, because... the light will simply “fly” into the sky and will have nowhere to be reflected. For street photography, a microlens diffuser is the only thing that will allow you to effectively cope with the shooting task, even in bright sun.
Option two. Remove the flash from the camera.
This option gives a more natural and artistic result, but is more labor-intensive and expensive for the photographer. In this case, we remove the flash from the camera and point it at the subject not directly, from the camera side, but at an angle to the scene being photographed. We can select the angle of the flash depending on the light-shadow pattern we need. If there are no specific and clear ideas, then we will almost never make a mistake by placing the flash to the scene being photographed at an angle of 45 degrees (approximately the angle of incidence of the sun during normal operation).
Thus, we will illuminate the plot with more voluminous light, but here we will have to face some more questions, namely:
— How to ensure that the flash fires and what to attach it to?
In order for the flash to fire from the camera, it must be synchronized. In other words, you need to add a couple more transmitter-receiver synchronizers to the kit, and if the flash already has a built-in receiver, then one transmitter put on the camera’s hot shoe will be enough.
The flash power can be adjusted manually, and if the flash has a TTL mode, then you can use synchronizers that support TTL mode and then the flash will “think” that it is on the camera and will itself measure the required impulse. The flash itself can be placed on a small stand and positioned at the desired angle. To do this, you will need any stand and holder for mounting the flash.
You can also add a small white photo umbrella to this set, which will diffuse and soften the light flux. Instead of a stand, you can use any available places where you can place the flash or ask an assistant to simply hold the flash.
Option three. Cartridge flash lamps.
There is another interesting type of flash - cartridge flashes. Their name comes from the fact that they are screwed into the socket of a regular light bulb, which avoids the confusion with wires of searching for free sockets and places where you can put a stand with a flash. These flashes can be screwed into regular home lights and thus simulate artificial home lighting.
They can be triggered by an infrared synchronizer or any other light pulse, up to the built-in flash (it is not advisable to launch from the built-in flash, but if there is nothing else, then you can). As we already guessed, it is advisable to use them only indoors, because... in other places it will not be very convenient.
You can, of course, purchase a holder for a flash cartridge and use this kit as a portable mini-studio, but for such purposes it is more practical to purchase a similar ready-made mini-studio kit.
Option four. Portable mini studio.
This is the most expensive, but most effective option. A small set of mobile lighting equipment will allow you to realize creative ideas to the maximum extent, just like when working in a studio, but it requires a more thorough approach from the photographer and certain skills in working with studio lighting equipment.
Principles of working with reporting flashes
It is not possible to describe in detail all the principles of working with studio light in a review article, so you can try to read about it in a smart book, or attend our courses at the Kiev School of Photography, where you can not only learn this, but also practice working with studio light, conduct shooting in interior conditions and receive any advice on all issues of interest.
Also, you should always remember that the key to success in any business is practice, and between “knowing” and “being able” there is still a certain way to develop practical skills. Therefore, before carrying out important shootings, practice first on your friends or relatives. They will always be happy to see new photographs, and for you it will always be an invaluable practical experience that will bring you closer to the desired success!
Good shots! Sincerely yours, Vadim Doktorov.