Teeth Whitening in Lightroom
LiveInternetLiveInternet
—Categories
- *Foamiran (21)
- *Seasons (81)
- Spring (6)
- Winter (26)
- Autumn (50)
- *Generators (76)
- HTML (1)
- Demotivators (3)
- Buttons and Banners (9)
- Lettering (14)
- Animation Trim (4)
- Music Trimming (1)
- Color Definition (8)
- Congratulations (4)
- Frames (4)
- Tables (2)
- Backgrounds (3)
- Photo effects (7)
- *For Blog (522)
- Avatars (29)
- Buttons and Banners (21)
- Comments (47)
- Dividers (40)
- Animated Backgrounds (22)
- Backgrounds Seamless (124)
- Backgrounds Ready-made (11)
- Stroke Backgrounds (28)
- Backgrounds Transparent (65)
- Font and everything about it (32)
- Epigraphs and Clocks (115)
- *Spirituality (10)
- *Painting (55)
- *Law and Law (13)
- *Health (264)
- Psychology (158)
- *Internet (98)
- *Indoor Plants (72)
- *Beauty (245)
- Facial skin care (64)
- *Personal (92)
- To my design (25)
- *My Schemes (58)
- Spring (7)
- Winter (14)
- Summer (3)
- Autumn (2)
- Holidays (16)
- Light (13)
- Dark (8)
- *Wallpaper (18)
- *Postcards (30)
- *Congratulations (20)
- *Politics (74)
- Russia (30)
- Ukraine (47)
- *Holidays (63)
- *Programs (116)
- *Frames (1155)
- March 8 (11)
- May 9 and February 23 (23)
- Spring (48)
- Valentine's Day (15)
- Birthday (38)
- Winter (90)
- Classic (45)
- Culinary (54)
- Summer (51)
- Maslenitsa (11)
- New Year (57)
- Autumn (105)
- Holidays (28)
- Religious (74)
- Christmas (14)
- Romantic (118)
- Text (247)
- Thematic (43)
- Floral (107)
- *Recipes (526)
- Baking (115)
- Potatoes (12)
- Canning (4)
- Chicken (7)
- Kitchen Tricks (8)
- Meat (66)
- Fish (43)
- Salads (46)
- Soups (7)
- Cottage cheese (24)
- *House Tips (60)
- *Poems (157)
- *Design Schemes (129)
- Spring (8)
- Winter (16)
- Summer (19)
- Autumn (22)
- Holidays (23)
- Light (31)
- Dark (17)
- *Flash drives (5)
- *Photography (193)
- Photography Lessons (161)
- Photographic art (21)
- *Photoshop (395)
- Lettering (21)
- Lessons (289)
- *Tea and Coffee (174)
- *Cribs for the Blog (254)
- *Humor and Aphorisms (76)
Teeth Whitening in Lightroom
Wednesday, February 08, 2012 16:59 + to quote book
Unfortunately, nature has decreed that not all of us have white teeth. But you really want to have a truly “Hollywood” smile. At least in the photograph. And here Adobe Lightroom will help us, in which this task can be completed quickly and easily.
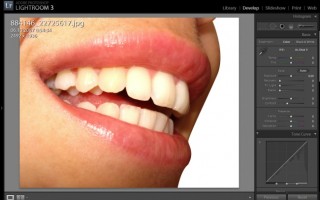
Uploading our photo. As an example, I specifically took a close-up photo of the teeth so that the result would be clearer. Go to the Development module and select the Adjustment Brush tool or simply press the “K” hotkey.


We assign parameters. We are mainly interested in 3 things.
- Slight increase in Exposure
- Minimizing Saturation. This is how we whiten our teeth, actually simply bleaching them. The lower the Saturation value, the whiter our teeth will be.
- Brush options. The main thing here is not to forget to enable the Auto Mask option. When this option is enabled, Lightroom will automatically apply brush settings only to the color and its shades that are located under the brush, minimally affecting neighboring areas. It is better to set the Feather parameter lower – around 20-30. The size of the brush depends on the photo, here the cards are in your hands. Leave the Density parameter at 100.

That's all. Now we carefully work on the teeth with a brush, varying the size of the brush if necessary and trying not to touch the gums and lips.

If desired, you can save the settings you have set into a preset and simply select them next time by clicking on Custom at the top of the brush settings.
How to whiten teeth in Lightroom
Lightroom: 11 Steps for Basic Portrait Editing.
I love Lightroom and use it almost exclusively when editing portraits. You can apply a variety of portrait effects in Lightroom, from sharp and gritty to light and dreamy. My methods depend on the portrait being edited, although the workflow is always the same.
The photo I chose for this tutorial can be taken at home. It was filmed indoors, with the only light source being a large window. The photo is part of a series of photographs taken in the same location.

One of the best features of Lightroom is the ability to sync settings. It saves a lot of time when you have a series of images taken under similar conditions. When you're done with the basic settings (white balance, shadow highlight, etc.) of one image, you can sync the rest of the images in the series with the same settings. Then you just need to adjust the rest.
This "before" image is too cold for my liking and there isn't enough separation between the model's hair and the background. I'll also even out her skin tone and add some sparkle to her eyes. As you work on your image, play with the sliders to see what effects they apply.
Step #1: Import the file
In the LIBRARY module, import the image into Lightroom. I created a custom Sharpening preset that works on most of my portraits. I apply this preset after importing - a convenient shortcut, especially if you are importing several images at once. Creating your own presets in Lightroom is easy, check out this tutorial on How to Create Your Own Presets in Lightroom.
To apply a preset to import, go to the right panel of LR, to the “Apply during import” tab.
Develop settings > user presets, then click on the preset you want to apply. After importing the file, go to the DEVELOP module. Import photos with this preset.
Lightroom lessons: How to whiten teeth in Lightroom?.
Category “Lightroom Lessons: Processing”
How to whiten teeth in Lightroom?
Watch and remember!
Everything is very simple and clear =) —————————————————————————
Subscribe, comment, thumbs up and share our videos on the social network.
Our group on VK: vk.com/youtube_photoschool
Voice acting: Ivan Fedotov - vk.com/fedotov.lvan
Comments
Add a comment
We recommend looking for more videos on the topic: Lightroom Lessons: How to
Teeth whitening in Lightroom.
Unfortunately, nature has decreed that not all of us have white teeth. But you really want to have a truly “Hollywood” smile. At least in the photograph. And here Adobe Lightroom will help us, in which this task can be completed quickly and easily.
Uploading our photo. As an example, I specifically took a close-up photo of the teeth so that the result would be clearer. Go to the Development module and select the Adjustment Brush tool or simply press the “K” hotkey.
We assign parameters. We are mainly interested in 3 things.
- Slight increase in Exposure
- Minimizing Saturation. This is how we whiten our teeth, actually simply bleaching them. The lower the Saturation value, the whiter our teeth will be.
- Brush options. The main thing here is not to forget to enable the Auto Mask option. When this option is enabled, Lightroom will automatically apply brush settings only to the color and its shades that are located under the brush, minimally affecting neighboring areas. It is better to set the Feather parameter lower – around 20-30. The size of the brush depends on the photo, here the cards are in your hands. Leave the Density parameter at 100.
That's all. Now we carefully work on the teeth with a brush, varying the size of the brush if necessary and trying not to touch the gums and lips.
If desired, you can save the settings you have set into a preset and simply select them next time by clicking on Custom at the top of the brush settings.
The 3 Most Important Tools for Working in Lightroom


For effective processing, it is not necessary to completely study the functionality of Lightroom; it is enough to study the basic processing tools.
In this article you will learn how to quickly and beautifully process a photo in Adobe Lightroom using the three most important tools: exposure, brush and toning.
Original: 
Let's start by analyzing the photo. The obvious problem is a large difference in brightness due to the fact that part of the face is in the shadow and the other part is in the sun.
What should be done? It’s simple - lighten the dark areas and darken the light ones, retrieving information lost in overexposure.
Work plan:
- Exposure compensation
- Eye brightening
- Toning
- Background separation
Important! You must understand that the numbers are always different and depend on the specific photo.
Exposition

Let's take a quick look at what we did:
Exposure: -1.05 – I lowered the exposure a notch in order to darken the overexposed areas of the face.
The dark part is darkened even more, but I'll compensate for that below. Hightlights: -46 – this setting controls the light areas, with its help I restore the still overexposed areas on the face
Shadows: +82 – I illuminate the dark areas of the photo
After this, the dark areas became too light, and the highlights on the face still remained.
Whites: -57 – unlike hightlights, whites works with the lightest part of the histogram, which will allow me to remove the last obvious highlights.
Blacks: -66 – due to the fact that I greatly lightened the dark areas in the shadows, I lost contrast, the picture became flat. And in this tool I darkened the darkest areas. pulled a lot out of the dark areas a lot
Clarity: +20 – the tool itself increases the contrast in mid-tones, that is, in our case the effect will literally be on the face.

Eye brightening
I decided to highlight my eyes a little. To do this, we will need to select areas of the image using a brush.
Working with a brush

Go to the brush tool, which is on the right, select New mode and set the values that you want to apply to the future selected area. These values can be changed at any time.
Below the settings for the selected area you can see the settings for the brush itself (underlined in green). You can configure three brushes: A, B Erase brush to switch between them. For example, one brush for large areas and another for small details.
The brush settings are the same as in Photoshop.
Size: brush size.
Feather: edge hardness.
Flow: flow, essentially transparency.
Auto Mask: turns on the mask.
If you select a blue sky, the brush will automatically select only the sky (based on color) and will not affect objects of other colors. Density: mask sensitivity.

Having started the selection, you will see a round dot, by which you can then find the selection (if it is in the way, you can turn it off with the H key) and the red mask area. By the way, the color of the mask can be changed using the keyboard shortcut CMD+O (ctrl+O for PC), this is necessary if you are trying to make a selection in the red areas.

As you can see, the green mask is more convenient for highlighting.
I end up highlighting the eyes and increasing the exposure and contrast. The latter is added so that they not only light up like light bulbs, but also maintain contrast. This is butter.
Toning
The toning tool in Lightroom is quite convenient.

For this photo, I chose a fairly typical combination - light yellow and dark blue.
The flexibility of the tool is that you can tint the light and dark areas of the image with different colors and at the same time control the balance of light and dark areas (for example, so that 20% of the histogram is taken as black, and the remaining 80% as light).
You can select a color by clicking on the rectangle to the right of the name. The color will be reflected below.
Highlights - light areas
Shadows - dark areas
Hue and Saturation - show the hue and saturation of the color, respectively.
Balance - balance between light and dark areas. If the value is 0, the balance is divided in half.
- +100 – the whole picture is filled with tone for light
- -100 – the whole picture is filled with tone for the dark

Background separation
The peculiarity of human perception is such that when we look at some object, our consciousness pushes all other objects into the background, making them less contrasting, less bright and less sharp. You can read more about perception in the article Why you have to adjust the image.
For my image, I'll simply select the background and change the exposure by -1 stop.
How can you whiten your teeth at home?

Everyone dreams of whitening yellow teeth effectively and without harm, because a beautiful smile is called an integral part of the image.
For this reason, it is important to keep your dental health under control. This is not entirely simple, because over time, even with the most careful care, the enamel darkens. It was its yellowness that became the reason for searching for different ways to return the shining whiteness to a smile. By the way, it should be added that many products are very simple and easy to use at home.
How to naturally whiten teeth
Folk remedies are becoming a worthy alternative to expensive dental procedures. They are easy to use, and good results become noticeable quickly. They cope well with darkening from nicotine, tea, coffee, etc.
Now about all these means in more detail.
Using soda
 Yes, it is the most common soda that is used in the kitchen. This product has been used for a very long time, and users who have tested its effects say that it works excellently.
Baking soda is an abrasive alkali and, when used correctly, is very gentle. The enamel becomes lighter due to the fact that its surface is polished, plaque and tartar are removed. Lightening with soda is possible by several tones.
To brush your teeth with baking soda, you need to take it in its pure form or mix it with toothpaste and gently brush your teeth. The color change is noticeable after the first procedure.
Activated carbon
It is called a progressive folk remedy that has received the best reviews. Baking soda and activated carbon are often present in toothpastes from well-known brands, and this fact only confirms the excellent capabilities of these products.
The significant advantages of coal include:
- natural composition;
- harmlessness;
- low cost and it is possible to prepare the product for future use.
To lighten teeth, you need to grind ten tablets of charcoal into powder, into which you dip a toothbrush and brush your teeth as always. During the procedure, you should not apply much force or put pressure on the gums.
Hydrogen peroxide
This product has long been known as a product that perfectly brightens the shade of tooth enamel. In addition, it perfectly brightens hair and facial skin. Today, peroxide is used not only for home procedures. In dental lightening systems, peroxide is used as the main component.
To carry out the procedure, you need to soak a cotton pad with peroxide, and then gently wipe the surface of the teeth with it. It is recommended to do this after brushing your teeth before going to bed. Lightening with peroxide is carried out for one week, but not every day, but every other day. The break between courses must be at least six months.
Banana peel
Supporters of safe products can recommend a gentle paste with a mild effect. It contains only natural ingredients.
To prepare, you will need to dry the banana skin in the microwave. Then you should add resin and sea salt purchased at the pharmacy. All components are ground in a blender, and olive oil is added to the resulting powder. Eventually a paste should form. It is used to lubricate the enamel after brushing with toothpaste.
Lemon
 Each part of a lemon consists of citric acid, which can lighten the shade of tooth enamel in a short time. But the pulp and juice of this fruit contains a large amount of acid.
Therefore, it is better to use the peel for whitening procedures. There is not as much acid here as in the rest of the lemon, and the possibility of lightening is no less. For example, this method is well suited for those who need to lighten a yellowed smile in 1 day.
Lemon can quickly remove yellowness and whiten enamel by three tones. The procedure itself is quite simple. The procedure is carried out with the white side of the peel - simply wipe the teeth from above and below. The advantage of this fruit is that it is harmless to enamel.
Crest Whitestrips 3D
In modern dentistry, there are currently a large number of ways to get a snow-white smile.
As a rule, the cost of such funds is not small, but the result is worth it. Very easy to use silicone mouthguards that follow the shape of the dentition. Sticks and strips also received positive feedback from consumers.
Operating principle
Apply the product to the strip and apply it to the surface of the teeth for half an hour. The course of treatment lasts from several days to one month.
Among the products in this series, Crest Whitestrips 3D strips should be highlighted, which professionals call the optimal product that gives positive results in four days.
Crest Whitestrips 3D are completely harmless to enamel and do not cause pain.
The advantages of this product are as follows:
- A more gentle action when compared with procedures using a laser.
- Tooth enamel is lightened in a short time.
- There is no increased sensitivity of teeth.
- The degree of whiteness can be kept under control.
- After restoring the color of teeth, a person’s self-esteem increases.
Order at a discount on the manufacturer's website.
How to whiten metal-ceramic teeth
The original shade of metal-ceramic teeth can change as a result of the influence of nicotine, coffee, food coloring and much more. For this reason, if you are planning a lightening procedure, then it is better to avoid such products first.
Cleaning at a dental clinic is considered more reliable. To effectively clean dentures, special mixtures, powders and polishes are used. Vanir is also an effective option for crown whitening.
Those who cannot go to the dentist can clean their dentures at home. For such tasks, not ordinary toothpaste is used, but whitening or gel.
Baking soda can effectively help remove stains on dental implants at home.
How to whiten teeth in Lightroom
Well, for those who want to refresh their smile in their photos, they have come up with excellent computer programs. The most popular are Adobe Lightroom and Photoshop. Appearance correction in Lightroom is done using the Adjustment Brush tool.

Conclusion
To achieve a sparkling, snow-white smile, people go through many experiments. The desire to quickly get the desired result often defeats the arguments of common sense. And, as a result, a person with permanently damaged teeth becomes a regular client of the dentist.
Before deciding to whiten tooth enamel at home, you should definitely consult a doctor and act only under his guidance.
If you follow simple recommendations and use the chosen product correctly, you will achieve the desired result in a short time.
After reading the material provided, you can quickly whiten your teeth at home, but do not make ill-considered and hasty decisions.
How to Whiten Teeth in Photoshop (Plus Lightroom Shortcut)
Smile! Here's how to whiten your teeth in Photoshop for a natural-looking result.
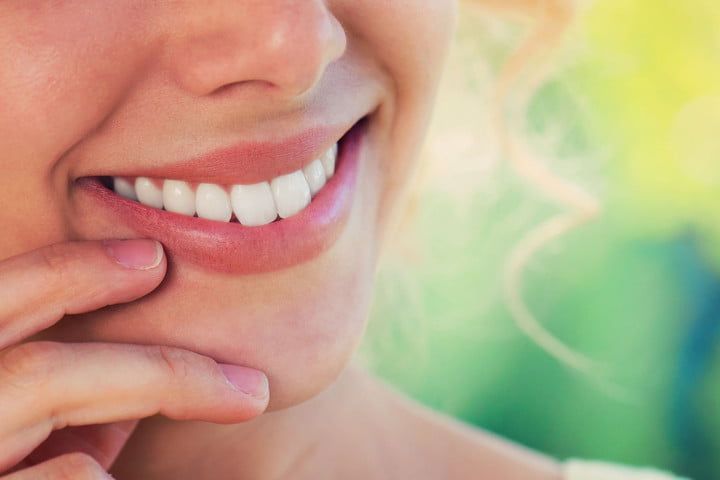 Nothing spoils a beautiful expression more than yellow teeth. In the wrong lighting, even someone with a great white smile can end up with a bit of a yellow tint in their photo. Luckily, it's not too difficult—and learning a few tricks on how to whiten teeth in Photoshop can create toothpaste-worthy smiles in minutes.
Adobe Photoshop has traditionally been the software for fixing things like teeth whitening, but the program's little brother, Lightroom, actually has a pretty good built-in fix that's even faster to use—and with Creative Cloud, if you have Photoshop, you also have Lightroom . We'll look at how to whiten teeth in Photoshop with a method that can fix any set of teeth, then move on to a quicker Lightroom fix that works on most smiles, so you can choose which method works best for the shot or your workflow photo editing.
How to whiten teeth in Photoshop
Step 1: Create a Layer Group, Then Select the Teeth
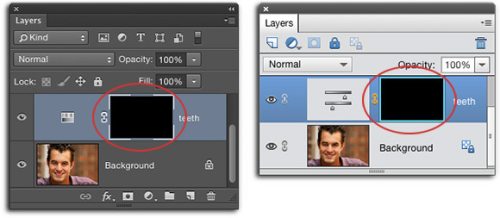
With the image open in Photoshop, start by creating a layer group that only includes the teeth. Click the folder icon in the Layers panel to create a new group.
Jozef Polc / 123RF / Edited in Photoshop
Then go ahead and select all the visible teeth using one of the selection tools. We used the Select and Mask tool in Photoshop - added in a recent update - to do this, go to Select > Select and Mask. Using the tools on the left and the brush size options on top, select the teeth. Then refine the selection using the "-" tool at the top, and for a more natural selection, drag the pen option a little to the right in the right toolbar. Click OK and the mask will appear in the Layers panel - if it doesn't appear in the group you created, just drag it into that group's folder.
You have now created a mask that only includes teeth. Anything white in the mask will be included in any effects you apply to the layer mask, while anything black will be excluded - so with white teeth inside a layer mask, you can only apply effects to the teeth, leaving the rest of the image untouched.
If your choice of teeth wasn't quite perfect, you can clarify by painting inside the mask with black and white brushes - just make sure the mask is selected inside the layers panel by clicking the black and white box next to that group folder. For example, we first selected too much of the photo while applying some effects to the edge of the lip. To remove this area from my selection, we simply painted over it with a black brush inside the mask. You can always come back and refine the mask later - it's often easier to see selection errors once you've started applying the whitening effects.
Step 2: Create and customize the Hue and Saturation layer.
With the teeth selected, it's easy to make adjustments and remove the yellow cast without affecting the colors in the rest of the photo using adjustment layers. Start by creating a Hue and Saturation adjustment layer by going to Layer > New Adjustment Layer > Hue/Saturation.
Inside the Properties panel for this new Hue/Saturation adjustment layer, grab and drag the Saturation slider to the left. The key here is to stop before you see the grey. If your teeth look gray, move the slider a little back to the right. To lighten your teeth, move the lightness slider a little to the right as well.
Step 3: Clarify with Levels
If your patient has yellow teeth, you can stop after step two and still get good results. The problem is that most teeth are not the same shade. Some spots may be more yellow than others, or the teeth at the front may be whiter than the teeth at the sides. So after the second step, you are left with mostly white teeth, but a few spots that appear more gray than white. This next step eliminates these problems and creates a more natural-looking result.
Go to Layers > New Adjustment Layer > Curves. Since you created the group when you added the mask, the same mask will already be applied to that levels layer and you won't have to reselect the teeth.
Inside the Curves layer's properties panel, drag the halftones up about one point on the graph—it will look unnaturally white, but don't worry, you'll fix that soon.
Now click on the FX icon in the Layers panel and select Blending Options. At the bottom of the pop-up window, you'll see "Select if gray." On the slider labeled "Underlying Layer", hold alt/option and click the right arrow on the white side of that slider, then drag to the left. until you get a more natural result - in our image we had to drag quite far to the left to get the most natural look. This step only applies a brightening effect to the gray stains on the teeth, making the teeth more uniformly white.
This is it! Enlarge your teeth to at least 100 percent before you call it good. You may need to get your act together and improve your mask a little. You can also go back to adjustment layers and reduce or increase the effect if the look isn't natural or white enough. This is one of the strengths of Photoshop's layer mask - you can always go back and adjust the adjustment levels later if you don't get it right the first time.
Embarrassed? Aaron Nace of Phlearn has a video tutorial using a similar whitening technique.
How to whiten teeth in a bright room
Photoshop gives you the most control over the teeth whitening process, but Lightroom has a control that still produces pretty good results, and is a little faster—we prefer Lightroom's tool, but we'll use Photoshop when Lightroom results aren't quite achievable.
Inside Lightroom's developer module, click on the brush tool. In the Effect section at the very top of the brush options, select Teeth Whitening from the drop-down menu. Below you can select a suitable brush size - we always check Auto Mask to ensure the program automatically detects edges, although if your teeth are very jagged you may need to uncheck the box and paint carefully. Now just paint over the teeth with a brush.
If your teeth appear too white, you can drag the amount slider down to reduce the intensity of the effect. You can also customize the brush by clicking on the arrow that appears next to the effect drop-down menu and adjust the exposure and saturation levels.
Lightroom whitens teeth quickly, while Photoshop offers a little more finesse. There's no wrong answer, but we basically left the task up to Lightroom after discovering how easy it is to whiten your teeth using the built-in tool.
With any beauty changes, always be careful about overdoing it. Whiten your teeth too much and they will look fake. When in doubt, get a third opinion from a friend, especially before you offend the person in your photo.
Using layer masks makes it easy to learn how to whiten teeth in Photoshop, so you can go back and fine-tune the effect. On the other hand, Lightroom's built-in teeth whitening brush is faster for quickly fixing problems. Now edit a photo that would make any dentist proud, or learn how to edit hair, eyes, or even oily skin.
Whitening teeth
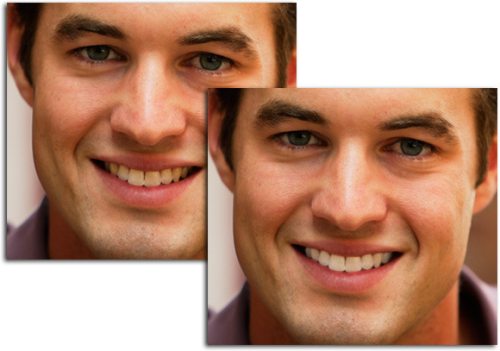
When it comes to portrait retouching, teeth whitening is one of the most common edits.
In this tutorial I will show you how to whiten your teeth without damaging the original image. You can whiten your teeth either in any version of Adobe Photoshop or in Photoshop Elements; programs such as Aperture, Lightroom and Pixelmator are also suitable for this.
The Power of Adjustment Layers
Both Adobe Photoshop and Photoshop Elements have a list with many options for adjustment layers, with which you can change the colors, lighting in the photo, and much more.
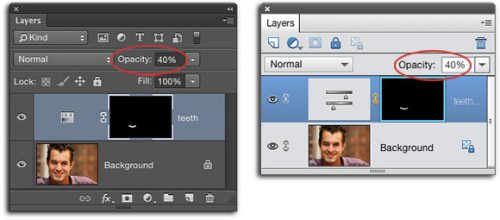
When creating, an adjustment layer is added on a separate layer, which is very convenient to use. For example, you can easily change its opacity without harming the original image, and if you don’t like something, you can delete it. A mask is automatically added next to each adjustment layer, with which you can partially hide the effect. All this is effective and convenient to use.
Teeth whitening
Open the image of your choice in Photoshop, you can also use the Photoshop Elements graphics editor.
In Photoshop Elements, the Editing Mode setting should be either Expert or Full Edit.
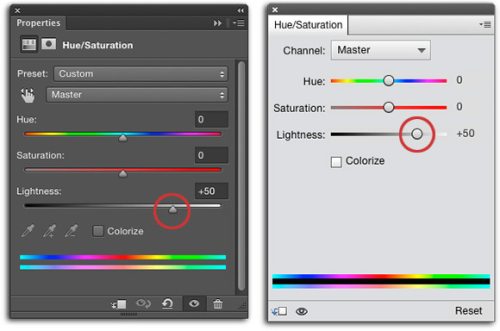
Go to the Layer tab > New Adjustment Layer > Hue / Saturation (Layers – New Adjustment Layer – Hue/Saturation). In the dialog box that appears, enter teeth as the name and click OK.
The adjustment layer will appear in the Layers panel. A window with settings will also open. For brightness, drag the slider to +50, the entire image will become light. We will fix this in the next step.
To return the photo to its original quality, we will use an adjustment layer mask. Make sure the mask is active. If the mask is painted black, the applied effect will be hidden. So invert the colors on the mask with Ctrl + I so that the mask color becomes black.
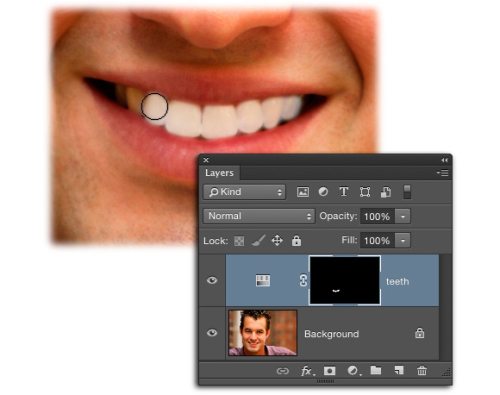
Our main task is to whiten teeth. For convenience, enlarge the image by pressing Ctrl + several times. Now hold down Spacebar and move the photo so that the teeth are in the center of the working document.
To lighten the teeth, we need to paint them white on a black mask. Press D to set the default colors and then X to change the foreground color to white. Select the Brush Tool (B) with soft edges and set the size to match the size of your teeth.
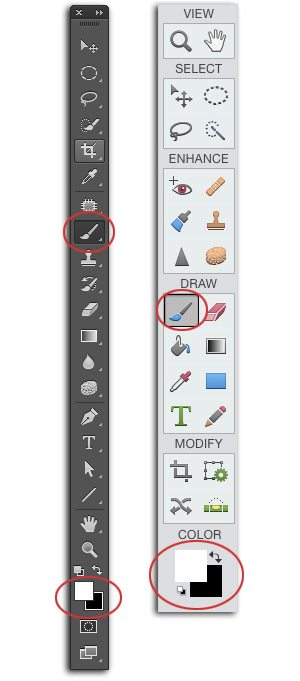
Using the selected brush, outline the teeth, make sure you have a mask selected. If you inadvertently painted over the extra area, press X again to switch to black and hide the extra areas.
You can adjust the brush size using the [ and ] keys – decrease and increase respectively. There are other ways to change the size, but this one is the simplest and most memorable.
If there is still a yellowish tint on the teeth, then go to a Hue/Saturation adjustment layer (if you have an earlier version of Photoshop, double-click on the layer thumbnail). In the settings, set the color to yellow and slowly move the saturation slider to the left until the yellow tint on the teeth disappears.
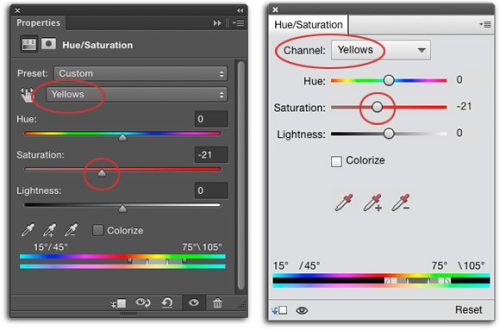
When you're done, lower the opacity of this layer to 40% to prevent the teeth from looking too white. Save the document File > Save As, select Photoshop as the file type. The document will be saved in PSD format, which means that the layers will remain intact.
Today you learned how you can whiten your teeth in a short time using Photoshop.
Teeth Whitening in Lightroom
At the same time, the Gradient Filter panel opens, on which 6 sliders are located: Exposure, Brightness, Contrast, Saturation, Clarity, Sharpness and the Color field. These parameters are available for adjustment in the Gradient Filter.
I think the basic settings of this panel do not require explanation. I will only focus on the Sharpness and Color parameters.
The Sharpness engine in the Gradient Filter (as well as in the Adjustment Brush) works according to the overall sharpness settings in the Detail panel for the current photo. Those. Here we are adjusting only the Strength, and the Radius, Details, and Masking are the same as for the entire photo. Moreover, if the Sharpness slider is moved to the left, then at a value of -50 it will completely remove the sharpening added in Lightroom in the Detail panel. And if the Sharpness value is reduced even further, the image will be blurred.
The Color parameter tints the photo in the specified color. In this case, the color used is mixed with the original colors, shifting their hue to the selected color. If the original colors are not saturated (close to a black/white photo), then the area is tinted in the selected shade.
Customize the engines to suit your design. For example, in order to highlight the sky in this photo, I reduced the Brightness by 21 and increased the Clarity by 33.
Then, to apply the filter, click on the photo where you want to start and drag to the place where you want to end the filter. In this case, three lines with a marker in the center will appear on your photo.
The effect of the gradient filter gradually decreases, from the first line to the third. The filter borders can be easily changed by simply dragging. By hooking the cursor on the center line, the filter can be rotated around the marker. You can drag the entire effect using the marker itself. If you drag the border while pressing Alt, you can compress/stretch the gradient relative to the center. If you hold down the Shift button while drawing a gradient, it will align horizontally or vertically. Anyway, give it a try, it's really easy.
When using any of the tools located under the Histogram, the image panel changes to a tool panel (hides/shows with the T key). It now displays the marker visibility mode. The default mode is Auto.
But the markers are easy to hide, just press the H key. Sometimes this key is pressed accidentally, and then the user begins to PANIC!
Where are all my masks (gradients, healing brush patches) it took me so long to paint them!? Everything is gone, damn ADOB, AAAA. Panic should be suppressed, look to the lower left corner, and if it says Show Edit Pins: Never in white and gray, then press the H key or select any other mode instead of Never
After we have adjusted the location of the gradient, we can adjust the effect again by adjusting the sliders. At the same time, the word Edit will be highlighted in the toolbar, indicating to us that we are editing an existing filter.
You can close the tool, for example by clicking the Close button or simply pressing Esc, and then return and edit it at any time. But to do this, you will first need to click on its marker in the photo. Otherwise, you will be setting up a new filter rather than editing the old one, as the highlighted New inscription will tell you. There is also confusion with this. You move these sliders and think why this photo doesn’t change! Until you finally realize that you are setting up a new effect and not editing an already applied one.
As you already understand, you can create a lot of gradients, as well as Adjustment Brush effects. To switch from one to another, you need to click on their markers in the picture.
You can delete the selected one using the Delete key. You can delete everything using the Reset button.
Emphasizing the sky
Traditionally, a gradient filter is used to create an expressive sky. At the same time, you can use the Exposure, Brightness, Saturation, Clarity and even Contrast engines. Usually they use a combination of Exposure to minus, Clarity to plus (emphasizes clouds).
But if our histogram is not cut off by the right edge, but is only pressed against it, then it makes sense to reduce the Brightness. What would correspond to a curve like this:
Which will stretch the upper compressed range of lights. If the histogram goes beyond the right edge, then you can first move it to the left by lowering the exposure, and then further reduce the brightness.
Here's a good example, in both cases I tried to make the clouds as expressive as possible.
In the version on the left, the exposure has been reduced. As a result, the clouds appeared, but the picture itself turned out dark.
In the version on the right, on the contrary, the exposure is increased and the brightness is reduced from the standard +50 to -6. The result looks the best, both in brightness and color.
Also, to emphasize the clouds, increasing Clarity looks impressive, the main thing is not to overdo it. Processing should be invisible!
Additional features of local tools
I use several engines at the same time, as in the example above, we create a combined effect. At the same time, it can be convenient to weaken or strengthen the effect of the filter as a whole. To do this, click the small triangle above the sliders, they will collapse, and in their place there will be a general effect slider, which is convenient for adjusting the strength of the filter as a whole.
Another interesting feature of local tools is the use of presets. Since the Gradient Filter is often used to highlight the sky, I created a “Sky” preset by setting the filter as follows:
To save the filter settings as your preset, click on the effect name and select Save Current Setting as New Preset from the menu. After that, it becomes available in the preset drop-down menu.
Almost always, when using the “Sky” preset, the filter requires additional adjustments, but it is convenient to use as a starting point.
Adjustment Brush
The adjustment brush is activated by the corresponding button under the histogram, or by pressing the K key (probably from the word Brush). The tool is similar to the Gradient Filter. Here you can also create several adjustment areas using the following parameters: Exposure, Brightness, Contrast, Saturation, Clarity, Sharpness and the Color field.
Each mask also has its own marker on the photo, by clicking on which you can change its parameters.
The only difference between a Gradient and a Brush is the creation of the area of influence. The Adjustment Brush tool allows you to set a free-form mask by painting it with a brush.
In the Brash section, you can configure two brushes A and B and an Erase eraser. You can quickly switch between brushes A and B using the “/” key on the numeric part of the keyboard. The eraser is activated by pressing and holding the Alt key.
It is convenient to adjust the size of the brush with the mouse wheel, the “[” and “]” keys also work, or you can use the Size slider. The softness of the brush is adjusted using the Feather slider, or Shift+mouse wheel, or Shift+[ or ].
The Flow parameter can be described as “Pressure”, it adjusts the opacity of the brush stroke. The strokes overlap each other, so you can gradually increase the density of the mask by passing the brush several times over the same place.
Unlike Flow, the Density parameter rigidly sets the opacity of the mask. Let's say we set Density 30 and everything we paint with such a brush will be 70 percent transparent, no matter how many times we pass the brush over the same place. Flow is convenient to set using numbers from the keyboard. Works exactly like Photoshop.
0 = 100, 1 = 10, 7 = 70, and so on. If you quickly press two numbers in a row, then we set a two-digit number, for example, 7 and 5, we get 75.
With the Flow and Density parameters we define the properties of the brush with which we will paint. You can't paint a mask with Density 100 and then reduce its opacity. You can only erase it, for example with a translucent eraser, or weaken the effect of the brush using the sliders in the Effect section.
Auto Mask
The Auto Mask parameter deserves special mention. When you turn it on, the brush will automatically detect areas that are similar in color and tone and paint only them.
It works like this. There is a “sight” crosshair in the center of the brush. Based on the pixels that fall under the “sight”, Lightroom determines the area that the brush will paint. Areas similar in color and brightness to those that the center of the brush is aimed at are painted. This allows you to select homogeneous surfaces of complex shapes. Of course, Auto Mask does not work perfectly, so for this mode it is better to enable the mask display. To do this, check the Show Selected Mask Overlay checkbox on the bottom panel or simply press the O key (apparently from the word Overlay “overlay”). The color of the mask can be switched by pressing Shift O, and it cycles through red, green, white, black.
After complex boundaries are outlined, as a rule, it is better to turn off the Auto Mask mode and correct the mask, sketching what was not painted over, and erasing what is not necessary with an eraser.
New presets for Adjustment Brush
Lightroom 3 has four new Adjustment Brush presets. They can be seen by clicking on the Effect drop-down list:
Added presets: Burn (Darken), Dodge (Lighten), Iris Enhance and Teeth Whiten.
With Burn (Darken) darkening and Dodge (Lighten) lightening, everything is clear.
Iris Enhance is designed to increase the brightness and expressiveness of the eyes, Teeth Whiten whitens teeth and performs dental restoration. These presets were written about on the Lightroom Journal blog back in 2012, and have now been included in the Lightroom distribution.
Interesting presets; Adobe seems to be hinting that in Lightroom you can not only process images in general terms, but also work with them in more detail. Whitening teeth and highlighting eyes is a classic retouching job that is traditionally done in Photoshop. Photoshop is certainly great. When it comes to single shots, this is the best solution. But what if you need to process dozens of photos? Here Lightroom can already compete in speed and convenience. With a Heal Brush, Stamp, Adjustment Brush, and Gradient Filter in your arsenal, Photoshop is no longer necessary for many tasks.
So let's look at Iris Enhance. The parameters are Exposure 0.69, Saturation 70, Clarity 66. In my opinion, too aggressive. I edited this preset to Exposure 0.40, Saturation 40, Clarity 0 and was happy with it.
Teeth Whiten is set to Exposure 0.41 Saturation -63 by default. In my opinion this is also too much. I like Exposure 0.35 Saturation -15 better, so I saved the Teeth Whiten preset with these parameters.
Now, you know as much about the local adjustment tools in Lightroom as I do! At least if you read it carefully
Hotkey cheat sheet:
Gradient filter M
Adjustment brush K
Hide/show markers H
Hide/show mask O
Change mask color Shift+O
Switch between brushes A and B “/” on the numeric keypad
Switch to eraser hold Alt
Brush size Mouse wheel or [ ]
Brush softness Shift + mouse wheel or Shift+[]
Flow (brush opacity) numbers on the keyboard