Changing the color of clothes and fabrics photoshop lessons
How to change the color of clothes in Photoshop
In this Photoshop tutorial we will look at how to change the color of clothing.

Category: Effects
Difficulty: Low
Date of: 10.04.2013
Updated: 24.08.2017
It so happened that, due to work, I needed to change the color of my clothes. The whole difficulty was that the clothes were absolutely white and when using the standard method (I will briefly describe it at the end; it is ideal for colored things), only the darkened folds changed color. I found a fairly high-quality way to change the color, in which the image does not become flat and does not lose highlights and shadows. I think it will be useful to you too, so I decided to share it.
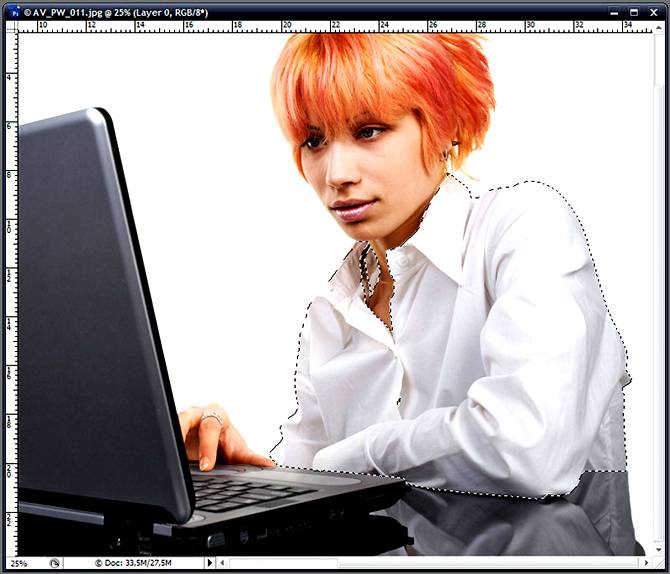
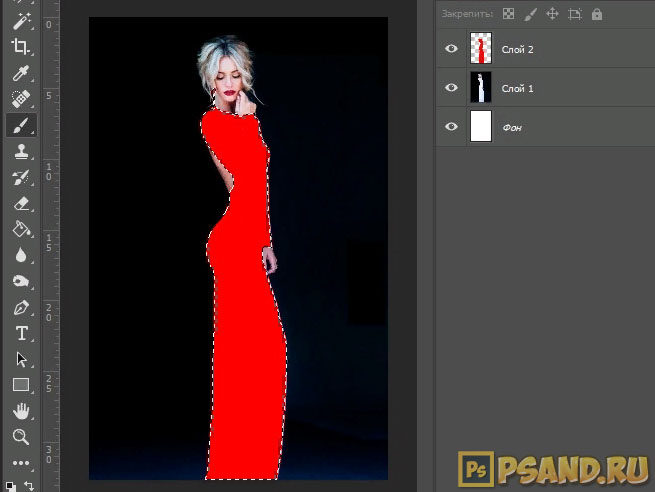
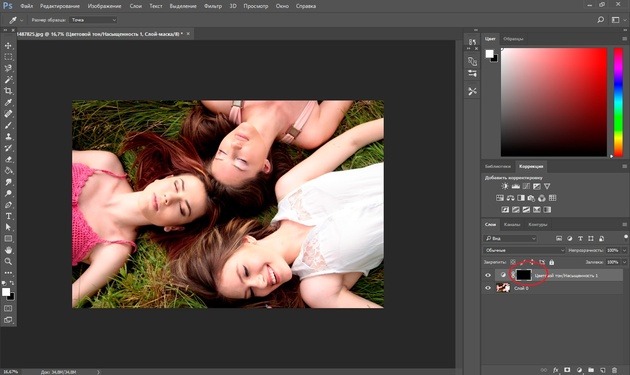
1. So let's get started. First, we need to select the desired object using any selection means, I used the Magnetic Lasso Tool (Magnetic Lasso Tool / L Key). Just be very careful, this is the most important part of the work.
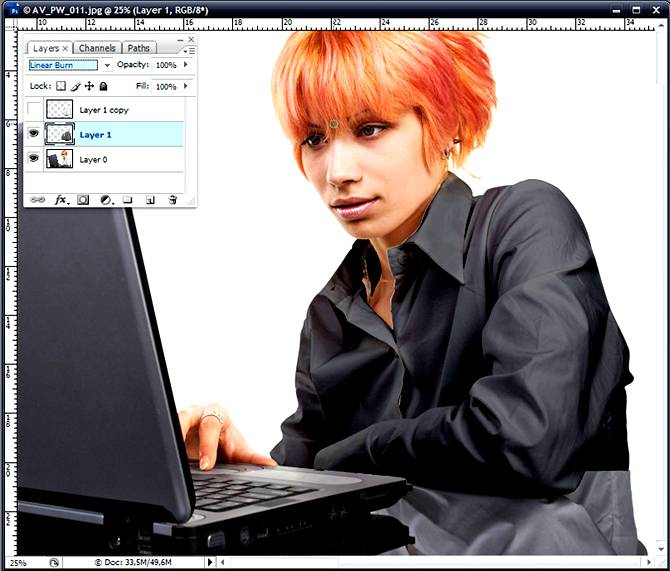
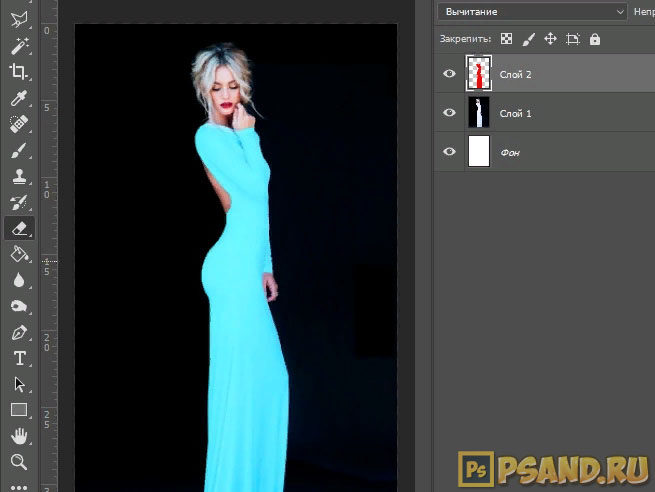
2. Now copy the selection Ctrl+C and paste it onto a new layer Ctrl+V (you can just press Ctrl+J while selecting it), while on the new layer with the command Ctrl+U call up the palette Image - Adjustments - Hue/Saturation (Image - Correction - Color Hue/Saturation) and lower the Saturation to -100 , this will discolor our blouse. Then duplicate the layer. Now we have three layers, the top two with a bleached blouse.

3. Let's go to the middle layer, again call the Hue/Saturation and lower the Lightness depending on how dark the color you want to get in the end. Set the value Burn Tool (Tool “Dimmer” / Key “O”) in the blending mode for the middle layer.
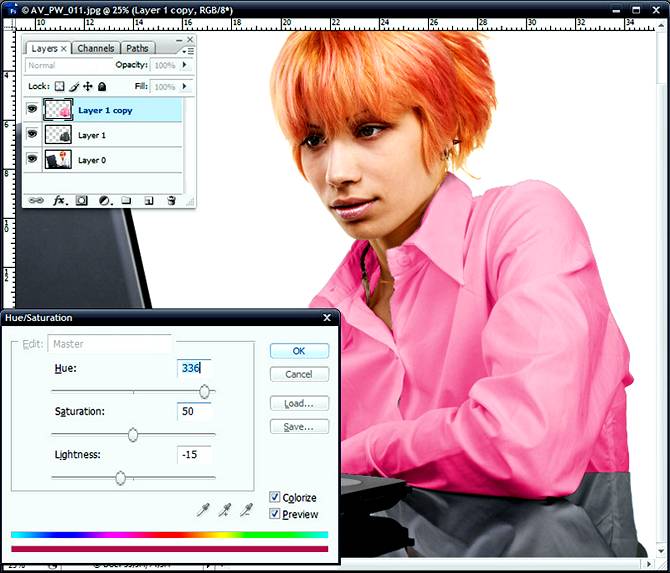
4. Let's go to the top layer and once again call the Hue/Saturation , check the Colorize and adjust the Hue to select the color we need, you can play a little more with Lightness . .
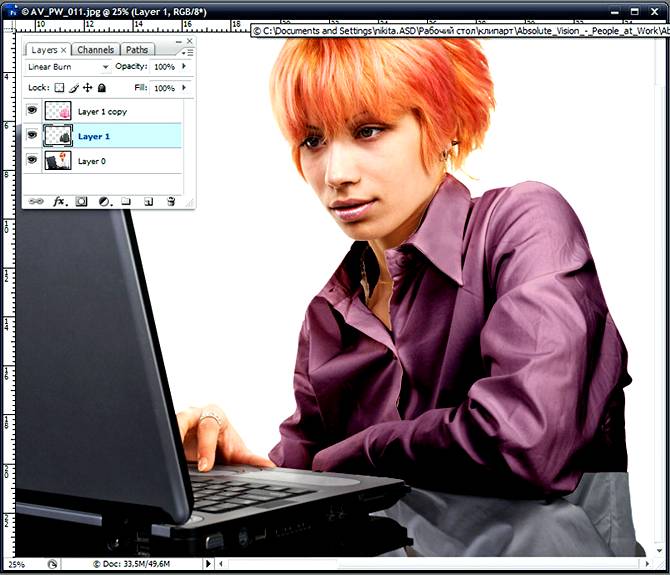
5. Set the blending mode for the top layer to Overlay (Overlay) and voila, all that remains is to slightly adjust the values in the Hue / Saturation palette (Hue / Saturation) and work with the Blur Tool (Blur Tool) along the edges on the middle layer to remove some dirt, although if you isolated everything perfectly at the very beginning, it won’t be there (I have a lot of it).
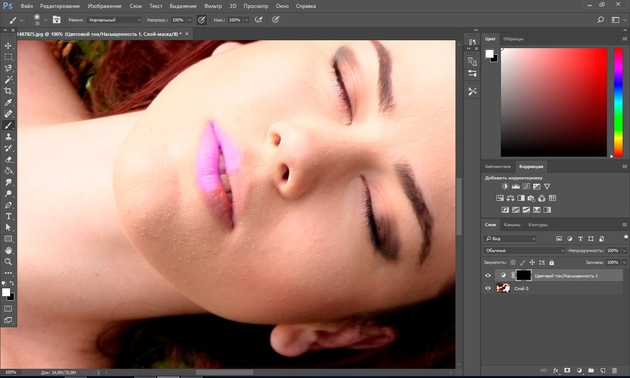
I repeated the same operation with the reflection.
The image does not claim any praise, it is only a means to demonstrate my method.
PS I decided to make a small addition about how to change colors on colored things. To do this, just select the desired clothing, enter the same Hue/Saturation and move the Hue to decide on the color, that’s it.
Final result 
Changing the color of objects in Photoshop

Changing colors in Photoshop is a simple but fun process. In this lesson we will learn how to change the color of various objects in pictures.
Color replacement
We will change the colors of objects in three different ways. In the first two we use special functions of the program, and in the third we paint the desired areas manually.
Method 1: Simple replacement
The first way to replace a color is to use the ready-made function in Photoshop “Replace Color” or “Replace Color” in English. It shows the best results on monochromatic objects. For example, let's take an icon and open it in Photoshop. Next, we will replace the color with any other one that interests us.

- Go to the menu “Image – Correction – Replace Color (Image – Adjustments – Replace Color)” .
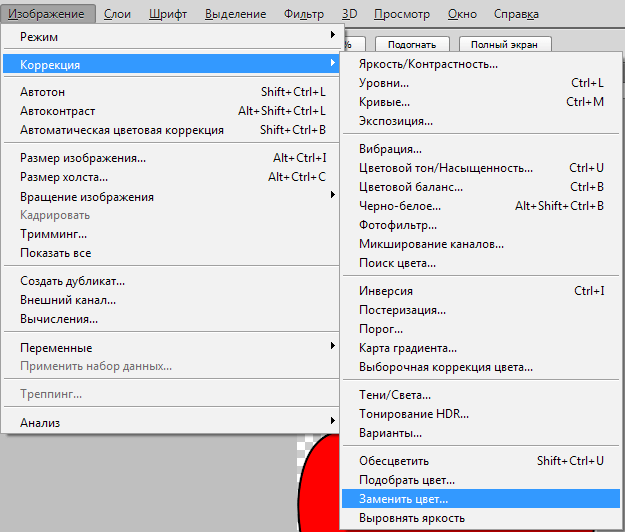 The Color Replacement Function dialog box appears. Now we must indicate which color we will change; to do this, activate the Eyedropper and click on the color. You'll see this color appear in the dialog box at the top, which is labeled Highlight .
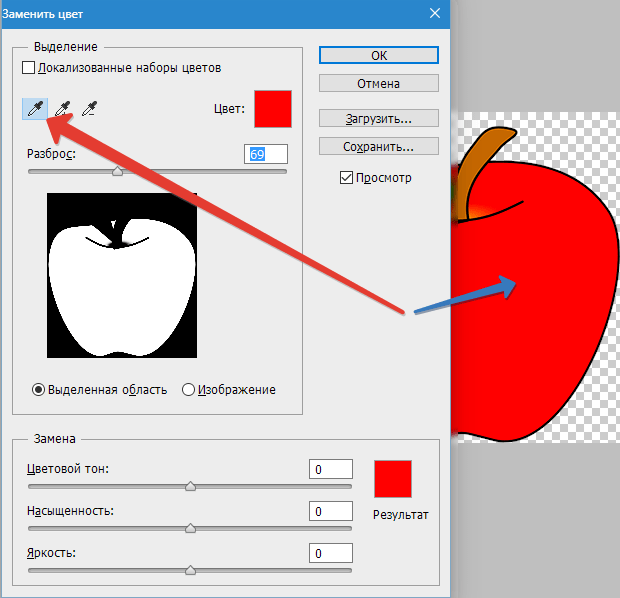 At the bottom is the heading “Replacement” - there you can change the selected color. But first, you can set the Scatter in the selection. The higher the setting, the more colors it will capture. In this case, you can set it to maximum. It will capture all the color in the image. Adjust the Replace Color to the color you want to replace. We selected green by setting the Hue , Saturation, and Brightness .
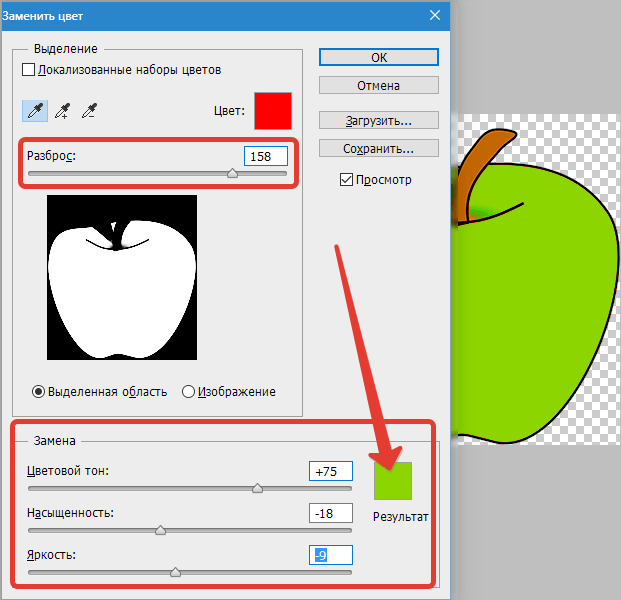
When you're ready to change the color, click OK .
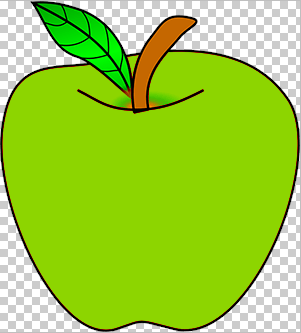
So we changed one color to another.
Method 2: Color Range
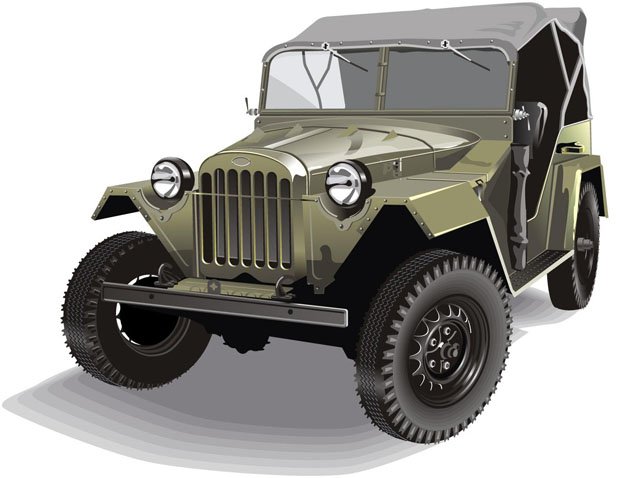
The second method, according to the scheme of work, can be said to be identical to the first. But we will look at it in a more difficult image. For example, we chose a photo with a car.
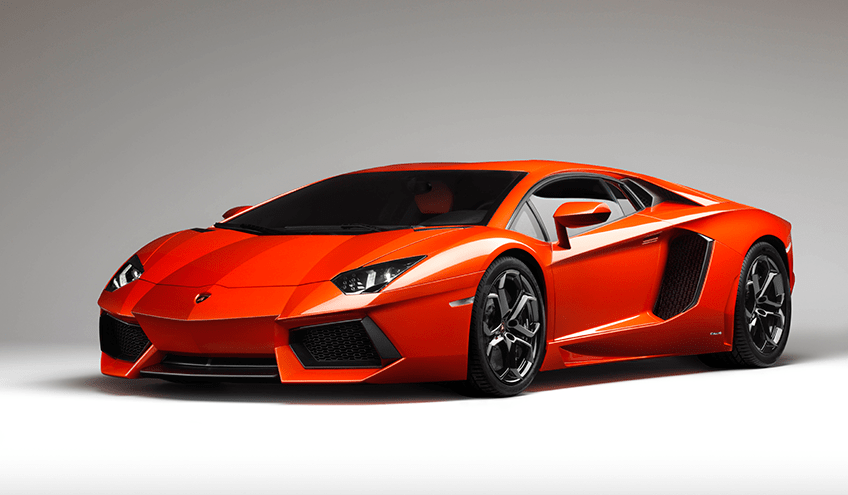
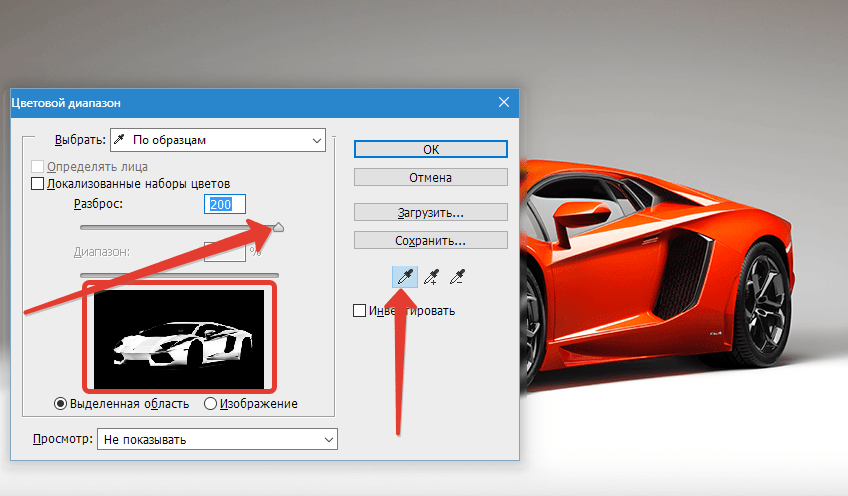
As in the first case, we need to indicate what color we will replace. To do this, you can create a selection using the color range function. In other words, highlight an image by color.
-
Go to the menu “Selection – Color Range (Select – Color Range)”
 Next, we just need to click on the red color of the car and we will see that the function has identified it and colored it white in the preview window. The white color shows how much of the image is highlighted. The spread in this case can be adjusted to the maximum value. Click OK .
 After you click OK , you will see how the selection has been created.
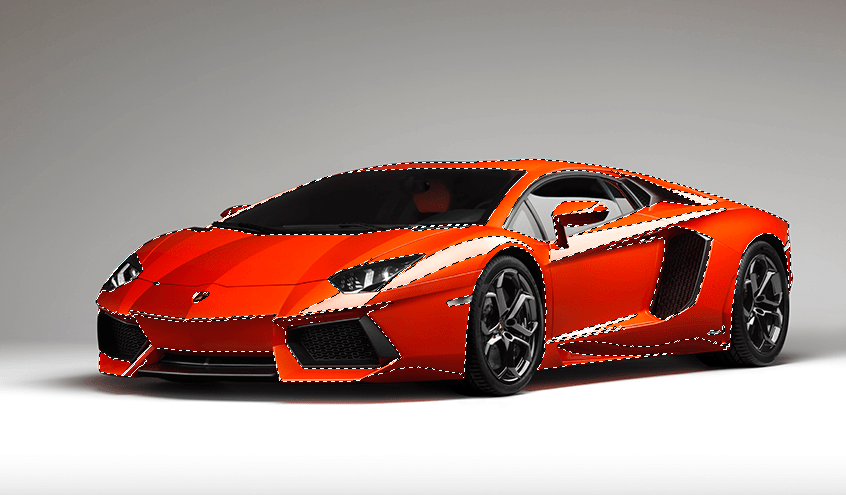 Now you can change the color of the selected image. To do this, use the function – “Image – Correction – Hue/Saturation (Image – Adjustments – Hue/Saturation)” .
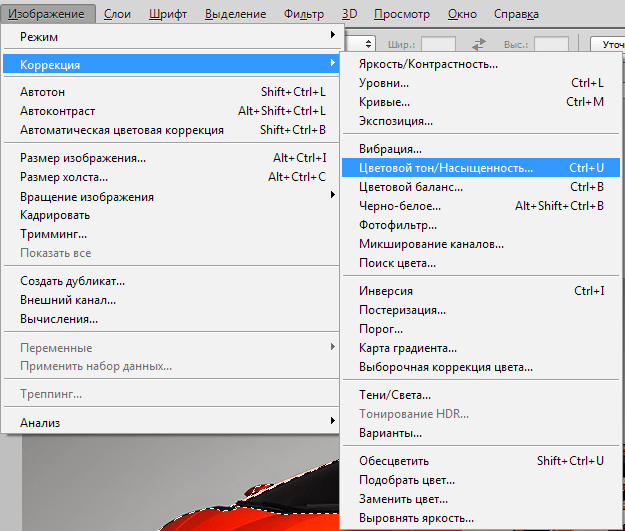 A dialog box will appear. Immediately check the Toning (bottom right). Now, using the Hue, Saturation and Brightness , you can adjust the color. We chose blue.
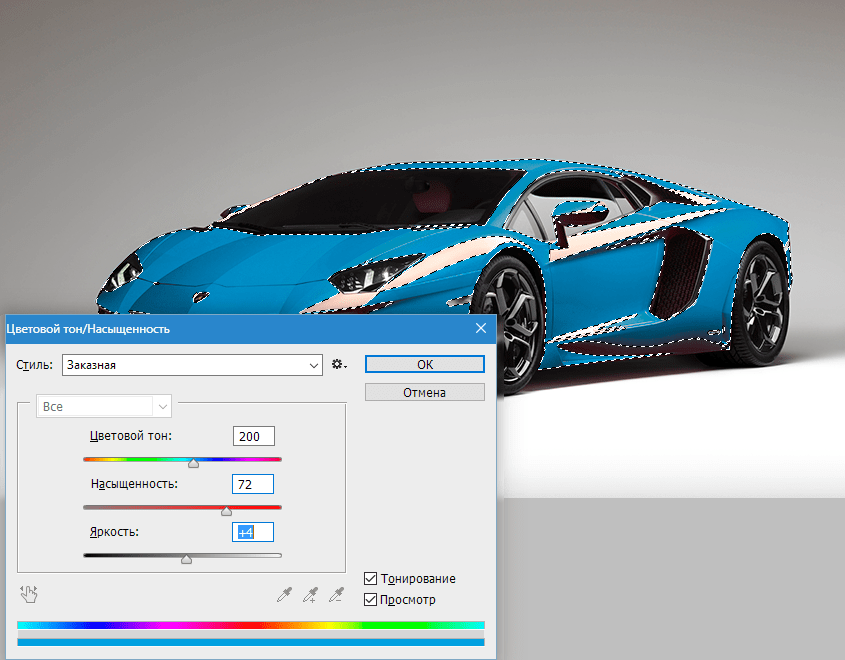
The result has been achieved. If there are areas of the original color left in the image, the procedure can be repeated.
Method 3: Manual
This method is suitable for changing the color of individual image elements, for example, hair.
-
Open the image and create a new empty layer.
 Change the blending mode to “Color” .
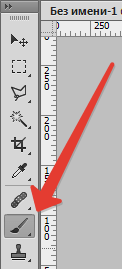
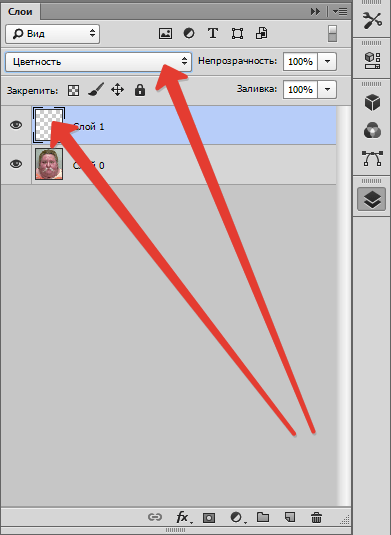 Select "Brush"
Set the required color.

Then we paint the desired areas.
This method is also applicable if you want to change the color of your eyes, skin or clothing items.
With these simple steps you can change the background color in Photoshop, as well as the colors of any objects - plain or gradient.
Thank the author and share the article on social networks.
How to change the color of clothes in Photoshop
| The content of the article | |
|---|---|
| 1 | Method 1 - Image Correction |
| 2 | Method 2 - Hue/Saturation Adjustment Layer |
| 3 | How to change the white color of clothes |
You got a photo, but you’re not happy with the color of the clothes? — Using Photoshop, you can change the color of clothes and thereby save a successful photo!
And this is just one example when such skill in working with a program is needed when working with clothes. Also, for example, you found someone else’s photo and to make it unique, you can change the color, then the picture will become suitable for use in your project/collage and safer in terms of sanctions from the search engine. In this lesson you will learn how to change the color of clothes in a photo using Photoshop.
I also recommend that you familiarize yourself with these materials on working with color replacement:
This is what changing the color of clothes looks like:
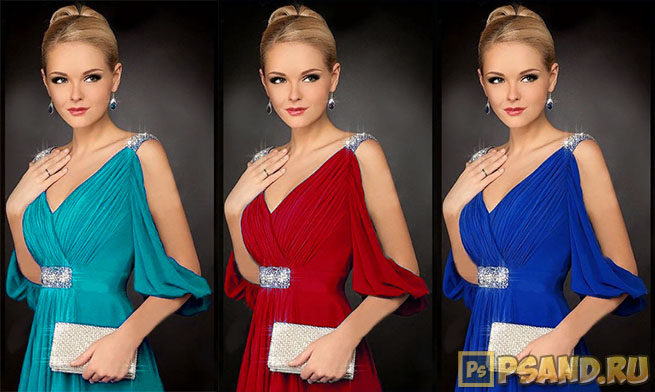
Let's open the image to work with:
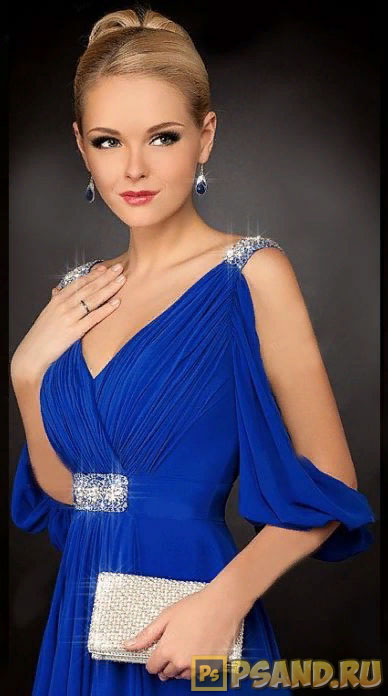
So, before us is a beautiful lady in a rich blue dress. And how many varieties of these dresses there are in the world, different styles, shades, lace and ruffles. But what if you like this particular dress, but don’t like the color? It's OK. The color can be easily and naturally replaced with another shade that you like. There are several ways to implement this idea. We will look at just two of them in this article. The first of which will be Image Correction.
The lesson was prepared by a website subscriber as part of the project: Do you know how to work in Adobe Photoshop? - Earn some money!
Can you do no worse? - Submit your application!
Method 1 - Image Correction
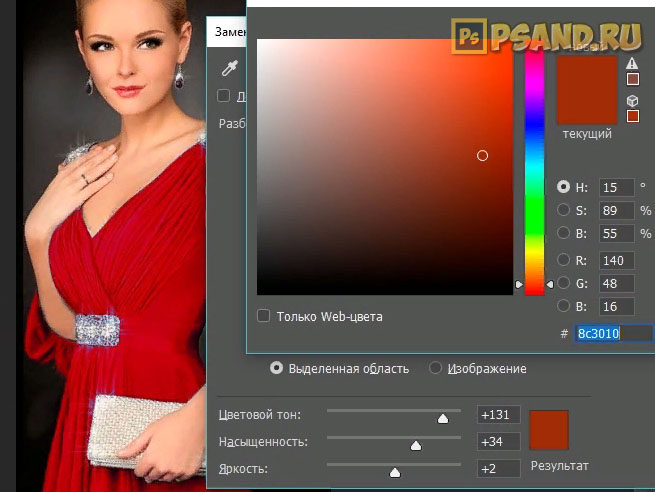
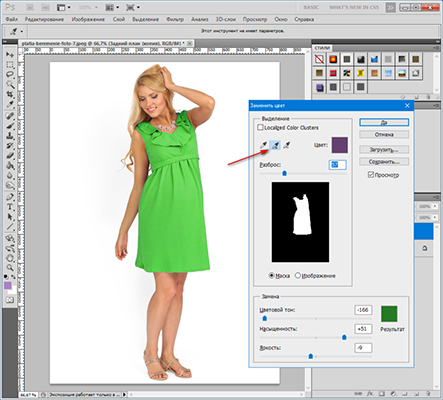
So, in order to change the color of clothes using correction, select the Replace color , which is located in Image - Correction .
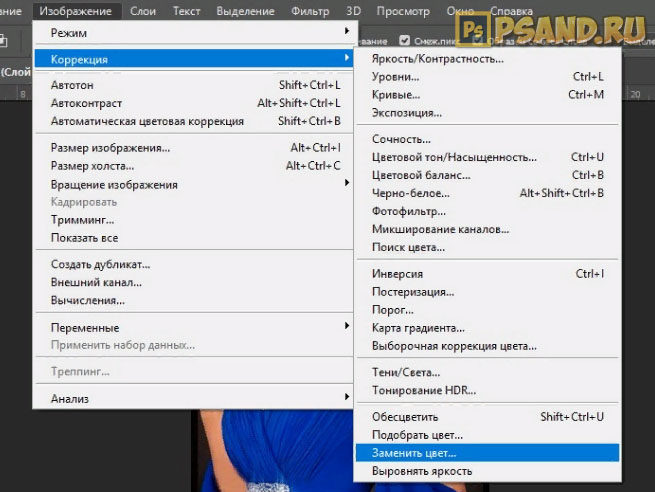
In the window that appears, you first need to select the color that you want to replace.
To do this, there are pipettes in the upper left corner of this window. The main eyedropper indicates the choice of one color, with a plus you can select several colors at the same time and, accordingly, with a minus it allows you to remove a color from the list of replaceable ones.
Also, using the Shift , you can easily and quickly switch from the regular eyedropper tool to the plus eyedropper. And by holding the Alt to the minus eyedropper.
Using these tools, select the necessary colors for the girl’s dress and adjust the scatter. As you move the slider, the number of shades captured will change.
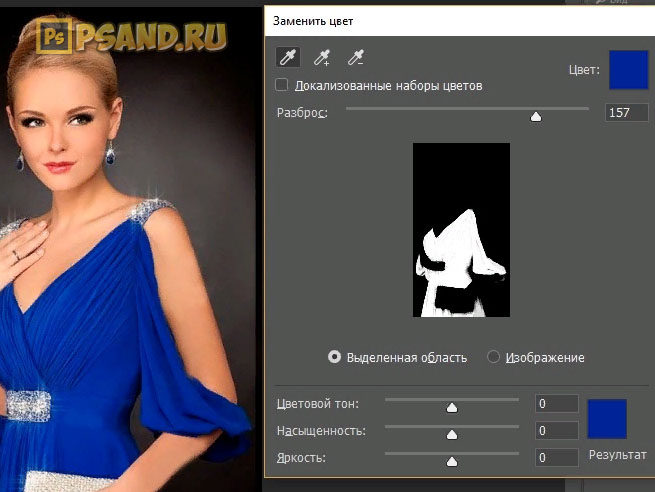
Now let's change the girl's dress to the color you like using the sliders below:
- Hue allows us to select the shade from which we will choose a color;
- Saturation is responsible for the richness of the shade we have chosen;
- Brightness is responsible for how dark or light our color will be.
You can also use the palette to select a specific color.
The disadvantage of this method is that choosing a natural color can be problematic, because the choice of color always depends on what it was originally, and somewhere there may be pieces of the previous color, which you need to carefully sit on and paint over all the artifacts that appear.
To keep them as small as possible, you should always adhere to the basic advice when working with photographs in Photoshop - take high-resolution sources. Recommendation - What is permission.
Method 2 - Hue/Saturation Adjustment Layer
The second way is to use a Hue/Saturation .
To implement this, you first need to select the color that needs to be changed. To do this, we use Color Range , located in the Selection menu, which determines colors in approximately the same way as Color Replacement.
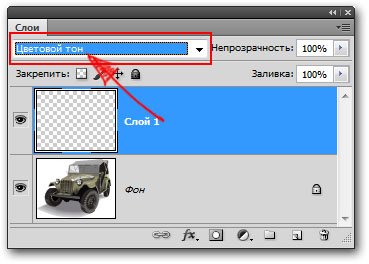
Select the desired color and add Layers – New Adjustment Layer – Hue/Saturation.
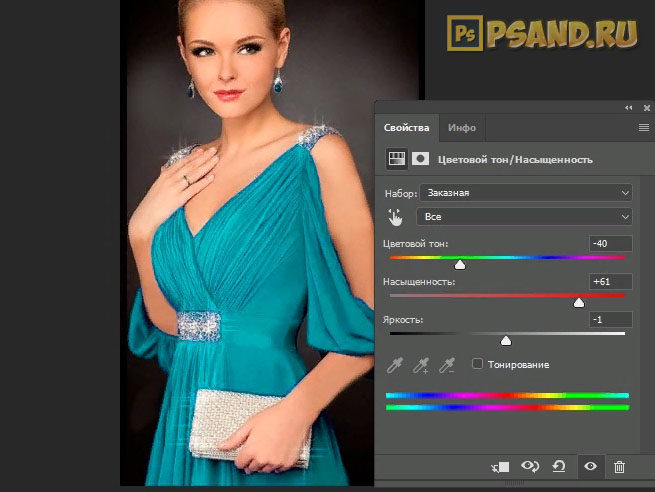
The advantage of this method is that if somewhere the color has not changed due to poor selection, then you can always go over the adjustment layer with a white brush in places where we need to add more replacements.
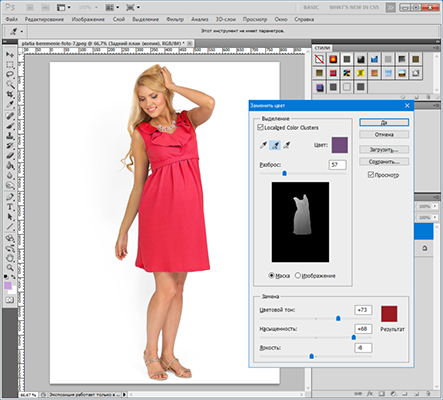
Here are our dress color options:
How to change the white color of clothes
Now you know how to change the color of clothes from one to another. But what if the clothes are white? Then the efforts with the adjustment layer method are useless, and the color replacement works very roughly and poorly. For example, this is what happens if you try to add a red tint:
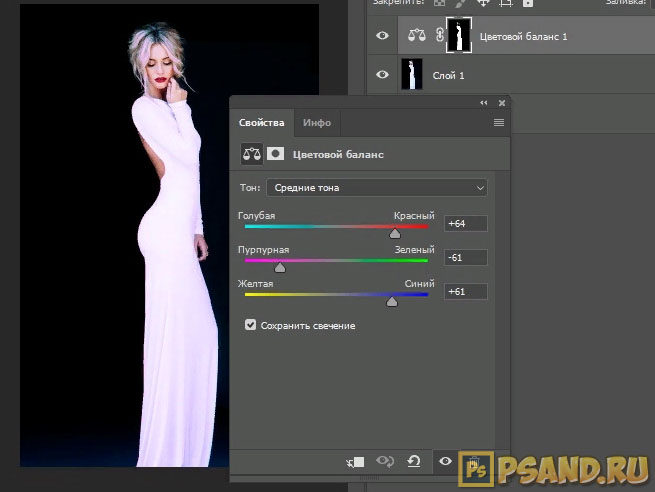
There is a way to change the white color of your clothes.
First, let's highlight the dress in any way convenient for you, be it a Color Range or a simple Magic Wand.
Now fill the selected area completely with Fill or paint with a Brush with any color using a new layer.
Let's apply the Subtract blending mode to the new layer, after which we see that the dress has acquired at least some shade, this will be to our advantage.
On the main layer, use the Burn areas that are poorly visible - where you should add shadows, in my case these are the arms, stomach and hem of the dress.
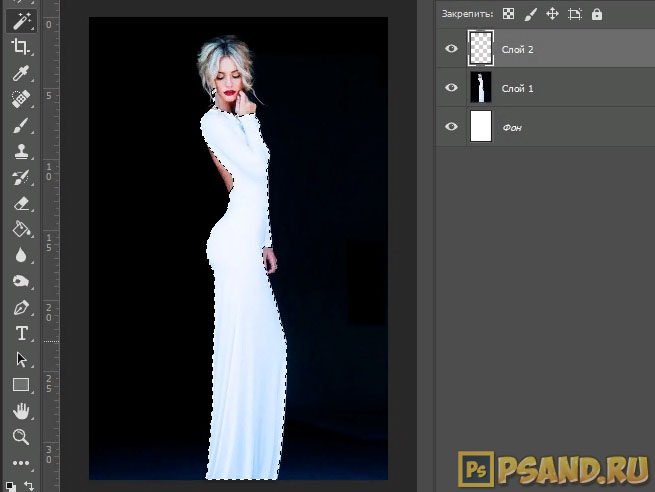
We merge the layers with shadows and the dress and create a new Adjustment Layer , which we previously used to make the green dress. Now we can adjust the color we want. This one will do just fine:
Then, using a soft white brush, we go over the adjustment layer along the edges of the dress, where the replacement effect is hard to see. This is what we got.
Changing the color of the product in the photo
In this master class I want to introduce you to a method (not the only one, but it does the job) of adjusting/replacing colors in Photoshop. It often happens that a craftsman is ready to make a product in different colors, replace one material with another, but the client is afraid to order a product that he has not seen. And this is where Photoshop can come to the rescue.
Necessary condition: the color that needs to be changed in the photo must be only on the product (it should not be in the background).
Open the original image in Photoshop.
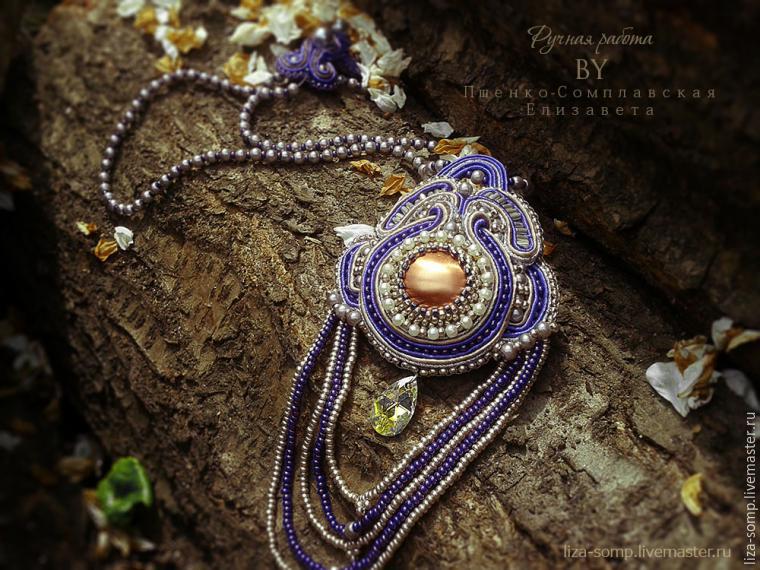
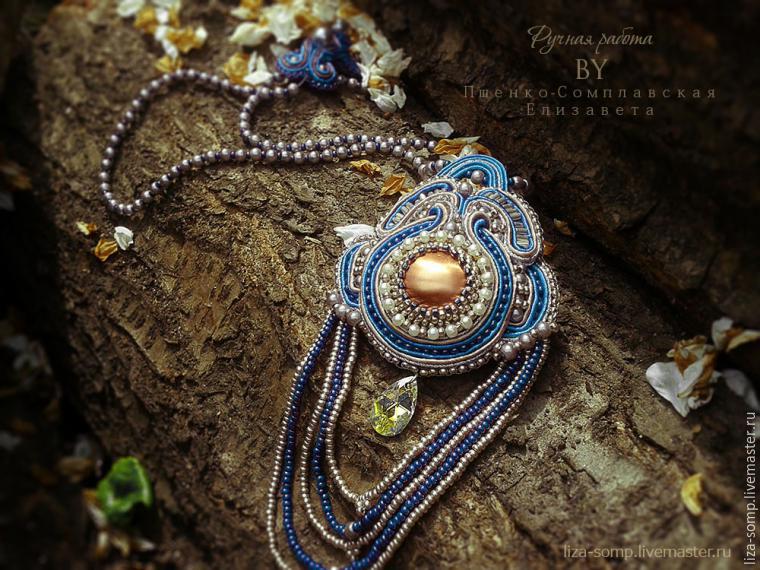
We want to change the purple color.
1. Go to the right column in the menu Correction . Select Hue/Saturation.
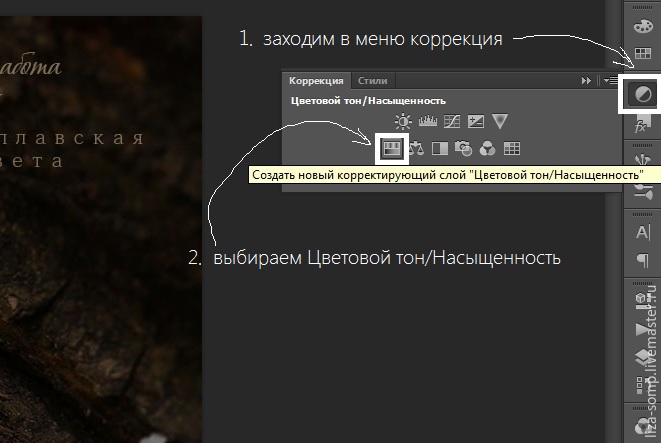
In the correction list with the inscription all, we select the group of colors that are most numerous in the shade we are correcting in the photo. In our case, purple has more blue. We correct it.
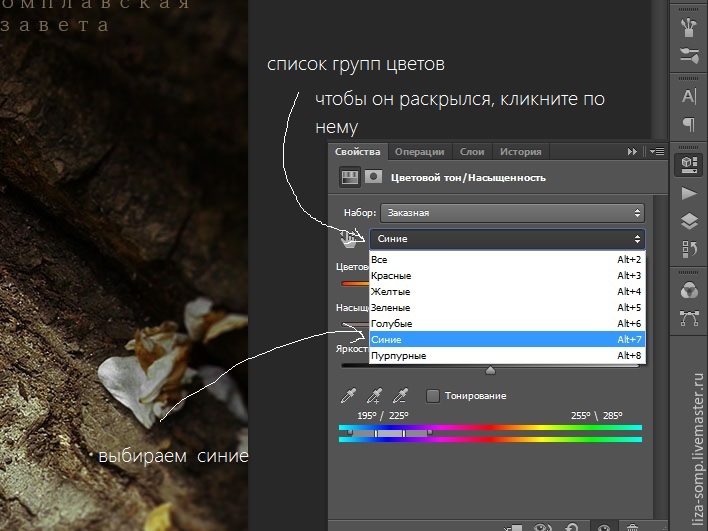
How it works:
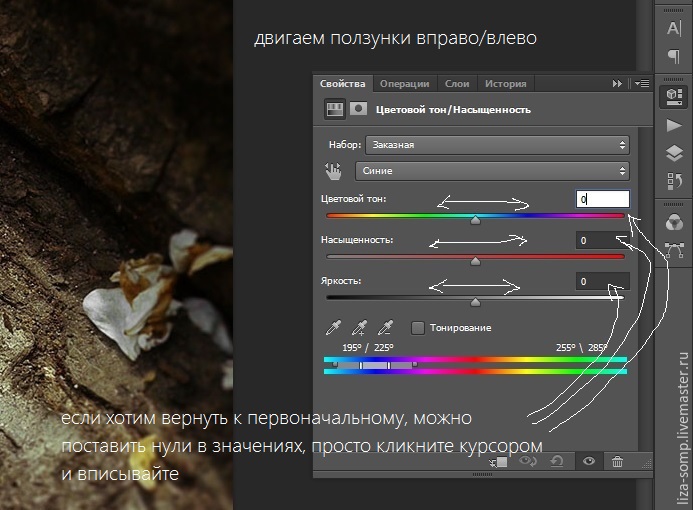
Move the sliders left/right.
If we want to return to the original, we can put zeros in the values, just click the cursor and enter.
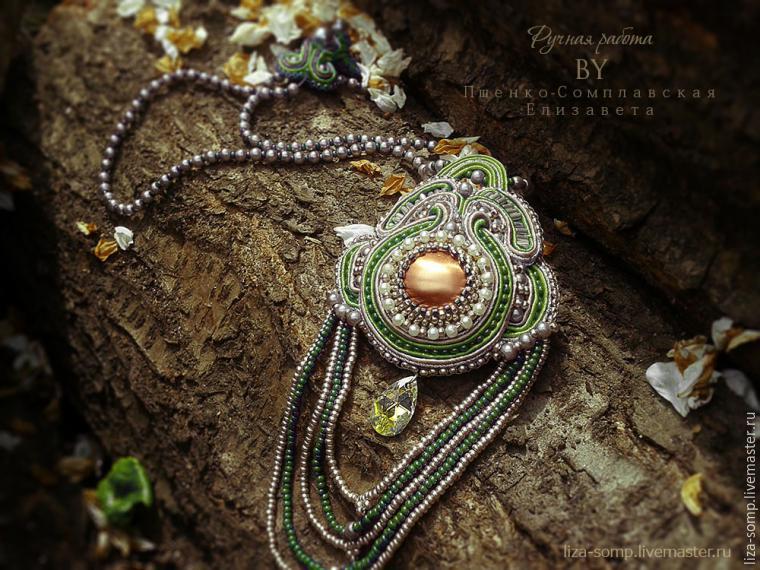
What can be achieved:
1. Simply move the Color Tone slider.


2. When the desired shade turns out to be too pale. Save the image and open Adjustments - Hue/Saturation again. And increase the saturation. I did this in the case of red and pink shades.

3. If you want to get a gray tint, you need to reduce the saturation of all colors present in the shade to 0. I lowered the Reds and Blues.

If you have any questions, write in the comments.
If you want to fix something in your photos, but don’t know how, write too, I’ll do a master class.
In the future I will publish more master classes on various corrections in Photoshop.
Thank you for your attention!
If you like it, don't forget to like it :)
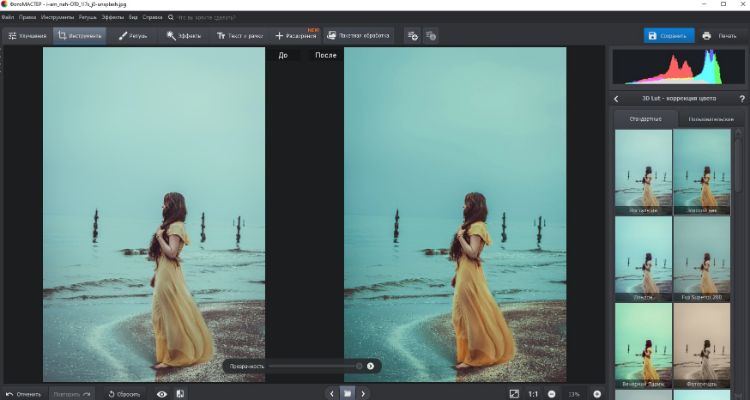
How to change the color of clothes in a photo?
Try the convenient PhotoMASTER editor:
For Windows 7, 8, 10, XP, Vista. Quick installation.
Changing the color of clothes in a photo is easy and beautiful!
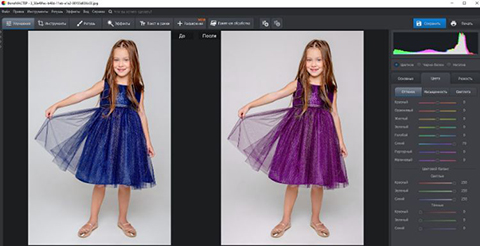
They turned out well in the photo, but the color of the dress blends in with the wallpaper of the room? Do you run an Instagram in beige colors and don’t want to ruin the harmony with a purple jacket? Don’t give up on beautiful photos because the color of the outfit doesn’t match your wishes. You can easily change the color of clothes in a photo using the convenient PhotoMASTER editor. Read the article to find out how to do it!
Change shades to “One, two, three”
The program contains two tools for changing the shade of objects. Which one is best to use depends on the specific situation. We will consider both options. To change the color of clothing you need to do the following:
- Step 1. Preparing for work
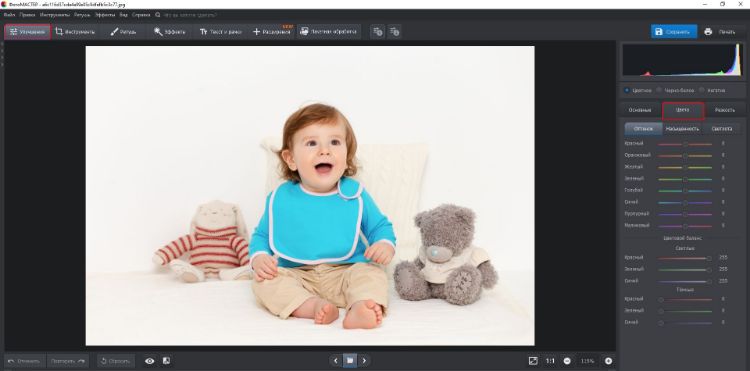
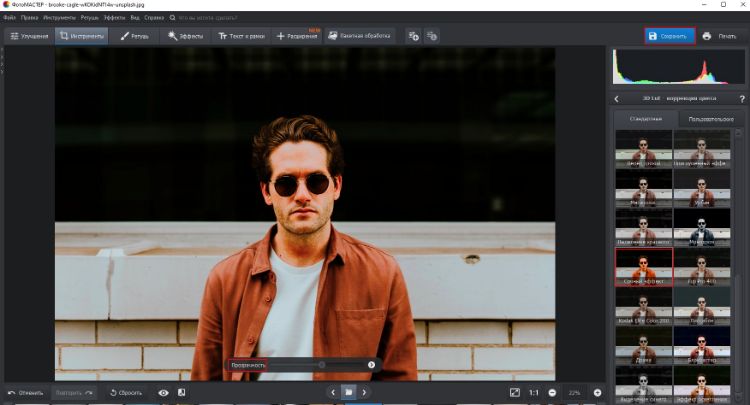
First, you should install “PhotoMASTER” on your computer. You can download the photo editing program on our official website. Wait for the distribution to download and install the software using the Installation Wizard. Find the photo editor shortcut on your desktop and double-click on it. The main menu will appear, where you need to click on the “Open photo” button and select the desired photo. It will load into the program's working window.
Adding photos to the editor
- Step 2. Change the color of clothes
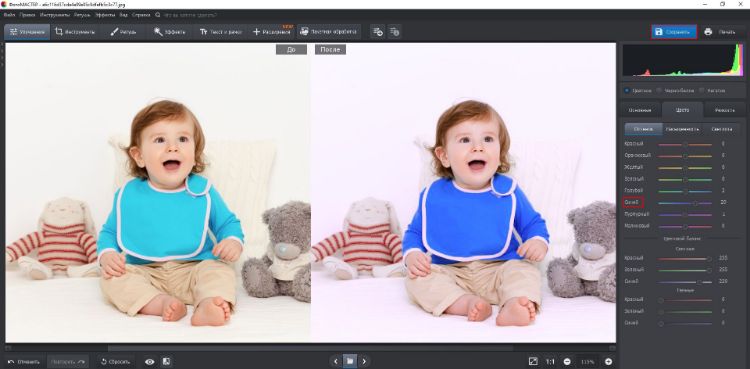
To change the color of clothing in a photo, you can use one of two methods. The first one is simpler and faster. Under Enhancements in the right panel, find the Color tab. Here you will see sliders with different shades. You need to choose the one that matches the tone of your clothes. To recolor a sea green dress (in the screenshot), you need to change the “Cyan” and “Blue” parameters. Adjust the shade to your taste.
Changing the color of the dress by adjusting the shades of blue and blue
The first method is not suitable if the photograph contains other objects of the same color as the clothing. For example, you need to repaint a green skirt, but there is grass in the frame. You'll have to use another editor tool.
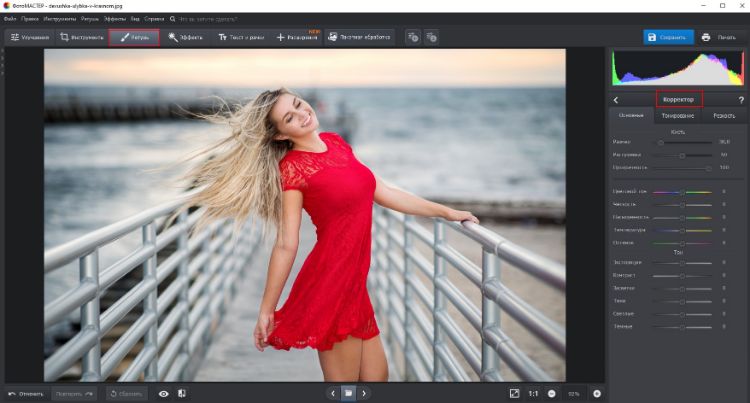
Go to the “Retouching” tab. Select the Corrector tool. It allows you to carefully select a separate image fragment for further processing.
Selecting the “Corrector” tool
Adjust the brush size using the slider in the right panel. Do not make the diameter too large, otherwise it will be difficult to work with narrow areas. Carefully paint over the item of clothing whose color you want to change. In our case, a pink blouse. Try to completely paint the part without going beyond the boundaries.
The more accurately and evenly you paint an item of clothing, the more natural and attractive the color-changed version will look. Please be a little patient!
Paint over the blouse with a concealer brush
Once the piece of clothing is completely selected, let's change its color. Move the Hue slider. You can repaint the item in any of the basic shades. Choose the option you want. The screenshot below shows how the pink blouse miraculously turned into blue.
Choosing a new color of clothes
Once a base color is selected, you can adjust the hue more flexibly and precisely using other settings. Set saturation, temperature and hue to suit your exact needs.
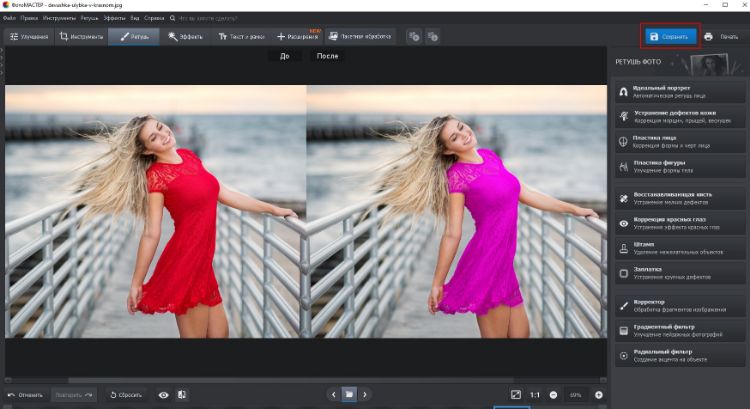
Adjust clothing color using hue and saturation settings
- Step 3. Saving the finished image
After completing all the manipulations and obtaining the desired result, all that remains is to save the photo. Press the Ctrl+S key combination on your keyboard. You can also click the “Save” button above the settings panel or go to the save tool through the “File” drop-down list located on the top panel. You will be asked to select a location on your computer where you want to save the edited photo.
Your entire wardrobe in one program
You see, changing the color of clothes in a photo using “PhotoMASTER” is extremely simple. You can experiment endlessly with shades, achieving the perfect match to your wishes. The tool will be useful if you need to choose exactly the color of a dress that will suit your face, if the background color does not harmonize well with the outfit, or in case you want to make a bright accent on a wardrobe item.
The PhotoMASTER program will show that there are simply no limits to the flight of fancy. Photo montage in our editor will make any photo bright and creative!
Replacing Colors in Photoshop
It often happens like this: I found the right picture, but the color is wrong; or just wanted to diversify the usual. How to replace a color in Photoshop with another? The question is justified, because in Photoshop you can replace color in several ways. Much depends on the dispersion of a certain shade throughout the image. The less often the color being replaced appears in other areas of the image, the easier it is to replace the color in Photoshop.
Now let's look at several methods and figure out how to replace one color with another in Photoshop.
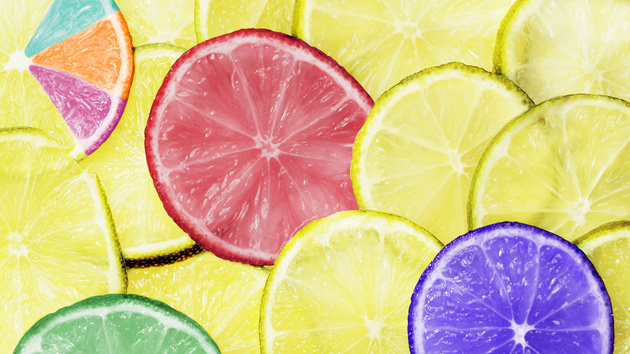
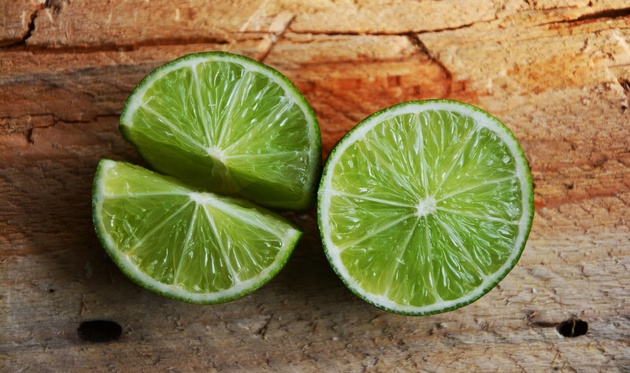
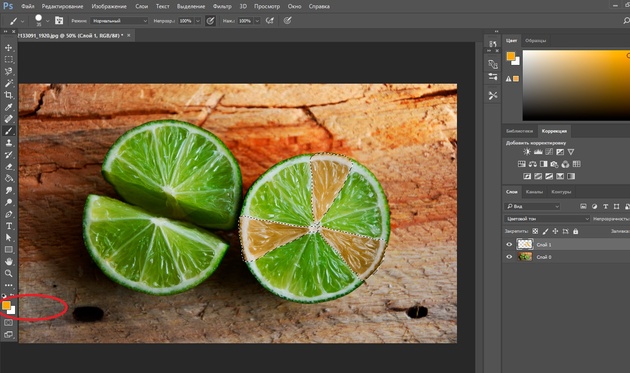
The first method is the easiest and fastest. But the object of repainting should not be too complex. For example, let's take a photo of a lime on a table. The background is almost uniform, the green color is present only on the lime. The fruit is round, it won’t be difficult to recolor.
Open the image in Photoshop and unfreeze the layer by right-clicking on the castle image.
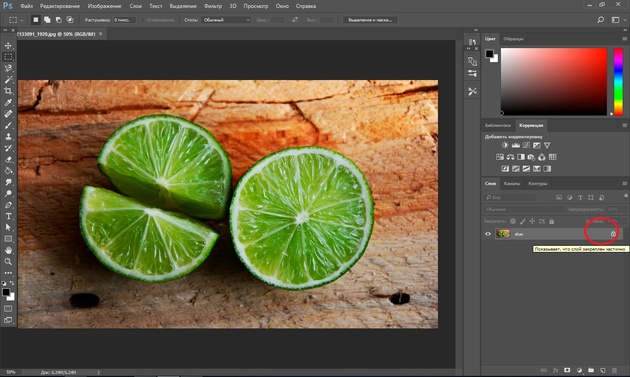
Create a new transparent layer above the photo layer ( Shift+Ctrl+N ). Call the Brush (key B ). It is better to use a hard brush. On the control panel, call up the brush properties and select a hard one, with clear edges of the stroke.

Select the color of the brush that you want to repaint the lime with. Let's take blue for example. The palette is in the toolbar at the bottom. Called by double clicking on the icon. By moving the sliders on the spectrum, you can select a color range. We select the color tone by moving the white ring in the square window, where the tone changes from white to black.
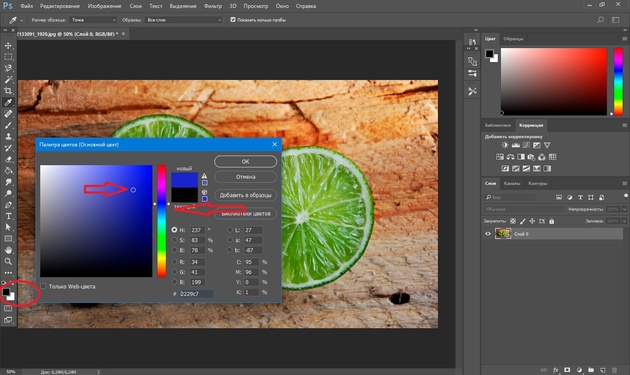
We stand on the transparent layer, select the brush size using the Ъ - increase, or X - decrease keys and paint over our lime.
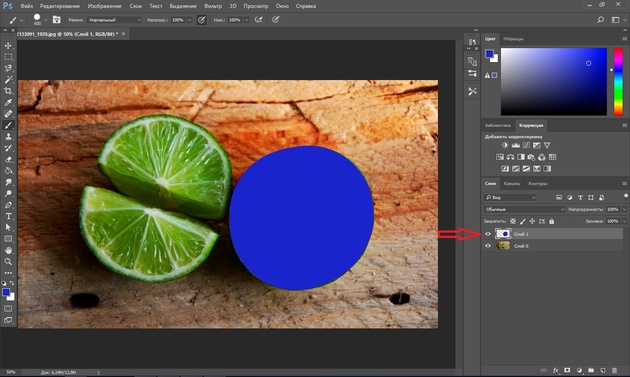
Now change the layer blending mode from “Normal” to “Hue” . You can do this in the layers palette. This will cause the lime to change color.
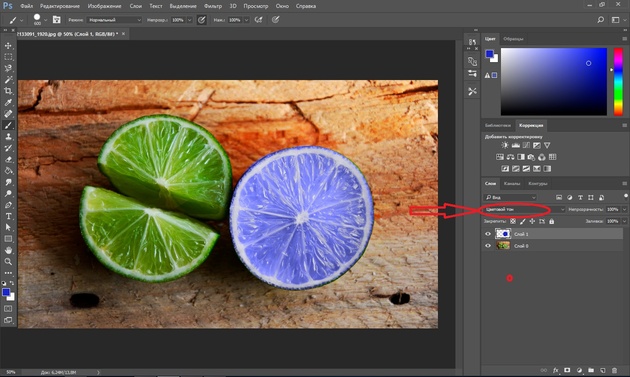
All that remains is to save the image. If desired, you can paint each slice with a different color.
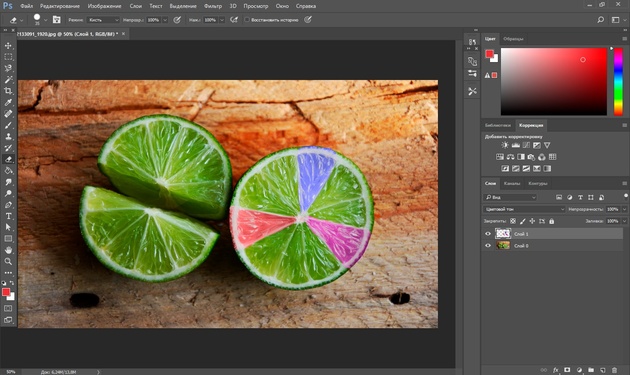
If you hold down the Ctrl and move the cursor to the layer icon and click once, the filled area will be highlighted. Now, without removing the selection, you can change the brush color and select other colors. There is no need to repaint. After selecting a color, you can press the key combination Alt+Delete . This will fill the selected area with a new color.
In the next example, we'll look at how to replace a color in Photoshop with better quality. This method may take a little longer, but the results are worth it.
How to replace one color with another in Photoshop if shades of the color being changed are often found in the photo
Let's say you need to change the color of a model's lips. Red, pink and shades of these colors are present in skin color. When changing the color of your lips, you need to leave your skin color unchanged.
Open the image in Photoshop. Create an adjustment layer “Hue/Saturation”/Hue/Saturation . The list of adjustment layers can be expanded in the layers palette below.
In the adjustment layer settings window, select the “Red” color channel, click on the Eyedropper Tool , then make one click on the model’s lips. This way we will determine the color that we will change.
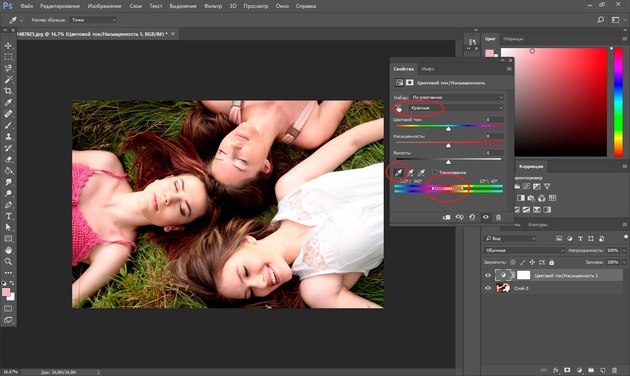
Movable brackets will appear on the gradient below. With their help, you can make the range of a given color wider or narrower. When you move the Hue checker, the selected lip shade will change across the spectrum, depending on where you move the checker. In this case, the shade of red will change throughout the image.
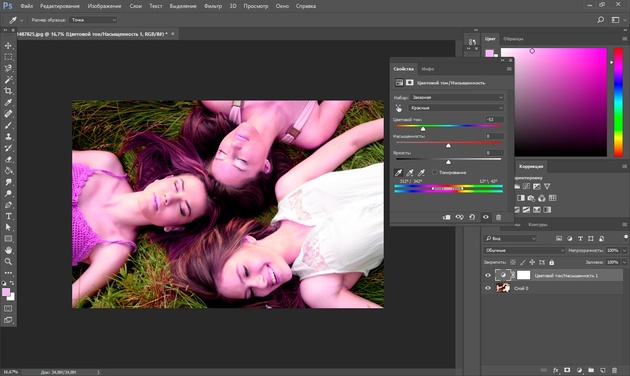
Having selected the color you want to change, close the adjustment layer editing window, step on the adjustment layer mask (white square) and press Ctrl+I . The mask will be inverted to black, and all our changes will be visually lost.
Having selected the color you want to change, close the adjustment layer editing window, step on the adjustment layer mask (white square) and press Ctrl+I . The mask will be inverted to black, and all our changes will be visually lost.
When all the areas where the color needed to be changed have been worked out, you can save the image (keyboard shortcut Shift+Ctrl+S ). If you miss in some area, you can cancel the Alt+Ctrl+Z or paint over all the mistakes on the adjustment layer mask with a black brush. This method will help you choose a new color more accurately, and the work will look neater.
You can learn even more about Photoshop in the course “Photoshop CC. Basics" at Fotoshkola.net.

How to replace one color with another in Photoshop if the original color is black or white
Things are different with the change of black and white.
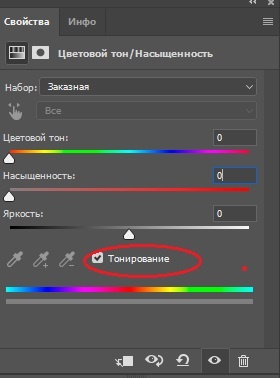
To change the black color, you can apply an adjustment layer “Hue/Saturation”/Hue/Saturation , but work not with the color channel, but with toning. To do this, in the layer settings you need to check the box “Toning”/Colorize .
Let's take a closer look. Let's say you need to repaint a black sofa. Select the sofa using the Quick selection (call with the W ).
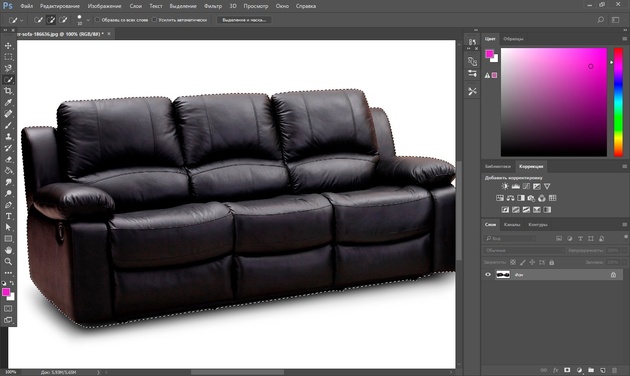
Using the combinations Ctrl+C and Ctrl+V , transfer the selected area to a transparent layer and apply an adjustment layer to it “Hue/Saturation” . To do this, between the adjustment layer and the layer with the selected object, you need to left-click while holding down the Alt .

Now, double-click on the adjustment layer to call up its settings, check the “Toning”/Colorize and, moving the hue, saturation and brightness checkers, select the desired color.
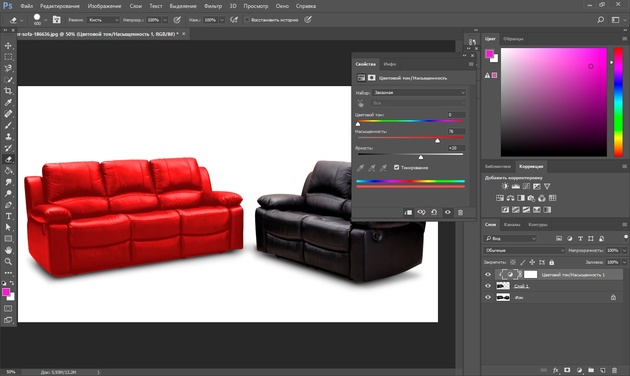
It turns out simple, beautiful, without a catch.
To recolor the white color, you can use the adjustment layer “Color” / Color in the blending mode “Multiply” / Multiply .
Open the image and create an adjustment layer “Color” . We immediately set the color of the layer to the one we plan to paint white.
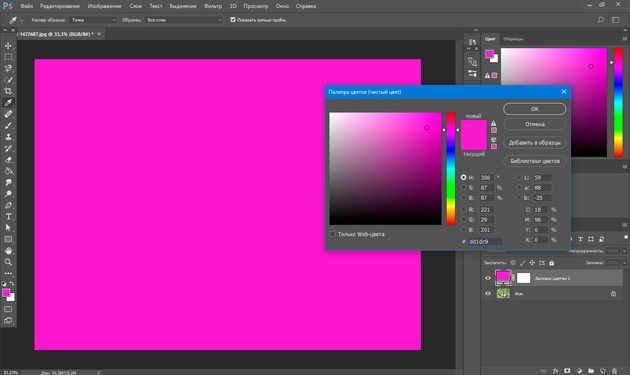
Change the blending mode to “Multiply”/Multiply , put on the adjustment layer mask and press Ctrl+I .
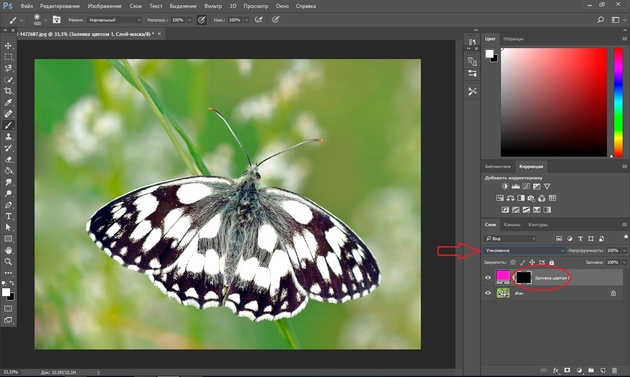
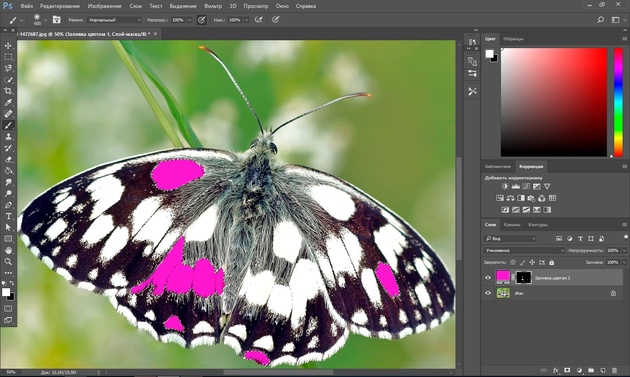
Go to the layer with the image and select the desired areas of white with the Quick selection (call with the W ). Without removing the selection, stand on the adjustment layer mask and paint over the mask with a large white brush. The color will change only where you set a selection with the Quick selection , which can be identified by the dotted line.
If desired, you can change the color of the adjustment layer. To do this, double-click on it and select any new color in the spectrum.
It's that simple. Try it, experiment. You will definitely succeed. Now you know several ways to replace a color with another in Photoshop.
How to change the color of clothes in Photoshop
19.10.2017 [01:11], nastya
Let's take a step-by-step look at how to change the color of clothes in Photoshop. For example, let's select a photo of a girl in a lilac dress and change it to green, and then to red.
How to change the color of clothes in a photo in Photoshop:
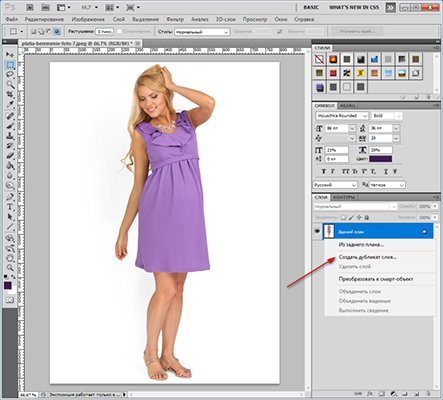
- Open the photo and create a copy of the layer (right-click on the image layer and select “Duplicate Layer”)
- Left-click on a copy of the layer to select that layer to work with. Open the color replacement window, do it like this:
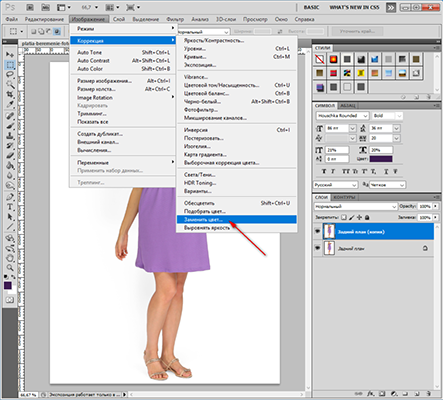
- Go to the “Image” menu item
- Click “Adjustment”
- Select the Replace Color tool
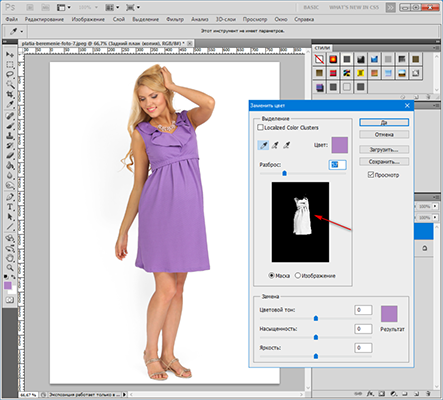
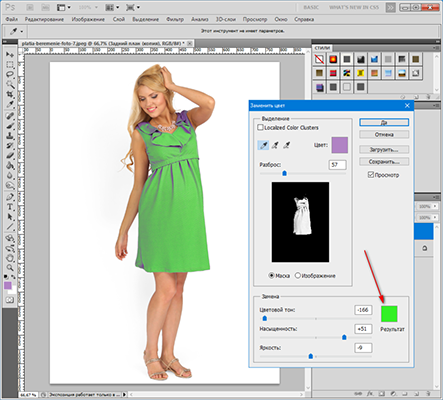
As you can see, the dress is now completely green. Now let's replace it with bright red, to do this, simply select it at the bottom of the color replacement window.
Now you know how to change the color of clothes in Photoshop.
How to change the color of a photo in Photoshop
You can change the color of a drawing or picture in many ways. Layering is the easiest way to replace the color in a picture. To change the color of a photo:
- Open the image in Photoshop
- Create a new layer
- Set the blending mode to “Hue” for the created layer
- Adjust the color you want in the Foreground color indicator
- Activate the Brush tool and paint on a new layer on top of the object
You can change the color in a photo using this method for any element. But please note that black or white will not change. This is what happened as a result of our attempt to replace the color in the drawing:

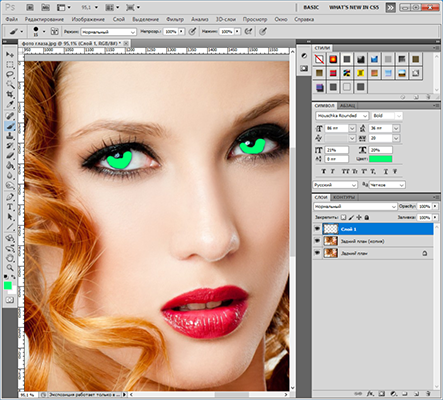
How to change eye color in Photoshop
Using an example of an image with a girl, where the eyes are clearly visible, we will show whether it is possible to change the color of the eyes, or rather, how to change the color of the eyes in Photoshop. How to change eye color in Photoshop:
- Add the photo to Photoshop and create a copy of the layer
- Now create an empty layer and select it
- Take the Brush tool (this tool can easily change eye color in Photoshop), select the color that interests you, and carefully paint the entire area where you need to replace the color
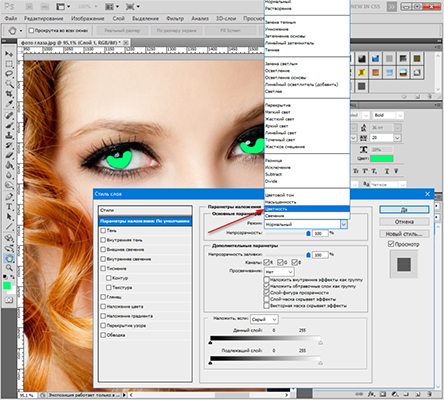
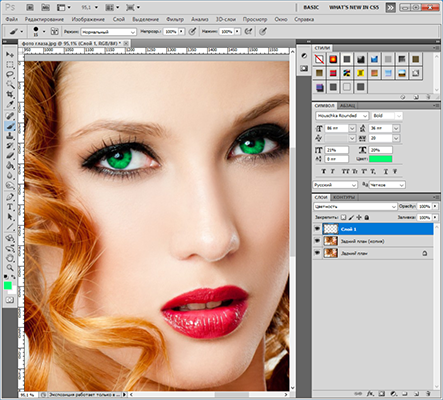
- It turns out too bright and unnatural, but at this stage that’s what we need. Now right-click on the current layer (on which you painted with a brush) and select “Blending Options”
- Select the blending mode “Color”. Now the eyes have acquired a beautiful green color. Now you can play with the “Opacity” slider and choose with what intensity the green tint will be applied
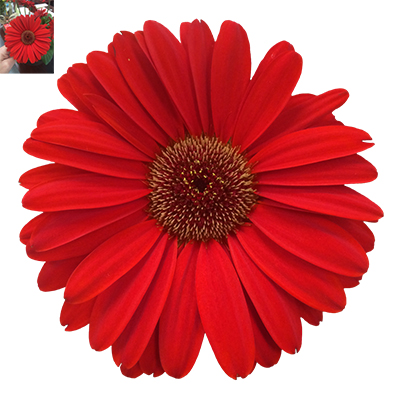
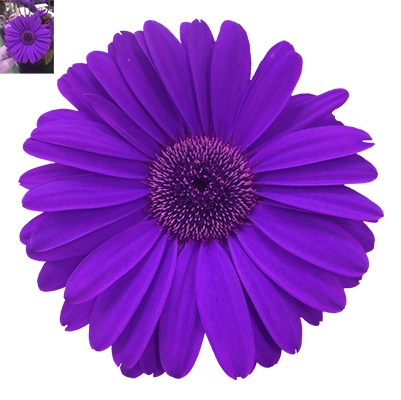
How to change the color of flowers in Photoshop
How to change the color of flowers in Photoshop or another object:
- To change color in Photoshop, load a photo into the editor
- Select the part of the image that needs to be edited
- Adjust the selection in “Selection” – “Refine Edge”
- Now you need to replace the color in Photoshop. Select “Image” – “Adjustments” – “Hue/Saturation”. With this setting you can replace the color with another one in Photoshop.
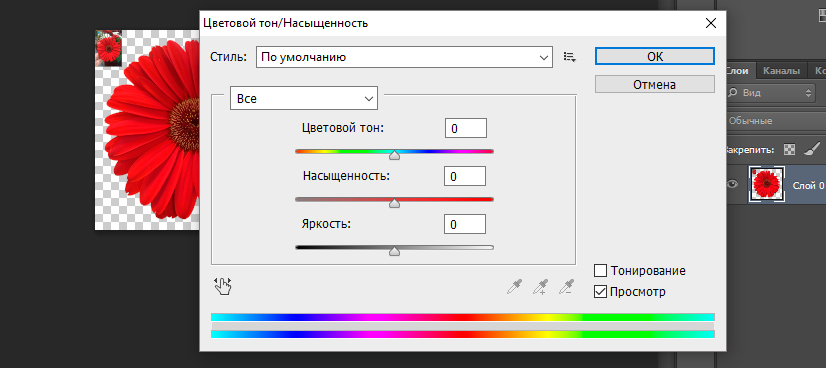
- Adjust the color and click OK to correct the color in Photoshop
How to change hair color online in a photo in Photoshop
How to change hair color online in a photo in Photoshop:
- Go to the site
- Upload a photo

- Create a copy of the layer
- Using the Quick Selection Tool, select the hair (use any other selection tool you like) on the duplicated layer
- Paint over the selected area of hair on the duplicated layer with any convenient tool.
- Set the blending mode to “Overlay” and adjust the layer opacity level
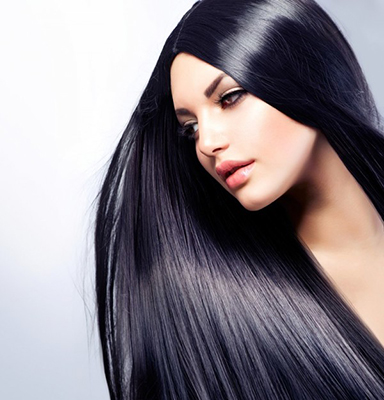
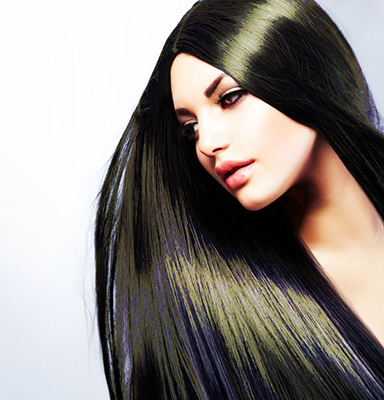
What ways do you know how to change hair color in a photo online in Photoshop? Tell us in the comments.
How to change photo color online for free
How to change photo color online for free:
- Go to IMGOnline website
- Upload a photo
- Select the color to change
- Select the color to replace with
- Adjust other photo settings
- Select the resulting image format
- Click OK to replace color on photo online

- Wait a few seconds and then open the image in your browser or download it to your computer
Changing the color of a picture online is quite simple. Here's what happened as a result: