Circular panorama in Photoshop for beginners
Create a circular panorama in Photoshop. It's simple!
In this lesson we will learn how to use Photoshop to make a circular panorama from a panoramic photo, which will look very original and can be used in web design or simply to “dilute” your ordinary album with something “fresh”
To begin with, we will need a ready-made photograph of the panorama, and the panorama does not have to be circular, even one photograph is enough, the main thing is that there is a horizon line on the left and right edges of the frame, or after “wrapping” the panorama it can be modified with a “clone stamp”.
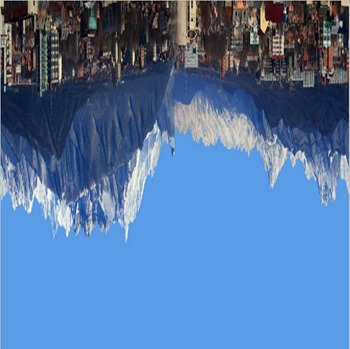
In the first example, a “non-circular” panorama with a “bad joint” is taken, that is, the left part will not coincide well with the right.

Image - Rotate Canvas - 180

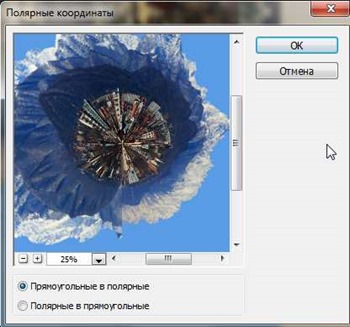
Filter - Distort -Polar Coordinates

Open the base layer by double clicking on the layer

With the Move tool active, drag, for example, the right marker until a square is formed 

Use the Crop tool to trim off the excess

The most painstaking part of the work is processing errors - the junction of the beginning and end of the photo, for this we use a tool - a stamp
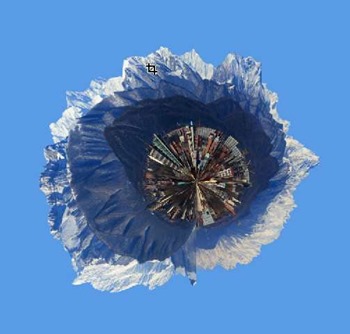
As a result, you can get the following image:

Method number 2. Circular panorama:
We take a ready-made circular panorama

Making a square out of a panorama
Edit->Image size, uncheck the “Constrain Proportions” checkbox and in the “Height” field set a value equal to the width of our panorama.


To get exactly the planet, turn the photo upside down Image->Rotate Canvas-> 180

Let's transform our panorama using the Polar Coordinates filter. Filters->Distort->Polar Coordinates and select “Rectagular to Polar”.

All. We rotate the finished planet, look at the best angle, and finalize the joint and edges of the photo.
How to make a circular panorama in Photoshop: the illusion of a review

Panoramic photography is a special type of image where we have a very wide viewing angle. Thanks to this, you can see almost the entire horizon. A circular panorama creates something like a globe on which the entire horizon is located. The effect is amazing and funny. By reading this article, you will learn how to assemble a panorama in Photoshop .
What you need : Photoshop installed
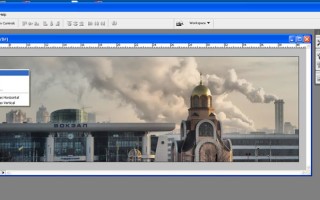
 Launch Photoshop . Select the photos from which you want to create a circular panorama using File → Open or using the keyboard shortcut Ctrl + O. Then select Image → Rotate Canvas → Rotate Canvas Vertical .
In the next step, select Image → Image Size . Uncheck Maintain aspect ratio and enter a value to make the image a square shape. It is best to enter standard dimensions - 20 centimeters in width and height.
Then select Filter → Distort → Polar Coordinates . Once the dialog box appears, select Rectangular to Polar and click OK. Then the image will be automatically adjusted in the form of a circular panorama. The best effect is achieved when the objects in the photo are of different sizes. Then you can see the contrast between all the components of the image.
After obtaining a circular panorama in this way, unfortunately, the connecting line of the photograph is visible. To remove it, you need to select the “Finger” tool, available in the tool palette on the left side of the screen. Then at the top, adjust the brush size. To have a more complete picture of the photo, enlarge the photo, press the Ctrl and + keys simultaneously.
In order to improve the created panorama select Filter → Artistic → Paint stroke . On the scale, set the brush size to 1 and also set the Focus to 1. Confirm the operation by pressing OK.
Then create a new document (Ctrl + N) and set its dimensions to be the same as the dimensions of the panorama. Using the eyedropper tool available in the tool palette on the left, load the background color of the panorama. Then select Paint Bucket, also from the tools on the left, and fill the new document with color. Then select the Move and move the view to the new document. Thanks to this operation, the background color will match exactly, which will give an aesthetic effect.
If the background still does not completely match the panoramic view, select Eraser , set the opacity to 10% and smudge those elements that do not suit us.
After finishing your work, flatten the image (the last window on the right side of the page under the triangle logo) and save the changes using the key combination CTRL + S.
Create a circular panorama in 5 simple steps.
Easily and quickly turn your panoramas into attractive, miniature planets using Photoshop or your favorite graphics editor.
Panoramas are one of my favorite ways to show a scene. They are so interesting and detailed that I advise you to pay attention to them. This little tip adds an extra pinch of creativity, turning standard panoramas into miniature planets that really have a "wow" factor.
The technical name for this technique is "stereographic projection", but don't be intimidated by this complicated word, it's actually much simpler. In this example I'll use Photoshop, but you can use any other editor, including GIMP which is free.

Selecting a suitable photo.
Almost any panorama will suit us, but there are moments that will improve the final result.
- The viewing angle is a 360-degree panorama, which works best because their edges merge together. Narrower angles will also work, but you may need to do some extra work to ensure the colors and textures are consistent across the edges of the panorama and match each other.
- Image Width - The aspect ratio (width divided by height) of your photo affects the smoothness of your planet. Wider images tend to produce smoother planetary surfaces, while narrower panoramas can produce larger changes in elevation. Both options look great.
- Sky - The panorama sky will be seriously distorted in the final image. Clear skies tend to produce the best results, although clouds can give an interesting stretched effect.
- The first is that the bottom of your photo will be squished into a bunch to form the center of the planet, which can lead to some distortion. As with the sky, smooth textures such as grass or sand look better.
- Horizon - must be perfectly leveled so that the edges meet neatly at the base of the steps. If your photo does not meet this parameter, then it can be corrected in a photo editor.
It may seem to you that there are many criteria in our business, but after trying, you will understand that almost any panoramas will do. If you still have doubts, take any panorama that does not fall under the above-mentioned “rules” and try what happens. The result may be interesting and unusual, and under normal conditions this would not happen. So don't be afraid to experiment.

Transformation of the planet.
Found a suitable image? Fine. Time to turn it into a planet.
1. Make a square image.
First, let's move on to the image sizes. Go to the >image “image” tab. Select the image size. In the window that appears, uncheck “maintain proportions” and set the height to match the width.

This procedure will distort your panorama a little, but don't worry that's how it should be.

2. Apply a gradient to the sky.
This step is optional, but without it, the final image may look warped and pulled at the corners. Select the gradient tool and set the edges to colors that match the prevailing colors of the sky. Set the opacity slider on the left side to 100%, and on the right side to 0%.

Drag the gradient from the top of the photo down as far as possible to create a smooth transition to a solid color.

3. Turn a photo upside down
Go to the image tab > rotate image 180° to turn your image upside down. This ensures that the twisting happens correctly when we turn our panorama into a planet.

4. Apply a filter , polar coordinates
Go to filters>distort>polar coordinates. In the window that appears, select the “Rectangular to Polar” option and click “ok”.

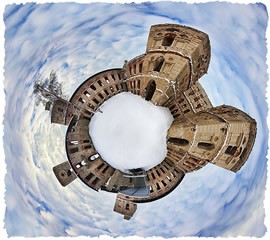
Voila! Your panorama is now folded into a circle and looks like a small planet photographed from above using a fisheye lens.

5. Finishing touches
Check the top center of your photo, it should be smooth, the joint should not be visible.
A stamp or healing brush will help here. If you prefer your own planet, now is the time to create it. You may still have white corners, but you can fill them with the same color you used in the gradient. Re-crop your image and you're done.

Creating small planets is extremely easy, you will understand it as soon as you try. In the future, you can experiment and get unusual, interesting effects. Therefore, do not think that you need to be rigidly attached to the above rules. If you come up with something unusual and interesting, be sure to share it in the comments.
Examples for inspiration.
Here are some examples to show what's possible when you add a little creativity and imagination to this technique.

Use a photograph of different terrain to create the jagged effect of the asteroids.

Place buildings everywhere, even in the center, to create a densely populated planet.

Shoot panoramas at night to get the effect of a planet floating in outer space.

Continue to step 3 to make it look like you are lying on the ground and looking up at the sky.
How to learn photography from ZERO?. Learn to get EVERYTHING out of your camera.
“Digital SLR for a beginner, or how to take great photos. Level I
Secrets of creative photos for a beginner. Photography techniques and tricks. Level II
Circular panorama in Photoshop for beginners

Easily and quickly turn your panoramas into attractive, miniature planets using Photoshop. This little tutorial adds an extra pinch of creativity by turning standard panoramas into miniature planets that really have a "wow" factor.
The technical name for this technique is "stereographic projection", but don't be intimidated by this complicated word, it's actually much simpler. In this example I'll use Photoshop, but you can use any other editor, including GIMP which is free.
Selecting a suitable photo.
Almost any panorama will suit us, but there are moments that will improve the final result.
- The viewing angle is a 360-degree panorama, which works best because their edges merge together. Narrower angles will also work, but you may need to do some extra work to ensure the colors and textures are consistent across the edges of the panorama and match each other.
- Image Width - The aspect ratio (width divided by height) of your photo affects the smoothness of your planet. Wider images tend to produce smoother planetary surfaces, while narrower panoramas can produce larger changes in elevation. Both options look great.
- Sky - The panorama sky will be seriously distorted in the final image. Clear skies tend to produce the best results, although clouds can give an interesting stretched effect.
- The first is that the bottom of your photo will be squished into a bunch to form the center of the planet, which can lead to some distortion. As with the sky, smooth textures such as grass or sand look better.
- Horizon - must be perfectly leveled so that the edges meet neatly at the base of the steps. If your photo does not meet this parameter, then it can be corrected in a photo editor.
It may seem to you that there are many criteria in our business, but after trying, you will understand that almost any panoramas will do. If you still have doubts, take any panorama that does not fall under the above-mentioned “rules” and try what happens. The result may be interesting and unusual, and under normal conditions this would not happen. So don't be afraid to experiment.

Transformation of the planet.
Found a suitable image? Fine. Time to turn it into a planet.
1. Make a square image.
First, let's move on to the image sizes. Go to the >image “image” tab. Select the image size. In the window that appears, uncheck “maintain proportions” and set the height to match the width.

This procedure will distort your panorama a little, but don't worry that's how it should be.

2. Apply a gradient to the sky.
This step is optional, but without it, the final image may look warped and pulled at the corners. Select the gradient tool and set the edges to colors that match the prevailing colors of the sky. Set the opacity slider on the left side to 100%, and on the right side to 0%.

Drag the gradient from the top of the photo down as far as possible to create a smooth transition to a solid color.

3. Turn a photo upside down
Go to the image tab > rotate image 180° to turn your image upside down. This ensures that the twisting happens correctly when we turn our panorama into a planet.

4. Apply a filter, polar coordinates
Go to filters>distort>polar coordinates. In the window that appears, select the “Rectangular to Polar” option and click “ok”.

Voila! Your panorama is now folded into a circle and looks like a small planet photographed from above using a fisheye lens.

5. Finishing touches
Check the top center of your photo, it should be smooth, the joint should not be visible.
A stamp or healing brush will help here. If you prefer your own planet, now is the time to create it. You may still have white corners, but you can fill them with the same color you used in the gradient. Re-crop your image and you're done.

Creating small planets is extremely easy, you will understand it as soon as you try. In the future, you can experiment and get unusual, interesting effects. Therefore, do not think that you need to be rigidly attached to the above rules. If you come up with something unusual and interesting, be sure to share it in the comments.
Examples for inspiration.
Here are some examples to show what's possible when you add a little creativity and imagination to this technique.
Use a photograph of different terrain to create the jagged effect of the asteroids.
Place buildings everywhere, even in the center, to create a densely populated planet.
Shoot panoramas at night to get the effect of a planet floating in outer space.
Continue to step 3 to make it look like you are lying on the ground and looking up at the sky.
Creating circular panoramas (flash)
How to take a panoramic photo with a 3D view
 Move your head - by dragging the mouse, or with the cursors ← →, zoom in/out - with the mouse wheel.
In this article I will talk about how to take panoramic photographs, as well as
how to make circular 3D panoramas from them: what programs are needed for this, and how to use them.
In a word, I will try to show the whole process step by step. At the end of the article I will do a little work on the mistakes and talk about how to avoid them in the future. In general, taking a panoramic photo (including a circular panorama) is not at all difficult.
With minimal skill, everything will take 10 minutes.
I will list everything we need:
- Camera.
I hope that for most readers it is still digital and not film, because... We will process the photos on a computer. - Computer.
Any computer will do, as long as it was released no more than 10 years ago and runs the Windows operating system.
You can create 360-degree panoramic photos on older computers and on computers with other operating systems - but this article doesn't cover them. - Programs.
- Adobe Flash Player 10 - most likely, Flash is already installed on your computer, and you do not need to download/install it.
- Microsoft Research Image Composite Editor (Microsoft ICE) - 3 MB, a program that glues disparate photographs into a single pane.
- Pano2VR 2.2.3 is a program that makes a circular (3D) panorama from a “flat” panorama using flash. Don’t forget to feed the program the key code so that the message “Trial Version Expired” does not appear on your panoramas later. Alternatively, the code can be purchased from the developers. There are other analogue programs for creating circular panoramas, which you can easily find through Yandex/Google.
- Instructions. (optional)
You are reading it now.
Let's get started.
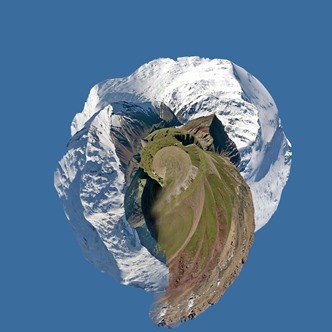
As an example, I propose to use the work on the panorama, the original photographs of which were taken in the winter of this year (2010) on the territory of the NPO Plastic plant, on Berezhkovskaya Embankment in Moscow.
You have already seen the picture of this panorama at the beginning of the page.
11 photographs were taken with a Canon 350D camera, with a kit lens, focal length 18 mm.
The photographs were taken without a tripod, handheld. The frame position is “vertical”. If the pictures were taken in “horizontal” mode, it would take 6-7 frames instead of 11, but then less of the landscape would be included in the frame (in height).
The photographs were taken with a slight “overlap”, i.e.
each new frame contained 5-10% of the previous frame. You can download the archive with the original jpg files at https://lesha.name/panorama/howto.rar, the file weighs 25 megabytes.
1. Launch the Microsoft Image Composite Editor program
... and click File→New.
 In the window that opens, select files from the unpacked howto.rar
(all at once), and click “Open.” For some time (a couple of minutes), the computer will puff,
trying to understand where the head is and where the tail is, and “gluing” the photos together with the edges based on the principle of finding identical objects in adjacent frames.
Those. using the same 10% layering of frames that we took as “overlap”. As a result, we will get something similar to this:
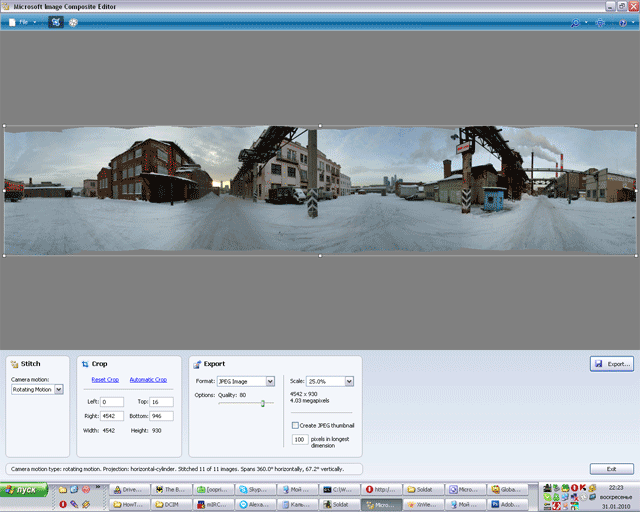
Now we need to trim off the irregularities resulting from gluing:
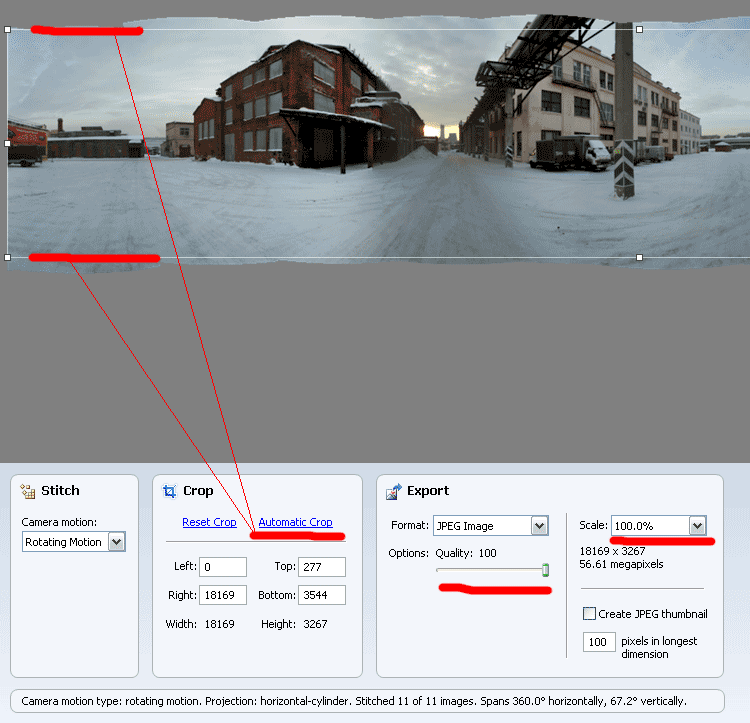
To do this, we press the Automatic Crop button (underlined in red) - and the program itself will cut off the excess.
At the same time, we set the maximum quality for the output image - move the Quality slider all the way to the right, up to 100%.
We will also leave the original size of the panorama - set it to 100% in the Scale menu.
We leave the maximum quality settings here because we will always have time to lower the quality - and we will do this at the final stage of creating the panorama, and not now.
Now we need to save the panorama as a JPG file.

Everything is done in two clicks - click on “Export”,
and then on “Save”.
Let's call the file, for example, panorama_result.jpg By the way, the file will be large, 28 megabytes.
However, we did this deliberately: the fewer steps involved in image optimization, the higher the quality of the final image. Our output file will be like this (only 10 times larger in size):
2. Launch the Pano2VR program
Add our file panorama_result.jpg to the program
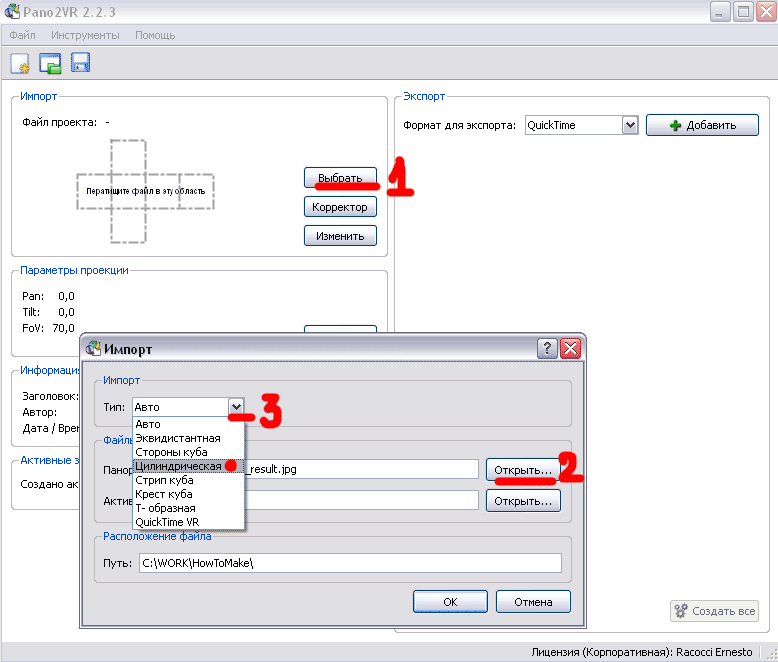 Click “Select” (number 1), then “Open” (number 2, and look for our file panorama_result.jpg in the window), then, just in case, indicate that we are going to make a cylindrical panorama (number 3). OK.
Now click on the “Export format” drop-down menu and select “Flash” there.
Then click on the “Add” button.
This window will pop up in front of us, which we will now consider in detail:
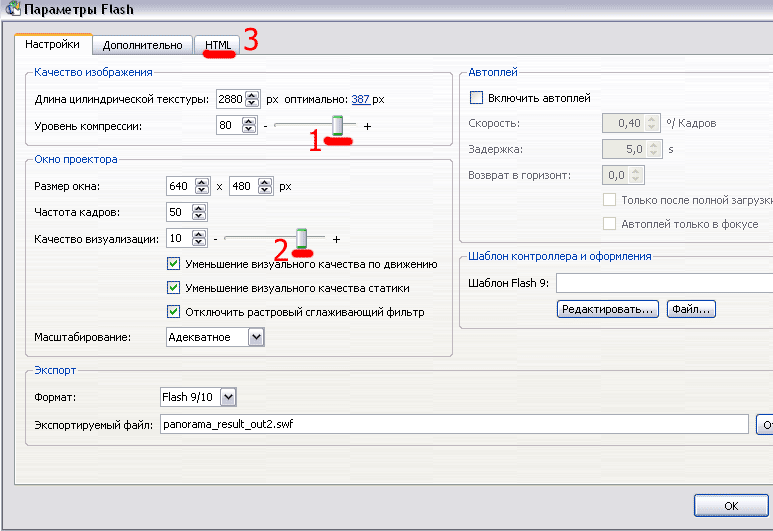
First, set the compression level to 80, the rendering quality to 10, and the length of the cylindrical texture to the maximum, i.e.
at 2880. By playing with these settings, you can get output panoramas of different quality/size.
Then go to the HTML tab and check the “Include HTML file” checkbox.
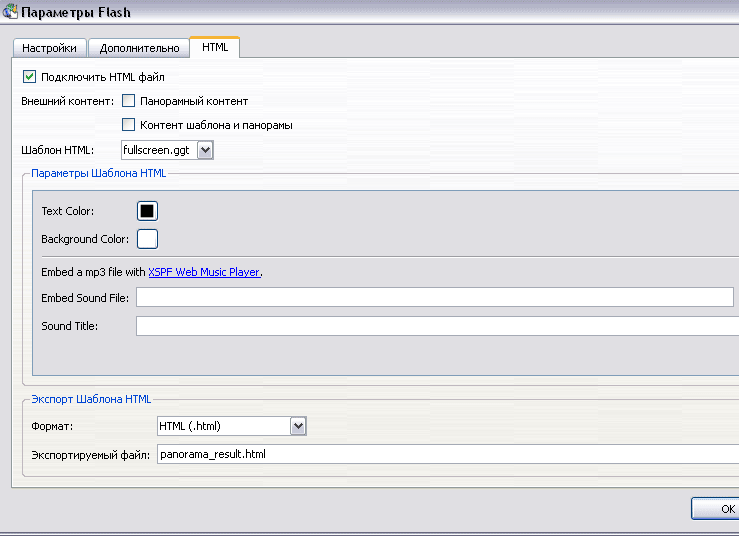
We do this so that the flash drive can be immediately posted on your home page. Let's call the file panorama_result.html Actually, that's all. We press the “ OK ” button, the computer will ask “Export file?”, after your affirmative answer, it will think a little and show a page in the browser - which will show something like this:
https://lesha.name/panorama/npo. htm
If you want to change any settings of the resulting panorama, you can change the settings in the “Projection Options” block, or click on the wrench image and change the quality/size of the photo.
3. Work on mistakes.
An observant North American reader named Sharp Eye will notice that there are at least two small blemishes in the panorama.
Firstly, to the left of the sun, along the brick extension, there is an uneven line where the two frames meet: which is why the left side of the building is brighter, and the right side is darker-mudder. And the sky above the building is different - part of it is with clouds, and part of it is without. This happened most likely due to autofocus and the presence of the sun in the frame. In order to avoid this, next time I will take a picture in such a way that the sun falls into the “overlap” of two frames - then, as a result, the parts of the image to the right and left of it will be as similar as possible in exposure (i.e., the amount of light), and There will be no sharp change in dark/light frames. Also, most likely, it was necessary to take photographs with constant manual focus.
The second defect is to the left of the yellow sign advertising bumper repairs.
If you zoom in and enlarge the image using the mouse wheel, you will see that the car cabins are not “docked” very correctly. This happened, most likely, also because of the automatic focus, plus, perhaps, I moved a little between frames. A tripod and manual focus should help correct the situation - a simple telescopic tripod costs 500-600 rubles, and can easily be stowed away even in a small shoulder bag. That's all for this.
If you have any comments, suggestions, or corrections to this article, please write.
—>For Photoshop lovers —>
Wednesday, 20-November-2019, 22:17—>Greetings Guest

Catalog of interesting things
Let's start the lesson.
A little theory. A panoramic photo differs from a regular photo in its size. Its width is four times its height. It is very elongated horizontally. Therefore, the first thing we do is create a document measuring 1600 by 400 pixels.

Now we will assemble a panorama from several photographs. It is advisable to select the same type. You can process them first by watching the lesson How to fix a photo taken in the dark in Photoshop. I found some from a party at the holiday home for Maslenitsa. So I prepared them. It took 4 pieces. Open the first one in Photoshop and immediately go to Image – Image Size.

Make sure that the Preserve proportions checkbox is checked. We correct the image height to 400 pixels. The width drops out automatically.

Take the Move tool and move our image onto a new long document. Since the height has already approached, we immediately move it to the edge, that is, to its place.

Take the second photo, open it in Photoshop, go Image – Image Size

Check the checkboxes again and correct the height.

Using the Move tool, we move the photo onto the future panoramic image. We immediately put it in place. We don’t pay attention to the edges for now, then we’ll deal with them.

After moving, we extinguish the red square in the image and do not save the changes.

We do this with all the photographs: open them in Photoshop, change the height of the image, move them to a panoramic image, and put them in place.
Now let's clean up the edges. Taking turns on each layer, starting from the top one (it’s the far right one in our panorama), take the Eraser, set it to a soft brush and erase the sharp edges of the pictures.

Go down one layer and clean up the edges of the next photo. And so we go along all the edges of the photographs.

Now that we have a panoramic image ready, we combine the layers into one to continue working. Right-click on the layer and select from the drop-down menu - Merge visible.

Let's make a smooth transition between the left and right edges of the image so that the transition in a circular panorama is seamless. Let's go Filter – Others – Shift.

In the shift window we set it to +800, the filter will shift our image and the border will be smooth.

A seam line has appeared in the picture; we’ll mask it with the Stamp tool.

Preparing the image for the panorama. Let's go Image – Image Size

Uncheck the Maintain proportions box and set the image height to be equal to the width – 1600 pixels.

Don't be afraid - the image has become elongated. Now let’s also rotate the image 180°. Let's go Image – Image rotation – 180°.

Now it's finally time for the filter. Let's go Filter – Distortion – Polar Coordinates.

Check that the filter parameter is Rectangular to Polar and click OK.

We got this interesting picture.
Then everything depends on your imagination. Since I have photos from Maslenitsa, I continue the theme of pancakes. Use the Oval Marquee Tool to make a circle. In this case, the Shift and Alt keys must be pressed so that the pancake is even and comes from the center.

To make the edges softer, let's do some shading. Right-click in the middle of the circle and select Feather.

Select a feathering radius of approximately 10 pixels.

Copy the selected circle to a new layer using the Ctrl+J keys and left-click twice on this new layer. In the layer styles drop-down window, select a layer style to suit your taste. I chose Pattern Overlay, Shadow, Outer Glow and Emboss. I tried to get something like a pancake.

I also wrote the inscription Maslenitsa, using the lesson How to make text that flows around a shape in Photoshop.
And this is the result. My friends will definitely like it.
How to make a circular panorama
The lesson on creating a circular (polar) panorama will be useful for us to create creative backgrounds and logos.
Source: panoramic photograph. This is a photograph whose main characteristic is that its width is much greater than its height. This photo is created from a series of photographs using Photoshop. You can do it yourself or find it on the Internet.

Open the panorama in Photoshop and find out its dimensions:
Image –> Image Size (Image –> Size image...):
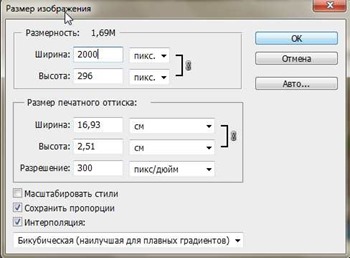
Now apply the Shift filter: Filter –> Other –> Shift (Filter -> Other –> Offset). The horizontal shift value is set to a value equal to half the width. For example, if the width of the original panorama is 2000 pixels, then we shift it by 1000:
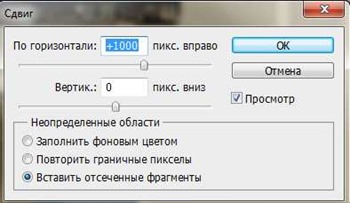
After the conversion we got a photo:

Using a stamp, smooth out the seam in the middle of the photo. I filled the sky with one color and masked the joint on the ground with a stamp. You can also use the “Blur” and “Finger” tools for these purposes:

Resize the image. To do this, go again Image -> Image Size, or (Image -> Size image...). Uncheck the box next to “Constrain Proportions”:
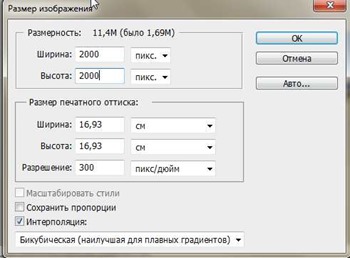
We will get a distorted image:
Now you need to rotate the image 180 degrees: Image –> Image Rotation –> 180° (Image –> Rotate Canvas –> 180°). We get:
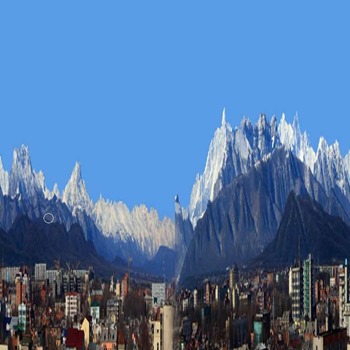
Now apply Filter -> Distort -> Polar Coordinates:
And here is our circular panorama:
Often after this step, stripes appear in the corners of circular panoramas. You can correct them by applying a stamp or replacing the background. The simplest thing is to take the “Oval Marquee” tool, make a selection around the circular area in the center, adjust the selection by transforming the selected area. Invert the selection and fill it with the desired color.
But you can get this logo from your blog header using this lesson on creating a polar panorama:
Based on it, you can make a vk group design. Fast, simple and unusual.