How to choose the best angle for photography.
Angle and shooting point in photography
An angle in photography is the position of the camera in relation to the subject of the photo. And as you practice, you'll notice the impact this position has on the overall composition of the photo. Remember: by experimenting with angles, we photographers are able to enhance the subject of a photograph.
Being able to select beautiful angles for photographs is perhaps the most important talent of a photographer. While an underexposed frame can be corrected in the editor during post-processing, a terrible angle cannot be corrected.
The angle and shooting point in a photograph reflect your vision of the story. And the only difference between a point and an angle is that when you select a shooting point, the geometric outline of the object does not change.
Introduction
From French raccource is translated as “shortened”, “shortened”. In other words, when you change the angle, some lines also change and shorten, and this is how you get an interesting perspective. This is a very common technique when a photographer, using an unusual angle for a photograph, slightly distorts the outlines of objects, but this technique should be used carefully, because it can either enhance the impression of the subject or spoil it.
Shooting point and photo composition
When choosing a shooting point, do not forget about the impact it has on the composition and artistry of the photograph. In order to more successfully reveal the intended plot and meaning of the content of the photo, you should treat the choice of shooting point with all responsibility, and not just click left and right.
A photographer has quite a few different tasks that need to be solved during shooting. One of these tasks is composition in photography. In general, this concept embodies the ideal combination of all elements: we look at the linear, light, tonal structure of the frame, as well as the overall coloring of the image.
Thanks to the harmonious combination of all the above-described elements, the photographer is able to create a system that will add artistic expressiveness to the photograph, and it, in turn, will arouse the interest of the viewer.
We offer you an example of when a photograph was taken without carefully selecting the shooting point, when the picture was taken thoughtlessly, as if for the record.
This kind of photographs cannot in any way claim the title of “beautiful photo”; they do not have high artistic value, but only cause some irritation. In a well-composed frame there is no room for unnecessary details - everything here is closely connected with each other and located at the right points of the plane. In the art of photography there is a whole set of rules and various requirements, guided by which you can create a good composition. Some rules even have the status of law.
But the laws of composition are a rather important and extensive issue, the presentation of which, alas, is not within the scope of this article and requires separate consideration. If you want to know more about composition, you can read about it here.
Photo angles
- Shooting at the level . When the camera position is level with the subject. This angle is considered neutral and natural. Bottom angle .
With this angle, the camera is positioned slightly below the subject/subject of the photograph. With this camera positioning, you can visually elevate the subject in the frame or increase its size and importance. But when photographing portraits, it is better not to use this angle, otherwise you will get a very comical face with a huge neck and chin. English
- Shooting with a neutral and natural camera position in line with the height of the subject. By placing the lens a little lower, you will visually raise the model in the frame. However, it is better not to use this position when shooting portraits.
- The position when the camera is above the object makes the hero look small and funny. This technique is used to reduce the value and distort the scale.
- At ground level there is a completely different and unusual point of view, which at the same time can show the world in a different color. Using this technique helps inanimate objects in the frame look more alive.
- By shooting from above perpendicular to the floor plane, you will reduce the perspective to nothing and get the opportunity to compare the actual sizes of objects.
- Positioning the camera just above the eyes allows you to focus attention on the face. Fat people will appear slimmer in the frame.
- By placing the lens below the eyes or even near the chin, you can create the illusion of being tall. However, this position should be used with caution due to the distorting effect, disturbing proportions and creating a comical frame in some situations.
- To take a successful group portrait, it is better to place the camera at or just below eye level. This way the proportions of human figures are preserved and distortions do not occur.
- For shooting a couple or one person, placing the camera above or at eye level is suitable.
We hope that our article was useful to you and now you know how to choose an angle for a photograph.
How to find the perfect angle

Have you ever had those moments when you take what seems like a great photo, but it doesn't look too good? You need to provide for everything, exposure, white balance, aperture, shutter speed... Perhaps it’s all about the lens? But no. The focal length is suitable and the focus is correct. If you're a smart shooter and still aren't getting exciting photos, I have some tips for you. 
There is a tool in the photographer's arsenal that beginners rarely fully utilize. I'm talking about your feet. This may not seem like a very important detail, but it really isn't. And that's why.
“A good photograph is made if you know where to stand” - Ansel Adams
If you've ever watched professional photographers at work, you may have noticed a common thread in their behavior. They move a lot. They try to find the perfect position and position, they are always looking for an angle.
Now you know to move, but only with experience can you begin to quickly identify the ideal angles.
The next shot shows the shadows of people on the wall. To photograph this I had to take a low position.

Finding the right angle to shoot is part of creating an attractive photograph. This will help in both portrait and landscape photography.

Getting down to the same level as your subject is a good way to find the best angle.
Errors in choosing an angle
1 Panic before shooting
Have you ever experienced something similar? You are walking down the street and see a beautiful girl on a bench. There is a stunning background behind her and you want to capture this moment, but you begin to hesitate and pass by.
You keep thinking about the missed moment and quietly return, but something has changed. You take a shot and it's not bad, but it's not what it could have been originally.
So what happened? You missed the perfect moment and lost a great shooting position because you were nervous.
Think about the shots you could take if you interacted with her or simply smiled and pointed at the camera. You beg to get down on one knee in front of her and take a close-up photo. Your possibilities will be limitless if you manage to cope with fear.
"If your photos aren't good enough, you're not close enough" - Robert Capa

Close-ups can make photos more intimate.
2 Zoom and walking
If you constantly hold the camera to your eyes and zoom, this is a bad habit. Zoom is not a tool that allows you to take close-ups without moving. This is a creative mechanism that allows you to change the viewing angle and depth of field.
Much has been said about prime lenses and their advantages, but this does not mean that zooms are bad. They can give you more options, but they can also make you lazy.
If you see a certain frame in your imagination, try to convey it using optics. Increasing the scale will visually bring the background closer and make the viewing angle narrower. The depth of field will also decrease. Think about whether you need it. If you want to convey the grandeur of nature, the beauty of the landscape, but there are unnecessary elements in the frame, just try to approach the subject rather than use zoom, which will kill the background.
When using a zoom lens, you need to understand exactly what each focal length will do. With this understanding, you can choose the right zoom setting, then get within the right distance to your subject to take a great photo.
3 Working with space and perspective
This happens to all of us. You found a scene and took a photo. It would seem that everything is fine, but do not rush to leave. Perhaps another angle will be more interesting. Try to see the scene from all sides.
If you make an effort and try to analyze the position of objects in the frame, your photos can turn out more interesting. By moving left and right, we can visually change the position of objects. By moving closer or further away, similar parallax effects are achieved. The relationship of all objects in the frame is very important.
Figure out where you should be, how high you should stand, and how to remove obstructive elements from the frame. Make smart choices and shoot. Then think and move again.

“It is an illusion that photographs are made with a camera... they are made with the eyes, the heart and the head.” - Henri Cartier-Bresson
Examples from personal experience
When you see something beautiful, you can work with it a little to achieve a better result. You can also use the basic principles of composition, such as the rule of thirds, the golden ratio, leading lines and others.
Let's go to East London. One morning in East London I came across this building. I liked the shadows falling on the wall and took a photo. But it turned out to be indistinct and not as impressive as it seemed in life.

I don't like to lose good light, so I moved closer and took another shot.

I liked this photo much better. I love walls with interesting textures. If there is graffiti, different shades of brick, glass, pipes - all these interesting elements enliven the frame. In addition, an interesting shadow was falling on the wall.
It is worth understanding that if the light in one place creates an interesting highlight, then it can also create a beautiful look in other places. Just look around. Explore the space.
Walking around the building on the other side, I got another interesting view.

The backlighting outlined the contours of the building and cast elongated, long shadows on the road. Good contrast made the photo attractive. It looks picturesque.
Another interesting feature of London is the mixture of old buildings and new skyscrapers that are located nearby.
I saw this particular contrast between the old church and one of these new "temples of business." And I thought it looked interesting - the contrast of old and new. But the photo turned out boring. None of the elements in this image are connected to each other.

And then I tried to do this:

And again nothing happened. The elements could not be linked. Then the decision comes to use leading lines more actively.
Rotating the camera 90 degrees to portrait orientation helped remove unnecessary objects from the frame. Also, the lines of steps and church buildings began to lead the eye to the business center, which soars into the sky.

One morning in Venice I was on the northern outskirts. It's a beautiful morning with a beautiful sky. I looked at these pillars and studied them. But nothing caught my eye.

I pointed my camera towards the rising sun and saw some photo opportunities. Objects on the water lined up in a row, and the glass of the building began to sparkle. But everything was in the shadows and looked boring. I was waiting…

More light would have filled the photo with brightness and color. The multi-colored glass of the building would sparkle with different shades. There would be glare on the water. I was waiting for the sun to come out from behind the clouds.
About ten minutes later I saw the sun change everything.

If you find objects that you like, keep them in sight. Perhaps after some time the situation will change for the better and you will be able to take the perfect shot.
I hope this was a good demonstration of the importance of moving while filming. You won't always have to do a lot of walking and searching, but most often this will allow you to see the scene in a new way, which will allow you to choose the best shot.
The author of the article is Anthony Epes, traveler, landscape painter and street photographer.
The opinions expressed in this article are solely those of the author.
Follow the news: Facebook , Vkontakte and Telegram
The right angle for photographs: what does it give the photographer?
Photography is one of the youngest visual arts. Much younger than, say, painting or drawing (according to one dating, the oldest rock paintings found in Spanish caves are more than 40,000 years old, they were created by Neanderthals). What is this compared to these 40 thousand 200 years? It is quite logical that in the sense of composition, photography for quite a long time—about the first hundred years, that is, half of its existence—was, as it were, the “younger sister” of painting. What I mean is that photographers used exactly the same compositional techniques that had been developed long before them by generations of painters. Photography seemed to imitate painting, trying to achieve its expressiveness, and only in the 20s of the last century did photographers (first several pioneers, and after them many others) begin to use the first purely photographic technique of composing an image - the use of an unusual angle.
The concept of perspective itself, of course, was used in fine art even before the advent of photography, and it meant “a perspective reduction in the shape of an object, changing its usual outlines.” In photography, this meaning of the word is also used - we have all seen thousands of photographs of a person with huge feet and a small head in the distance, or vice versa. But it so happened that another meaning of the word “perspective” has taken root in photographic language, perhaps not entirely accurate - the shooting point.
In painting (at least in classical painting) one point of view is usually used - natural. Painters depict the world as it is seen by the eyes of a person normally oriented in space (that is, standing or sitting on a chair). This is largely explained by the painting technique - if you stand on your head (or lie on the floor, or climb a fire escape), working with a brush will not be as comfortable as standing or sitting in front of an easel. The first cameras, as we remember, were bulky and in this sense not too different from a canvas on an easel. Therefore, all photographs of that time were taken from the same angle, or point of view - from eye level. Only with the advent of compact cameras did photographers begin to experiment with other shooting points - and not immediately, many continued to traditionally shoot even with compact “watering cans” as if they were holding a giant, clumsy large-format camera that required a giant tripod.
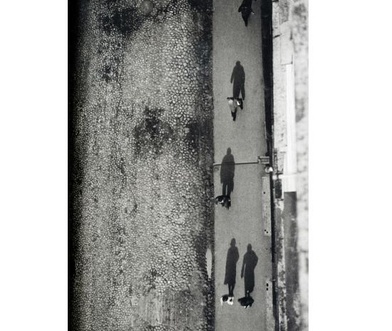
To be fair, it should be noted that the first photographs from an unusual point of view were taken back in the 19th century with large-format cameras. These were photographs of Paris and Boston, taken from a bird's eye view, or rather from the height of a hot air balloon, respectively, by the Frenchman Nadar and the American James Blake:
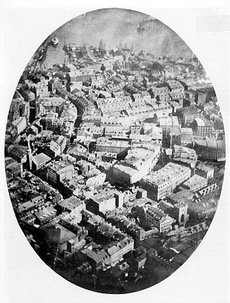
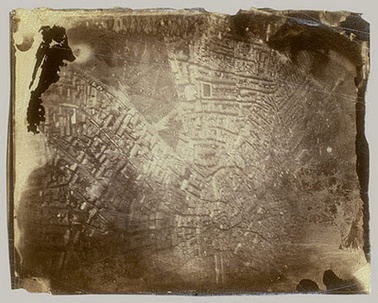
Nadar was even mocked by his contemporaries, “witty” noting that he had raised photography to the heights of true art. However, the truly pioneers of perspective photography should still be considered people born half a century later. These are the Soviet photographer and artist Alexander Rodchenko and the Hungarian (who, however, like his predecessor Nadar, lived in Paris) Andre Kertész.
Between these two photographers, as we will see, there are both huge differences and significant similarities. The difference, first of all, is that Kertesz was interested not only in documentary photography, and in documentary photography - not only in the search for unusual angles. To say something similar about Rodchenko would also be a great simplification, but in his legacy most of the photographs were taken from an unusual point of view.
Kertesz, although he did not climb as high as Nadar, also loved to look at the world from above:
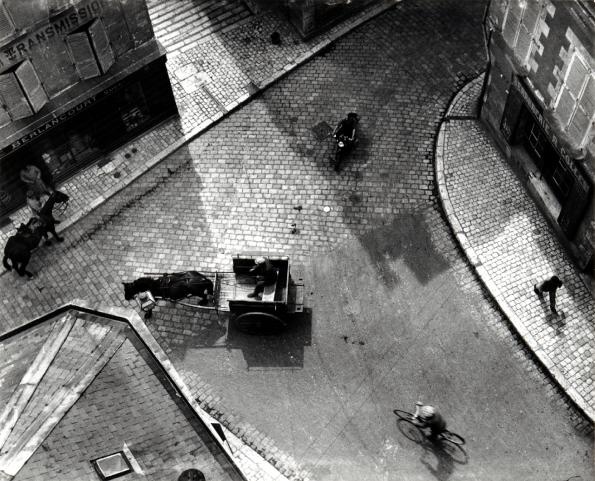
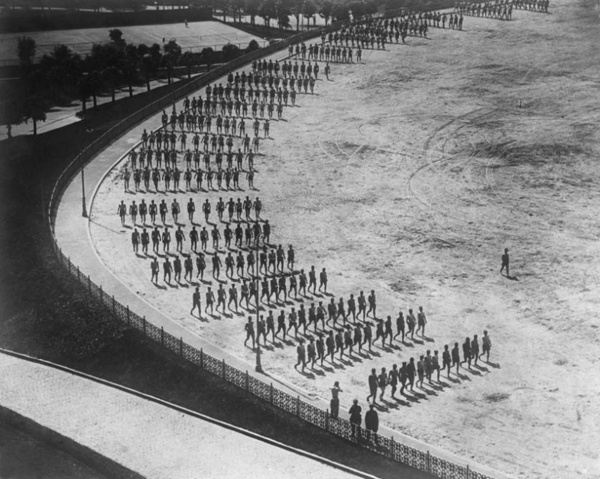
What can you say in general about the top shooting point? Firstly, you can see more from above. Much more than from below or from eye level. For this reason, the top shooting point was very popular among Soviet photographers in the 20-30s - as A. Vartanov wrote in the magazine “Soviet Photo” in 1985: “Her masters were eager to make their photographs extremely rich in information: after all, they had to tell about the events which for the most part could be accompanied by the inscription “For the first time in the world!”

By the way, photographs from a “strictly perpendicular from above” point of view, in which people turn into optional attachments to their own shadows, were also taken at that time “for the first time in the world.” However, even modern photographers sometimes find it difficult to resist the temptation to repeat this angle, despite the fact that, as soon as it appeared, it immediately became a cliche. Let’s compare, for example, photos of Rodchenko and Kertesz:
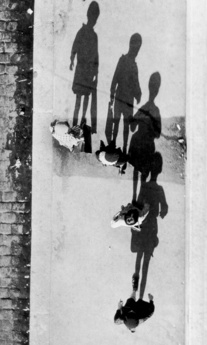
It is quite obvious that in the 20s this was new and fresh, but these two great men, having opened this topic, immediately, in general, closed it.
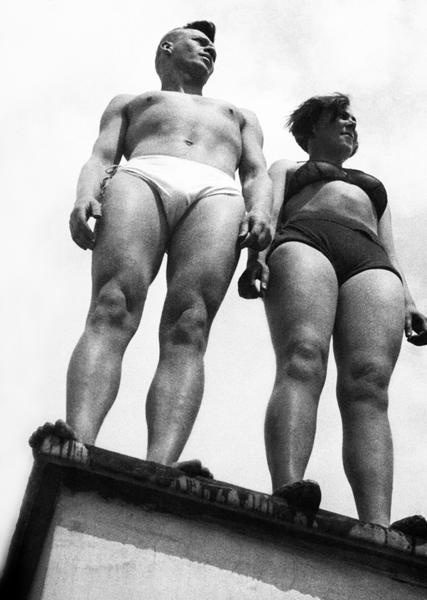
The lower angle is used in photography for completely different purposes. Here, too, the pioneer was Alexander Rodchenko - let us at least remember his “pioneer”:
“Pioneer,” of course, is a special case; this photograph does not fall under the general rule of using a lower angle. Rather, this is a completely successful attempt to find new means of artistic expression to depict a “new” person, the herald of a new era. Rodchenko managed to create an expressive and memorable image; however, more often than not, using this angle risks turning the character into a caricature of himself.
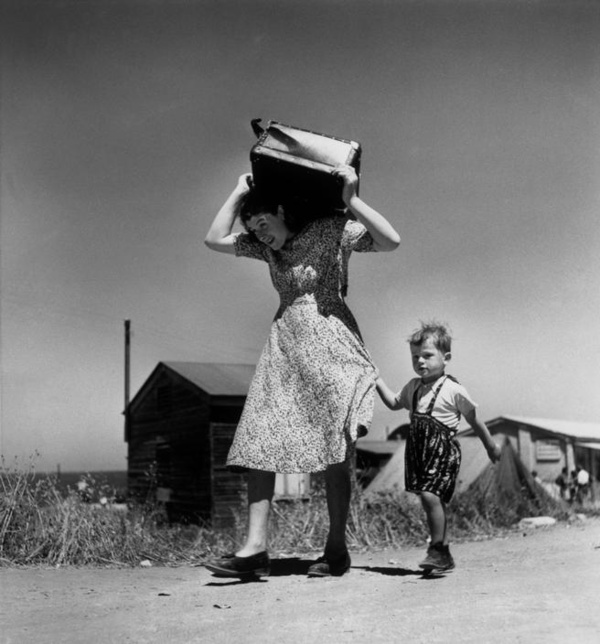
The general rule is that the bottom point of view is most often used to show that the subject is of great importance. Something (or rather someone - few people would think of attaching too much importance to inanimate objects) shot from the bottom up looks much more monumental and impressive than if the same object were shot in a "normal" way, that is from eye or chest level. Example number one can be found in the same Rodchenko:
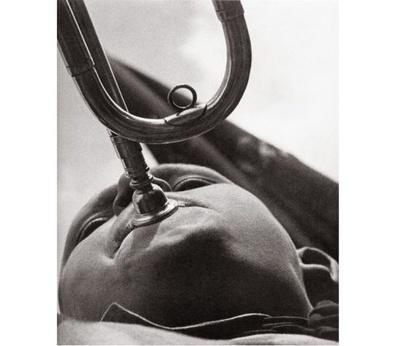
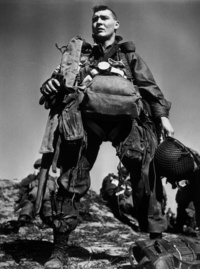
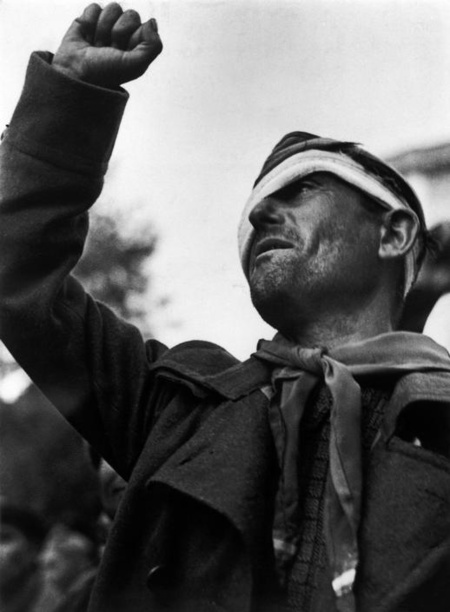
Robert Capa loved photographing his heroes from this point of view:
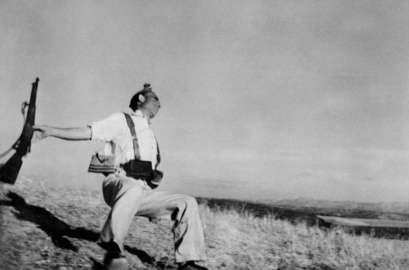
His most famous photograph, “Death of a Republican,” also used the same technique. You can doubt the documentary nature of this photograph as much as you like, but it is difficult to argue that the author managed to create an absolutely monumental image that flawlessly conveys the pathos of this tragic moment.
Here's another photo of Robert Capa. The moment it captures is not so tragic - no one dies (at least in the frame), just a little girl cries. We can tell from the caption that it's taking place in a refugee transit camp, but that doesn't explain why the girl is crying. Maybe she doesn’t have parents, or maybe she just simply wasn’t given candy, or she’s just tired. It doesn’t matter - the camera’s point of view, which is located below the girl’s face at the moment of shooting, turns this, perhaps quite ordinary moment, into a symbol of the displaced person camp - disorder, fear of the future, empty hopes...
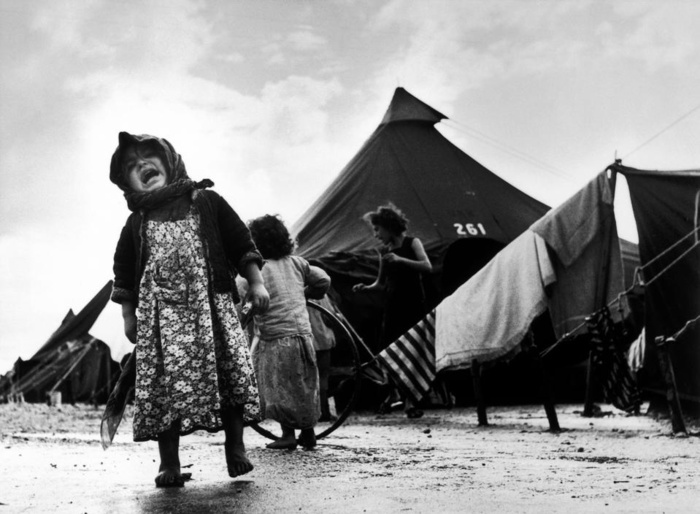
If the camera is positioned a little higher - at the level of the child's face - the photo will not turn out to be either monumental or metaphorical. It will turn out to be simply... human. In ordinary life, we look down on children and treat them with condescension. The camera at the child's eye level allows the viewer to be on an equal footing with him, and, moreover, to look at the world through his eyes.
In exactly the same way, you can show the audience the world through the eyes of a dog. Or a cat, or an ant - I think the general principle is clear.
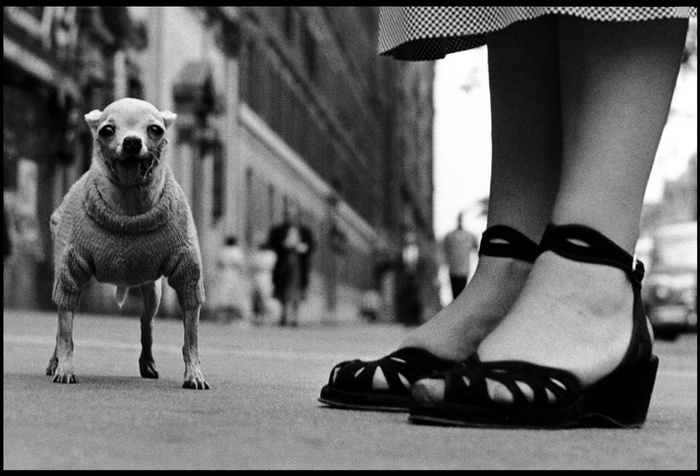
the world through the eyes of a dog, photographed by Eliott Erwitt
Recommended articles:
How to choose an angle for a photograph?
Many amateur photographers sincerely believe that purchasing a SLR camera, even an amateur one, can solve all their problems regarding the quality of the resulting photographs. It seems as if a large lens, zoom and focusing ring can work a miracle and in an instant, from a person who could only photograph family celebrations, a photography lover will turn into a real professional.
Often, after a tidy sum of money has already been spent, an expensive camera is already in the hands of a novice amateur photographer and he takes a few test shots, the common truth is revealed that it is impossible to achieve a good result in the art of photography if you do not know how to choose an angle for a given shooting situation. In order for your photo cards to be as beautiful and high-quality as possible, you will need to do the following.
Photographing people
To photograph people, you need to choose the location of the lens so that the camera is approximately at the level of the model’s chest. In addition, when framing, you definitely need to ensure that the free space above the model’s head at the bottom and top of the photograph remains no more than half the height of the face. Only under this condition will a photograph depicting a person look harmonious. If you don't follow this rule, too much free space will cause the model to look too small. The lack of air space above your head is also not very good. If you are taking a close-up portrait, then the lens position should be strictly in the center of the cropped image.
Creative approach
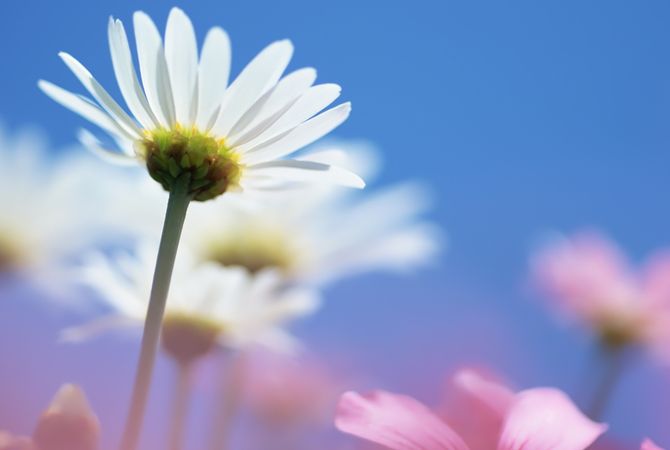
In the case of an image of something familiar to the eye, it is worth trying to find an unusual photo angle. For example, everyone has seen wildflowers growing in flower beds or naturally in a meadow. Standing near a flowering lawn and filming this scene from a height of human height, you are unlikely to be able to get a beautiful and memorable shot. The reason is that people are used to looking at flowers from above. However, as soon as you lower the camera to ground level and shoot the scene being described from the point from which ants and other insects crawling on the ground admire the flowering lawn, the photo frame becomes extremely interesting and expressive.
Scenery
Speaking about the topic of how to choose an angle for landscape photography, it is necessary to recommend that when framing, take into account the presence of foreground, middle and background. Depending on this, you can either climb the highest tree or mountain with your camera, or, conversely, install the camera on a low tripod.
Group photo
For group photographs, it is not always necessary to follow the rules for photographing portraits and install the camera at chest level of the people being photographed. Photos taken from the top position will look very interesting.
Now you know how to choose an angle and can do it with your eyes closed, depending on the current shooting situation.
Angle and photography
Every photographer dreams that his photographs will be interesting and that the audience will like them. The quality of photographs is influenced by many factors. This is the content of the photograph, so to speak, its information content, and its idea, and composition... We can talk about this for a long time. Today we will talk to you about such a factor, about such a component of photography as perspective.
First, let's figure out what it is - perspective, and how to use it competently and correctly in your work, that is, when photographing. As you know, the angle can no longer be used in post-processing, so you need to be able to choose it correctly at the very first stage of creating a photograph, that is, during the actual shooting.
What is perspective?
So, the first step is to determine the angle. How do experts interpret this concept in their textbooks? Foreshortening is the photographer's point of view on the object in space that he intends to photograph. Also, the angle is the projection of this object obtained during the photography process at one point or another. That is, simply put, this is the image recorded on the matrix of a digital camera (on photographic film, on an artist’s canvas and other media) that we ultimately obtain in one technical way or another.
However, in modern photography, angle usually refers to the shooting point relative to the position of the subject being photographed.
Of course, this second definition does not accurately reflect the meaning and essence of the concept of perspective, but in order to make it more convenient for us (and you), let’s agree that we will understand the perspective exactly this way: the point and direction of shooting.
A little excursion into history
For many years, photographers have applied the same principles and laws of composition to their work as artists who create their works using other technical means, such as painters who work with paint on canvas.
Most often, at the dawn of photography, the height of a rather bulky and heavy camera depended not on the creative idea of the photographer, but on the height of the tripod he had, on which, in fact, the camera was then mounted. This principle did not change a little later, when cameras noticeably decreased in size and “body weight”. Pictures began to be usually taken from a height of human height, and much depended on the height of the photographer himself. But one day, an artist, writer and photographer from France, Gaspard Felix Tournachon, took off over Paris in a hot air balloon and created a photographic panorama of the city from a bird's eye view. This happened in 1858. This was the world's first photograph taken from the air. And the favorite of the Parisian elite, Gaspard Felix Tournachon, instantly turned into the greatest photographer Nadar, who left a very, very noticeable mark in the history of world photography.
But, nevertheless, initially Nadar was openly ridiculed by some of his contemporaries. The popular Parisian cartoonist of those years, Daumier, created a caricature of Nadar, in which he depicted him flying in a hot air balloon with a camera in his hands. The caption to the cartoon read: “Nadar raised photography to the heights of true art.” Oh, if only Daumier had known then that his words would become a real prophecy!
Yes, photography really ceased to be a technical pastime for wealthy people of that time and became high art. And Nadar was one of the first to promote this. After all, it was he who came up with the idea of changing the shooting point. He was the first to deviate from generally accepted standards and take a photograph from an angle. And this became a kind of revolution in the fine arts, because even in painting, even the foreshortening was practically not used. But after Nadar, avant-garde artists of various persuasions and directions began to actively use different angles.
What are the different angles?
A slight change in the shooting point relative to the object being photographed (the so-called slight angle) changes this object very slightly. That is, to be more precise, a slight angle changes only some elements of the frame. But a fairly significant shift (obvious angle) will require the photographer, that is, you, to almost completely rearrange the composition of the entire frame.
In some cases, in order to achieve a bright and memorable photo, you will have to significantly change the shooting point, move away from the usual shooting from the level of your own eyes. Photos that were taken from a very low or, conversely, from a very high position of the camera look very interesting.
But, nevertheless, you should not abuse the angle. Both the upper and lower angles should be used only when your creative idea, such a shift in the shooting point relative to the subject being photographed, justifies itself when it is really needed. Simply put, think first, and then change your perspective.
Bottom angle
By photographing from a lower angle, you can emphasize the height, size, grandeur, and significance of the object. By shooting from bottom to top, you visually magnify all these parameters of what you are photographing several times. Well, for example, you can often see photographs of slender pine trees from a lower angle. So that their crowns appear against the background of the blue sky. Or tall buildings photographed in approximately the same way, for example, temples and bell towers. But here you need to be very careful - buildings photographed from a lower angle may appear “overwhelmed” in the picture, that is, falling. At the same time, this “clutteredness” gives the picture dynamism, the effect of some kind of movement. In this case, it is better to compose the frame diagonally.
The lower angle can also be used in reporting. This technique works very well in sports photography. For example, a high jumper or a motorcycle racer taking off from a springboard during a motocross, photographed from the lowest point, will look very, very impressive in the picture.
Top angle
Photographing from an overhead angle, of course, also visually changes the actual dimensions of the subject. If you shoot an object from the top, you seem to press it down to the ground, or to the surface on which it is located. Shooting from the top point, the photographer displays quite a significant space and the objects located in this space in the picture. This simple technique can emphasize the position of an important object in the overall compositional structure of the frame.
If you are photographing a person in a studio, then the upper or lower angles will allow you to take very original, interesting and bright shots. But at the same time, do not forget that such shooting points significantly distort the proportions of the object being photographed that are familiar to our human perception, and this is not always acceptable, and you need to work with this very carefully and carefully.
Shooting direction
Speaking about the angle in photography, we can’t help but talk about the direction of shooting. It can be diagonal, central or lateral (that is, offset shooting). Look at this drawing here. In the presented diagram, the letter B indicates the frontal composition of the frame, that is, a frame taken from a central angle. In this case, the optical axis of the image coincides with the optical axis of the camera lens. By photographing from this angle, you deprive the image of depth and the sense of space disappears. The subject becomes flat and uninteresting. It is especially unacceptable to photograph buildings and other architectural objects in this way.
If the photographer gradually shifts the shooting point to the right or left side relative to the object being photographed, then the so-called side view will be obtained. In the diagram it is indicated by the letters B, D and D. When shooting from a side angle, the object acquires volume, and the space of the photograph acquires depth.
Changing the side angle can occur until the subject is located diagonally relative to the shooting point. This angle is usually called diagonal. In the diagram presented, it is indicated by the letter A. Diagonal angle is used by experienced photography masters with great success when photographing city landscapes and, in general, in architectural photography in general. We recommend that you experiment in this direction.
Finding a good angle - what is the secret of expressive photos
The main factors that determine the artistic value of a future photograph are the correctly chosen angles for the photo and the plot, which certain poses for a photo shoot can create when photographing a person. Professionals know how the camera's position relative to the subject in the frame affects the overall composition of an image. By experimenting with the position of the lens, you can enhance certain effects and highlight the desired aspects of the model.
The ability to select good angles is one of the most important talents of a photographer. All other defects in the image, such as incorrect lighting or unnatural color tone, can be easily corrected in post-processing. While a bad shooting point (the difference is that when choosing the latter, the geometric outlines of the object do not change) cannot be corrected in the editor. This article is devoted to learning how to determine the correct angle and reflect your vision of an object, using techniques for working with perspective to make the frame more expressive and interesting.

Some tips on how to choose an angle
When changing positions, technically, some lines of objects change and shorten, resulting in an interesting perspective. You need to be careful when experimenting with changing the camera position, since the outlines can be distorted both beneficially and far from successfully. You should also be responsible when choosing a shooting point. Compliance with these rules allows you to create a successful frame composition.
Understanding how to choose the right angle for a photo comes with experience. However, beginners can take advantage of the advice of professionals to significantly raise their level quickly. In particular, experienced professionals suggest using the following popular and effective solutions:
The creation of portraits is particularly specific. If for a genre photo shoot the right moment is of great importance, then for a staged photo shoot it is necessary to choose a good pose, as well as use the techniques described above, taking into account the goals of a professional photographer and model.

Having mastered the techniques that allow you to figure out how to choose a beautiful angle for a photo, you can safely start experimenting. And one of the Instax instant printing cameras will help make this activity even more enjoyable and exciting. These are modern gadgets that allow you to take and instantly develop photographs without processing or with minor editing, depending on the device model.
A limited number of frames will encourage you to study the laws of perspective and learn how to create masterpieces yourself, without relying on the tools of photo editors. You can choose a subject to shoot or personally pose for a photo. The devices make it possible to create perfectly composed self-portraits thanks to the built-in selfie mirror. And if you already know how to find interesting angles for pictures everywhere, then the Instax camera can become an indispensable companion at parties, walks and travel!
How to choose the best angle for photography.
![]()
![]()
![]()
![]()
![]()

With the advent of digital photography, catching a good shot has become much easier than using an old point-and-shoot camera. You no longer need to look through the lens for your target; you just need to look at the screen and see your future photo. You no longer need to be afraid of ruining the frame - the expensive film is replaced with a memory card, a couple of button presses - and the unnecessary picture will be deleted.
A high-quality photo can not only take its place in a paper album, but also decorate a website and increase the flow of visitors who want to look at an interesting angle, as SEO courses teach.
Of course, you can take a good image in quantity by taking fifty photos and choosing one among them, but professionals prefer quality, because one well-chosen angle can attract the eye in a way that a stack of colorful mediocre pictures cannot.
How to take photos correctly
The first thing you should take care of when shooting is the photographer’s position in sunny weather. It must be remembered that the light entering the lens significantly degrades the quality of the image, so you should stand so that the sun is behind your back. This is easy to do when shooting portraits, but if you have to work with a stationary target: houses, nature, then you need to at least cover the lens with your hand, shielding it from the sun’s rays.
The second is the placement of the main subject in the frame. It is clear that the people in the future photograph should be located in the center, but what if you need to capture, for example, a forest area, where can you find the central figure? The solution is simple: even in a series of seemingly identical trees, you can find one that stands out for its shape or size, or a group of trunks that makes up a single whole, or a noticeable clearing, which should be placed in the middle of the composition. In this case, the photo will not look like a green background, and the eye will find something to latch on to.
Thirdly, for those who are interested in Yandex Direct for beginners, not only the quality of the image is important, but also the content itself, which should be of interest to the general public. To capture a moving subject, such as a celebrity's face in a passing car, you should use your camera's settings and select the appropriate exposure.
1″ :pagination=”pagination” :callback=”loadData” :options=”paginationOptions”>