How to remove translucent inscription from a photo?
How to remove text from a picture in Photoshop
Captions and extra text can greatly ruin the impression of a photo. Quite often it is necessary to remove the inscription in Photoshop from a picture, from billboards or from clothing so that it does not distract the viewer’s attention.
It’s worth making a small reservation here - you don’t need to remove watermarks and copyright lines from other people’s photos. By doing this you are violating copyright laws. If you really want to use someone else's photo, look for photos under a CC0 license or contact the author and ask permission.
Let's first figure out how to cut out an inscription in Photoshop. This method is suitable if the inscription is on a fairly uniform background without pronounced details, object boundaries and color transitions.
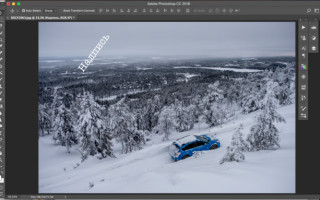
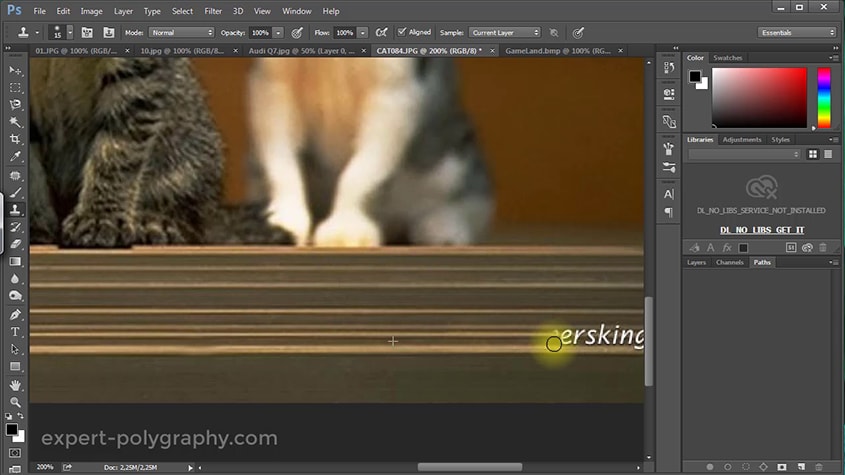
Let's look at an example of how to erase an inscription in Photoshop without damaging the background (we added it on purpose).
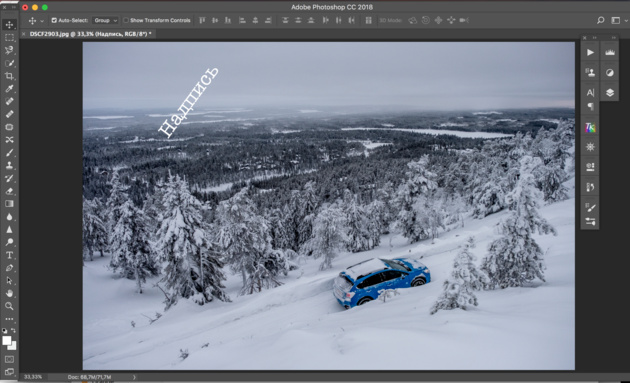
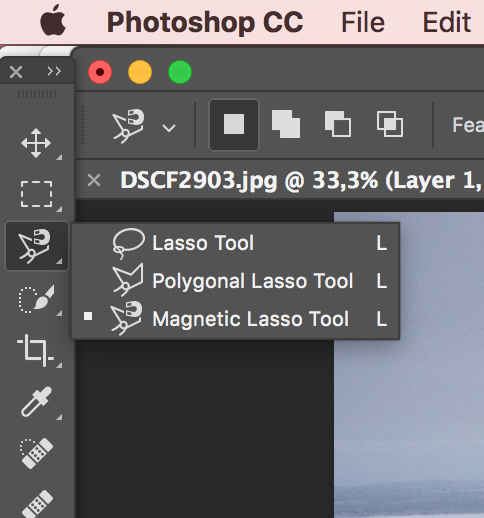
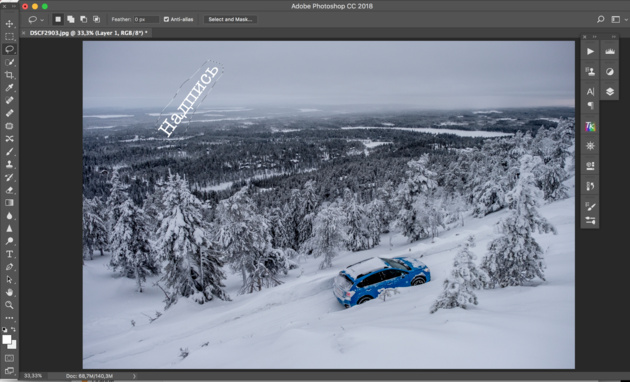
Select the Lasso Tool and use the mouse to trace the text.
A line of alternating white and black stripes appears around the word, sometimes called “running ants.”
After this, right-click on the selected area and select the menu item Fill/"Fill" .
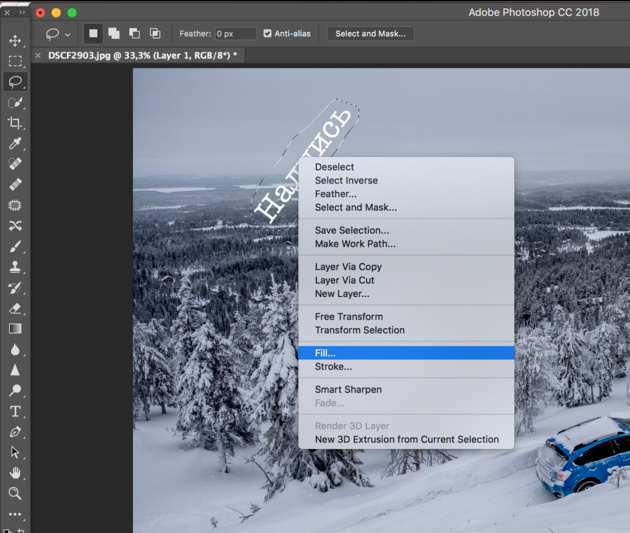
In the dialog box that appears, in the Contents parameter you must set the value Content-Aware/“Content-aware” . This setting instructs the program to automatically fill the selected area based on what is shown in the photo nearby. In the case of homogeneous surfaces or some textures, the result is of high quality.
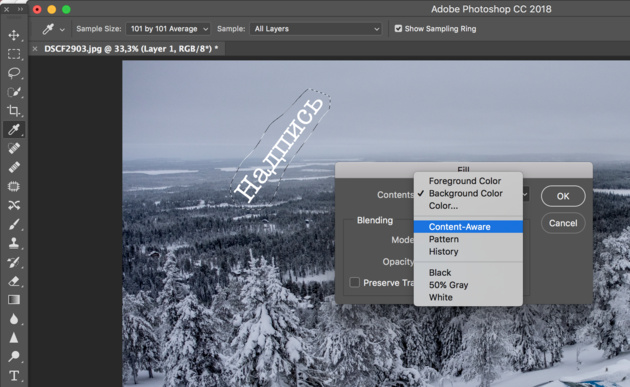
After that, click on the Ok and see that our text has disappeared, and Photoshop has “finished” the area as similar to the surroundings as possible.
This simple and quick method allows you to remove text in Photoshop from a picture when it is written on uniform surfaces.
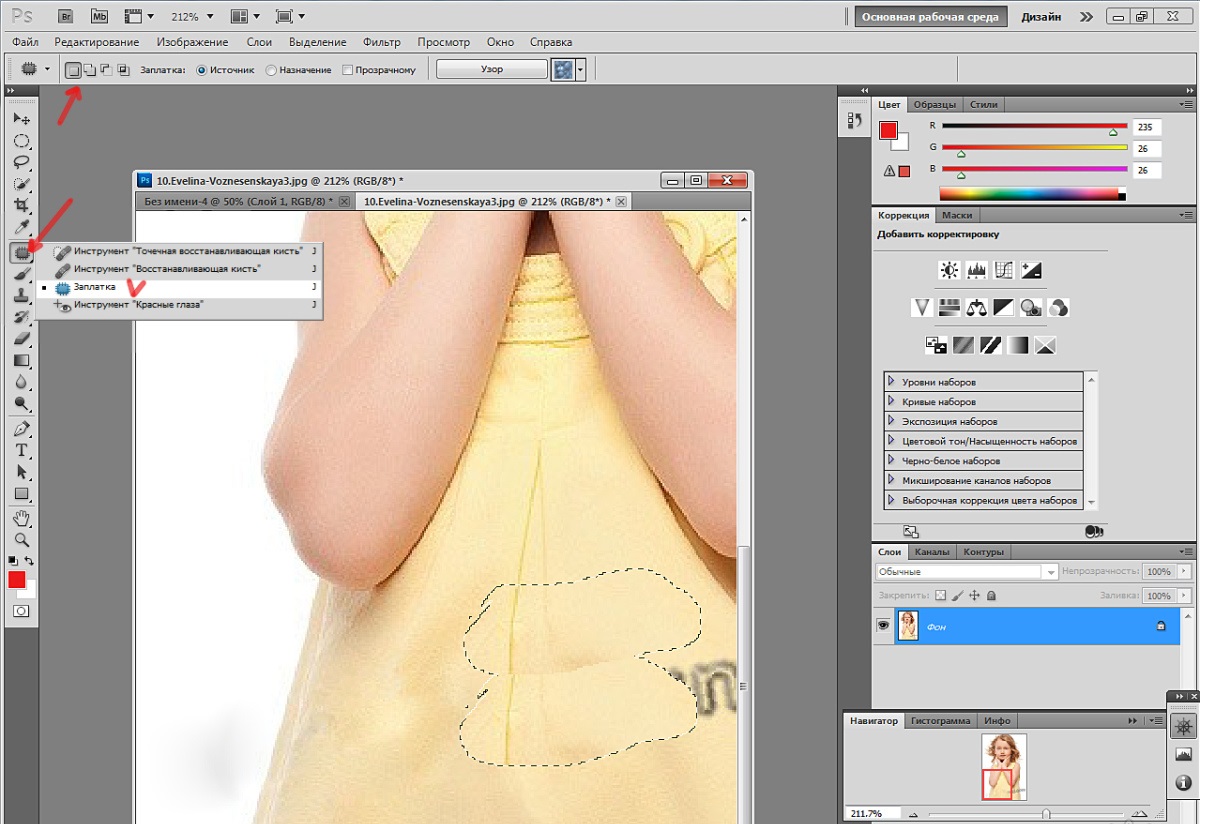
For more complex situations, a method based on using the Clone Stamp Tool / “Healing Brush Tool” .
Let's look at how to remove the inscription from a picture in Photoshop using the example photo below.

If you use the previous method, you will not be able to accurately restore the structure of the tree branches. You can, of course, select one letter at a time, but even here it is not a fact that you will get a decent result.
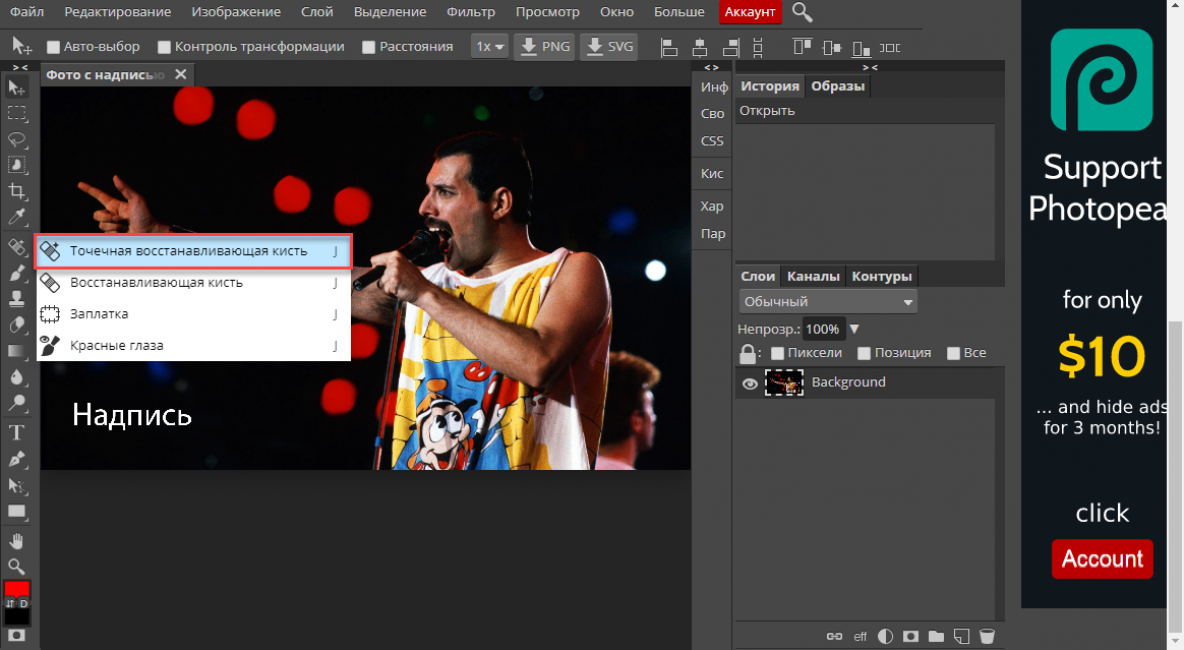
Therefore, select the Spot Healing Brush Tool .
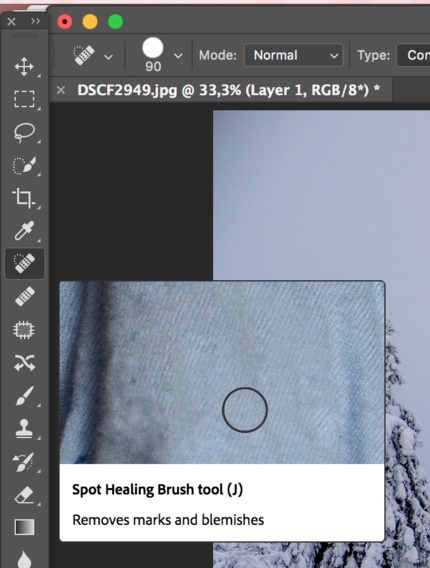
In the top toolbar, set the size of the tool and be sure to specify that the Type is set to Content Aware . The meaning of this parameter is similar to that described in the previous method - Photoshop will try to restore the area of influence taking into account the structure of the image.

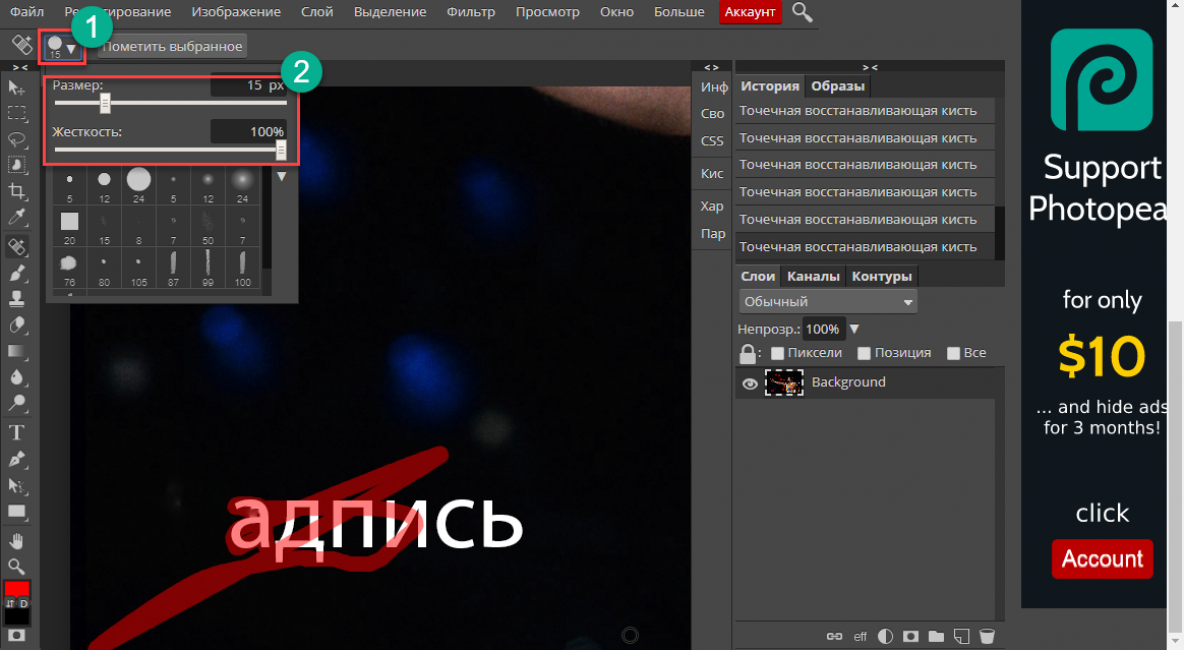
The size must be selected depending on the size of the inscription, its font and the thickness of the letters, as well as the size of the image itself. The optimal result can be achieved if you choose the thickness of the tool approximately equal to the thickness of the font line.
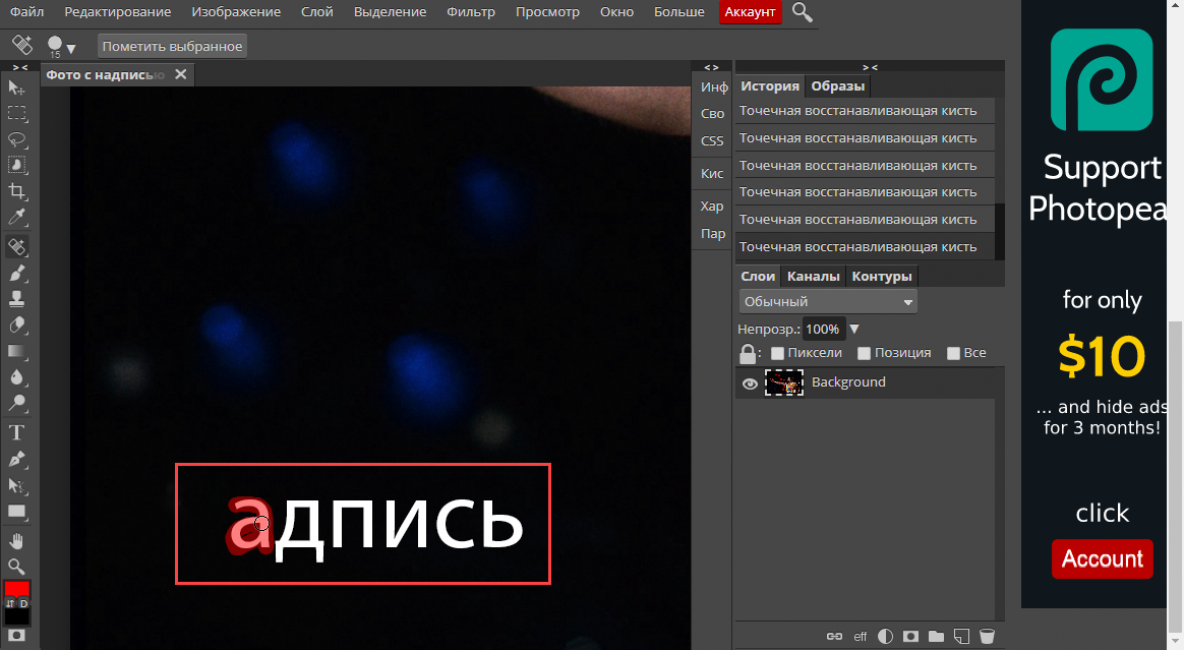
After you have decided on the size of the tool, move it along the contour of the letters by pressing the left mouse button. The affected area will be highlighted in gray. As soon as you release the mouse button, Photoshop will replace the caption with the background and image elements. This allows you to retouch in small steps. For example, you can delete one letter at a time and control the result.
We continue to “circle” the letters until the entire inscription is removed from the photo.
These two methods, based on the principles of filling taking into account the background, allow you to very carefully, without leaving a trace, remove the inscription on a picture in Photoshop. The choice of a specific method and parameters of the working tool depends on the source image and the size of the inscription.
Removing the inscription from a photo online

The need to remove any text information from an image arises among users quite often. Typically, candidates for elimination are automatically inserted shooting dates or inscriptions identifying the original source of the photo - watermarks.
This can be done most correctly using Adobe Photoshop or its free analogue - Gimp. However, as an option, the necessary operations can be carried out using appropriate web services. It's even easier than you think.
How to remove an inscription from a photo online
If you are familiar with the features of working in graphic editors, understanding the web resources presented in the article will definitely not be difficult. The fact is that the services described below follow all the basic concepts of similar desktop programs and offer the same tools.
Method 1: Photopea
An online service that most accurately copies both the appearance and functionality of the well-known solution from Adobe. Similar to the image editors mentioned above, there is no one right “magic” tool for removing inscriptions from images. It all depends on how important or homogeneous/heterogeneous the content of the photo directly below the text is.
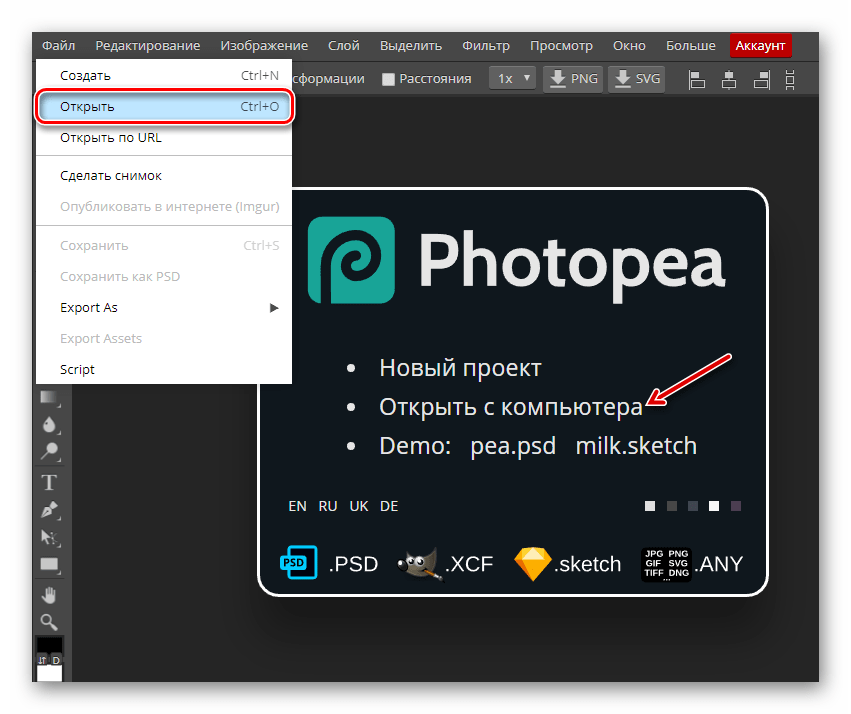
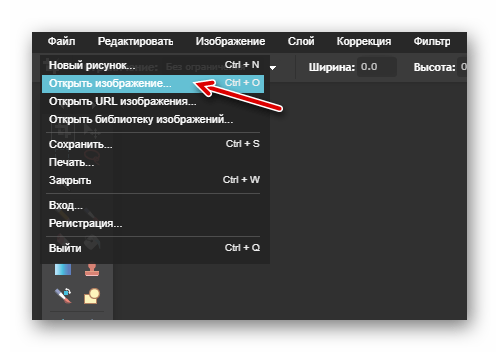
- The first step, of course, is to import the image onto the site. This can be done in several ways, namely: click on the “Open from a computer” in the welcome window; use the key combination “CTRL + O” or select “Open” in the “File” .
- For example, you have a beautiful landscape photograph, but with a small defect - the date of shooting is marked on it. In this case, the simplest solution would be to use one of the group of restoration tools: "Spot Healing Brush", "Healing Brush" or "Patch".
Since the content under the inscription is fairly uniform, any nearby patch of grass can be selected as a source for cloning.
If the background is very motley, use Stamp the Healing Brush , regularly changing the cloning source.
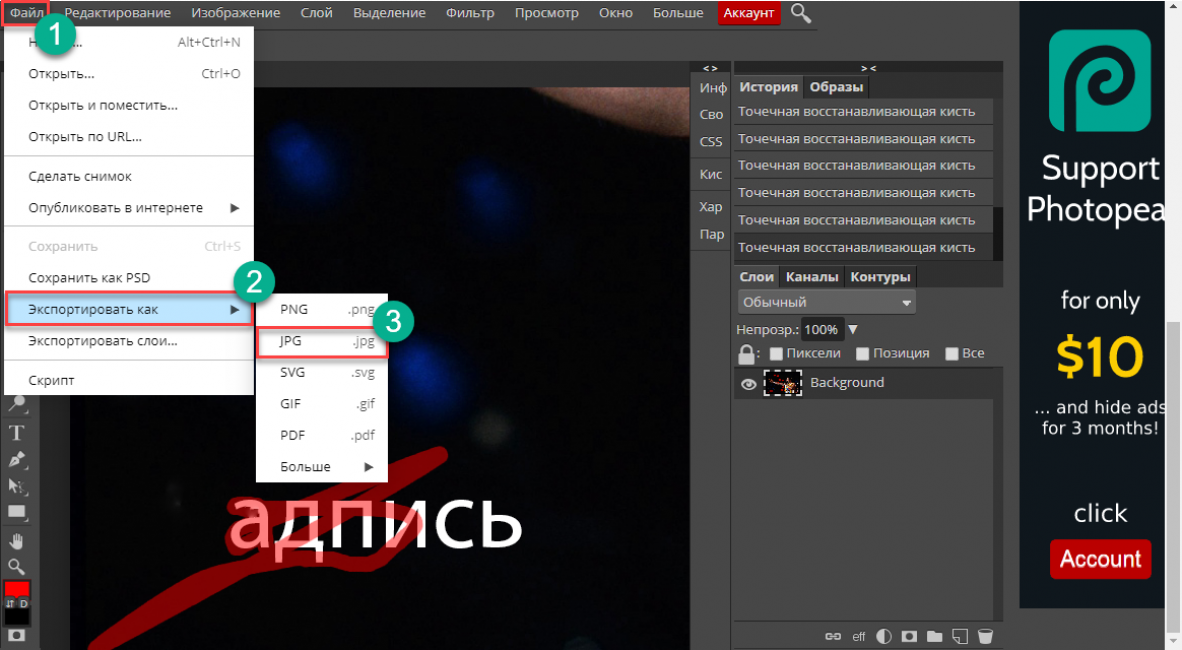
 Having finished working with the photo, you can export it using the menu “File” - “Export as” , where you select the final format of the graphic document.
In the pop-up window, set the desired parameters for the finished photo and click on the “Save” . The image will be immediately downloaded to your computer's memory.
So, with a little time, you can get rid of almost any unwanted element in your photo.
Method 2: Pixlr Editor
A popular online photo editor with a wide range of functions and its own characteristics. Unlike the previous resource, Pixlr is based on Adobe Flash technology, so for it to work you must have the appropriate software on your computer.
-
Like Photopea, registration on the site is not required. Just import your photo and start working with it. To upload an image to the web application, use the appropriate item in the welcome window.

Well, already in the process of working with Pixlr, a new photo can be imported using the menu “File” - “Open image” .
In the pop-up window, specify the parameters of the image to be saved and click on the “Yes” .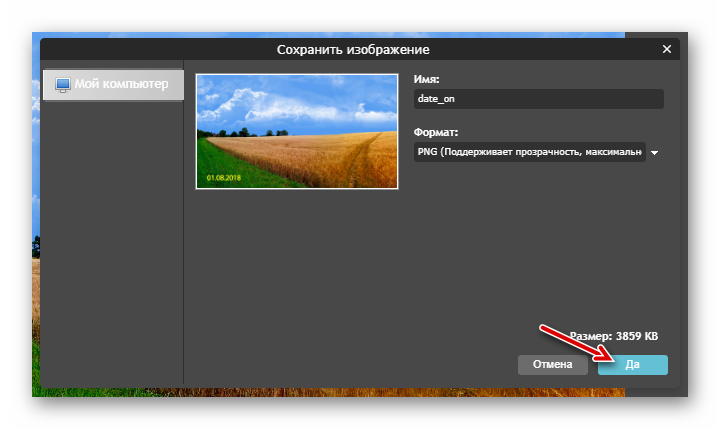
That's all. Here you do almost all the same manipulations as in a similar web service - Photopea.
As you can see, you can remove an inscription from a photo without special software. In this case, the algorithm of actions is as similar as possible to what you would do if you were working in one of the desktop graphic editors.
Thank the author and share the article on social networks.
LiveInternetLiveInternet
—Categories
- (0)
- Adobe Flash CS6 (4)
- Aleo Flash Intro Banner (4)
- Aurora 3D Animation Maker (1)
- BluffTitler PRO 11.10.2 Rus Portable by Valx (6)
- Chrome (1)
- COLOR HUNTER (1)
- Corel Paint Shop Pro Photo X2.exe (2)
- Corner-A ArtStudio v1.3.3 (5)
- CrazyTalk PRO (4)
- GIMP (7)
- Jasc Animation Shop (8)
- Mandelbulb 3D (1)
- Microsoft Office (3)
- Paint.Net (2)
- Portable GIF Movie Gear 4.2.3 Rus (1)
- Proshow Producer (4)
- Quick Time (3)
- Recomposite (2)
- Sony Vegas Pro (3)
- Sothink SWF Easy v6.2 622 (6)
- Sothink SWF Quicker (18)
- Sqirlz Water Reflections (3)
- Animation (19)
- Anonymizer (1)
- Banners (4)
- Adventure games (0)
- Everything for the blog (52)
- Gradients (3)
- Girls (3)
- Decor (9)
- Diary (5)
- Painting (41)
- Health (16)
- Art (39)
- Brushes (6)
- Clipart (25)
- Corel for beginners (22)
- Cooking (35)
- Favorite music (60)
- Macros (6)
- Masks (10)
- My translations in Corel Paint Shop Pro (84)
- My translations of lessons from Butterfly (5)
- My translations of lessons from Adilia Monteiro (2)
- My translations of lessons from Adita (4)
- My translations of lessons from Adrimar (3)
- My translations of lessons from Ahmet (3)
- My translations of lessons from Annarella (3)
- My translations of lessons from Athenais (4)
- My translations of lessons from Benice (8)
- My translations of lessons from Crealine (4)
- My translations of lessons from Gina (2)
- My translations of lessons from HaZal (4)
- My translations of lessons from Hilda-Rosa (19)
- My translations of lessons from Inge-Lore (6)
- My translations of lessons from KeT (23)
- My translations of lessons from Luz Cristina (4)
- My translations of lessons from Luz Maria (9)
- My translations of lessons from Luzcristina (2)
- My translations of lessons from Maritos (7)
- My translations of lessons from Maxou (24)
- My translations of lessons from Merydesign (2)
- My translations of lessons from Meta (2)
- My translations of lessons from Mineko (11)
- My translations of lessons from Niria Mercader (5)
- My translations of lessons from Noisette (4)
- My translations of lessons from Renee (2)
- My translations of lessons from Roserika (8)
- My translations of lessons from Silviaterencio (3)
- My translations of lessons from Tamer (5)
- My translations of lessons from Tchounette (4)
- My translations of lessons from Verone (1)
- My translations of lessons from Vivi (3)
- My translations of lessons from White Diamond (2)
- My translations of lessons from Yolanne (4)
- My translations of lessons from Yvonn (4)
- My works (855)
- My categories (1)
- My schemes (10)
- MY TUBES (33)
- My lessons in Corel Paint Shop Pro (6)
- My computer (72)
- My macro photography (22)
- Translations (3)
- Translations of lessons for PSP from Natalinka (4)
- Plugins (74)
- Players (1)
- Congratulations (16)
- Useful programs (37)
- Private posts (8)
- Program "Color Range" (1)
- PhoXo program (1)
- Photoshop editor (1)
- Drawings in Corel Paint Shop Pro (2)
- Websites (3)
- DIY (5)
- Scrap (2)
- Poems (4)
- Schemes (2)
- Surrealism (30)
- Textures (3)
- Tests (29)
- Tubes (3)
- Corners (2)
- Patterns (2)
- Ukraine (14)
- PS lessons from Mischele7 (1)
- Lessons in Corel (80)
- Corel collages, (36)
- Lessons in Corel (2)
- Lessons for “dummies”. A. Kurganov (1)
- Lessons from Mademoiselle Viv (26)
- Lessons from Miss Kcu (4)
- Lessons from Sabina Astana (4)
- Lessons from Elena 505 (1)
- FS lessons from Ledy Angel (15)
- Physics lessons from Natali-NG (3)
- FS lessons from Alena 48 (7)
- Physics lessons from Larisa Guryanova (9)
- FILES (6)
- Flash materials (23)
- Backgrounds (1)
- Cameras (2)
- Photography (29)
- Photoshop (132)
- Flowers (5)
- Fonts (8)
- Humor (2)
- Yandex (5)
—Always at hand
—Tags
—Music
—Applications
- Postcards Reborn catalog of postcards for all occasions
- I am a photographer Plugin for publishing photos in the user's diary. Minimum system requirements: Internet Explorer 6, Fire Fox 1.5, Opera 9.5, Safari 3.1.1 with JavaScript enabled. Maybe it will work
- always no analogues at hand ^_^ Allows you to insert a panel with an arbitrary Html code into your profile. You can place banners, counters, etc. there
- Online game "Empire" Transform your small castle into a mighty fortress and become the ruler of the greatest kingdom in the game Goodgame Empire. Build your own empire, expand it and defend it from other players. B
- Online game "Big Farm" Uncle George left you his farm, but, unfortunately, it is not in very good condition. But thanks to your business acumen and the help of neighbors, friends and family, you are able to turn around a failing business.
—Search by diary
—Subscription by email
—Friends
—Regular readers
—Communities
—Statistics
GIMP Tutorials - How to remove translucent text.
Tuesday, January 22, 2013 13:06 + to quote book
GIMP Tutorials - How to remove translucent text.
It often happens that websites add unpleasant watermarks to images. This lesson will teach you how to quickly get rid of them! We have an image with a watermark. There is translucent white text on the image as a watermark.

Using the Related Area Selection , select the text in the image that you want to remove and duplicate it onto a new layer.

Now let's try some other type of blending to see if we get a color similar to what it would be if there was no lettering. I got this with the Multiply :

The colors on the face after applying this blending mode are almost identical. Select the area that is close to the original image, cut it out and paste it onto a new layer.

Now you need to work with the “Sharpen or Blur” and “Finger” to make the resulting image monochromatic.

Go to the text layer again and try setting a different blending mode for it. I got similar colors in the wing area using the Burn .

Again, cut out the piece of text that matches the color and paste it onto a new layer. Let’s take the “Finger” and blur the sharp color transitions in the wing area...

On the remaining layer, we leave the same blending mode, but edit the color scheme using “Hue-Saturation” (Color – Hue-Saturation) .

After working a little with the “Finger” we get the result:
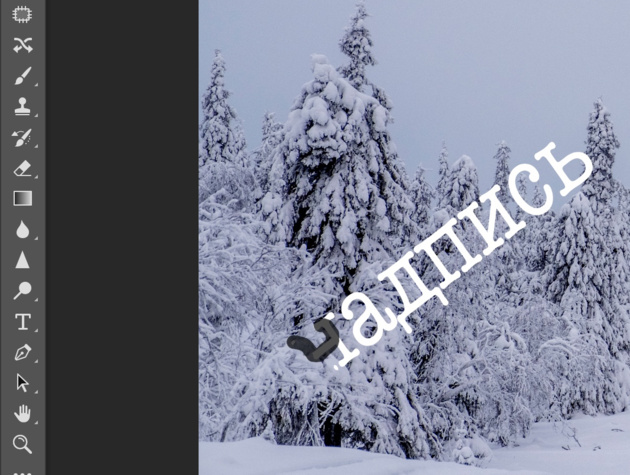
Easily remove the inscription from a picture in Photoshop
Do you have an impressive photo, but you can’t use it because the caption is in the way? You can get out of this situation by using the functions of Photoshop. There are several ways to remove text from a picture in Photoshop. Even a person who has never used the program before can use them.
Fill
This is the easiest option on how to remove an inscription from a picture in Photoshop. It will work if the text is located on a relatively uniform, non-detailed background. It should not have sharp transitions between tones. The sky, a blurred forest, a wall - inscriptions with such “backdrops” can be easily removed using filling.

- Select "Lasso" in the left panel. When you press the button, three types of lasso are displayed; just click on the first one.
- Use the mouse or stylus of a graphics tablet to circle the area where the inscription is located. It is better to do this as close as possible to the outline of the letters themselves.
- A dotted line appears indicating that the text is selected. You need to right-click on the selection and select “Fill” from the pop-up menu.
- An additional window will appear. In it, in the top line of settings you need to set the “Content-aware” option. This way the program will fill the selected area with more than just color. She will try to recreate the texture and color scheme that is presented on the nearest background.
If you use Fill on homogeneous parts of the image, the result will be spectacular. It will not be noticeable that the image has gone through additional manipulations.
If you remove a watermark from a copyrighted image and then use it for commercial purposes, you could be sued. You should not use the tips outlined in this article to steal content.
Healing brush
This method, which allows you to remove an inscription from a picture in Photoshop, is similar to the previous one. The only difference is that the Healing Brush tool is more suitable for pictures with high detail. If you approach the process correctly, you will be able to restore the texture of tree branches, complex patterns, etc.

- Select the appropriate tool from the panel.
- Of the several brush variations, you need to choose a dotted one, since it restores the image most carefully.
- In the top panel, opposite the “Type” option, you need to set “Content-based”. The size of the brush is selected according to the letters. It's good if it roughly matches the line thickness of the font.
- You should carefully select the letters one by one with a brush, holding down the left mouse button. Just release the button and the selected area will automatically be restored.

The selection area will appear several shades darker.
Removing layers
This method is useful if the image is in PSD. This is the file format of Photoshop itself.

Removing text using rasterization is done in a couple of clicks:
- Open file. On the right side, view the list of layers. Perhaps the inscription added by the author is located on a separate layer. This often happens.
- Select the layer on which the text is located. Click "Delete".
The technique will not work with JPG files and the like.
Additional tip
It happens that he wants to add his own text instead of the deleted one.

How to remove an inscription from a picture and write your own in Photoshop:
- Use any of the above methods to delete text.
- Click on the "Text" tool. It's an icon with a big T in the left vertical bar.
- Click on the place in the image where you want to see the text. A graph will appear. You need to enter an inscription into it.
The inscription can be modified in the future. In the window on the right, the user can increase or decrease the size, change the font, color and position.
It is better to save a photo with an inscription in PSD format. Then in the future you can delete the text by simply selecting it in the program.
So, thanks to the simplest functions of Photoshop, you can qualitatively restore an image or add your own inscription. In rare cases, if text takes up too much space, the effect of the fill or healing brush may be too low quality. But even in this case, do not despair: rasterization will help solve the problem.
How to remove an inscription from a photo? | TOP 5 Simple software methods

Nowadays, many sites mark photos with their own mark. But ordinary users are irritated by such amateur activities. After all, it’s not interesting when the downloaded picture has an inscription (for example, the address of a website).
However, the problem can be solved. Moreover, sometimes it is not at all necessary to install special editors (like Photoshop) on your computer.
However, now we will talk about everything in more detail and try to correct the situation with the marked pictures.
Content:
Using online editors
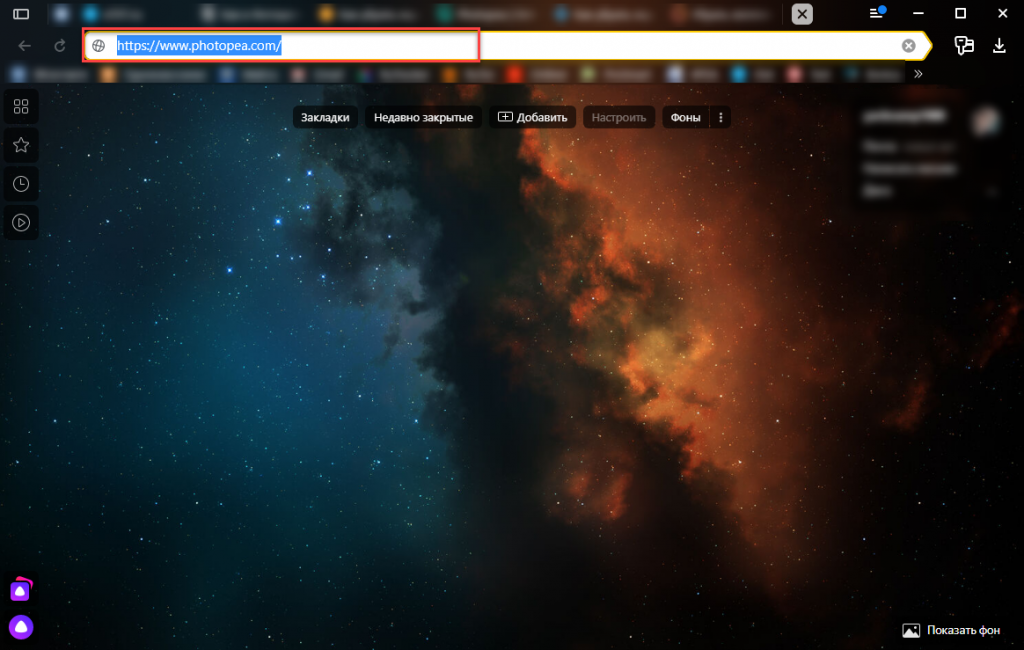
There are special services that allow you to edit a photo and process it. Among other things, you can remove unnecessary content. The best resource in this regard is Photopea. It is completely free and easy to use.
Let's see how to work with it.
Here are the step-by-step instructions:
Next, click on Open from computer
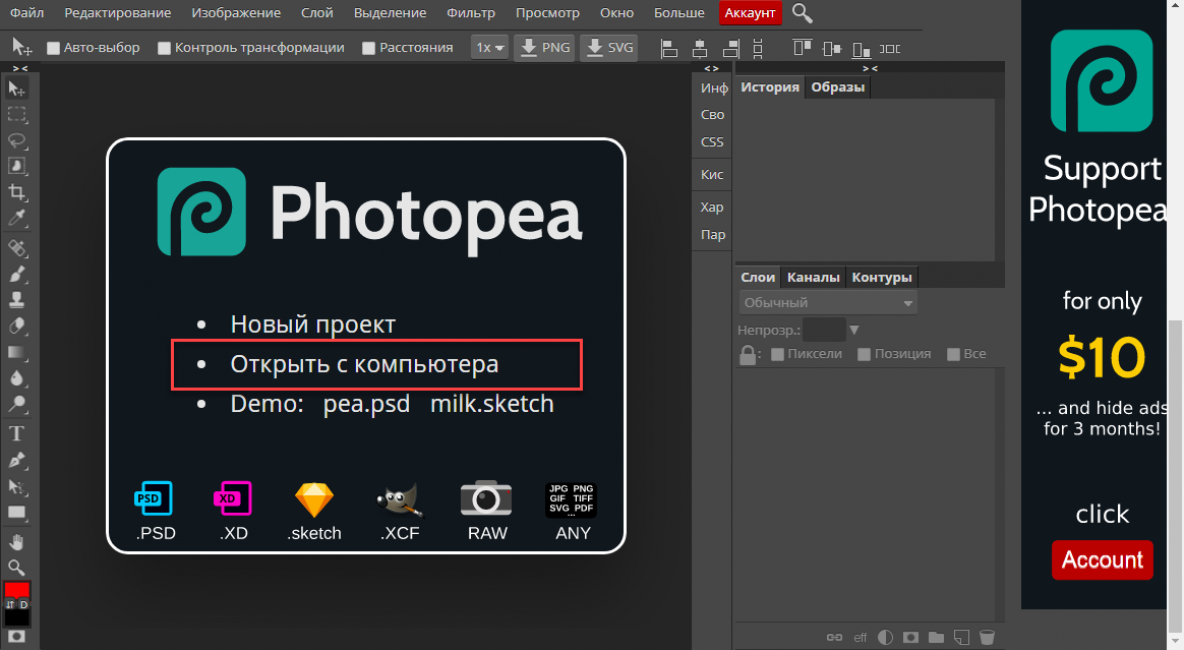
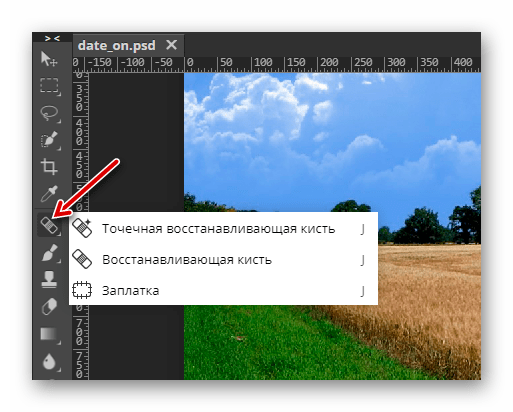
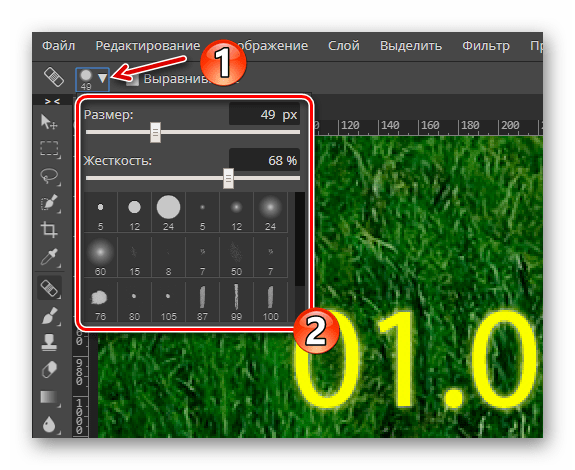
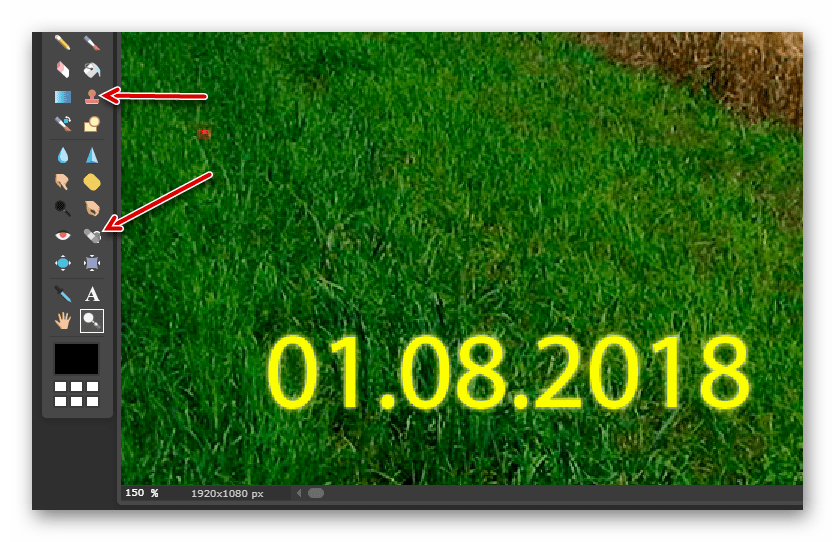
Then click on the button with the desired tool and select Spot Healing Brush
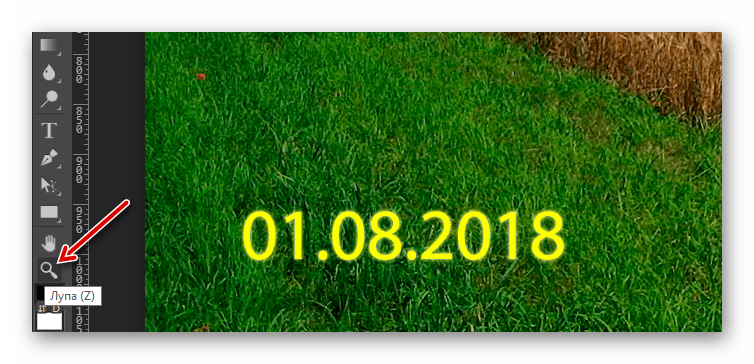
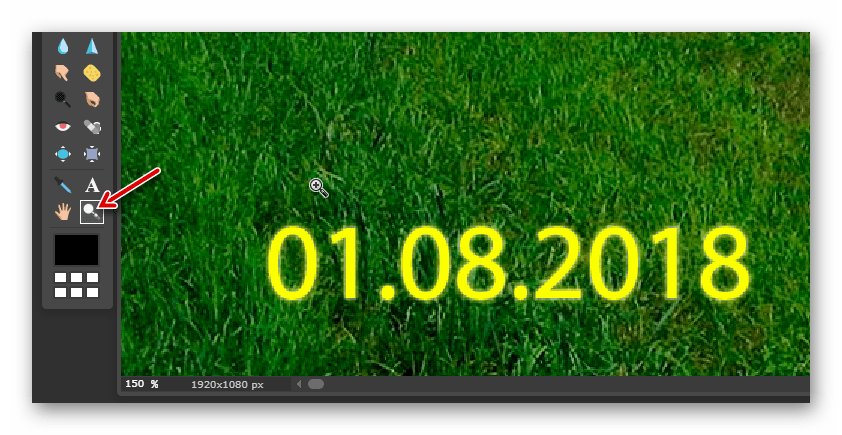
We enlarge the desired area in the picture using the Loupe tool.

Now you need to adjust the brush size and its hardness in the corresponding menu.
After this, we brush over the area closest to the inscription. This is needed to capture a recovery sample. Then we begin to cover up the inscription itself.
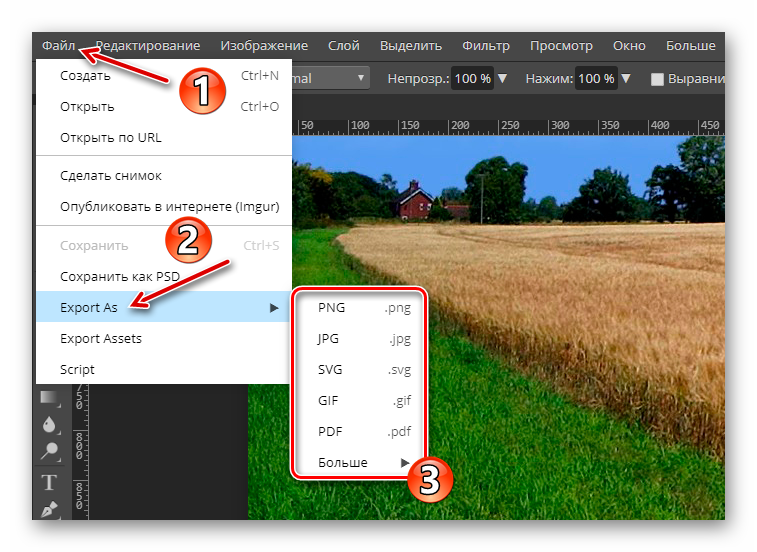
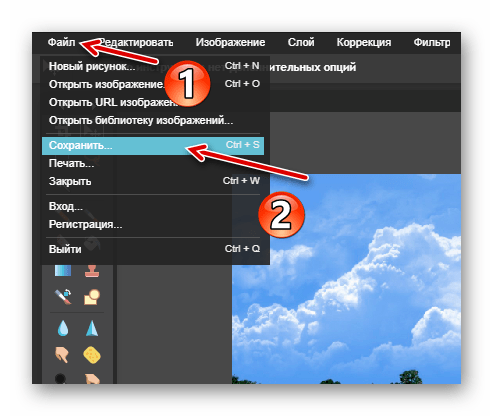
When the process is complete, click on File and select the Export as option. Then select the format to export.
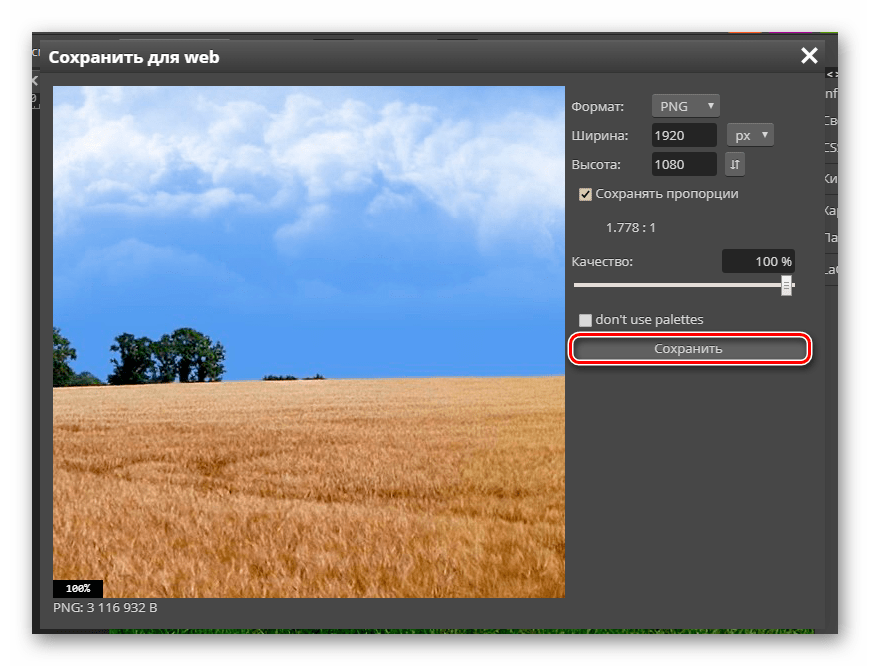
In the next dialog box you will need to configure the image parameters and click the Save button

As you can see, managing the service is very simple
Moreover, the Russian language is present. By the way, instead of the healing brush, you can use the Stamp tool. It is suitable if the background is too varied.
By the way, you could also use a fill, but this tool is too much fuss. The method described above is much faster. And we don’t need unnecessary actions now. There is another similar resource - Pixlr Editor . Some prefer it.
Using Paint
Almost everyone probably knows about this editor. This is a standard utility for simple photo processing from Microsoft. It comes with Windows. She can also help solve our problem and remove the inscription on the photo.
There are two ways to get rid of text on a picture in Paint: crop the image or try to cover up the text. In this case, the watermarks completely disappear. The most convenient way is to cut out the text. But this option is not always suitable. Here's how to use the program.
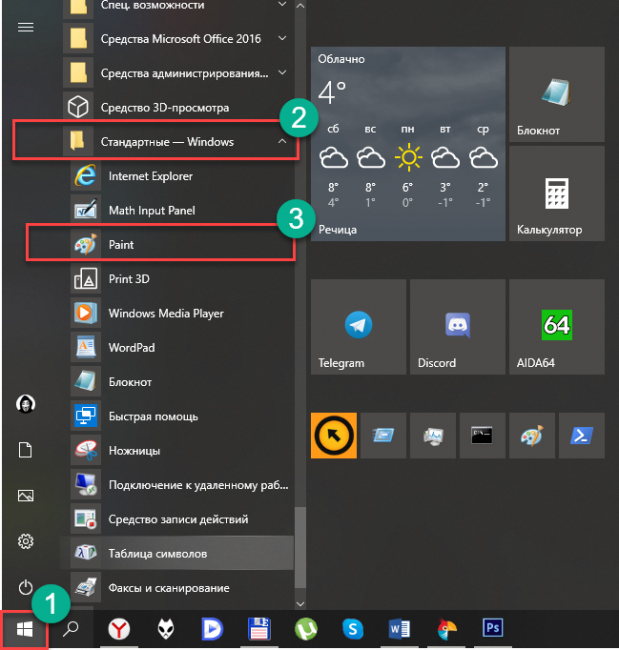
Open the Start menu, go to Accessories - Windows and click on Paint
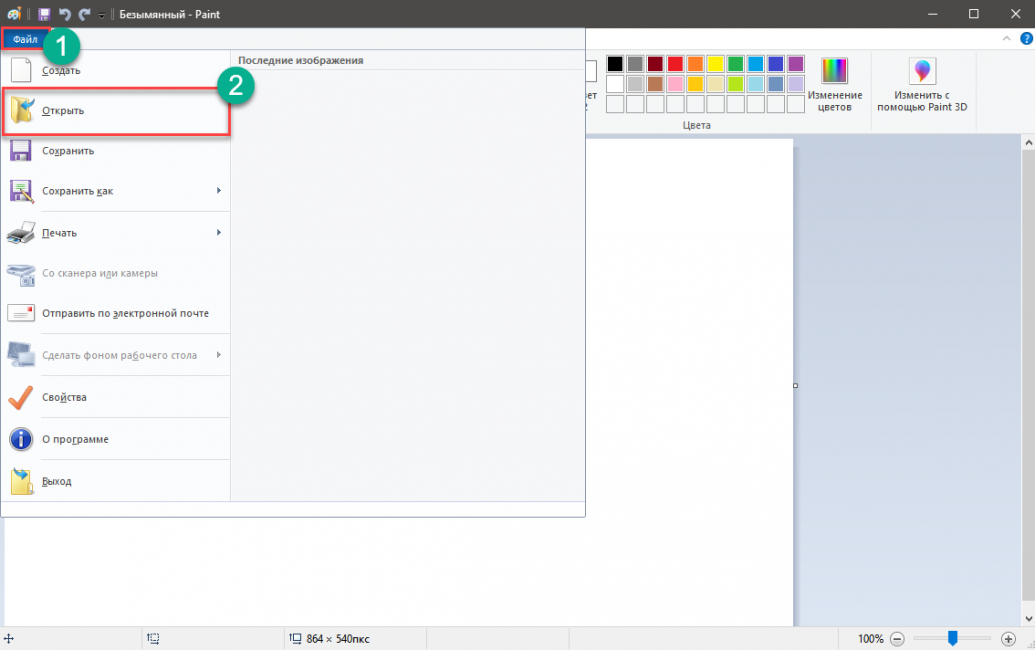
Next, click on the File button and select Open
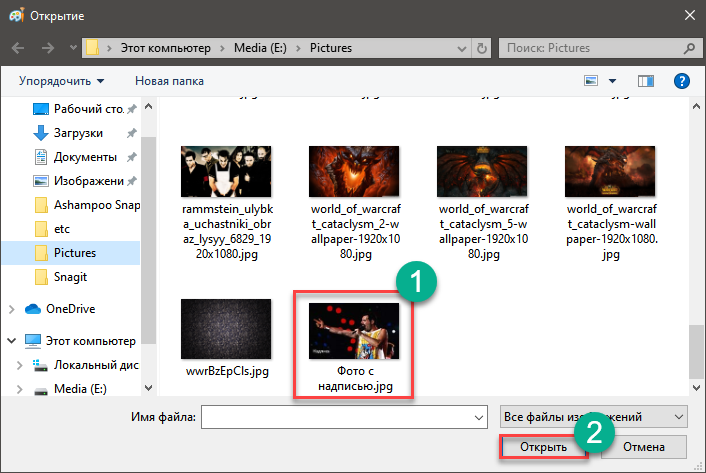
Find the desired image on your computer and click Open again
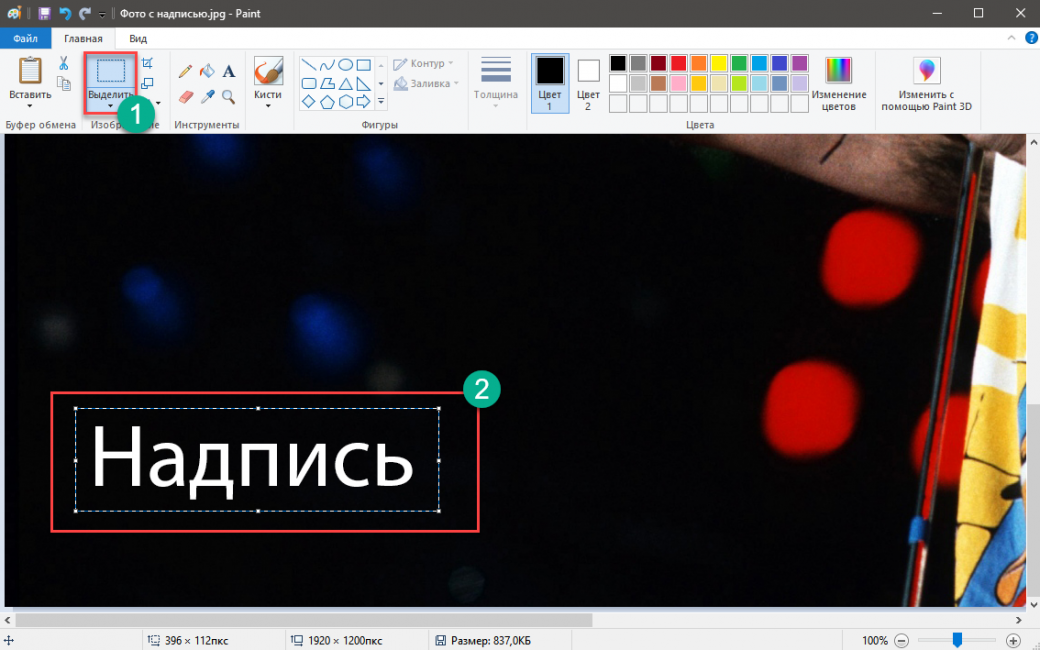
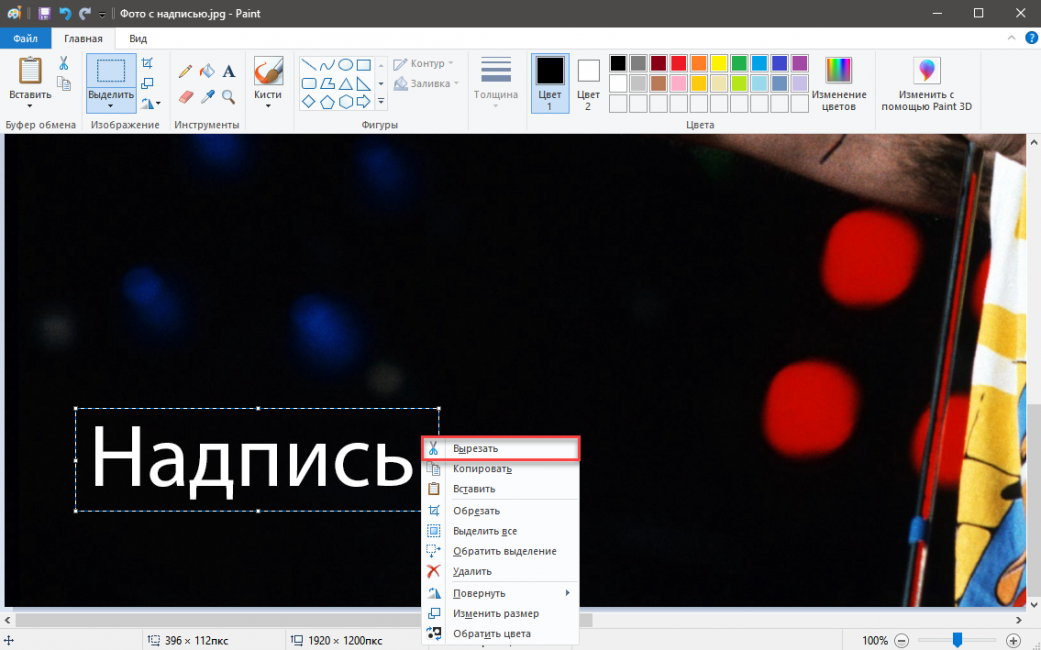
Now let's try to crop the part of the photo that contains text. To do this, select the Select tool and use it to select the text.
Next, you need to right-click and select Cut from the menu that appears.
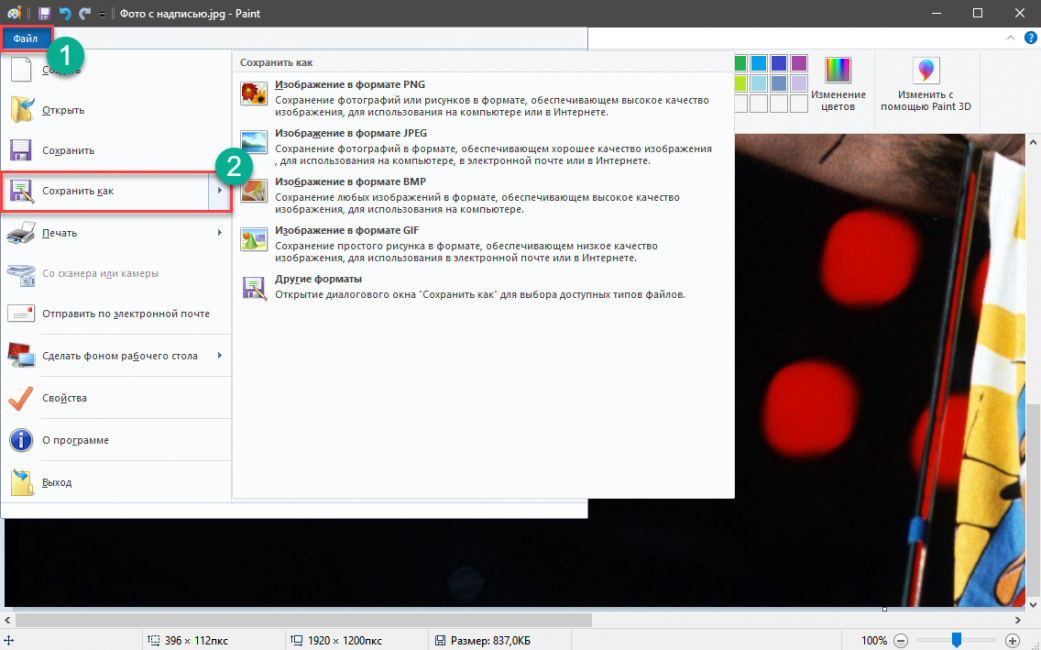
That's all. All that remains is to save the image for future use. This is done using the File menu and Save As.
If there is an opportunity to cover up the text, then you should not miss it. Click on the Palette tool and then click on the space next to the text.
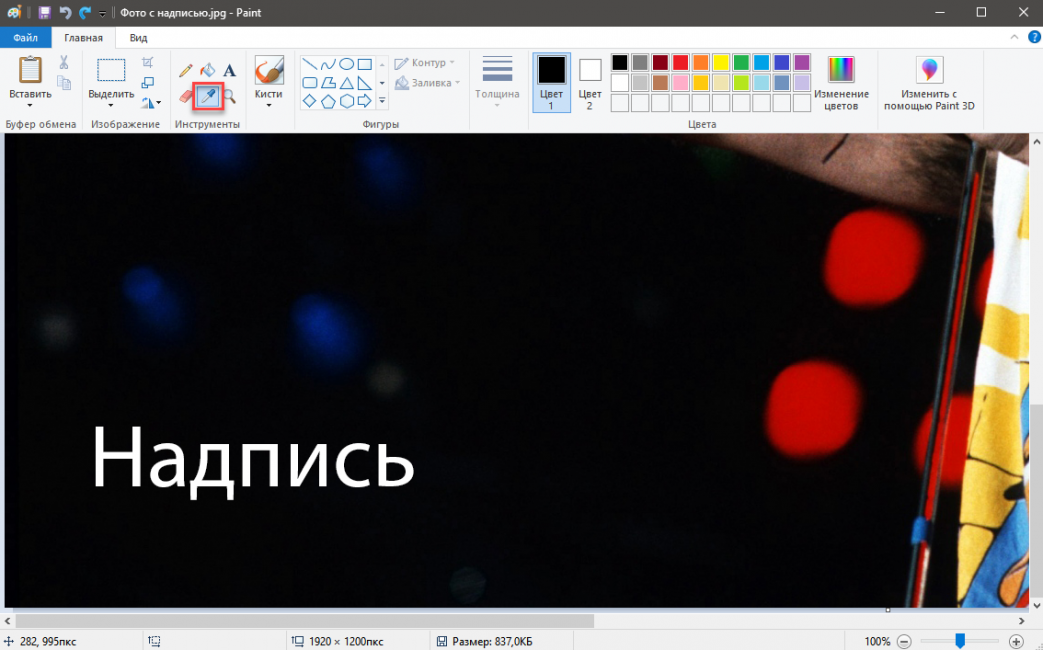
Now select the Brush and paint over the desired area. All that remains is to save the image.

It is worth noting that the last method only works if the background of the picture is plain. Then the smeared area will not stand out. However, this is far from the only way. There are alternative options.
The above algorithm is suitable for those who do not need special accuracy. Even if some traces remain, it’s not so scary. However, Paint is not the most convenient option. And pruning is not quite what I would like.
Using Movavi Photo Editor
It is worth noting that the program is not completely free. However, the capabilities of the free version are enough for us. This is an option for more advanced users.
Here's how to use the program:
Launch the application and click on File. Then select Open
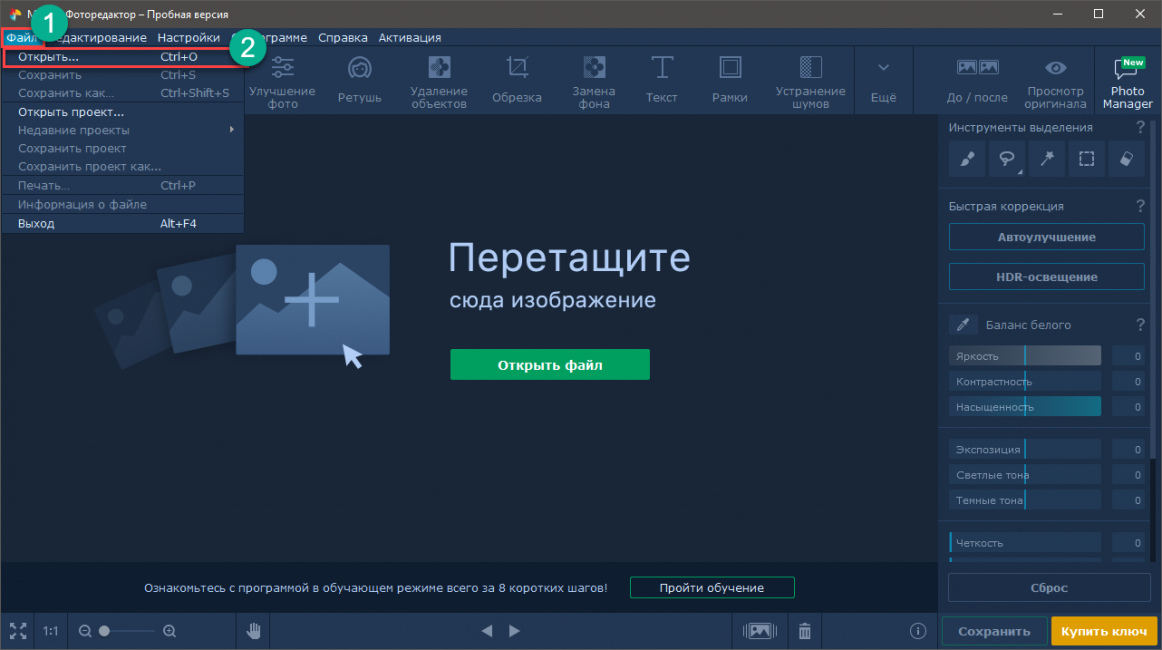
Find the image on your computer and click Open

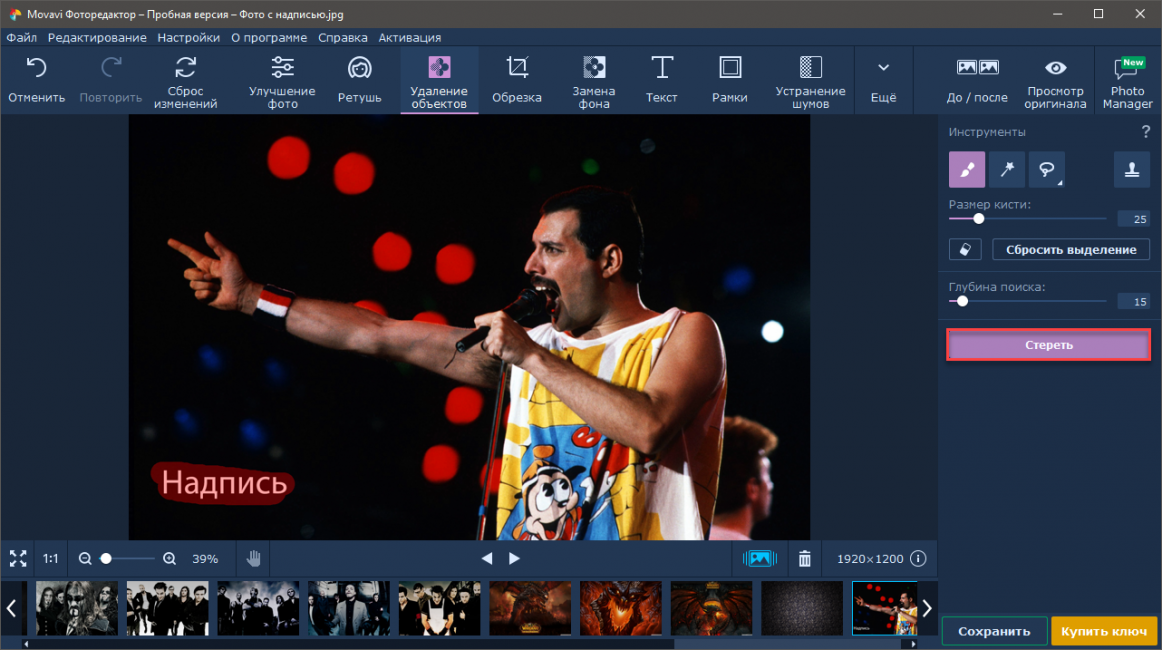
In the top panel, click on the item Delete objects. In the sidebar, select the Brush tool and carefully cover up the inscription on the photo.
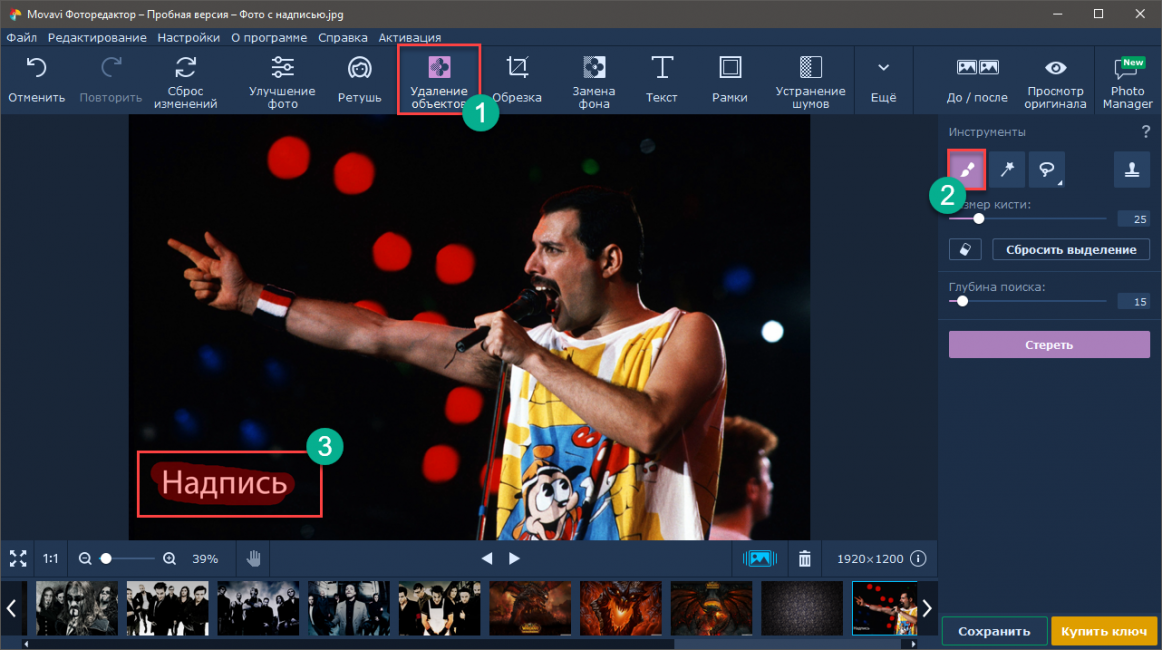
Then click Erase
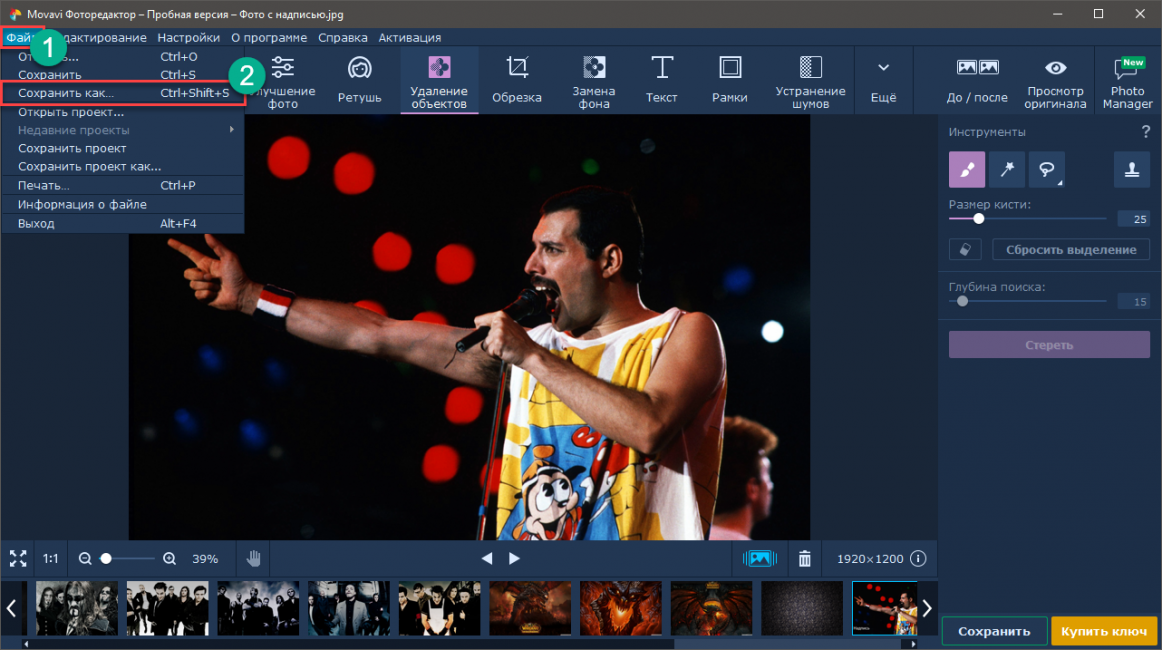
All that remains is to save the finished image using the File menu and Save As
In some cases, removal is not complete. Then you can use the Stamp tool to remove the cutting marks. After this the picture will look better. However, let's move on to the next method.
Using Adobe Photoshop
This is the most famous graphics editor. He is capable of many things. However, it is quite difficult to use. Besides, it is expensive. And you can download it on the official website. Installation is easy, but long 🤔.
Here's how to work with the editor:
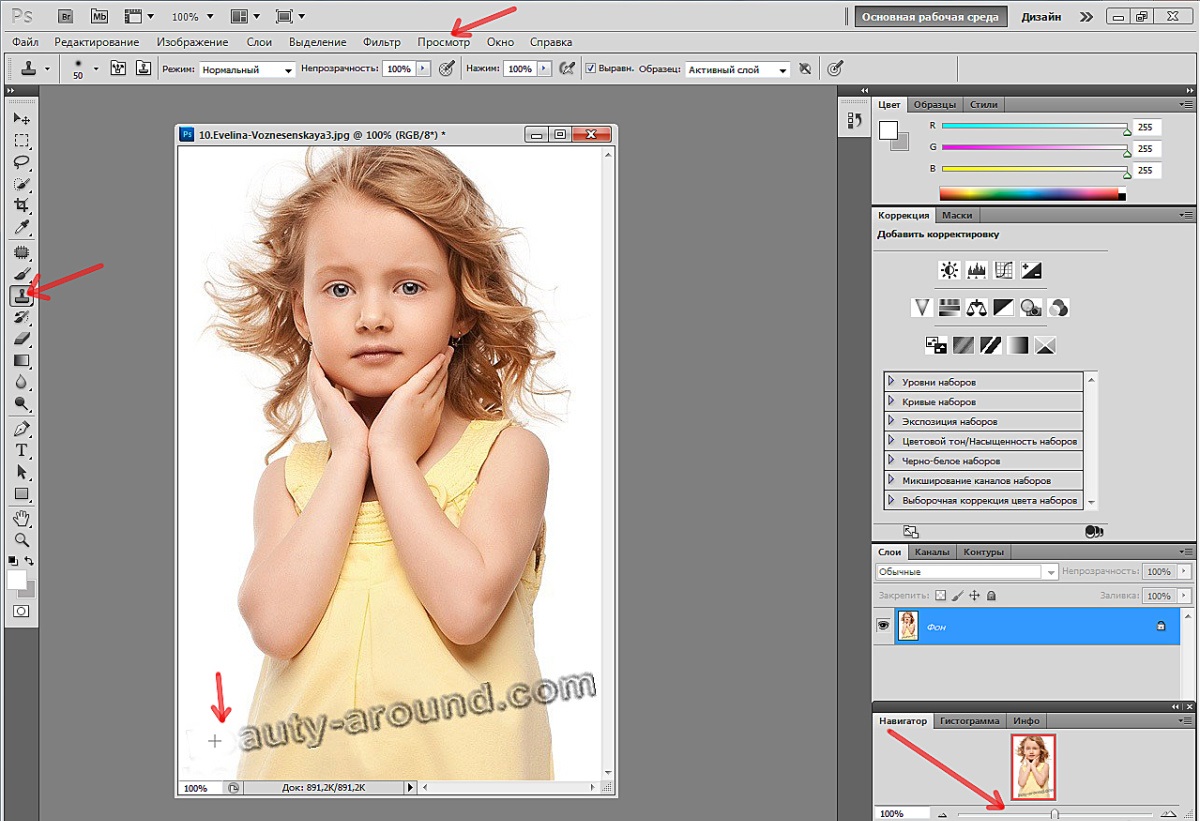
Launch Photoshop, click on File and select Open
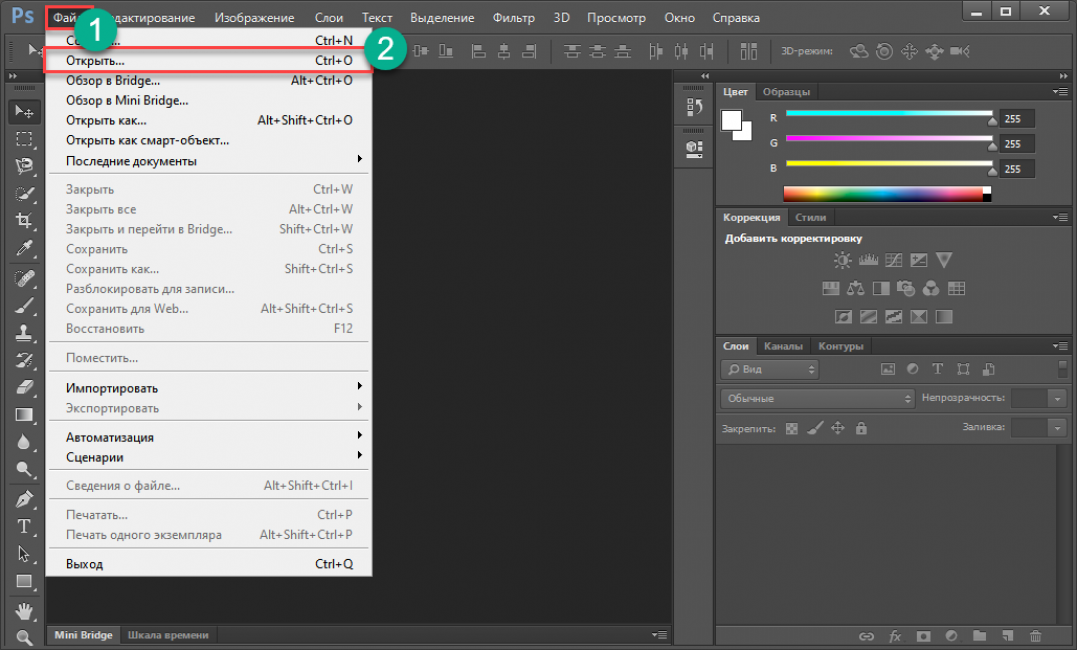
We find the desired image on the PC and open it using a standard dialog.

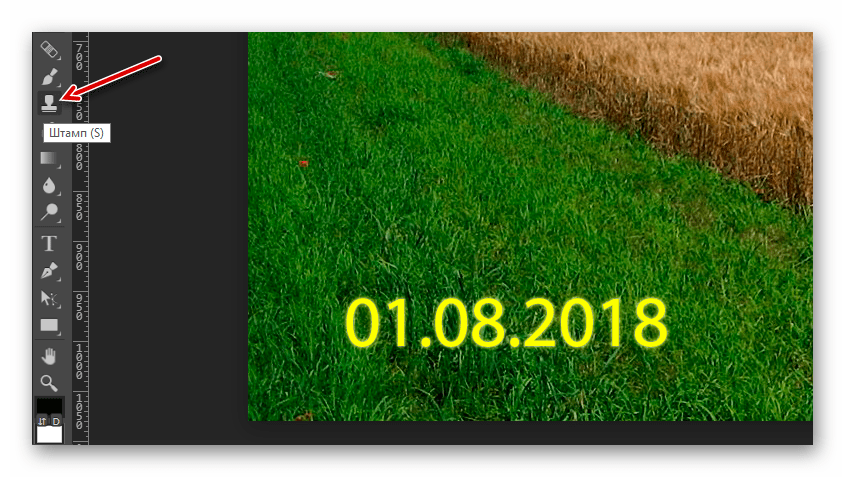
Now on the side toolbar click Stamp

Hold down the Alt button on the keyboard and click on the background of the picture closer to the inscription.

Next we begin to paint over the text.

That's all. All that remains is to save the picture using the standard item in the File menu. This is the easiest way to get rid of watermark using the wonderful Adobe Photoshop program. Moreover, the manipulations are not particularly complicated. However, let's move on to the next chapter.
Removing an inscription on a smartphone
A free mobile app called Snapseed can be used for this. It can be easily found on Google Play. Installation is standard. It will not cause any problems even for beginners.
Now let's look at the process of working with the application.
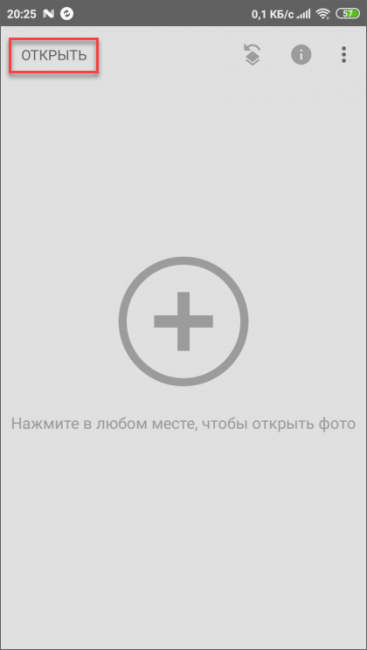
First you need to upload an image. Launch the application and tap on Open
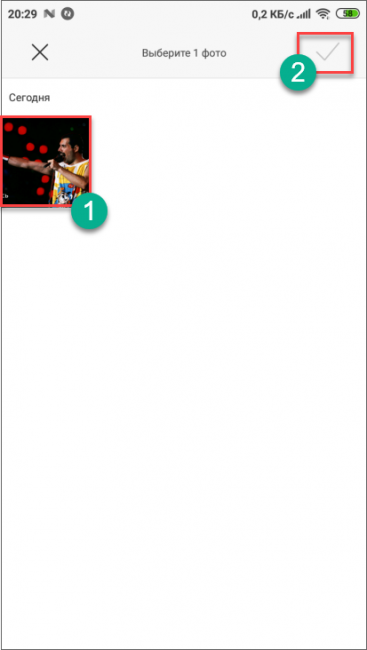
Next, select the desired picture and click on the button with a checkmark.
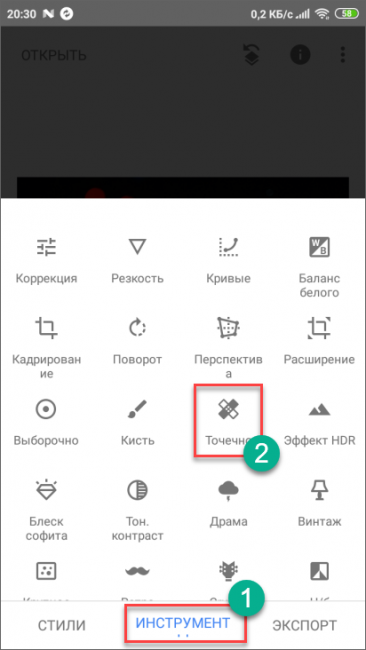
Open the Tools menu and select Spot
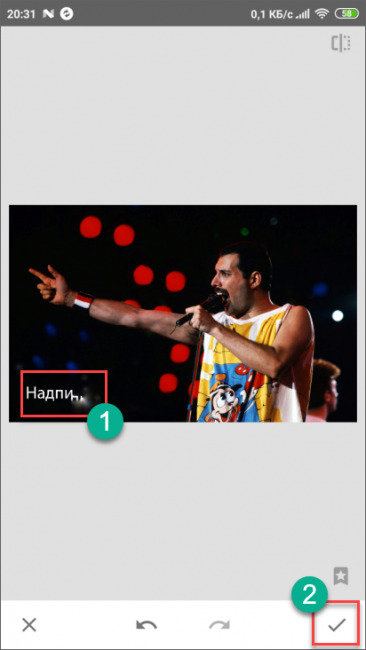
Cover up the inscription (make corrections if necessary) and tap on the button with a check mark.
After that, select the Export menu
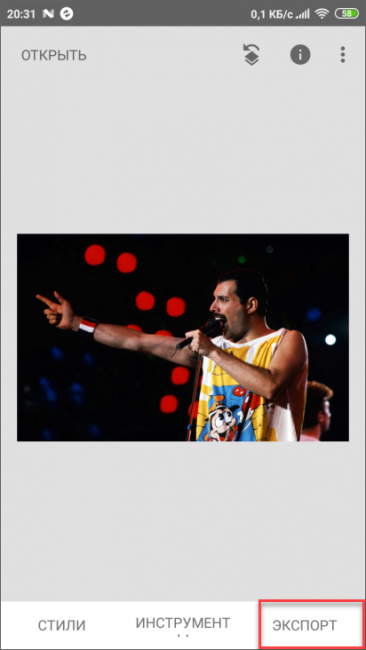
Here click on Save
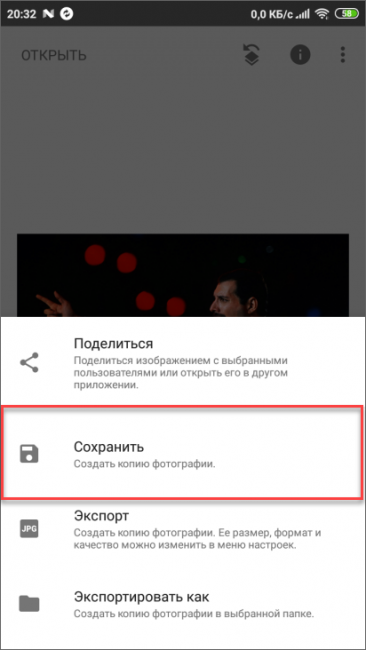
After this, a copy of the image without the inscription will be saved in the smartphone’s memory. You can continue working with the picture. By the way, if you are too lazy to do all this, you can simply search Google for a similar image without text.
Results
Now it's time to summarize the information. If you accidentally downloaded a picture with an inscription, this can be easily corrected. There are many ways to remove unnecessary inscription. Moreover, none of them are particularly complex; some editors are even very simple.
VIDEO: How to remove a watermark. How to remove a caption from a picture in Photoshop
How to remove a watermark. How to remove a caption from a picture in Photoshop
How to remove an inscription from a photo? | TOP 5 Simple software methods
Feedback from our readers is very important to us. Leave your rating in the comments with reasons for your choice. Your opinion will be useful to other users.
How to remove text from a picture in Photoshop
Often beautiful photographs are spoiled by inscriptions. However, this defect can be corrected using Photoshop. It has many different tools with which you can erase text on any image. Even a beginner who does not have professional skills can do this. We'll tell you how to remove an inscription from a picture in Photoshop.
Archive brush
The removal process will depend on how complex the text needs to be removed. So, if the inscription is located somewhere at the bottom and the letters are small, then removing them will be very easy.
To do this, you need to adhere to the following algorithm:
- Launch Photoshop and load the photo you want to fix into it.
- Next, select the “History Brush” tool and crop the image, cutting out the fragment where the number or inscription is located.
- The disadvantage of this method is that after removing the text, the picture will become smaller, but often this does not affect its quality in any way.
Use multiple tools
If the text on the photo is located in the center or on a significant part of the image, then you won’t be able to simply crop it.
To remove the inscription in this case, you can use other methods. We'll tell you how to remove an inscription from a picture in Photoshop in another way and write your own.
The work is as follows:
- Take any tool that you can use to make a selection. It is most convenient to use a “Lasso”, preferably rectangular in shape.
- Using the selected tool, draw an area around the text. In this case, it is necessary to place the selection as close to the letters as possible. In this case, the result will be accurate.
- After the desired area is selected, right-click and select “Fill” from the menu that opens.
- Then in the window opposite the words “Contents”, select the item “Taking into account the contents” and press the OK or Enter key on the keyboard. After this, the inscription should disappear.
This method of removing text is great in cases where the background in the photo is more or less uniform. But often, in place of the deleted text, defects and blurring appear.
They can be easily removed from a picture in Photoshop using the Healing Brush tool:
- In the tool settings, you need to select a hardness of about 20-25% to make the transition smoother.
- Set the desired brush size.
To remove dots or irregularities that appear in the photo that remain after the text, you need to press the Alt key and, while holding it, left-click on the place in the picture that will replace the defects that appear.
Try to choose places as a donor area that are very similar in shade to the one that needs to be corrected.
Now you know how to remove an inscription from a picture in Photoshop and add your own.
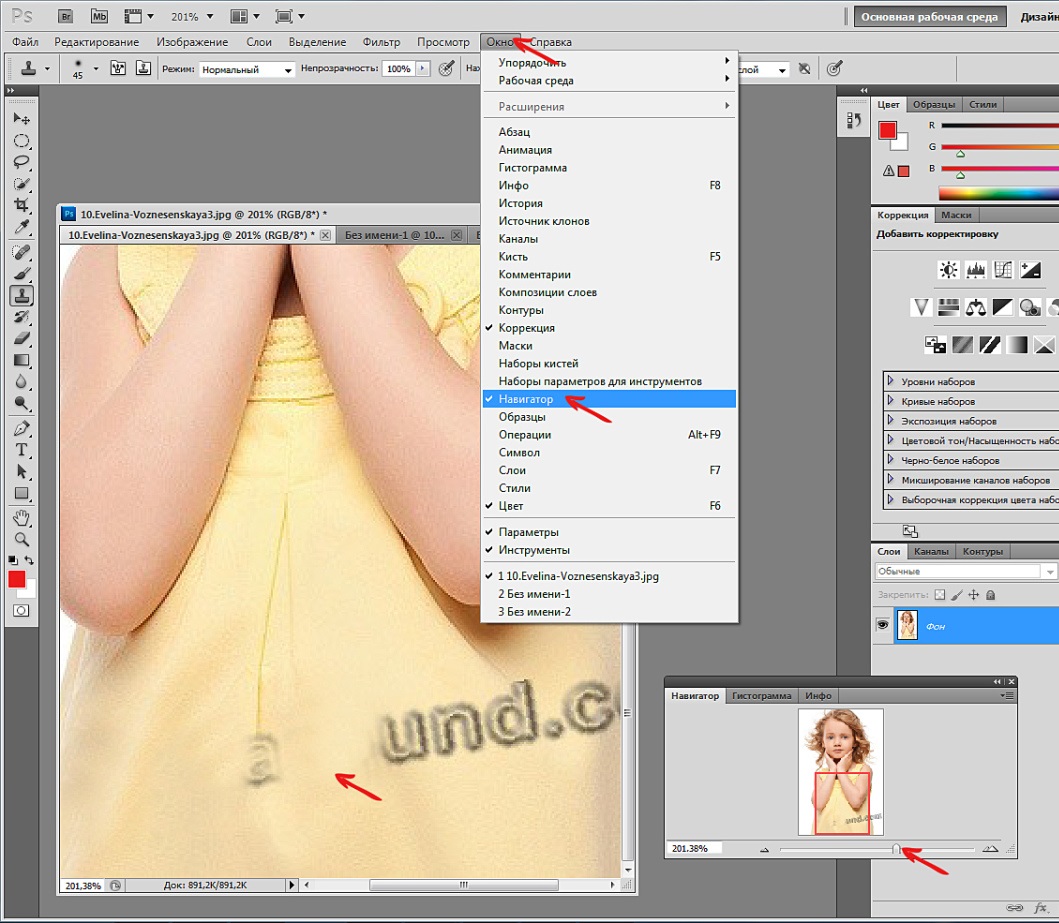
Removing text using the Stamp tool
- Open the image you want to work with in Photoshop.
- From the toolbar, select Stamp. For work it is better to use a soft brush.
- Create a duplicate of the background layer. To do this, simply drag the last one down the window with layers to the “Create a new layer” icon. Or just press the key combination Ctrl+J.
- Place the mouse cursor in the area that most closely resembles the background where the text is located. The selected area will become the source through which the text will be removed.
- After releasing the Alt key, simply left-click on the text. It will be replaced by the source. When performing work, you need to pay attention to the lighting in the photo.
- Continue working until all the text is completely removed.
The light at the source location should be in the same direction as the area to be corrected.
To get a high-quality result, you should not rush. If the text takes up too much space on the photo, it may take a long time to completely remove it.
Removing watermarks from photos in Photoshop, Microsoft Word, PDF.

Why do beautiful photographs and drawings on the Internet get spoiled with watermarks? How to remove these translucent inscriptions?
Firstly, you need to understand why watermarks are placed in the first place. A watermark is the most effective way to protect a photo or drawing from being used. Watermarks are ideal for designers, photographers, and artists to protect their work from theft.
On the one hand, watermarks do not interfere with viewing the image, on the other hand, it is extremely difficult to remove the protection, and no one will use crossed out pictures with other people’s contacts.
Most often, photos with watermarks sell. By paying for a work of art you will receive it without protection and full moral right to use it for your own purposes.
Sometimes photographs are not sold, but watermarks are added for marking purposes, for the author's signature, or to indicate the source. Typically this is placed at the edge of the image and does not block views.
Purchasing an image
No matter how trivial it may sound, the very first and best way to remove watermarks is to buy the work. Think about how long it will take you to create something like this? Most likely, for such work you would ask no less than it costs you. Any work must be paid.
In addition, you can only remove a watermark manually by sketching the background underneath it, and this is a very labor-intensive process.
Either you spend money and get a high-quality product with the right to use it, or a lot of work and a mutilated image, without the right to use it.
Therefore, by paying money for someone else’s work, you get the full right to use the work for your own commercial projects. Today, the largest service for selling photographs, drawings, videos and even music is Shutterstock (Shutterstock or Shutter).
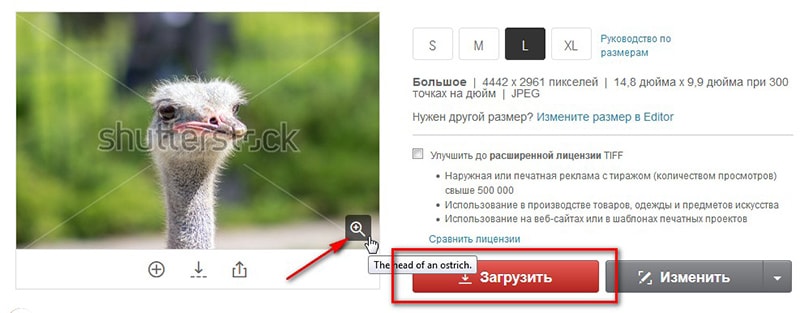
Buying one image is always more expensive than a set or an annual subscription.
Retouching
If you don't want to buy an image, but want to remove the watermarks manually, then you will need Photoshop, a lot of time and minimal artistic skills.
When the image has a grid dotted with logos, or the logo is located right in the center, then it needs to be sketched with a background lying around it. To do this, Photoshop uses retouching tools. For example, “Stamp” (Clone stamp tool).
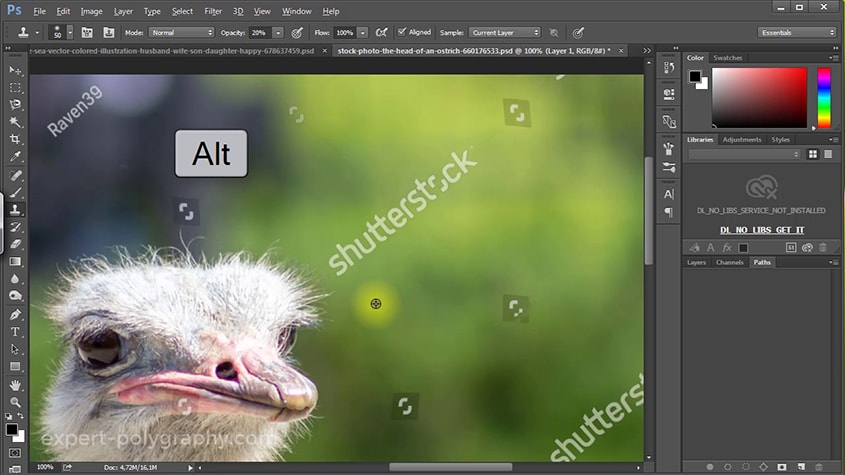
Hold down the ALT key and show a similar area to the one that lies under the watermark. And then paint it over.
There are two more very convenient automatic tools: the Patch Tool and the Spot Healing Brash Tool.
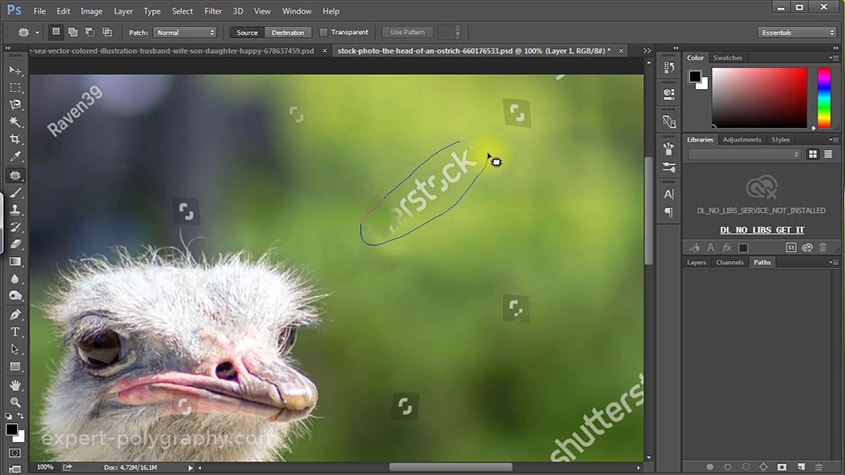
With a “spot” brush, just paint on the icon and it will disappear. And “Patch” - circle the watermark and drag it to where it is not.
As mentioned above, such a sketch is very labor-intensive. One image can take up to several hours of jewelry work. And even after this, the image will not look like the original one at the protection site. Therefore, it is worth making an effort in the beginning to contact the author of the image and buy.
For example, microsinks are mainly protected by mesh, which is difficult to remove. In the image you can find the name of the stock and the picture number.
What if the work is not sold and the logo or inscriptions are placed for other reasons? In this case, the following methods will help you:
Crop image
If the image only has a small logo in the corner, try simply cropping it by making the image smaller. Surely nothing important will be lost.
If the integrity of the image is important, try painting the logo as a background using the retouching tools described in the previous step.
Draw a picture
This method is only suitable for vector drawings. If the image is vector and not complex, it will be easier to redraw it again than to cover up the watermarks:
In other cases, it is enough to increase the “Levels” in Photoshop so that the watermark disappears completely. Simply put, you need to cut off the range of gray pixels by setting the sliders as shown in the figure.
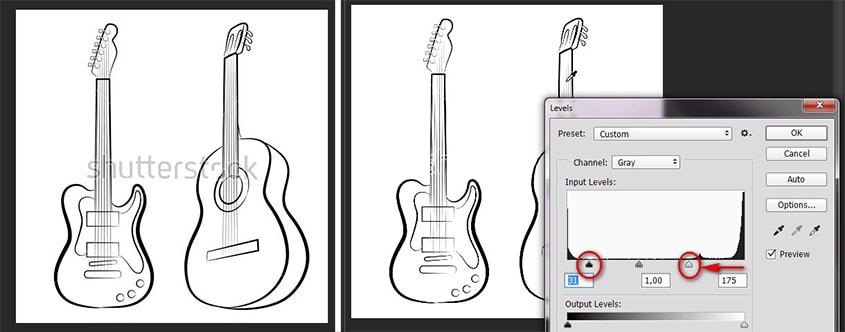
Naturally, this technique is only suitable for black and white images, where cutting off the range with gray pixels will not affect the picture in any way. But at the intersections there is still a stain left on the neck of the guitar.
Watermarks in Microsoft Word
To remove a watermark in Microsoft Word 2016, click - Design/Watermark/Remove Watermark.
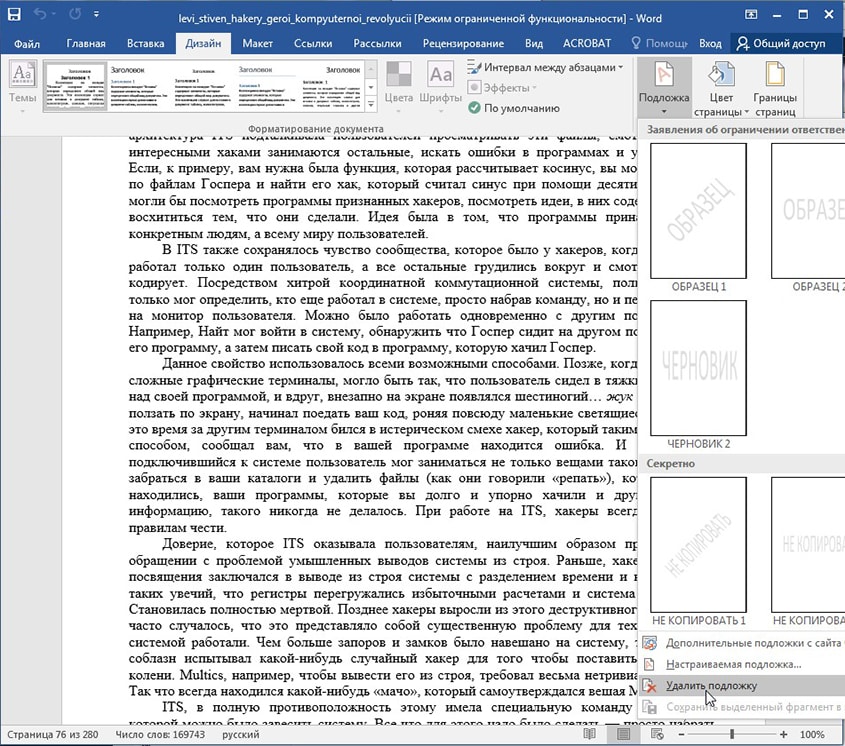
Sometimes, a watermark refers to headers and footers. To delete them, you need to double-click and erase the text or delete the picture.
Removing watermarks in PDF
Full editing of a PDF file is only available in Adobe Acrobat. For this he has a special tool - Edit PDF.
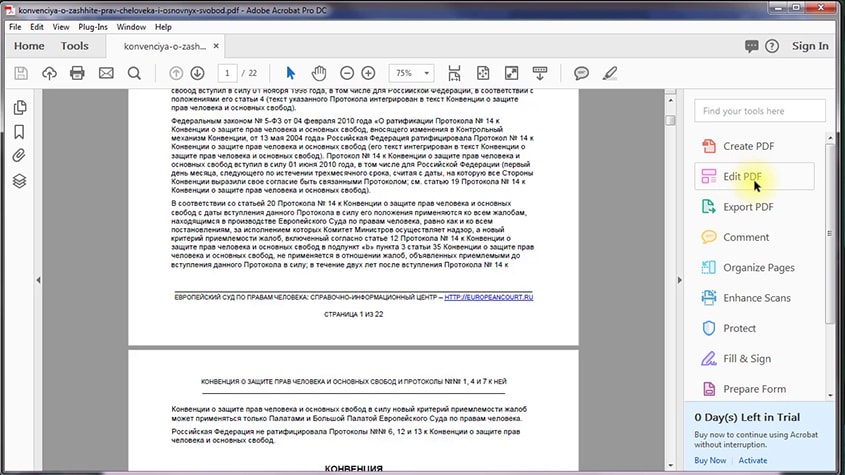
Next, you can delete any text and elements placed in the PDF file.
Conclusions : The most profitable way to remove a watermark is to buy the work. If it doesn't sell, retouching or cropping tools will help. Word and PDF have special tools for removing them.