Retouching a studio portrait in Photoshop
Retouching a studio portrait in Photoshop
On this catalog page we have posted lessons that will teach you how to retouch photos in Photoshop. With their help, you can improve your photos, make your face more expressive, or remove figure flaws. Now you don’t have to worry about not being photogenic – using various Photoshop techniques will solve this problem.
Using the editor's tools, you can correct the color and condition of your skin, make your eyes more expressive, apply non-existent makeup, add volume to your hair, and even become a supermodel with ideal curves. Step-by-step instructions included in the lessons will teach you a variety of techniques, including Dodge Burn (a technique of lightening and darkening). Each retouching lesson is a treasure trove of invaluable information, presented in such an accessible way that even a child can understand it.
To learn how to retouch a portrait in Photoshop , after each lesson, practice as much as possible with your photographs. Give free rein to your imagination, experiment, and very soon you will learn to create real masterpieces from any photographs that you won’t be ashamed to put on your avatar on a social network or make to order. If you want to add to the collection of lessons, use the site form.
A wonderful technique that allows you to actually “re-draw” the black and white pattern and create the volume we need by lightening and darkening individual areas of the photograph.
Nothing makes a woman look better than Photoshop. And its most powerful tool on this path, of course, is Liquify.
The third part of a lesson on portrait retouching using the frequency decomposition technique.
Lesson in English on how to retouch glowing hair to get an even hairstyle
How to create a perfectly smooth and shiny hairstyle in Photoshop. Part 2
How to create a perfectly straight hairstyle in Photoshop. Part 1
How to make natural leather from washed porcelain leather. We fix photoshopped photos.
Create perfect face shapes using the liquify filter and other tools.
The second part of the tutorial on portrait retouching using the Dodge & Burn method
An introductory lesson in a series of lessons dedicated to portrait retouching.
Accelerated studio portrait retouching process from Vladislav Sirosh
How to completely retouch a portrait taken in a studio. Lesson by Anton Shulgin
How to Create Interesting Portrait Lighting in Photoshop
How to make a beautiful waist in Photoshop. Using the Plastic Filter, tricks and tricks.
We use 2 methods: color correction and blending modes.
A retouching technique called Dodge and Burn or in Russian Lightening and Darkening.
This is a compilation of highlights from a large version of the stream conducted by Alexander Ambalov
How to make beautiful eyebrows in Photoshop
How to complete the missing part of a photograph using scrap materials. Author: Pavel Lebedev.
The stream is strictly required viewing, since it outlines the very basics of processing on which the Dodge and Burn technique is based
Retouching a studio portrait in Photoshop
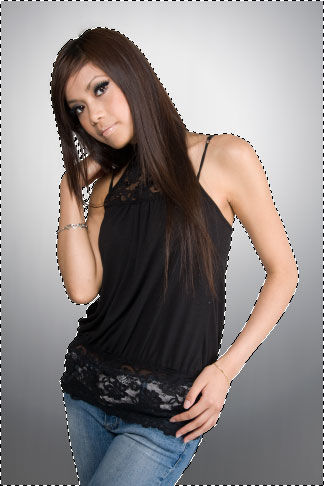
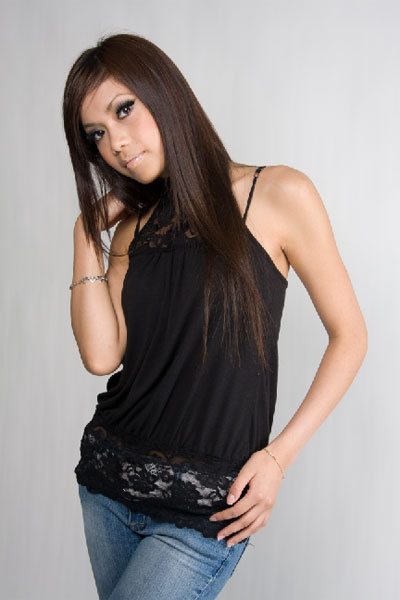
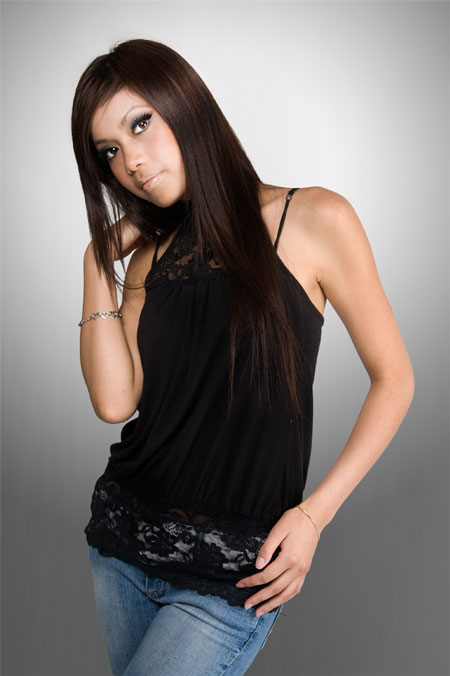
Here is the original image. The photo was taken well, but it looks a little boring. In Photoshop we will learn how to polish the captured images. Let's open our image.
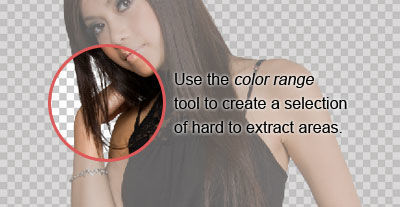
Let's start by removing the background first. For this I used the Extract and Color Range . First, remove the background using the Filter > Extract . We still have some parts of the background in the hair area, so let's finalize it with the Color Range .
Then go to Select > Color Range to select the area of hair that was poorly processed by the Extract .
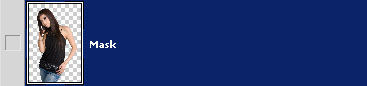
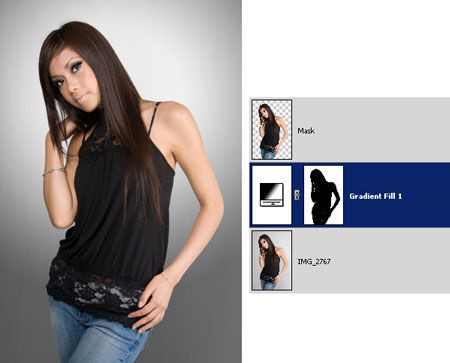
Now we have a selection mask on this layer. Let's name the layer "Mask".
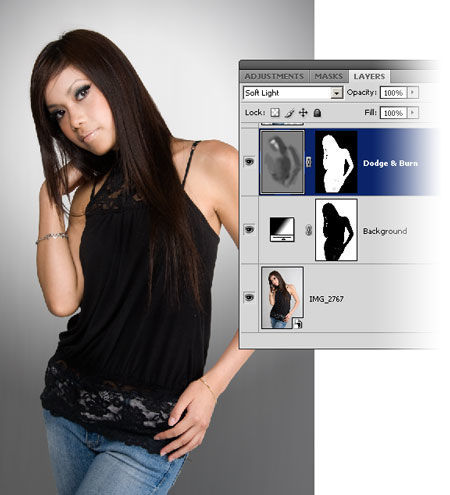
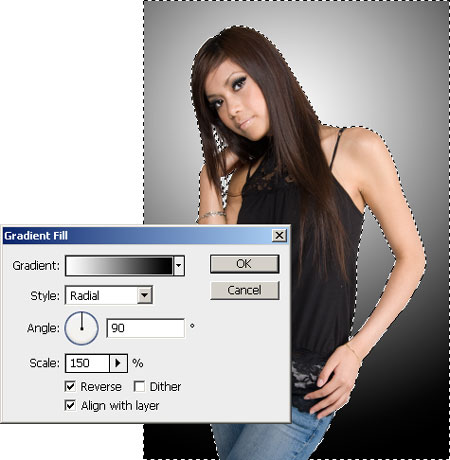
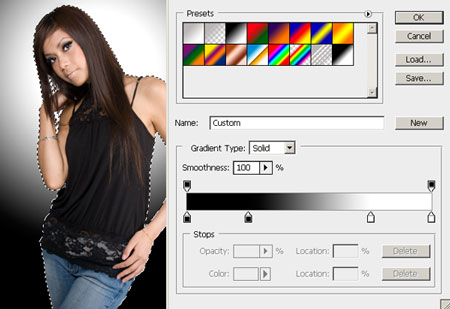
Now we can add a gradient to the background. Adding a gradient to your background is a simple and effective way to remove a boring background. Here's a preview of what the layers will look like in the end.
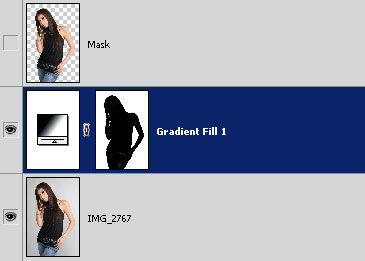
To create a gradient for the background, we will use a "Mask" layer. Press Ctrl+click on the layer thumbnail to load the selection. Go to Select > Inverse (Selection - Inverse selection). Then Layer > New Fill Layer > Gradient (Layer – New Fill Layer – Gradient).
Set the following fill layer settings.

Gradient options.

Finally, set the Opacity to 50% of this layer.
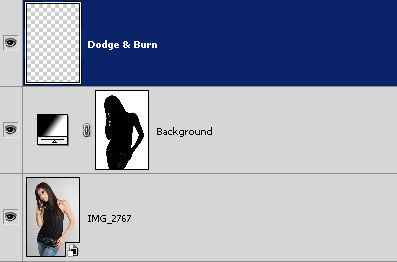
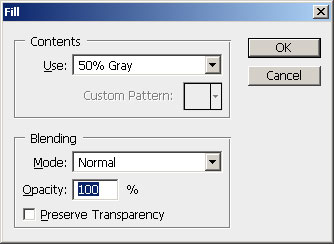
Create a new "Dodge & Burn" layer. Place this layer above all others. Change the Blending Mode to Soft Light .
Run the command Edit> Fill (Editing – Fill) and set the following parameters.
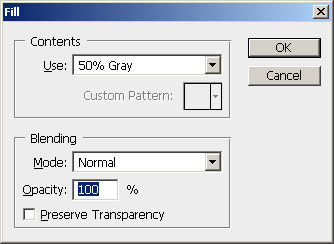
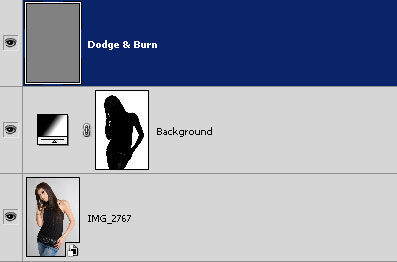
The layer should be filled with 50% gray.
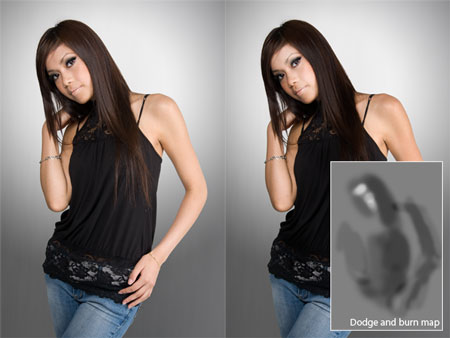
Let's add a layer mask. Make sure the layer you just created is active. Then press Ctrl+click on the thumbnail of the “Mask” layer and click on the layers palette “add a layer mask” (create a layer mask). It should look like this.

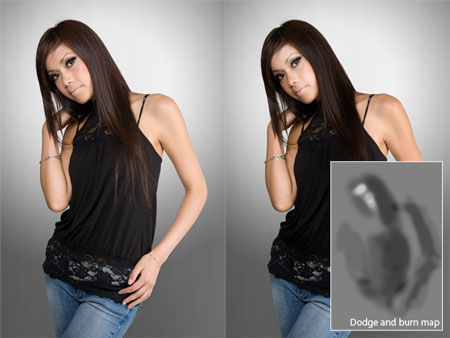
Use the Burn Tool  on part of the girl’s face, her hair and her hands. Then use the Dodge Tool
  to paint the rest of the model's face.
Before and after applying darkener and brightener.
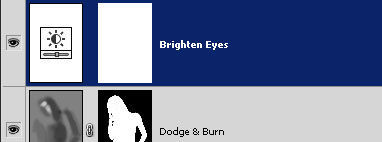
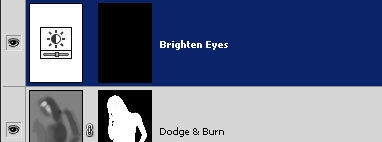
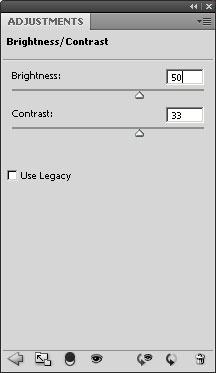
Now you need to brighten your eyes. The Brightness/Contrast adjustment layer will help us with this. Execute the command Layer > New Adjustment Layer > Brightness/Contrast (Layer – New Adjustment Layer – Brightness/Contrast).
Name the layer “Eye Brightness”.
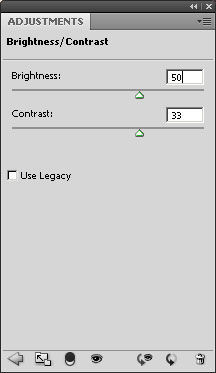
Set Brightness to 50 and Contrast to 33.
Select the mask of this layer, go to Image> Adjustments> Invert (Image – Correction – Inversion). This will invert the layer mask from white to black.
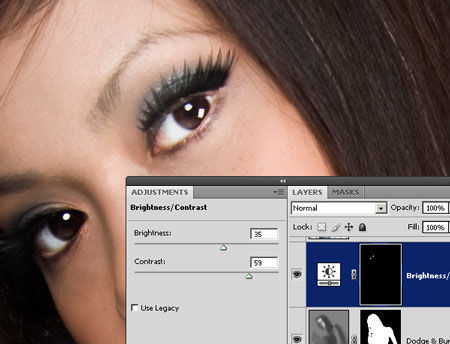
Using the Brush Tool  (Brush) white, go over the eyes using a layer mask. You will see your eyes become brighter. Then, go back to Brightness/Contrast and set the following parameters.
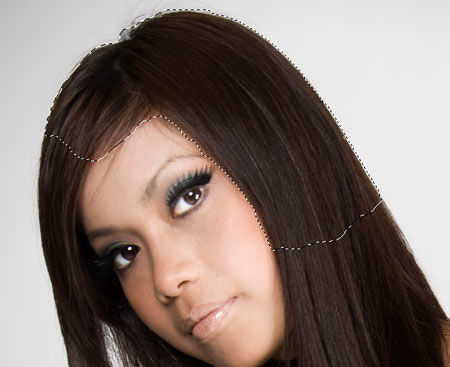
Finally, add shine to the hair. Let's start with a quick selection. The Magic Wand Tool  can help us with this to create a selection of the area of hair where we want to add shine.
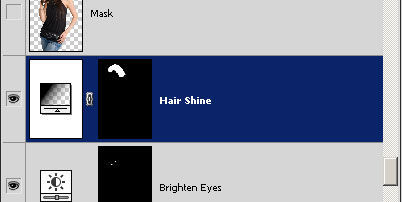
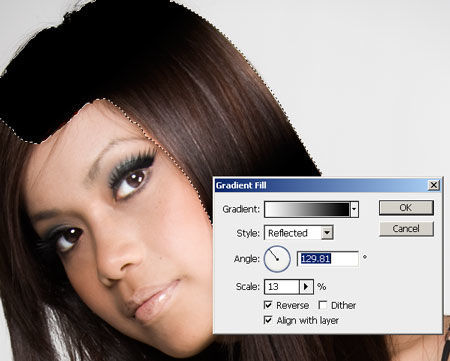
Without removing the selection, execute the command Layer > New Fill Layer > Gradient (Layer – New Fill Layer – Gradient). Place the layer above the “Eyes Brightness” layer. Change layer blending mode Overlay . You should get a picture like this.
Go back to the Gradient setting. Set the fill from white to black, style Reflected . Adjust the Scale at which you want to add shine to your hair.
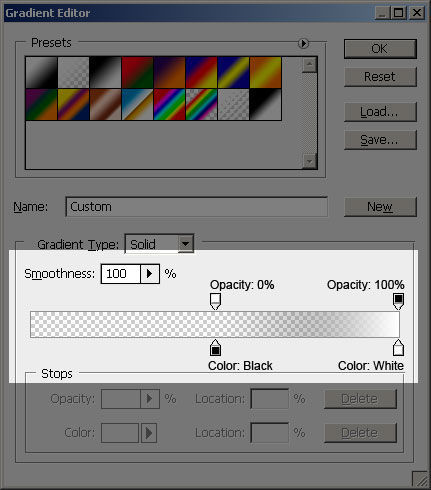
Let's fix the Gradient. The gradient options are shown below. Move the top and middle sliders to the middle of the ruler, set the transparency and color.
We gave shine to the hair.
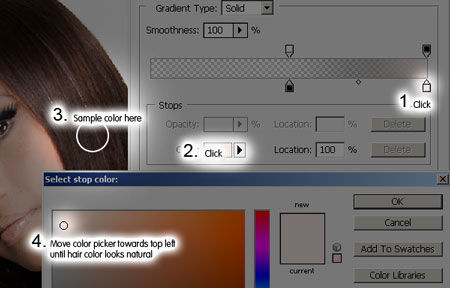
But it may not look entirely natural. You can come back and correct your hair color at any time. 1. Click on the lower left ruler slider.
2. Click on Color and the color picker window will appear.
3. Take a sample from your hair to find the desired color.
4. Move the circle in the palette window to the upper left corner until natural shades of hair color appear.
5. Click OK three times to exit the Gradient Fill settings.
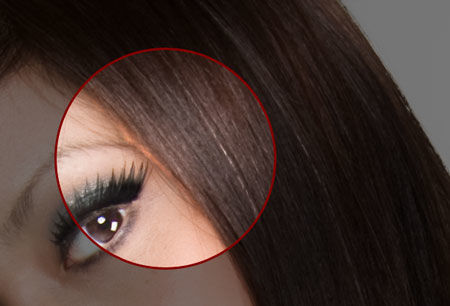
We added shine to the hair, but if you look closely, you can see the shortcomings of our work.
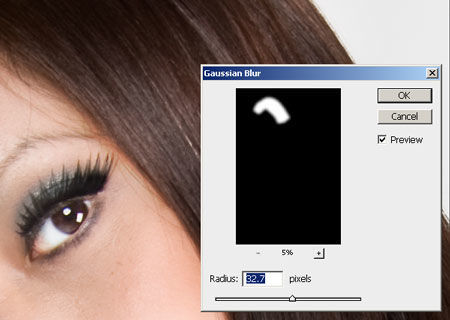
We can easily fix this by blurring the layer mask. Select the mask layer with the hair shine, go Filter > Blur > Gaussian Blur (Filter – Blur – Gaussian Blur). Set the parameters as in the figure below.
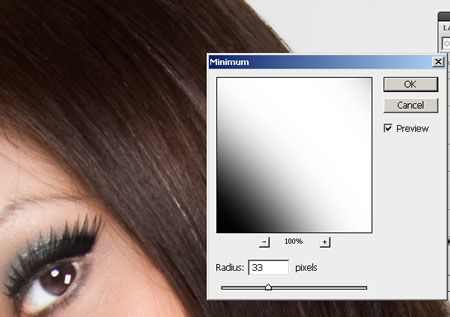
If your hair shines on your skin, use the Minimum filter to hide it. Run the command Filter > Other > Minimum (Filter – Other – Minimum) and set the following parameter.
Here's before and after adding shine to your hair. You can add emphasis to your eyes by matching the shine of your hair with the shine of your eyes.
Quick portrait retouching
You don’t always want to tinker with a photograph for a long time, and sometimes there is no need to perfectly process the model’s skin. I just want to improve the quality of portrait photography a little and do a quick portrait retouch .
This Photoshop tutorial will show you a very simple way to improve the quality of your skin, which does not require much knowledge of Photoshop.
The lesson was made in the Russified program Photoshop CS3, but can be done in almost any version of Photoshop.

Let's open the original photo.

Let's create a duplicate layer - Ctrl+J.

Set the blending mode for the new layer to “Soft Light”. “Overlap” is also perfect for some photos—experiment.

This is what the model looks like now.

Let's go to "Filter - Blur - Gaussian Blur".

The contrast mode we set allows us to blur the photo quite a lot.

We get this photo. Skin has improved significantly. But the effect was applied to the entire photo, and we only need it to the skin.

Hold down the Alt key and click on the third icon from the left - a black layer mask is loaded onto the top layer, and the image returns to its original state.

Make the “Brush” tool (B) active with standard parameters, set the foreground color to white.

Use a brush to apply only the skin.

After using this method, the red color saturation will usually increase too much. Therefore, click on the middle button at the bottom of the “Layers” palette and select the “Hue/Saturation” adjustment layer from the drop-down list.

Reduce saturation to the required degree - depends on your photo.

We get this photo. Everything already looks good, but due to the use of the contrast mode, the girl’s part of the neck was too lightened. Let's fix this problem.

Using a brush with standard parameters (set the foreground color to black), we “walk” over this area of the neck.

We get this result.

Compare the image of the model before and after processing the photo in Photoshop.
We did a very quick portrait retouching in Photoshop .
How to become a MASTER in portrait photo retouching?
The answer is here

If you don’t want to miss interesting lessons on photo processing, subscribe to the newsletter.
5 techniques for creating a background for a portrait.

Hello. Today I decided to write a post about the background of a portrait. I’m sitting here retouching another portrait and asking myself - damn, why is there this halo-glow around the portrait again? Is this a standard move?
And today I decided to experiment with the background.
Here I will analyze techniques for creating backgrounds for portraits on stone, ranging from simple ones to some unusual ones.
1. This is a common background that is used in many portraits.

Well, there's nothing complicated here. As a rule, it is done with a soft wide brush on a separate layer behind the portrait.

Another way that allows you to do this a little faster:
1. Press the “D” key - make the main color black and the background color white.
2. Hold CTRL+Click on the icon of the layer with the portrait - select the portrait.
3. Ctrl+Shift+N (new layer).
4.Selection - Modify - Feather - value 40 - feather the border by 40 pixels.
5. Selection - Modify - Expand - value 40 - expand the selected area by 40 pixels.
6. Ctrl+Del - fill it with white.
7. Ctrl+D - remove selection.
8. Move the layer with the halo below the layer with the silhouette.

This is the result. To be honest, I don’t really like it, in some places you still need to work with the brush, but in terms of saving time, it’s just right.
2. Background glow.

1. Create a new square document, 500x500 pixels.
2. Press "D" to set the default colors (black and white).
3. Filter -> Rendering -> Clouds.
4. Filter -> Design -> Mezzotint, specifying “large dots” in the drop-down menu.
5. Filter -> Blur -> Radial Blur.
Set “quantity” to 100, “method to linear” and “quality to best”. 6. Filter -> Stylization -> Edge Highlighting.
7. Ctrl+I to invert the image
8. Filter -> Blur -> Radial blur with the same parameters.
9. Filter -> Blur -> Radial Blur, setting the “quantity” parameter to 5, “method - ring” and “quality - best”.
10. Filter -> Stylization -> Edge Highlighting.
11. Ctrl+I.
12. Filter -> Blur -> Radial Blur.
Set “quantity” to 100, “method to linear” and “quality to best”. 13. Ctrl+L - levels.
14. Level values at 10, 2.00 and 200. You can experiment with the values.
3. Background “manual”. It seems to imitate engraving with a hand tool on stone.

1: New document or layer (depending on what stage) 30x40 grayscale 33.3 pixels/cm.
2. Fill it with black.
3. Filter - Sketch - Reticulation: Density 12, foreground level 40, background level 5 (you can experiment)
4. Image - correction - levels: black slider 60, white 60 (you can play with how many white and black dots you need, it depends taste).
5. Oval Marquee Selection Tool.
6. Selection - transform the selected area (fit it to the portrait, again to your taste) enter.
7. Selection - inversion.
8. Selection - modification - feathering (I set it to 100 pixels, the smoothness of the transition will depend on this)
9. Delete (check that the second color is black if it’s just a background and not a layer)
10. Deselect.
You can also click on the layer with the face and torso, expand the selection, shade it, perform the above manipulations on a new layer and you will get a background along the contour of the portrait.
4. Newspaper background.

This background is made using a filter.
1. First, draw a regular background with a soft, wide brush.
2. Then: Filter - Design - Colored halftones.
And everything should turn out to be a background like from a newspaper.
5. Striped background.

1. Create a new document and make various chaotic dots on it - small, large, medium.
2. Next - Filter - Motion Blur.

Here you can specify the angle of the blur. Also, displacement is a kind of intensity.
You can of course play with layers, duplicate, try different blending styles, etc.
If you have your own techniques that you use in your work and want to share them, then write to me by email: [email protected] or in the comments.
Sergey ( Sunday, 26 April 2015 16:04 )
Super! Thank you very much, it was a very good article, informative!
Revaz ( Saturday, 29 December 2018 08:28 )
Really great! Well done guys, you helped a lot, happy new year to you!
TorMoZzzz. ( Sunday, 11 August 2019 09:04 )
Copy the portrait layer (it must be cut out) ctrl-j
Switch to the portrait layer that is under the copy (or make a copy under the original
Now we need curves ctrl-l curves make the portrait completely white
Next, overlay the “blur” layer (goes immediately under the “normal”)
Go to filter-blur-gaussian blur and adjust our oriole to size
LiveInternetLiveInternet
—Music
—Tags
—Categories
- General information (52)
- Photo design (51)
- Retouching at its finest! (43)
- Let's draw! (40)
- Collages (29)
- Perversions of text (26)
- Useful things and a little about them (20)
- Photo Montage: when the impossible is possible (19)
- Video tutorials (17)
- All about Photography (7)
- Buttons and other joys of website creation (6)
- MM is my goddess (3)
- Mine (1)
—Search by diary
—Subscription by email
—Interests
—Regular readers
—Communities
—Broadcasts
—Statistics
Retouching a studio portrait in Photoshop
Saturday, June 12, 2010 17:31 + to quote book
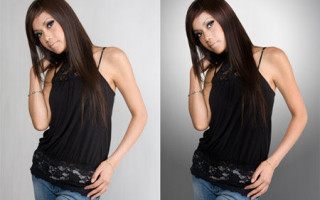
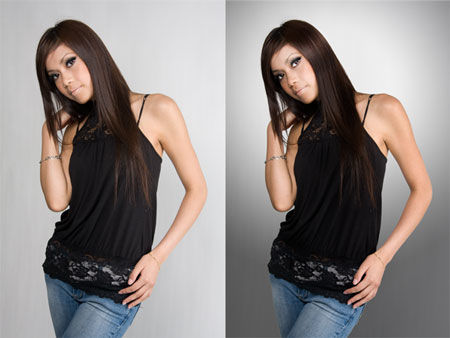
In this tutorial you will learn how to properly retouch studio portraits.
Before and after.

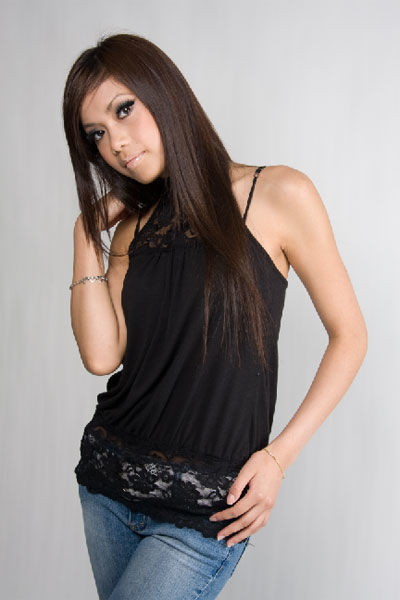
Here is the original image. The photo was taken well, but it looks a little boring. In Photoshop we will learn how to polish the captured images. Let's open our image.
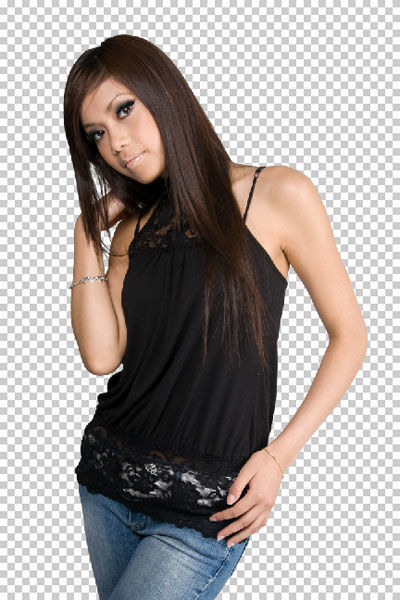
Let's start by removing the background first. For this I used the Extract and Color Range . First, remove the background using the Filter > Extract . We still have some parts of the background in the hair area, so let's finalize it with the Color Range .

Then go to Select > Color Range to select the area of hair that was poorly processed by the Extract .

Now we have a selection mask on this layer. Let's name the layer "Mask".

Now we can add a gradient to the background. Adding a gradient to your background is a simple and effective way to remove a boring background. Here's a preview of what the layers will look like in the end.

To create a gradient for the background, we will use a "Mask" layer. Press Ctrl+click on the layer thumbnail to load the selection. Go to Select > Inverse (Selection - Inverse selection). Then Layer > New Fill Layer > Gradient (Layer – New Fill Layer – Gradient).

Set the following fill layer settings.
Gradient options.
Finally, set the Opacity to 50% of this layer.

Create a new "Dodge & Burn" layer. Place this layer above all others. Change the Blending Mode to Soft Light .

Run the command Edit> Fill (Editing – Fill) and set the following parameters.
The layer should be filled with 50% gray.

Let's add a layer mask. Make sure the layer you just created is active. Then press Ctrl+click on the thumbnail of the “Mask” layer and click on the layers palette “add a layer mask” (create a layer mask). It should look like this.

Use the Burn Tool  on part of the girl’s face, her hair and her hands. Then use the Dodge Tool
  to paint the rest of the model's face.

Before and after applying darkener and brightener.
Now you need to brighten your eyes. The Brightness/Contrast adjustment layer will help us with this. Execute the command Layer > New Adjustment Layer > Brightness/Contrast (Layer – New Adjustment Layer – Brightness/Contrast).
Name the layer “Eye Brightness”.

Set Brightness to 50 and Contrast to 33.
Select the mask of this layer, go to Image> Adjustments> Invert (Image – Correction – Inversion). This will invert the layer mask from white to black.

Using the Brush Tool  (Brush) white, go over the eyes using a layer mask. You will see your eyes become brighter. Then, go back to Brightness/Contrast and set the following parameters.

Finally, add shine to the hair. Let's start with a quick selection. The Magic Wand Tool  can help us with this to create a selection of the area of hair where we want to add shine.

Without removing the selection, execute the command Layer > New Fill Layer > Gradient (Layer – New Fill Layer – Gradient). Place the layer above the “Eyes Brightness” layer. Change layer blending mode Overlay . You should get a picture like this.

Go back to the Gradient setting. Set the fill from white to black, style Reflected . Adjust the Scale at which you want to add shine to your hair.

Let's fix the Gradient. The gradient options are shown below. Move the top and middle sliders to the middle of the ruler, set the transparency and color.

We gave shine to the hair.
But it may not look entirely natural. You can come back and correct your hair color at any time. 1. Click on the lower left ruler slider.
2. Click on Color and the color picker window will appear.
3. Take a sample from your hair to find the desired color.
4. Move the circle in the palette window to the upper left corner until natural shades of hair color appear.
5. Click OK three times to exit the Gradient Fill settings.

We added shine to the hair, but if you look closely, you can see the shortcomings of our work.

We can easily fix this by blurring the layer mask. Select the mask layer with the hair shine, go Filter > Blur > Gaussian Blur (Filter – Blur – Gaussian Blur). Set the parameters as in the figure below.

If your hair shines on your skin, use the Minimum filter to hide it. Run the command Filter > Other > Minimum (Filter – Other – Minimum) and set the following parameter.

Here's before and after adding shine to your hair. You can add emphasis to your eyes by matching the shine of your hair with the shine of your eyes.

Author: Denny Tang
Translation: Gavrysh Ekaterina
Link to source
Portrait processing
Greetings, dear readers! It's been a while since we've had photo editing lessons. Today I decided to fill this gap, so we will process the portrait in photoshop .
For our experiments, I took a photo from one of the free photo stocks. You can take your photo.

And this is what it will look like after processing:

Portrait processing
I urge you to start processing a portrait (and any other photograph) with analysis. Let's now determine what is wrong in the photo and needs improvement.
- Noise. As you can see, there is a lot of noise in the area of the sweater and hair:


We will fix this first.
— The eyes look boring, let’s add some shine to them.
— Increase the clarity of the photo
— Too much red
Let's go to process the portrait according to the points just outlined.
Portrait processing: removing noise
Go to the Channels tab and select Red, the image will look like this:

Now apply Filter -> Noise -> Reduse Noise to this channel.

There is a result, but it’s rather weak, let’s repeat the filter action (Ctrl+F). I did this twice and got this result:

It's not bad, the noise has become much less. Now do the same for the other channels, if there is noise there (and most likely there is), and go back to the RGB channel by clicking on it with the mouse:

Great! We dealt with the noise, and now the portrait looks much better. Let's move on!
Portrait processing: sparkle in the eyes
Select the iris of the eyes with any convenient tool (you can use the Pen Tool, but I do this using the Elliptical Marquee Tool (M) and the Polygonal Lasso Tool (L) in subtraction mode)

And copy it to a new layer (press Ctrl+C, and then Ctrl+V - copy and paste, a new layer is automatically created when pasting):

Hold ctrl and click on the thumbnail of the newly created layer, the selection will appear again. Now take the Dodge Tool (O) with an Exposure value of 18%

And we begin to process the eyes:

The eyes turned out too bright, so I'll have to tone down the effect. Set the Blending Mode to Lighten Color and reduce the Opacity to 43%:


Now it’s more like business, we’ll finish the work with the eyes and move on to further processing of the portrait.
[info_box]I admit, I went too far with my left eye, don’t make the same mistake[/info_box]
Portrait processing: increasing clarity
We will increase the clarity of the portrait using the Hight Pass filter. So, merge the photo and the eye layer (Crtl+E) and create a copy of the photo (right-click on the layer -> Duplicate Layer). Apply Filter -> Other (Other) -> Hight Pass (High Transition) with a radius of 4px. Set the blending mode to Vivid Light:

Clarity has improved significantly, but we don't need it in all places. So create a layer mask (Layer -> Layer Mask - Reveal All), take a soft black brush with an opacity of 50% and go over those places where the clarity turned out to be excessive:

Well, that's not bad. Merge the layers (Ctrl+E).
All that remains is to suppress the red color. To do this, go to Image -> Adjustments -> Curves, select the red channel and lower the curve in the place where the red peak falls:

The result of processing the portrait looks like this:

Result using Cross-Processing:
Well, this is where we can end today’s photoshop lesson , but the topic of photo processing is too vast to be covered in one material. For example, the girl in the photo in this example had fairly smooth skin, without defects, so we did not need to remove moles, pimples, oily skin, etc. In addition, we did not stylize the photo, did not apply any filters, but simply simply improved the quality of the portrait and gave it more expressiveness. So I will write more than one lesson on the topic of photo processing and retouching, so subscribe to the RSS feed so as not to miss these lessons. I’m also looking forward to your comments 😉
With that, I’ll take my leave and wish you creative success, until we meet again!
Retouching a studio portrait in Photoshop

Hello to all Photoshop lovers! Today I have prepared for you a lesson on retouching portrait photography. To begin with, I suggest looking at the original photo and the final result of the work.


The photo that we will use for work can be downloaded from the free photo hosting site https://clip.dn.ua/dedushki-i-babushki/64905_138/. Lesson time is about 2 hours. Let's start.
Step 1. Launch Adobe Photoshop and open your image. Before we begin retouching, we will determine the areas of work: smooth out deep wrinkles on the face and neck, remove moles near the nose, under the eyes and lip. Next, we will correct the shape of the eyes and mouth, tint the eyebrows and hair to remove gray hair.
We will use the Healing Brush (J) because it does not disturb the texture of the skin. First you need to adjust the shape of the brush, approximately as in the picture below.

Now let's get down to the main part of the work. Create a new layer (Shift + Ctrl + N). Increase the image scale to 100%, set the healing brush size to 30-40 pixels and hardness to 50%. With the new layer active, hold down the Alt key (the appearance of the brush will change) and specify the location from which the sample will be taken. Release the Alt key and begin to carefully paint over the deep wrinkles on the forehead. If you want to undo changes, use the keyboard shortcut Alt + Ctrl + Z.


To remove smaller wrinkles, for example, in the eye area, increase the scale even more (it is more convenient to adjust the scale by simultaneously pressing the Ctrl, + or - keys), and reduce the brush size to 10 pixels (you can adjust the brush size using square brackets). In the same way, smooth out wrinkles in the nose, mouth, chin and neck. When you're finished, you should end up with a result similar to the image below.


Step 2: Change the shape of the eyes and mouth. Select the bottom layer with the original image and use the Rectangular Marquee (M) to select the right eye. Right-click on the selection area and select “Copy to New Layer.” Make this layer active. Warp tool to change the shape of the eye (see photo below).


Apply the changes. Soft eraser (E) at 60 px. and 0% hardness, erase unnecessary details.


We perform similar actions for the left eye. And, if desired, change the shape of your lips. Let's look at the result.


Step 3. Next, create a new layer. Select a soft round brush (B) 60 px, set the foreground color to #000000 and paint the eyebrows. The edges can be erased a little with a soft eraser.

Change the layer blending mode to “Soft Light” and reduce the opacity to 83%.
Next, let's color the hair. Also create a new layer on top of the previous ones. Choose a dark brown foreground color, like #1d100f. Take a soft brush again and begin to paint over the hair. You can immediately change the blending mode of this layer to “Soft Light”. Finally, reduce the opacity a little, to about 89%.


Step 4. To complete the lesson, darken the photo a little and adjust the color tone and saturation. Create a new adjustment layer “Curves” and lower the curve at two points slightly below the diagonal (see picture).


Then add a new Hue/Saturation adjustment layer and set the saturation value to +6. Make sure that the “tinting” option is not checked.

This concludes the lesson. Let's look at the final result of the work.