Exposure metering and how it works in your camera
What is exposure metering and what are they, when to use which?
Good day! Timur Mustaev is in touch with you again. I am sure that the progressive category of amateur photographers have already heard a lot about the concept of exposure. After all, this is one of the defining characteristics of photography!
All you and your camera do is light photography. Do you think that the method of determining the quantity and quality of incoming light is also important? I will say an unequivocal “yes”. Among the functions of any camera is exposure metering.
Not all photographers actively use it, but in vain, because it can significantly affect the image.
I repeat that you need to be able to understand the process of setting all the necessary parameters that make up the exposure, that is, photosensitivity (ISO), aperture, shutter speed.
But besides this, it is important to measure this very exposure, or visible light radiation, in the correct way. This is done using technology; the “by eye” method cannot always be trusted.
Types of Exposure Metering
I will tell you about the existence of three types of measurements in the camera:
- the first is matrix ;
- the second is center-weighted ;
- the third is point .
There may be more, but these are the main ones.
Now more details about each. Let's look at why they have such names, how they differ from each other, and which measurement to use depending on the situation.
It is believed that the preference for any of them makes a significant contribution to the illumination of the entire photograph and its individual parts.
Please note that measurements can be called differently - it all depends on the camera model. But Nikon, Canon or some other brand doesn't actually change their specifics.
I’ll immediately give an example where different exposure metering was used. The photographs have not been processed. The shooting was carried out at home under normal lighting. Parameters: aperture priority mode, ISO-100, f/7.1, white balance - incandescent.
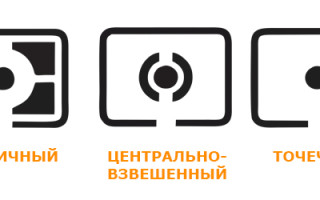
The first measurement is matrix
The metering mode is matrix. It can also be called evaluative, also multi-segment.
You can quite guess what the term means: a matrix is, in mathematics, a rectangular table divided by columns and rows; and the prefix multi- speaks of multiplicity or multiplicity (for example, segments or certain sectors).
We conclude that thanks to this measurement, photographic equipment divides the frame into several zones in which it measures the lighting. After which all measurements are summed up and a certain average value is given.
By the way, it has proven itself quite well, which is probably why it is suitable in most cases and more often than not it is the default one in the camera settings.
For what genres and subjects is it most useful? This may include:
- landscape and nature photography, where all the parts and all the objects on different planes play a role in the overall picture. Therefore, assessing the lighting in each corner of the frame is important.
- a photograph with many significant elements located throughout the photograph, including in the highlights and shadows.
The image will be generally satisfactory if the external conditions are quite simple; in more complex conditions, try other exposure meters.
Second measurement - center-weighted
Center-weighted option. What is this? Perhaps the word “weighted” is a little confusing. But here it appears in the sense of assessed and measured.
The main thing here is the center . Similar to the previous measurement, since the light is taken into account throughout the scene, but a larger percentage (about 70-80) still falls in the middle.
It is assumed that the main object, character, that is, an object that is more significant, brighter, more intense, etc. will be located in the center.
Sometimes a partial type occurs. The only difference from the central one is that it covers a smaller area where it takes measurements. About only 10 percent. And so he similarly focuses attention on the center of the picture.
It is probably useful if in the middle of the photo there is an object with ambiguous lighting characteristics or it is important to measure some specific detail of the object that falls in this area.
Measurement number three - spot
Spot, or exposure metering using dots, is recommended when photographing portraits.
You may disagree - why not use center-weighted then? The only advantage of the third method of measuring exposure is the ability to determine in which particular zone it is necessary to evaluate the lighting (not necessarily in the central one).
True, this area will be very small, even smaller than for the partial view. There is one caveat. Canon users claim that, unlike Nikons, their spot metering only works in the middle of the photo, and the movement of the focus point does not affect it in any way.
I cannot recommend any metering mode. I use matrix or center-weighted metering less often than spot metering. In different cases, a different measurement is used.
As you can understand from the above, a certain situation, certain shooting conditions and objects require the appropriate type of metering. This is ideal. In fact, it is worth trying everything, and then making a personal choice in favor of the one that is most convenient for you.
Useful facts
Did you know that there is a device for accurately determining exposure? You may have already heard about it or read about it from my recent article. This is a flash meter (exposure meter).
Unlike in-camera metering, that is, an exposure meter, many amateur photographers resort to this external device. It, of course, does not come with a standard set of photographic equipment; it is purchased separately.
Despite its small size, it can be expensive. The fact is that the camera does not always clearly determine which settings are suitable in a particular case. It is especially difficult for him to cope when the subject in the frame is contrasting, there are many bright and dark areas.
Therefore, if it is important for you to get the perfect shot that fully corresponds to the idea, then I recommend buying yourself a flash meter. Not only does it measure incoming light in different ways, but it is also capable of storing multiple measurements taken.
With such a device, it will most likely be easier for you to adjust all photographic values during shooting and spend less time subsequently on image processing. In addition, a simple photo exposure meter built into the camera is indispensable when working with pulsed light in studios.
Before I say goodbye to you, I would like to introduce you to the video course “Digital SLR for a beginner 2.0” - for NIKON owners or “My first MIRROR” - for CANON owners. What's good about it? The answer is simple - you will learn to understand your DSLR camera and take decent pictures, getting the most out of it. You will learn a lot of new things that you didn’t even know about your camera. Don't stand still, develop, everything is in your hands!
Digital SLR for a beginner 2.0 - if you have a NIKON SLR camera.
My first SLR - if you have a CANON SLR camera.
Goodbye, visitors to my blog! Subscribe and read new articles!
Types of exposure metering - let's understand it simply and without panic!
Even if you were embarrassed to ask the seller about exposure metering modes when buying a camera and are afraid to get bogged down in technical details while mastering the camera manual, you won’t be able to ignore this issue for long, since without mastering such valuable information, no photographer has ever managed to take high-quality photographs on DSLR. To do this, it is worth understanding the different types of exposure metering. But first of all, let's look at what the exposure is for?
Exposure in photography is determined by the amount of light that hits the camera's sensor or film. This amount can be adjusted by changing the ratio of aperture and shutter speed. The ratio is determined by the exposure meter built into the camera. But to help the exposure meter itself correctly estimate the amount of light is the photographer’s task. After all, the camera is an extension of the brain of the photographer, and not vice versa. She doesn’t know how to read thoughts, she needs to clearly set the settings that are required to get a high-quality photo.
The main function of a light meter is to measure the amount of light entering the camera. More specifically: it measures the light reflected from various objects in the scene being photographed. But how to determine the correct exposure if several different objects enter the lens, which, by definition, will reflect light differently? It all depends on the dynamic range of the camera and metering modes.
Each of the camera's metering modes (of which there are usually four) will process the scene differently, and it is up to the photographer to decide which mode is best in each case:
- evaluation measurement
- partial metering
- spot metering
- center-weighted average metering
Please note that we are talking about digital SLR cameras from two of the most popular manufacturers - Canon and Nikon. Other manufacturers have very similar metering modes, available features, and naturally deliver the same results.
Evaluative (matrix) metering mode
Evaluative metering (Canon) or matrix metering (Nikon) divides the entire photographic scene into small areas. All measurements are then calculated and averaged to determine the optimal exposure (shutter speed and aperture combination). As you can see from the photo, the red square shows the area that will be assessed by the sensor. Given the “advanced” capabilities of modern SLR cameras, not only the amount of light is measured, but also things like the distribution of shades, colors and even distance.
Typically, evaluative metering is the default setting on most digital cameras and will give good, correct exposure. Evaluative metering is suitable for most standard situations, such as landscape photography.
Center-weighted metering mode
Center-weighted metering also attempts to measure the entire scene on average, with the only difference being that more weight is given to the area in the center of the viewfinder. In the photo, more significant places are indicated by the intensity of the red color. About 70% of the counting is made up of the area around the center of the viewfinder. This exposure metering mode involves increasing intensity towards the center.
Partial metering mode
As you can tell from the photo above, partial metering covers about 9% of the viewfinder and will be most effective when the background is much brighter than the subject. Particularly due to its emphasis on the center of the viewfinder, this metering mode is most effective when the edges of the scene are significantly lighter or darker than the center, meaning the edges may have an undue effect on the exposure of the frame. But the disadvantage of this mode is precisely its emphasis on the center of the viewfinder.
Spot metering
Spot metering mode gives you better control over where to take light metering data for exposure, since it only covers about 4% of the area entering the viewfinder. This is the smallest area of all metering modes. The main advantage of spot metering comes from the fact that the location for metering exposure can be selected using the focus points and thus make a more accurate metering exactly where needed. Spot metering is what you need for portrait photos because it measures the light reflected from the face over a range of about 1 meter.
When to use each metering mode?
So which metering mode should you use and when? evaluative (matrix) or spot measurements are most often used The other two types of measurement are used less frequently. Ultimately, it comes down to personal preference. You can choose one or two and use only them. The only thing you need to know for sure is how the camera will measure exposure in this mode in order to then make adjustments through compensation or bracketing. Having started with a clear mastery of the evaluative exposure metering mode, you can move on to subsequent ones and get to know your camera and its capabilities better.
Photogora video channel
You can leave your comment on this article
Exposure metering modes and how they work
Correct exposure versus camera exposure
Exposure is a complex beast. And conquering it is very, very important. Exposure and composition are two of the most important components of great photography.
The exhibition consists of three components:
- ISO or light sensitivity;
- Aperture, or the size of the opening through which light enters;
- Shutter speed, or the amount of time it takes for light to pass through the aperture.
You can shoot in Manual, Shutter-Priority, or Aperture-Priority mode, but that won't make the sensor evaluate the scene any differently.
Measuring the light or brightness of the scene you are trying to capture is a critical component in determining the ideal exposure.
To do this, you need a sensor that can sense brightness levels. Exposure is measured using a light meter. There are two types of light meters: the first measures the light falling on an object or scene and is called a luminance light meter; the second measures the light reflected from a scene or selected object, which is why it is called an illuminance meter. All exposure meters built into digital cameras are exposure meters that measure illumination, and in this article we will talk about them. The more you understand how these light meters work, the better you will be able to understand and interpret the data they give you. Note that light meters that measure by brightness are much more accurate than light meters that measure by illuminance.
How does your camera determine exposure?
Light meters attempt to estimate the amount of light in the scene you are trying to capture. Unfortunately, this estimate is just a guess. You've most likely encountered instances where you tried to photograph a very dark or black subject and it came out overexposed, or it was a snowy scene where the snow looked gray or underexposed. The reason is that the camera's light meter is convinced that most scenes are reduced to medium gray (18% gray). This medium gray is the middle ground between the darkest shadows and the brightest highlights. Since the sensor in a camera has no concept of white or black, you must help it by using some form of exposure compensation based on the color scheme of the subject or scene.
Exposure Metering Modes
To work with exposure and determine the degree of exposure compensation, cameras have exposure measurement modes. Typically, you'll encounter three main modes: Matrix (also called Evaluative), Center-Weighted, and Spot modes. Each of them is suitable for certain situations. And don’t be mistaken that one of the named modes will do everything for you.
Evaluative exposure metering
In this exposure metering mode, the sensor divides the scene into segments and analyzes each of them for the ratio of light and shadow (bright and dark information).
Once the information is collected, it calculates the average and sets the exposure based on that. Please note that different cameras may divide the frame into different numbers of segments. In addition, different cameras calculate the average value for exposure differently. Manufacturers use complex formulas to calculate exposure. Therefore, it is important that you know how your camera behaves in different situations and learn when to trust it and when not to. Many modern digital SLR cameras do not simply average the values obtained in grid segments, but also pay special attention to the focal points that are used to create a particular photo.
The matrix exposure metering mode was used to set the exposure for the next series of photographs.
Under the same lighting, white and black panels were placed next to each other. When taking the first photo, the camera set the exposure while pointing between the white and black panels. The camera assessed all the white and all the black and came to a logical decision by averaging the exposure.
Evaluative exposure metering - center between white and black panels
Measurement on a white panel
This photo was taken with the camera's sensor judging the exposure using a white panel. The white turned out to be gray, and the black turned out to be a darker gray. This happened because the camera tries to make everything neutral gray or 18%.
Metering on a black panel
In the third photo, the camera assessed the exposure based on the black panel. As a result, the photo was overexposed: the white was too bright, and instead of black it turned out to be dark gray.
Center-weighted exposure metering
In this measurement method, the central part of the frame is most important, which can make up up to 75% or more of the entire frame, while the edges of the photo are considered a less important part of it.
Many professional digital SLR cameras allow you to change the diameter of this center-lighting zone. Many photographers prefer this mode of exposure measurement, while obtaining quite good exposure accuracy. Please note that when using center-weighted exposure metering, in most cases you need to place the subject in the center of the frame, determine the exposure, and only then choose the desired composition for the photo.
Spot metering
In this mode, light is measured only within a very small part of the scene.
Typically this area is in the center of the photo and the measurement range is approximately 3 to 7 degrees. Typically, the measurement area takes up less than 5% of the frame. Most mid- and high-end DSLR cameras allow the photographer to move the metering point within the frame to determine the location from which data should be collected (usually the same as the focus point). This is a very accurate exposure metering mode.
It provides accurate data from a small area of the selected scene and is most effective when shooting scenes with high contrast. The same white and black panels were photographed using spot metering. As you can see in the photo below, there is a similar problem. Even the point mode was fooled.
Spot metering on black (photo on the left) and spot metering on white (photo on the left)
To determine the correct exposure (and the camera was not fooled), spot metering was done using a gray card placed in the same light as the black and white panels. The exposure determined using the gray card was used to photograph the two panels. In the photo below we can see a good exposure.
Exposure determined by gray card
How do I switch between exposure metering modes?
The exposure metering mode icon looks like an eye in a rectangle. Your camera's exposure metering system may have three or more modes of operation. When changing the measurement mode, the icon will also change.
Which exposure metering mode should I use and when?
Matrix exposure metering
Matrix metering works well for scenes that are evenly lit. It can work well if you need to take photos quickly. While your camera's light meter may fail you at times, it is a sophisticated computer-controlled device that can be relied upon for general photography. You can set this mode on your camera and use it to improve your understanding of exposure.
Center-weighted exposure metering
Use this mode for any scene where you want the main subject to be properly exposed, while other areas of the photo are not as critically exposed.
This mode is great for taking portraits of people and pets, still lifes, and some types of product photography. Center-weighted mode is much more consistent and predictable than matrix mode. Use it thoughtfully when determining where your camera will measure light in a scene, while also paying attention to areas where lighting is not key to your composition.
Use this mode, for example, for street portraits, scenes with high contrast, shooting goods and food.
Spot metering
Spot mode provides the greatest metering accuracy and exposure control.
It's great for backlit subjects, close-up photography, and macro photography. This mode can be used to determine the exposure for the brightest and darkest areas of the landscape. Without this mode it is impossible to photograph the moon. Don't forget about spot metering when it's important to determine the correct exposure for a subject that doesn't take up the entire frame. Spot metering is great in situations where the subject is much lighter or much darker than its surroundings.
Exposure compensation
In some situations, you will need exposure compensation to get the correct exposure, no matter which exposure metering mode you use.
Scenes with a lot of snow will appear underexposed and will require +1 or more stops of correction to make the snow appear white. Conversely, a black shaggy bear or a person in dark clothing will be overexposed, so a negative adjustment of -1 stops or more will be required.
So which mode should you use?
The answer is that it all depends on the subject, the direction of the light, and so on.
For evenly lit scenes, choose matrix mode. Center-weighted mode is suitable for scenes with high contrast where you want the exposure to be correct for the main subject. Spot mode is good for shooting backlit subjects. Finally, a brightness meter can be useful to accurately measure exposure, as your camera's sensor can be fooled quite easily. But knowing how the light meter in your camera works will definitely help you get the correct, more accurate exposure.
Exposition. Part 4. Metering modes
In the previous part of the lesson, we found out that the camera is equipped with a very accurate tool for measuring the brightness of the scene. To always get high-quality photos, you need to learn how to work with it.
The camera can meter exposure in different modes to suit different shooting situations.
Matrix exposure metering
This icon indicates matrix metering on the camera.
With matrix metering, the brightness of a scene is measured over the entire area of the frame.
The most suitable exposure metering mode for beginner photographers is matrix. It is also called evaluative or multi-segment. The brightness of the scene is measured over the entire area of the frame, using the maximum number of sensors. The results from each sensor (remember that depending on the model of the device, their number can reach tens of thousands) are analyzed, and the camera determines the optimal exposure value. Methods for analyzing this data are constantly being improved and become more intelligent. The number of exposure metering sensors is also growing. All this makes matrix metering more accurate with each subsequent generation of cameras. Today, with matrix metering, it is almost always possible to obtain the correct exposure. Minor difficulties may arise in non-standard situations for automation. For example, shooting a person indoors against a window. In this case, the automation cannot accurately determine what we are filming: a landscape outside the window illuminated by the midday sun or a person dimly illuminated by room light. It can solve this problem in different ways depending on the situation and the specific layout of the frame. Shooting on a white or black background can also cause difficulties: the automation will try to equate the prevailing shades in the frame to gray. Therefore, frames on a white background will turn out too dark, and frames on a black background will be too bright. Shooting test frames and then applying exposure compensation or using other metering modes (for example, spot) will help solve this problem.
There are many light shades in the frame: snow and dawn sky. When using matrix metering, I had to make positive exposure compensation to prevent the frame from being too dark.
When to use matrix metering? This mode is suitable for most shooting situations. It will be optimal for active reportage shooting, photo walks, amateur family photo sessions and travel.
Spot metering
Symbol for spot metering.
The area of analysis for spot metering is a small dot. In older Nikon models, the area of the dot is only 1.5% of the area of the entire frame. The exposure metering point will be located where the current autofocus point is. This is a very advantageous feature of Nikon cameras, distinguishing them from many competitors.
This way, you can measure exposure not only in the center of the frame, but also in any part of it. This makes working with spot metering more convenient and flexible.
Quite difficult to use, but the most accurate exposure metering mode is spot. The brightness of the photographed scene is measured over a small area, a point. In Nikon cameras, this point will be located in the same place as the active autofocus area. Since the measurement occurs only in a very small fragment of the image, you need to choose the area for measurement wisely. If you thoughtlessly poke this point into any place you come across, the result will most likely not be the most successful. We will get an incorrectly exposed frame. Spot metering should be done relative to the average brightness areas in the image. After all, the camera believes that we are “showing” it an object of average brightness and, based on this, measures the exposure.
For example, when photographing this house, you should measure the exposure not against its white wall (otherwise the picture will turn out too dark) and not against the dark forest (we will get an overexposed frame). It is better to use medium-brightness fragments of the plot. The ideal option would be a slate roof for the house.
Spot metering on the roof of a house.
Spot metering on a white wall. Result: the photo turned out too dark.
Spot metering in the forest thicket. Result: the photo was too light.
Some people use spot metering in portrait photography. This is convenient if you are shooting with a Nikon camera and the metering point is in the same place as the focusing point. Since people's faces tend to be average in brightness, face spot metering will generally work correctly. But if we are photographing a dark-skinned or black person, it is worth considering making a slight negative exposure compensation.
Spot metering was made on the girl's face. Since the background in the photo is quite dark, other types of metering would most likely give a different exposure and require exposure compensation.
Exposure lock. Often, after measuring exposure using spot metering, the shot needs to be recomposed. To prevent the exposure from being lost after recomposing (after all, the device constantly measures exposure until we take a picture), there is a special exposure lock button - AE-L (Automatic Exposure Lock). When you click on it, the camera fixes the current value of the exposure parameters. This feature is useful not only when working with spot metering, but also when you need to take several shots with the same exposure without switching to manual mode. This is often necessary when shooting panoramas.
On modern devices, the exposure lock button is combined with the focus lock (AF-L). By clicking on it, we lock both autofocus and exposure. However, we can configure these parameters in the camera menu, indicating what exactly this button will block.
For this shot, I used spot metering, measuring the exposure on the rock in the foreground. After that, I held down the AE-L button and recomposed the frame the way I liked.
By the way, when you hold the shutter button half-pressed, exposure metering is also locked. After you press the button all the way and the frame is taken, exposure metering will continue, which is not always convenient (for example, when shooting panoramas).
When to use spot metering? First of all, when you are confident that you can handle it. After all, for accurate measurements you will have to carefully monitor which object in the frame the exposure is measured on. Photographers often use this type of metering when shooting landscapes with complex (sunset, dawn) contrast lighting. This type of metering can also be used in portrait photography, measuring the exposure exactly according to the model’s face.
Center-weighted metering
This is how center-weighted metering is indicated on the camera.
Measurement area for center-weighted exposure metering.
Center-weighted metering is a classic type of exposure metering, inherited from modern devices from the very first film SLR cameras with a built-in exposure meter. Exposure metering in this mode is carried out over a large area in the center of the frame, in a circle of large diameter. In this case, the area located directly in the very center of the frame has higher priority (greater “weight”) when analyzing the received data. Today, this type of metering is a little outdated against the background of, firstly, intelligent and easy-to-use matrix metering and, secondly, accurate and flexible spot metering.
This meter, like the matrix meter, is easy to use. However, it must be taken into account that the exposure will not be measured over the entire area of the frame, but only over its central part.
Bright spot metering
Symbol for measuring in bright areas.
Highlight metering, as its name suggests, focuses primarily on the brightest parts of the frame. His task is to preserve all the details on them.
This is the newest exposure metering mode. It appeared in the most modern Nikon devices: D750, D810. Experienced photographers know how unpleasant overexposure in photographs is. In areas with overexposure, there is a complete loss of detail; in the image, the overexposed area simply looks like a white spot. There is no way to save overexposed areas even when processing the photo in RAW. The RAW format has a peculiarity: it is very easy to make it lighter and “stretch out” details in the shadows, but it is often not possible to save objects from overexposed areas. To reduce the amount of overexposure to a minimum, a metering mode for bright areas was invented. It will protect your photos from losing detail in the bright areas of the frame. Don't be surprised if your photos come out a bit dark; this is to preserve detail in the highlights. And the brightness of the frame, as you know, can be easily adjusted during processing. It is much easier to process images without overexposure, and the result will be of better quality.
When to use highlight metering? Then, when you shoot in RAW format and plan to “develop” the photos in a RAW converter after shooting, bringing them to perfection. Since I only shoot in RAW, I have switched almost entirely to this metering mode. Working with him is easy and pleasant in all shooting situations.
Which exposure metering mode is best?
Which exposure metering mode is better than others? Point, center-weighted or evaluative (matrix)?
Exposure metering is one of the most tedious and difficult topics in photography. Many for whom photography is just a hobby do not pay due attention to this topic, but in vain.
As a rule, inexpensive, non-professional cameras (point-and-shoot cameras) have a fixed exposure measurement system; the device itself analyzes the light and selects the exposure; you cannot interfere with this process in any way. However, if you are the proud owner of a professional or semi-professional SLR camera, then it is important to know and understand how to use different types of exposure metering. Put in a little effort and you will understand how important and necessary it is.
How does your camera measure exposure?
When metering exposure, light is divided into reflected and incident light. It is not difficult to guess that reflected light is light that is reflected from the subject, and incident light, accordingly, falls on the subject. Modern cameras are equipped with the latest developments in exposure metering, which have greatly simplified the entire process of exposure metering. However, it is important to understand the difference so that you understand the limitations of your camera's metering system.
An exposure meter based on incident light gives more accurate results than based on reflected light. By measuring the light reflected from an object, the built-in light meter does not know how much light is actually hitting the object (the incident light value), so it is quite easily misled. Remember how you tried to photograph a snowy landscape and were probably disappointed with the result. The fact is that snow is highly reflective, and the built-in exposure meter mistakenly assumed that the scene was brighter than it actually was. As a result, we end up with underexposed photos.
I recommend that you purchase an external exposure meter that can measure the incident light. But first, you should study in detail the operation of the built-in exposure meter and find out under what circumstances you should use one or another exposure metering mode.
A reflected light exposure meter, just like the one installed in your camera, roughly speaking, simply guesses about the amount of light on the scene, since all objects have completely different abilities to reflect and absorb light. Let's take the example of a snowy landscape again and compare it with a forest landscape; the reflective ability of snow is many times greater than that of trees, grass, etc. All light meters perceive the reflective surface in the same way, presenting it as a neutral gray. Subjects that are lighter or darker than the specified neutral gray are no longer exposed correctly.
Metering Modes
Fortunately, digital SLR camera manufacturers allow us to choose our own exposure metering mode, which makes it possible to somewhat compensate for the shortcomings arising from the reflected light metering system.
There are three main exposure metering modes: matrix (also often called evaluative, multi-zone, multi-zone, depending on the manufacturer), center-weighted and spot. Now let’s quickly figure out how they differ from each other:
Matrix mode
The concept of matrix metering is actually very simple to understand. To measure exposure, the frame is divided into zones, after which the brightness and the ratio of light and shadow are measured in each individual zone. As a result, the average value is displayed for all covered areas of the image, on the basis of which the exposure is set.
Everything seems quite simple, but the matrix system has a very complex algorithm, which is developed individually by all manufacturers and is kept secret. Depending on the manufacturer, during the metering process the frame is divided into a different number of zones; for some devices this number is not so large, but for others it reaches thousands.
In the metering process, in addition to light, other factors are taken into account, for example, the distance between the camera and the subject, colors, and focus point. Nikon even has a built-in database containing more than 30,000 different photographs of common scenes that were taken at the most optimal exposure. The camera can reference these photographs as a template when determining exposure.
Center weighted mode
In center-weighted mode, exposure is metered at approximately 60-80% of the image and measured over a central circle-shaped area. Some cameras are equipped with a function to adjust the size of this circle. The areas located at the edges of the photo have practically no effect on exposure metering, however, when calculating, at least slightly, they are still taken into account.
Previously, this metering method was considered basic, but is now used in compact cameras as the main one. Why him? Because, as a rule, the subject is still closer to the middle of the frame, and not at its borders, so it is quite logical to determine the exposure in the center of the image.
Spot and partial modes
Spot and partial modes are similar to each other; they work on the same principle: they take very small areas of the image (usually in the center of the frame) as the area for measuring exposure. For spot metering, this area is approximately 1-5% of the entire image; partial metering covers a slightly larger area, approximately 15% of the entire frame. On cameras from some manufacturers, the so-called exposure metering area can be shifted from the center to the corners of the frame.
Spot metering allows you to very accurately expose individual fragments that are small relative to the entire image. Spot metering is most effective when shooting high-contrast images, when the subject is well lit and the background is in shadow, or vice versa, when the subject is framed by bright light.
When to use matrix metering
Matrix exposure metering is perhaps the most widely used, both among professional and amateur photographers. It is best used in conditions of uniform lighting. If you don’t know which mode is best suited for a given frame or you simply don’t have time to think, then choose the matrix mode by default, as many photographers do.
When to use center-weighted metering
Center-weighted metering is suitable for portraits. In this mode, the illumination of the central part of the frame is measured; the further the object is from the center, the less its influence on the exposure. The results of center-weighted metering are more predictable than matrix metering, but it requires more concentration on the part of the photographer. When you need more control over exposure (for example, you don't want light coming from the back of the frame to affect your exposure), choose center-weighted metering mode.
A good example of the benefits of center-weighted metering are high-contrast photographs, such as those taken in bright sunlight, and especially portraits taken outdoors. When photographing portraits, it is important to correctly expose the subject, and not what surrounds it.
When to use spot metering
Spot metering, as a rule, is used by professional photographers who have relevant experience and an excellent understanding of the exposure metering system as a whole. When you master this knowledge and understanding, you will be able to use spot metering, for example, for shooting in backlight (in backlight, it is only possible to correctly expose the model’s face using spot metering, otherwise the model will turn into a dark silhouette). Spot metering is also good for shooting subjects at long distances or for macro photography, especially when the subject does not take up most of the frame. When using spot metering, be careful: if you expose a small area well, you can easily lose the rest of the frame.
Spot metering works well in situations where the scene is evenly lit, but the subject is clearly brighter or darker than its surroundings. For example, a white dog against a dark wall or a man dressed in black standing against a white building. Another good and very famous example is the moon against the night sky, a bright object against a very dark background.
Use pre-focus mode
When photographing in center-weighted exposure metering mode, I recommend using the pre-focus function. This feature locks exposure metering while the shutter button is pressed halfway. This is convenient because center-weighted mode allows you to expose objects that are only in the center of the frame. With this function, you can position the subject in the center of the frame, read the light information, and then compose the photo and then press the shutter button.
Another function of your camera will also be useful, namely Auto Exposure (AE) lock.
Don't forget about exposure compensation
Exposure compensation can greatly improve your photography. Do not forget that all built-in exposure meters, regardless of the selected metering mode, only take into account reflected light, and this often leads to errors. For some types of scenes, exposure compensation will be essential. Again, using a snowy landscape as an example, or a photo taken on a beach where the sand is too light, these frames will be underexposed and will require at least +1 stop compensation.
Which mode is better?
So, everyone is probably wondering which exposure metering mode is best to use. To this question, as to many other questions regarding the shooting process, I will answer: it all depends on the situation. Most likely, for the most part, you shoot or will shoot in center-weighted and matrix modes, preferring one of the two depending on the type of lighting and your own preferences. Low-contrast or even dimly lit objects are best shot in matrix mode. And for contrasty images, center-weighted metering is more suitable. As for spot metering, leave it for backlit scenes and other experiments.
Measuring exposure is a complex technical part of photography, and success is achieved through trial and error. And if photography is just one of your hobbies, and this information doesn’t seem particularly necessary to you, then just set the matrix exposure metering mode. But don’t stop there, experiment, try new things and develop.
Metering types made easy!
Exposure in photography is determined by the amount of light that hits the camera's sensor or film. This amount can be adjusted by changing the ratio of aperture and shutter speed. More details in the previous post. This ratio is determined by the exposure meter built into the camera. But to help the exposure meter itself correctly estimate the amount of light is the photographer’s task.
The main function of a light meter is to measure the amount of light entering the camera. More specifically: it measures the light reflected from various objects in the scene being photographed.
Each of the camera's metering modes (of which there are usually four) will process the scene differently, and it is up to the photographer to decide which mode is best in each case:
— Centrally weighted average metering
Please note that we are talking about digital SLR cameras from two of the most popular manufacturers - Canon and Nikon . Other manufacturers have very similar metering modes, available features, and naturally deliver the same results.
Evaluative (matrix) metering mode
Evaluative metering ( Canon ) or matrix metering ( Nikon ) divides the entire photographic scene into small zones. All measurements are then calculated and averaged to determine the optimal exposure (shutter speed and aperture combination). As you can see from the photo, the red square shows the area that will be assessed by the sensor. Given the “advanced” capabilities of modern SLR cameras, not only the amount of light is measured, but also things like the distribution of shades, colors and even distance.
Typically, evaluative metering is the default setting on most digital cameras and will give good, correct exposure. Evaluative metering is suitable for most standard situations, such as landscape photography.
Center-weighted metering mode
Center-weighted metering also attempts to measure the entire scene on average, with the only difference being that more weight is given to the area in the center of the viewfinder. In the photo, more significant places are indicated by the intensity of the red color. About 70% of the counting is made up of the area around the center of the viewfinder.
This mode turns out to be very convenient if you need to photograph an object located in the center of the scene. At the same time, the necessary exposure for the subject is ensured, and the surrounding areas or background are characterized by a different level of illumination.
Partial metering mode
As you can tell from the photo above, partial metering covers about 9% of the viewfinder.
Particularly due to its emphasis on the center of the viewfinder, this metering mode is most effective when the edges of the scene are significantly lighter or darker than the center, meaning the edges may have an undue effect on the exposure of the frame. But the disadvantage of this mode is precisely its emphasis on the center of the viewfinder.
Spot metering mode gives you better control over where to take light metering data for exposure, since it only covers about 4% of the area entering the viewfinder. This is the smallest area of all modes. The main advantage of spot metering comes from the fact that the location for metering exposure can be selected using the focus points and thus make a more accurate metering exactly where needed.
Spot metering is what you need for portrait photos because it measures the light reflected from the face over a range of about 1 meter.
Ultimately, we can conclude that it all comes down to personal preference. You can choose one or two modes and use only them. The only thing you need to know for sure is how the camera will measure exposure in this mode in order to then make adjustments through compensation or bracketing. Having started with a clear mastery of the evaluative exposure metering mode, you can move on to subsequent ones and get to know your camera and its capabilities better.
Especially for the League of Photographers - UnPlugged
No duplicates found
this means that she somehow installed tracking autofocus, which allows the release to be done without focusing confirmation
or in general, like one story about a girl who received a tower based on photography and for 2 years was surprised at the smear with the lens clicked into the manual.
She installed tracking AF (Nikon calls it AF-C, I can’t say about Kenon, I haven’t used it), and it’s with this that half-pressing matters - first you press it, focus it, and then press it at the right moment. If the mode is normal (AF-S), then the shutter simply won’t work until focusing is achieved. Although, as an option, she stupidly switched to manual focusing, either on the camera, or moved the switch on the lens.
On DSLR Olympuses, it was possible to enable shutter priority over focus. I suspect that modern cameras also have this option. Although not too necessary anymore.
Nikonov can also install this through the menu.
But then I began to suspect why the above-described girl’s shots might have turned out blurry.
Just returned from Istanbul. Sitting in a cafe overlooking the Golden Horn, I watched a picture of a Turkish girl trying to shoot a view of the city with a Nikon D3200. He takes a picture, opens it, and starts babbling in Turkish with annoyance. I couldn’t resist asking to see it. All frames are stupidly out of focus and blurry. I looked at the camera and saw that the rightmost focus point was selected. But when shooting a general view, this is bullshit; it won’t have much effect. But in addition to everything, she also has the focus switch on the lens set to M! Plus ISO costs 100, and this is already at dusk. And with all this set of settings, she is trying to shoot something.
I suspect that the girl described by DaRo2017 also had something similar.
There is still a post to be made on light filters.
Yes, why not?
Nowhere in the text of the article is it indicated that this is a universal instruction for absolutely all models.
Please note that we are talking about digital SLR cameras from two of the most popular manufacturers - Canon and Nikon. Other manufacturers have very similar metering modes, available features, and naturally deliver the same results.
If you do something, do it well. Or don't do it at all.
And this post is a fucking rewritten manual without pictures. And an attempt to reduce criticism addressed to oneself to “Why such hatred for everything?” looks bad 100% of the time.
Thanks for the info
Just based on the measurements, I wanted to refresh my memory and here is your post
Saved as a reminder
If you open the manual for the camera, it turns out that your particular camera does not measure as described here.
spot metering is done in a circle - yes yes
partial along a rhombus
but these small squares and rectangles indicate the zones to which autofocus clings; by their shape you can also determine the type of sensor: square - cross; the rest are linear
so read the manuals
matrix based on the database of images if you do something that does not fit into the database, then the result will be appropriate
and the metering is also based on the normal exposure of a white person’s skin
allowances must be made for blacks
I can’t speak for Kenon, but in all modern Nikon models, including amateur models, in spot metering mode, the metering point is tied to the focusing point on which the camera is currently focused. And not at the central point, as you claim. Do not mislead people.
Did I talk about the center point or the circle?
By God I see what I want
and you can put ML on the old Canon and create a perversion that the new Nikons never dreamed of
. and you can install ML on the old Canon and create a perversion that the new Nikons have never even dreamed of.
— Kenon is cooler than Nikon!
Please don’t descend into a banal argument about who has the bigger pussy. ))
and I’ll tell you now why spot metering is bullshit
the focus is on the eye as a contrast zone, and autoexposure sets the camera settings so that the metering zone in the image corresponds to 18% gray (what will fall into this 18% white iris and makeup? geez), the output will be a forge
therefore, yes, Canon is cooler than Nikon, if you take pictures of people, if only because it doesn’t make pornography with skintone
and yes, dual ISO allows you to completely forget about annoying overexposure and failures
Well, I didn’t argue about this topic.
Personally, I rarely use spot metering. Rarely—probably once every 10 years. That is, I used it three times. )) I prefer to either promptly enter the correction, or remove it in M. But again, you’re writing crap about this, and it doesn’t matter whether you’re taking pictures of people or the sky. You're talking bullshit, that's a fact.
If we take the fact that you built this on your justification, “how bad it is that the measuring point is tied to the AF point.” Bullshit! Always! There is always the option to hold down the AE-L button. There is always a choice - quickly, if there is no time, take a measurement at the AF point, or, if you have time, thoughtfully choose for yourself at what place to take the measurement. Without unnecessary movements. By pressing one button. Moreover, I’ll tell you - in Nikon’s settings you can select in advance: either the exposure is fixed while you hold down the AE-L button, or you stupidly press it, release it, and the exposure will be fixed until the shutter is released.
And I repeat - there is no need to compare your pussy. This is stupid. Especially if you know another system very poorly.
Camera metering modes
In inexpensive point-and-shoot cameras, as a rule, built-in electronics analyze the light and independently select the exposure that best suits the shooting conditions, and the photographer cannot interfere with this process. But in advanced compacts, SLR and system devices, the user is given the opportunity to use different exposure metering modes. Many photographers ignore this opportunity and completely in vain. After all, knowledge of how different types of exposure metering work, and in what cases to use one or another option, is very valuable. Proper use of exposure metering capabilities allows you to display the photographed scene as accurately as possible.
Exposure metering
Exposure, as we know, is based on the amount of light hitting the sensitive sensor. Correct exposure allows you to get a high-quality frame without the presence of overexposed or, conversely, too dark areas, with the maximum amount of detail and the desired brightness. Modern cameras are necessarily equipped with a built-in exposure meter with sensors that can determine the amount of light entering the camera in a given shooting situation. In DSLR cameras, exposure is measured through the lens. In any case, the light flux hits a special sensor, which provides data to the processor. The latter, in accordance with certain algorithms, selects the most suitable exposure pair. This is exactly what the process of determining exposure looks like when shooting in automatic mode.
In most shooting situations this is quite enough. However, the camera’s built-in electronics often make mistakes when choosing exposure parameters. This can happen for various reasons. In particular, the light meter can measure the light reflected from the subject, so it is not difficult to mislead if you are photographing a highly reflective subject. For example, a snowy landscape in winter. Due to the highly reflective properties of snow, the light meter may mismeter the exposure, which ultimately results in underexposed photographs.
And such situations are not uncommon. Therefore, manufacturers of modern photographic equipment offer users to choose which exposure metering mode to use in a particular situation to achieve the best shooting results. If you can understand how different metering modes perform in certain scenes, you can improve the quality of your photographs.
Metering Modes
So, in modern digital cameras there are several basic exposure metering modes that are available to the user. Everything, of course, depends on the manufacturer of the specific model of the device, but, in general, the following modes can be distinguished:
This mode is used by default on most cameras. The essence of matrix exposure metering is that sensors measure the brightness of all areas in the frame and then the device’s processor selects the appropriate exposure value for the scene being photographed. That is, in this case, the entire scene is divided into small zones, in each of which the illumination is assessed. All these measurements are then processed and averaged to compare with a database of correctly exposed images to determine the most appropriate combination of shutter speed and aperture. In advanced DSLRs, sensors measure not only the illumination of individual zones, but also the distribution of shades and colors, which improves the quality of matrix exposure metering.
The workflow is not very difficult to understand. And in most standard shooting situations, the matrix system shows excellent results. At the same time, such versatility of matrix metering is also its weak side. In an attempt to “average” the illumination of the scene and get one correctly exposed image, the camera’s automation often makes mistakes in exposing the main subject. Although the built-in electronics tries to correctly expose the area of the active autofocus point, due to algorithms for averaging scene illumination, this is not always possible. It should be noted here that the effectiveness of matrix metering depends on the camera processor, the number of focus points and the algorithms by which the scene is averaged.
When should you avoid using matrix metering? Particularly when you need to get an evenly exposed photo. The need for this often arises in landscape photography. The matrix system also performs well when photographing any evenly lit scenes.
The next mode is center-weighted, which also attempts to measure the light of the entire scene on average, but gives more weight to the areas in the center of the viewfinder. That is, in this case, priority is given to measuring exposure in the central area of the frame, which has a circular shape. The illumination of areas located outside the circle is also taken into account by the processor when determining a suitable exposure, but to a lesser extent.
If your subject is located closer to the center of the frame, then using center-weighted metering makes perfect sense. It's worth switching to this mode when you don't want the light coming from the back of the frame to have any effect on the exposure. The benefits of using this mode are especially true when photographing people outdoors on a sunny day when you're dealing with strong contrast. After all, this mode allows you to correctly expose an object that is located exactly in the middle of the frame. In addition to portraits, this mode can be useful for reportage photography.
The dot mode is a kind of opposite of the matrix mode. Here, only a small area of the image is taken as the area for measurement, which is equal to one to five percent of the entire frame area. This small light metering area can be moved from the center to the edges of the frame. With spot metering, you can expose small details in a photo. It is this system that makes it possible to extremely accurately measure the brightness and illumination of any area of the scene being filmed.
Spot metering comes to the rescue when you need to get a properly exposed subject, be it a portrait or photographing architectural details. It is well suited for photographing in backlight, in order, for example, to correctly expose a person’s face, which in the default mode will simply look like a dark silhouette in the photo. This mode is also worth using in situations where there is an evenly lit scene, but the subject itself is slightly brighter or darker than its surroundings. Spot mode can be useful when photographing objects at a great distance, in order to correctly expose objects or details distant from the camera, and when doing macro photography, when the object does not occupy a significant part of the frame area.
Partial metering works on the same principle as spot metering. However, in this case, for measuring exposure, an area of a slightly larger size is selected - about eight to ten percent of the frame area. There is also an emphasis on the center of the viewfinder. The rest of the scene is not taken into account, which can be both an advantage and a disadvantage of this method. This is an extended version of the spot mode, which is used, for example, in cases where the background is much brighter than the subject being photographed. Also, partial metering can be considered as a good replacement for spot metering if you need to correctly expose an area of the frame that is larger in size than the spot metering area.
To summarize, we can say that before you decide to use one or another metering mode, you need to carefully study the scene you are going to shoot. If the scene is evenly flooded with light, then use matrix metering without changing anything. In most cases this is landscape photography. If you are shooting a high-contrast scene, such as a person or object that is located in the center of the frame and backlit by some bright light source, then switch to center-weighted metering mode. In principle, this is the best option for portrait photography. As for spot or partial exposure metering, these modes should be used in situations where you want the subject or individual details that are a significant part of the photograph to be exposed correctly.
Many novice photographers simply ignore such an opportunity as choosing an exposure metering mode. However, the correct choice of exposure always plays a huge role in obtaining high-quality photographic images. By correctly using one or another exposure metering mode, you can significantly increase the quality and detail of your photographs.