Learning to identify light patterns in photography
Lighting Patterns: The Secrets of Good Portrait Photography
Getting to know different lighting schemes will not only help you diversify your portrait portfolio, but will also allow you to more effectively realize your creative ideas and ideas for shooting future portraits . It all depends on what exactly you plan to express in your photographic work. For example, some types of lighting are more suitable for portraits of men, while others are better at enhancing the beauty of a woman's face.
By choosing one or another lighting scheme, you can add drama to your photo, emphasize or, conversely, neutralize various features of the photographed model. Some lighting methods are a little more difficult to implement, others are simpler, but they are all certainly worthy of detailed consideration and study.
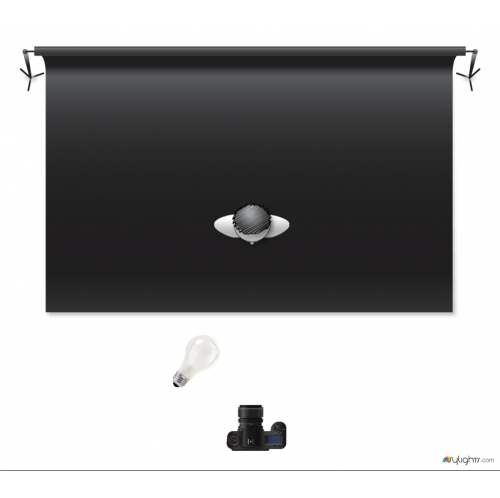
To use various lighting schemes, there is no need at all to have complex types of special lighting equipment, since all these schemes can be implemented using a simple light bulb or even sunlight from a window. In fact, sometimes it is more convenient to use a continuous light source (for example, a simple lamp), since this allows you to see the actual illuminated object, as opposed to the situation when photographing using flash.
When using flashes or flash lamps, you must first take a test shot, check the result, and then, taking this test shot into account, adjust the settings and shoot again. But this is not always possible, and beginners in photography are unlikely to be able to do this the first time. It may be argued that this is the essence of flash lighting, and that it is far from wrong, but at this stage we are simply trying to explore various lighting schemes without delving into the complex processes of using flash lamps, although these will need to be covered in further development of this topic.
Portrait of Aranzazu LaCorte 01 © studio.es. Written by Vincent Botew
It should also be noted that the lighting installation methods given here are not the only possible ones, but they are very simple and can be easily implemented using minimal equipment, allowing beginners to learn different models of studio lighting, which is exactly what we are writing for this article. So let's get started.
Wide illumination vs. short illumination
These terms are often used when talking about lighting schemes, but they usually refer to a shooting style rather than a way of lighting a subject. Many of the lighting schemes we'll look at in this article can use both wide and short lighting, so it's difficult to isolate them into separate independent schemes. But, nevertheless, it is simply necessary to be able to distinguish between them.
Wide lighting: When the subject is positioned at some angle to the camera and the light source is directed directly at the part of the face closest to the camera, the illusion of visual widening of the face usually occurs. This method is recommended to be used when it is necessary to visually expand the model's face, make it fuller, or to soften wrinkles.
Wide coverage - Indian. Author Yulia Libkina
Short coverage: This is the opposite of wide coverage. The model's face is again located at an angle to the camera, and the short light illuminates a more distant, that is, smaller part of the face for the camera. Short lighting visually narrows the face and creates the effect of a slimmer model.
Short coverage. By Helga Weber
Breaking Lighting
The name “breaking lighting” quite clearly defines the essence of this model. The light source seems to divide the face into two halves: one is fully illuminated, and the other is in shadow. Depending on the situation, the separation effect can be enhanced, as in the photo below, or weakened.
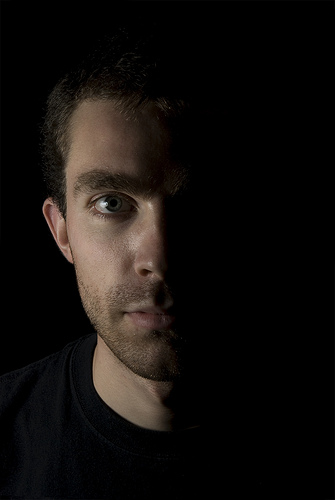
Breaking Lighting - Hatchet. Written by Esther Gibbons
When to use: Break lighting is most often used for portraits of men and less often for portraits of women and children. The contrast between light and shadow on the face adds drama to the portrait.
How to set up break light lighting:
Break lighting: The model is positioned in line with the camera, and the light source is placed perpendicular to the side of the subject's face.
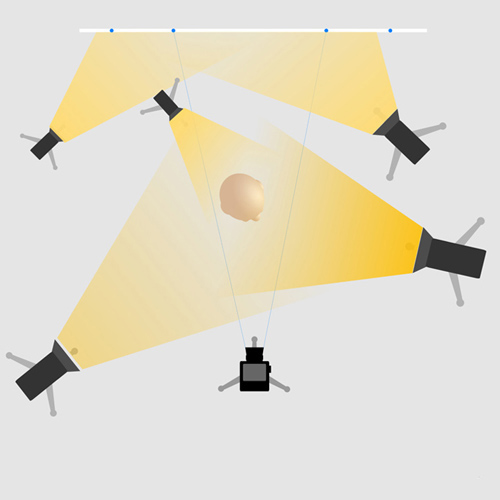
Lighting "Butterfly"
You may have heard of this scheme, otherwise known as glamor lighting, paramount lighting or beauty lighting. It is commonly used in fashion and beauty shoots because this type of lighting is extremely complimentary to the face. The name "butterfly" comes from the symmetrical shadows under the nose that result from this lighting scheme.
Lighting Butterfly - People I've met: #1, Long ago. By James Kendall.
When to use it: This is one of the most common lighting schemes used when shooting models in the fashion industry. This technique works especially well when shooting androgynous models with defined cheekbones and thin faces. This lighting scheme is contraindicated for shooting models with round faces.
How to set up the Butterfly lighting scheme:
Butterfly Lighting: The light source is directly behind the camera, slightly above it. The camera is located directly below the light source.
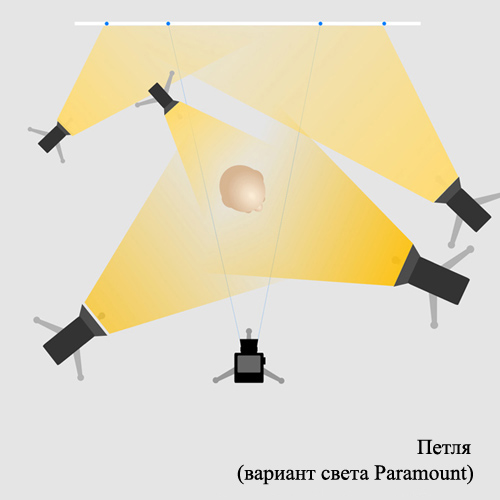
Lighting "Loop"
The name "loop" refers to the outline of the nose shadow that this lighting creates on the cheek. This pattern is probably the most widely used as it works great on almost all face types. In the photo below, you can see the shadow of the nose, which falls on the model’s right cheek and slightly below.
Lighting "Loop". Alba Dominguez 17 © studio.es. Author: Vincent Botew
When to use: If you're not sure which pattern to use in a given situation, try starting with Loop lighting. This design suits almost all face shapes and illuminates most of the subject's face well. A small shadow in the shape of a loop allows you to add depth to the portrait.
How to set up the Loop lighting pattern:
The model is positioned directly facing the camera. The light source is positioned at an angle of approximately 35 degrees from the camera to the subject and slightly above eye level.
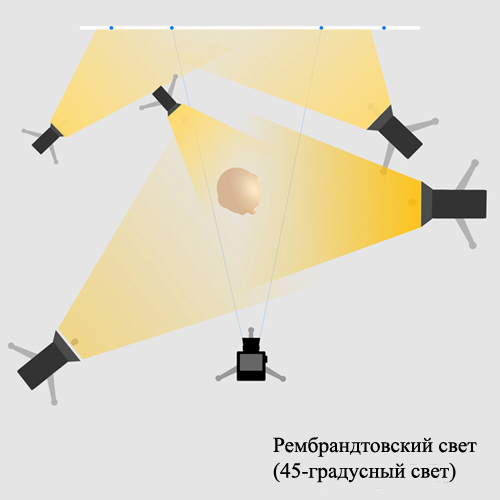
"Rembrandt" Lighting
This method got its name due to the fact that this kind of lighting is present in almost all portrait paintings of the great artist Rembrandt. The distinctive feature of this lighting scheme is the characteristic triangle of light on one side of the face.
"Rembrandt" lighting. Lorena Sturlese 01 © studio.es. Author: Vincent Botew
When to Use: Rembrandt lighting is very stylish and perfectly captures the mood of the portrait. This is excellent lighting, but it is not suitable for all situations, so it should be used very selectively. For example, if you are creating a portrait of a perky, happy and good-looking fan, then this is not the best choice. “Rembrandt” lighting is best used for portraits of more restrained and strict individuals.
How to set up Rembrandt lighting:
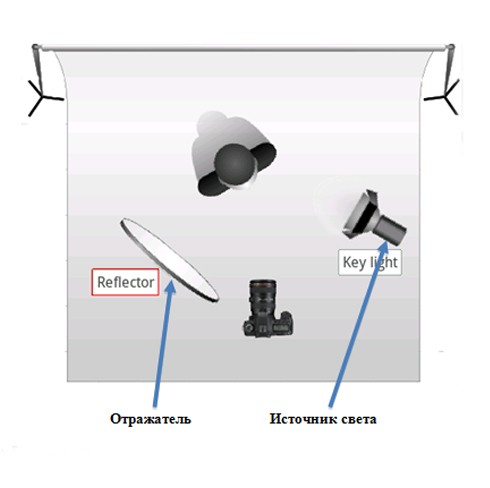
If you don't have a reflector, use a piece of white board or a helper with a white cloth.
As mentioned above, if you know enough about flash tubes and flashes and prefer to work with them, then you can safely use them!
Once you've learned how to work with different lighting schemes, it's time to start applying your own modifications to these schemes. Experiment with shooting from different angles, adding lights and/or modifiers, and try creating a portrait using multiple frames at once. Take a closer look at the portraits you have in your home or on your favorite portrait photographer's website and try to guess what kind of lighting schemes were used to create those portraits and why they gained popularity.
Finally, don't be too hard on yourself, some of the lighting models described may be difficult to implement on your first try. Do not despair! Just keep practicing!
11 Basic Studio Lighting Designs
Every photographer knows that light is the most important tool when creating a great portrait.
Below I offer for consideration a simple classification of studio lighting schemes that will help you achieve excellent results. Types of light sources
Painting light
The main and powerful light source that creates hard (reflector with shutters) or soft shadows (diffuser, softbox, umbrella, reflector).
Fill light
Additional lighting sources with softboxes, diffusers, etc. You can also use reflectors, background light, and backlight for a fill effect. Often shutters are used to allow you to control which areas to illuminate and which to leave in the dark.
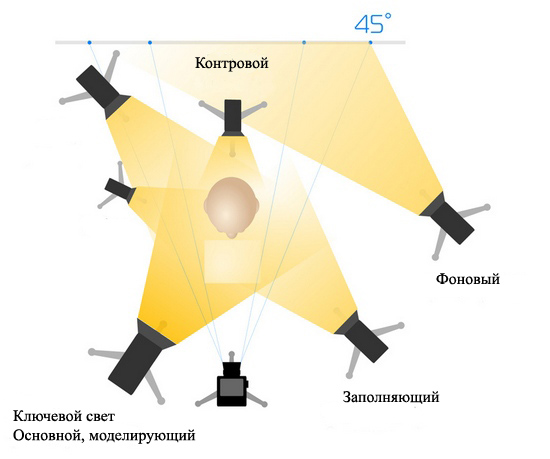
The procedure for setting the light in the studio
First of all, you must set the background light and then set the backlight. This order will allow you to see the effect produced by these light sources. The next step is to install the fill and then the key light. It is also important to know what effect each light source gives; to do this, turn the flashes on and off one by one. And you will definitely get a result that will satisfy you.
There are several types of illumination of the model's face: wide light and short light (front, side, and various options thereof)
Wide light - full illumination of the side of the face aimed at the camera
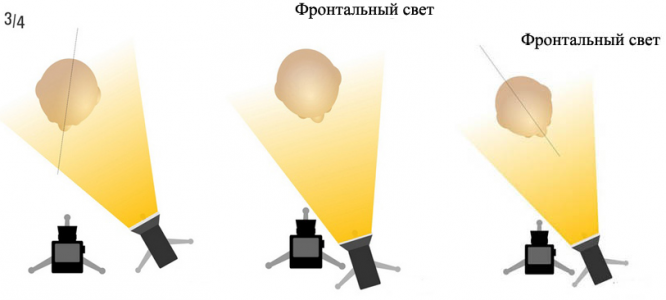
Three-Quarter Lighting: Wide Type
Universally positioned key light for formal photography. The light source is placed near the camera to illuminate the side of the face facing the camera. Shadow is minimized. This is the most suitable type of lighting for normal and narrow faces.
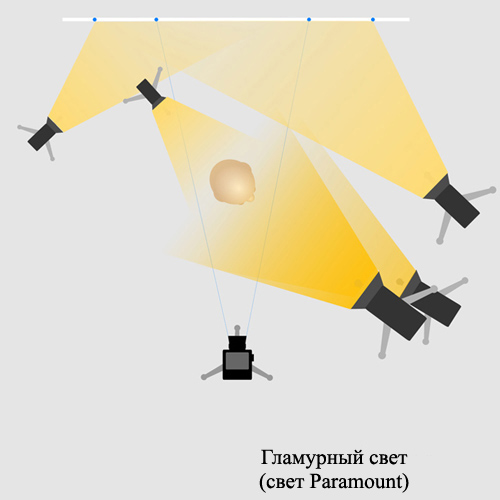
Paramount (glamorous light)
This type of light is named after the Paramount studio and is also known as butterfly, Hollywood or glamor light. This is a soft and “feminine” highlighting light aimed directly at the model’s face and allows you to idealize her skin as much as possible. The drawing light is placed on the right above eye level, the filling light is there, but below the drawing light. You can also use a reflector on the side of the model. This way we will form a symmetrical shadow from the nose, which should be no more than half the length of the lips.
Loop (Paramount circuit variant)
This light pattern allows you to create a beautiful shadow on the model’s cheek, which is closest to the highlighting light. The key light should be lower than when used in the Paramount scheme and placed closer to the background. The fill light should be level with the camera, higher in relation to the main light and located opposite. Lighting Loop helps to widen the face and is suitable for working on narrow faces with ruddy skin. The loop from the nose area should not touch the shadow area of the side of the face. This is the most interesting lighting scheme. This lighting scheme creates an interesting three-dimensional effect on the model's face and body.
Short light - full illumination of the side of the face that is not directed towards the camera
Partial (narrow) illumination of the side of the face that is directed towards the camera. These patterns are useful when you are photographing wide faces. This is a very interesting and dramatic lighting scheme as the viewer sees more shadows. Also, this light sharpens the facial features a little.
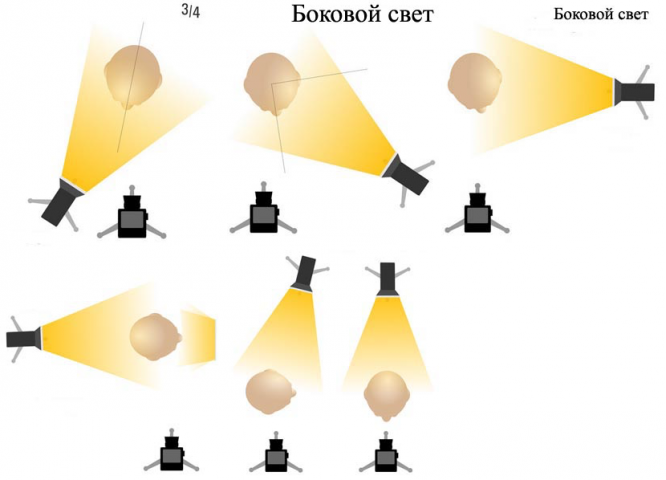
3/4 light pattern
Light sources are located in 3 quarters: the universal location of the key light is suitable for various types of faces. Minimum illumination visually narrows the face. This is an acceptable lighting solution, even if the model turns her head to the side during shooting.
Rembrandt light (45 degree lighting)
Dramatic, “masculine”, mood light. A very interesting light scheme where the source of the highlighting light is placed at cheek level. It's not a bright light. On the shadow side of the face, a typical triangle of light is obtained.
Divided Light
This type of lighting creates an effect similar to a burning candle: only one part of the face is illuminated. The key light is at nose level. The fill light can be raised or moved closer to the camera. This is very effective for significantly “narrowing” the face and nose, hiding any facial defects.
Profile light
Lighting the profile/contour of the model. The key light (when photographing the model's profile) is placed behind the subject (the person is looking at the reflector or the key light source). Profile-edge. You must create outline lighting using a key light. When using a key light to highlight the haircut, raise the light source slightly to achieve the effect.
Lighting schemes for portraits. 6 Classic Lighting Designs for Portraits Every Photographer Should Know.
When shooting a classic portrait, there are a few key details that you need to keep in mind and keep under control: the overall light intensity of the portrait, lighting scheme, facial expression, shooting angle. In our opinion, every photographer should know how a classic portrait is made. Knowing these simple rules, no one can stop you from breaking them, following your creative goals and doing it consciously.

In this article we will look at the classic lighting schemes used in portrait photography.
The meaning of the phrase “light scheme” can be explained as follows: a pattern of light and shadow, giving the portrait various shapes, depth, sharpness, etc.
There are 4 main lighting schemes for a classic portrait:
• Split lighting
• Loop lighting
• Rembrandt lighting
• Butterfly lighting
There are two more lighting styles: “broad lighting” lighting") and "Narrow lighting" ("Short lighting"), which have a unique style and can be used in conjunction with the classic lighting schemes listed above.
Let's consider all 6 schemes in order.
1. Split lighting

Split lighting, as the name suggests, splits the subject's face into two equal halves, with one side illuminated and the other in shadow. This scheme is most often used to create portraits of musicians and artists. The division lighting scheme is better suited for male portraits, but no one forbids you to use this scheme for female portraits. There are no hard and fast rules, only recommendations.

To recreate this pattern, simply position the light source at a 90-degree angle to the left or right of the model, and perhaps even slightly behind her head. The exact degree of placement of the light source will depend on the shape of your model's head, so experiment by observing the shadow patterns on the face. Note that in a classic split lighting design, the light falls equally on the subject's eyes, but does not affect other parts of the darkened side of the face. If, when you illuminate both eyes of the model, the light also falls, for example, on the model’s cheek (which should have remained in the shadow), then it is quite possible that the shape of your model’s face is simply not suitable for the dividing lighting scheme.
You can use this scheme not only for the front view, but also for the profile, ¾, etc. Just remember to keep the light source at the same angle to the model's face. If the model turns her head and the light sources remain in place, you will end up with a completely different lighting scheme.
Remember the glare in your eyes.

Look at the photo above. The light source used in the photograph is clearly visible in the child's eyes. First, you can reconstruct the lighting pattern used for yourself by looking into his eyes. And secondly, without glare, the eyes would remain black, dull, lifeless. Therefore, do not forget about the glare, the sparkle in your model’s eyes.
2. Loop lighting

Connecting lighting is created by creating a slight shadow from the nose on your model's cheek. To recreate this lighting scheme, you need to place the light source slightly above the model's eye level and 30-45 degrees from the camera (degrees depend on the shape of the face).

Look at the photo above to see where the light is coming from. You can see there is a slight shadow from the nose on the left side of the face. This diagram assumes the presence of such a shadow, so do not remove it with another light source! Also note that the shadow from the nose and the shadow on the cheek are not connected. It is important. Be careful not to place the light source too high, as this will result in an irregularly shaped shadow, elongated, which will look bad. The connecting lighting scheme is perhaps the most common in portrait photography, because... it is very easy to recreate, and the result suits absolutely everyone.

The diagram above shows the lighting arrangement used for newlywed photography. The black background in the diagram is the trees and grass in the background. The sun peeks out from behind the trees, but the young couple is completely in the shade. A white reflector is installed to the left of the camera to properly direct the light onto the faces. The reflector, at the same time, can be located both in the sun and in the shade, you will still be able to catch the desired light. Just play with the angle of inclination, but do not change the location of the reflector in relation to the models and the camera, because this will change the light pattern. Here the reflector is located at a distance of 30-45 degrees from the camera and slightly above the eye level of the young couple. A common mistake made by novice photographers is to place the reflector below the model’s eye level and direct the light from bottom to top.
3. Rembrandt lighting

Rembrandt lighting is named after the paintings of the artist of the same name, who used a specific lighting scheme in his portraits, as in the painting above.
This pattern can be easily recognized by the light triangle on one cheek. Unlike the join light pattern, where the shadow of the nose and the shadow on the cheek are not connected (this is an important feature of the join light pattern), here they merge, which creates a triangle of light on the cheek. To create this scheme, make sure that the model's eye, which is in the shadow, still catches the light and glare from the source.
Otherwise, one eye of the model will be illuminated, while the other will remain lifeless, without a sparkle in it. Rembrandt's scheme is somewhat dramatic, creating the character of the portrait, a somewhat dark feeling from it. This scheme must be used accordingly.


To create this diagram, you need to slightly turn the model away from the light. The light should fall on the model from above, so that the shadow of the nose falls on the cheek. Not all faces are suitable for Rembrandt's scheme. It will work if the model has high and pronounced cheekbones. But, for example, if the model’s nose is small or the bridge of the nose is flat, the scheme is unlikely to work.
4. Butterfly lighting

The butterfly pattern is so named because it creates a butterfly-shaped shadow under the model's nose as a result of placing the light source above (slightly behind the camera), directly in front of the model. A photographer usually takes a photo under a light source. This pattern is often used for glamor portraits and creates shadows under the cheeks and chin (outlining the shape of the face). This scheme is also very beneficial for portraits of older people, because... highlights their unique wrinkles better than all other schemes.

As shown in the diagram, the light source is located above the camera, behind it. At a level that will be slightly above the model’s eye level, or slightly above her head (depending on the model’s face). Sometimes this scheme is supplemented by a reflector, which is located under the model’s chin, often held by the model herself. This scheme is suitable for people with defined cheekbones and a thin face. People with a round face or a wide face will look better in a Connecting Light or Splitting Light pattern (to visually narrow the face).
5. Broad lighting[/b]
Broad lighting is not so much a classic scheme as simply a lighting style. Wide and narrow lighting can be used with separating, connecting light schemes, as well as with the Rembrandt scheme.

Wide lighting: when the model's face is turned slightly away from the center, while the part of the face that is closer to the camera (it is, as it were, wider) is in the light. This effect essentially makes the lightened part of the face appear wider, and the unlightened part narrower. Wide lighting is often used for high key portraits. This scheme is very beneficial for people whose faces are elongated and thin, because... allows you to make them visually wider. Accordingly, do not use this pattern for people who have a round face shape.

To create a wide lighting pattern, the model's face should be turned away from the light source. Watch how the part of the face that is closest to the camera receives most of the light.
6. Short Lighting

As opposed to a wide lighting scheme, a narrow lighting scheme, as you can see in the example above, keeps the side facing the camera in shadow. This scheme is often used for low key portraits or just dark portraits. Essentially, most of the face is in shadow, but this gives the portrait a sense of volume, makes it sculptural, visually makes the face narrower, and is liked by most people.

For a narrow lighting scheme, turn the model's face towards the light source. Make sure that the part of your face that is turned away from the camera receives the most light. Shadows fall on the part of the face that is facing the camera.
Conclusion
Once you learn to recognize and recreate classic lighting patterns for portrait photography, you will have a much better understanding of when to use which pattern. Study your model's face, think about which scheme will suit her best. Remember also about the mood that you want to get in the portrait. Good luck!
ARTICLE PROVIDED BY FOTIME PHOTO STUDIO.
MOSCOW.
How to See Light in a Photograph

See and understand? how light works in photography is the result of more than one year of work and practice. You can build the ideal composition as much as you like, select poses, outfits and invite the best makeup artists, and at the same time all the work done can be ruined by setting the lighting incorrectly.
For myself, I divide photographers into 2 categories: those who shoot in the studio with pulsed light and those who work with constant light (street, window light, or cinema light). Since I can't control the light outside, I chose studio shooting.
This article will talk about how to see the light using studio photography as an example, since from personal experience I know that it is difficult for “street” photographers to work in the studio for various reasons, and the first of them is ignorance of how flash attachments work.
This article is a continuation of the material “How to repeat photographs of famous photographers,” in which we have already examined the technical component of the photographs. Now let's move on to the light!
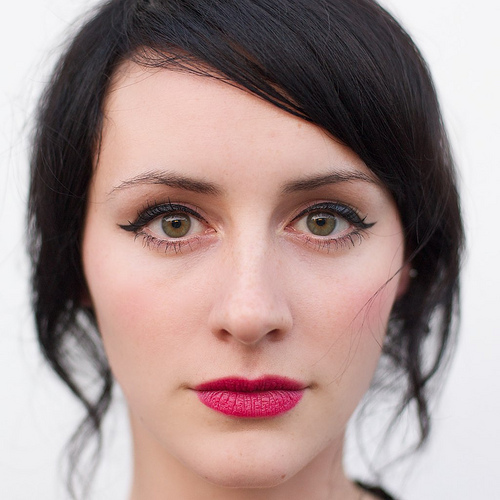
Analysis of images
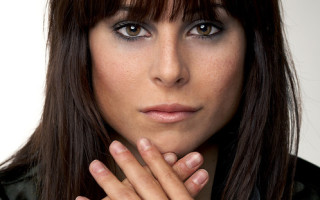
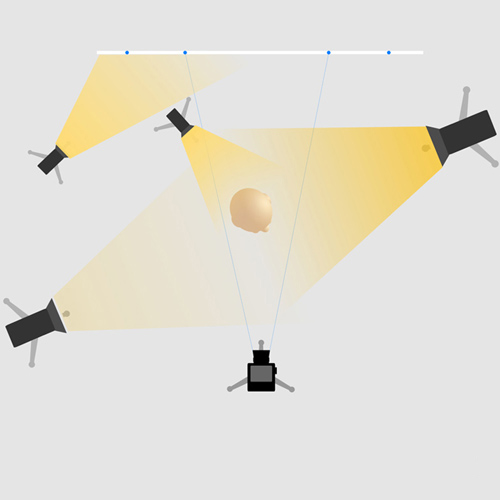
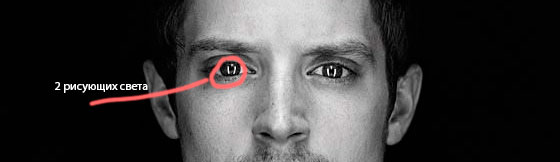
Life hack: to see the light pattern, just look into the eyes of the person in the portrait. Eyes are the only glossy part of our body in which everything is reflected.
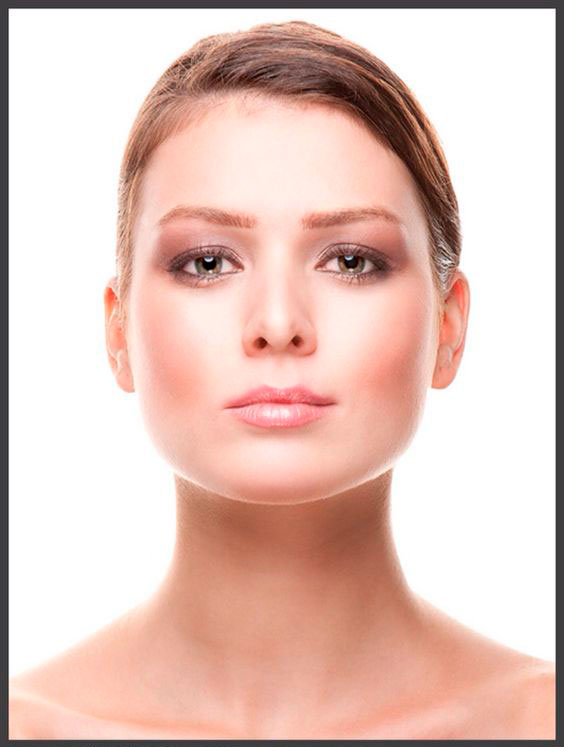
Now let's take a closer look:
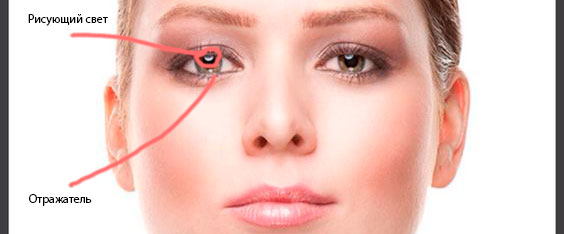
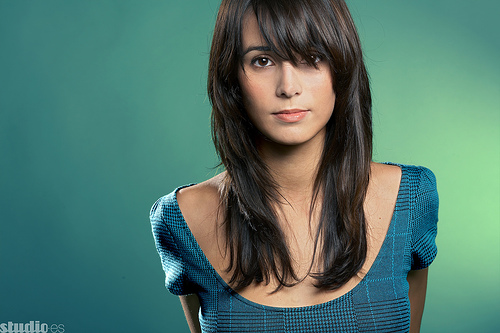
Judging by the round shape of the nozzle, a plate was used as a key light. The reflector used here is a standard round one. The plate is facing the model, at an angle of 45 degrees. The frontal location is explained by the fact that the plate is located in the middle of the pupil. An angle of 45 degrees is the standard and best use of such a reflector.
How does this affect the skin?

This light-shadow pattern is created by the plate.

This highlight is created by the reflector, plus it softens the harsh dark shadows that a plate would produce.
What else can you see on the skin? The fact that there was backlight in this photo.
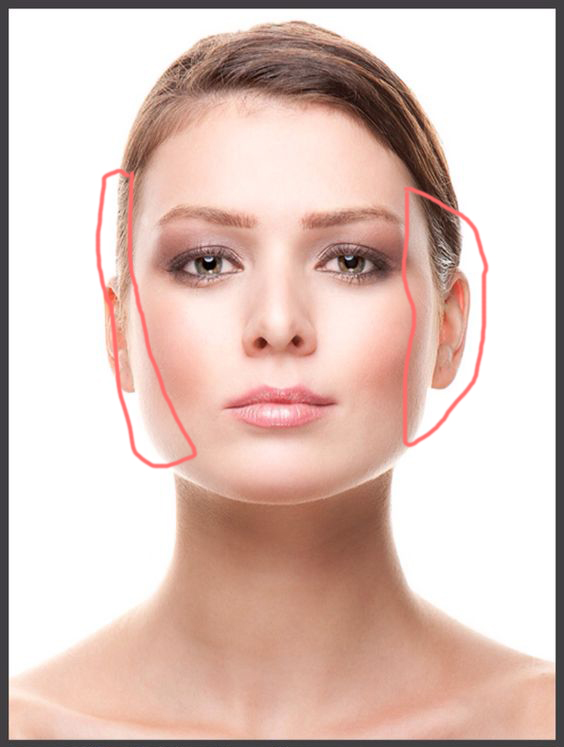
These two highlights are created by reflection from a white background, or by two stripboxes.
In total, in this photo we used 1 or 3 flashes (2 of them were backlight, and 1 was a “dish” key light) and one reflector. All this is available in any studio, as it is basic equipment.
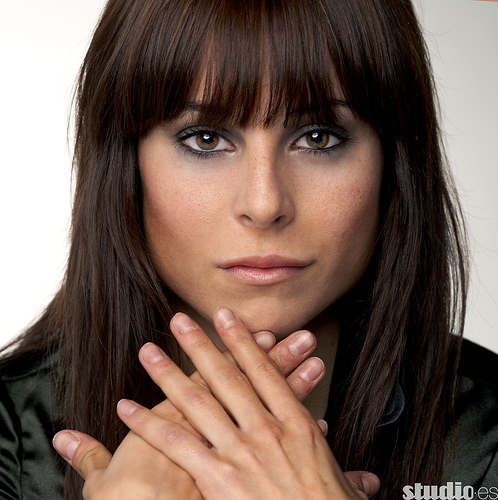
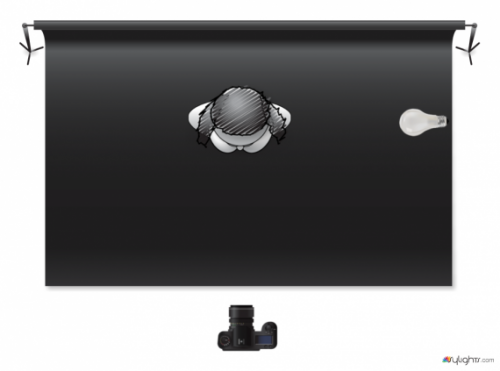
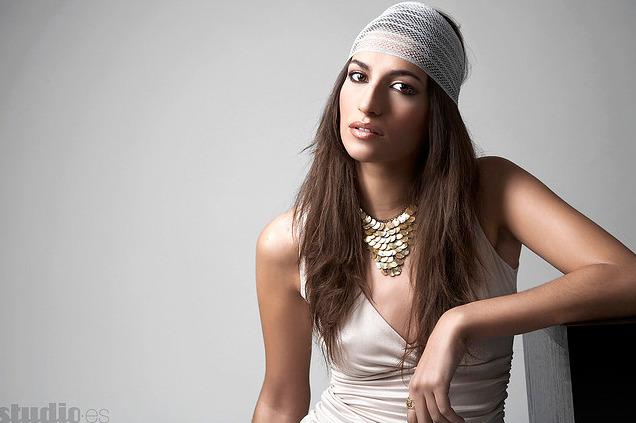
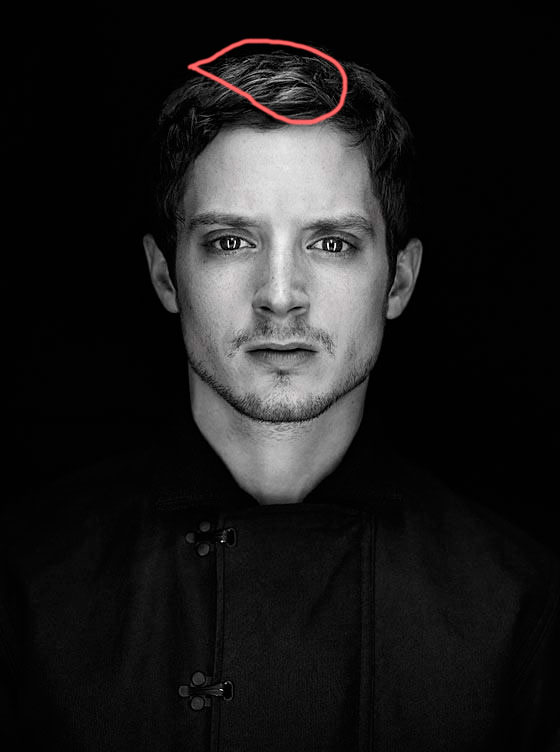
Let's look at another portrait:

First of all, we look at the model’s eyes and see that 3 flashes were used. This portrait was shot using the classic Esquire magazine setup, using two strip boxes and one overhead light.
We used 2 stripboxes as key light in this photo, bringing them close enough to the model to achieve the “cat’s eye” effect; this position of the flashes makes for a very voluminous portrait.
The small dot in the eye from above is already the author’s idea, since in nature a person is always exposed to overhead light: the sun, lamps, the sky. Therefore, such a highlight on the hair looks natural.
Where to get knowledge?
Pinterest for certain queries: Headshot, Portrait, bts, behind the scene. Or here's the link.
Instagram in the following public pages: famousbtsmagazine, iso1200magazine, where photographers from all over the world exhibit their lighting schemes.
If you have any difficulties or misunderstandings, be sure to write in the comments.
Learning to identify light patterns in photography
To come in
Lighting schemes in a portrait - classical (Rembrandt) lighting scheme.
The main goal of studio lighting is to imitate natural light. The first photographic pavilions used natural light until artificial lighting was invented. This is what the first pavilions looked like.

Studios were usually located in the attics of houses, as filming required a lot of sunlight. There were wide windows in the roof and light came through them. If it rained or the weather was cloudy, the shooting was postponed.
The first studios worked with contrasting, hard lighting, but with the development of technology, studios began to be arranged with windows facing north in order to avoid direct sunlight. The photographer had the option of opening the windows or covering them with frosted glass or curtains. Reflectors made of polished copper sheets were used for illumination.
In the picture you see the classic lighting scheme that is still used by all photographers in the world. The light comes from above and from the sides from the windows, the light is soft and can be compared to lighting from a large softbox. With the help of reflectors, the shadow side of the model is highlighted, and the reflector above the model’s head provides contour illumination of the hair and allows you to “separate” the figure from the background. This is the classic lighting scheme. It is often called Rembrandt's because the artist painted his portraits in this manner.
How artificial light is installed in studios today.
Drawing light is the main light flux that forms a light-tonal or light-and-shadow pattern. The most powerful light source.
Key light can be hard or soft. If the light is hard, the shadows will be sharp and contrasting. For hard light, small reflectors and beauty dishes with a silver surface are used. For soft light you need a softbox or diffusing attachments on a reflector or dish. We must not forget that the farther the light source is from the model, the harder the light will be.
Options for location of the key light source:
- Frontal
- Anterodiagonal
- Side
- Posterior diagonal
- Back-up

This is what the cut-off pattern will look like under different lighting options:

front lighting

front diagonal lighting (key light on the left)

side lighting (key light on the left)

back-diagonal lighting (key light on the left)

In the classic design, the key light is usually placed in a forward-diagonal position, at an angle of approximately 45 degrees relative to the camera-model line.
The light source is placed slightly above the model's head. If you set it too high, the shadows will creep down, you will get shadows under the eyes and a long shadow from the nose. If it’s too low, the shadows will creep up and the face will look wide and creepy.
Here are the options for upper and lower light, as an example of the distribution of shadows.

overhead light

bottom light
The power of the key light should be about 1-1.5 stops brighter than other sources. In order to receive harmonious light, you need to be able to coordinate the action of all lighting devices.
Fill light is a source of diffused light that plays an auxiliary role in cut-off lighting and a major role in light-tonal lighting. The goal is to highlight shadows and soften the light and shadow pattern. In light and shadow lighting, it reduces the contrast of the image and makes it possible to reproduce shape and texture in the shadows. It should not be noticeable as an independent light flux.
For fill light, a softbox or reflective panel is usually used, onto which the fill light source is directed. Fill light is usually placed behind the camera, front or front diagonally.
This is how the filling of the shadows will change depending on the strength of the fill light source.

weak shadow filling

medium shadow fill

strong shadow filling
Modeling light is a narrowly focused, not very intense stream of light, which is designed to emphasize the shape and texture in the shadows (texture of hair, clothing, neck line, shoulder line, etc.). It is also necessary to separate the model from the background.
Usually this source is installed in the rear diagonal, sometimes in the back direction.
Light-forming attachments are used to obtain a narrow light spot: a tube (Snoot), reflectors with curtains (Barn Doors), and sometimes strip boxes.
The brightness of the light modulation in the shadows should not exceed the brightness of the highlights formed by the source of the key light.
Background light is a light source designed to illuminate the background.
The purpose of background light is to separate the model from the background, give the photo volume and show perspective. Nozzles for background light are usually used - standard reflectors (sometimes with curtains), a tube, a bucket. The background can be colored using filters. For a photon pattern, you can use gabo, which gives some kind of pattern (window, leaves, spots, etc.). You can make gabbo yourself or use some available means (baskets, other objects with holes). If the background is not evenly lit, an additional feeling of space is created. That is, the abstract background is illuminated unevenly, thereby creating the illusion of aerial perspective, where light is perceived as distant and dark as close.
The background light source is coordinated, if possible, with the direction of the key light source.
This is what a portrait will look like with one, two, three and four light sources:

one light source (drawing)

two light sources (key and fill)

three light sources (key, fill and background)

four light sources (key, fill, background and hair modeling)
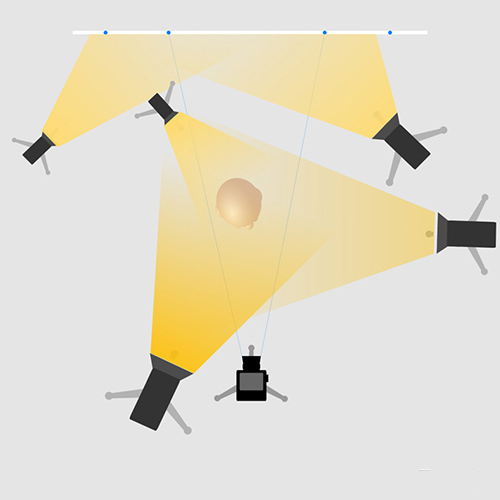
This is what a classic four-source circuit looks like:

It is usually recommended to turn on the background light source first. Then the key light turns on. As described above, the nature of chiaroscuro will depend on the intensity of the key light source, its distance to the model, the installation height and the direction of the light source. Then, depending on the artistic task, the fill light source is set (strong or weak filling of shadows). And at the very end is the modeling light source.
There are many options for the sequence of turning on light sources. The main thing to remember is that you are shooting a portrait and the person should ultimately look like himself.
Learning to identify light patterns in photography
To come in
Photo school. Lesson #6: Working with two light sources.
Lately, in our community, we have quite often seen messages about our colleagues and friends deciding to buy themselves a set of artificial light, and this is not surprising. We earn or are learning to earn money with our photographs, and when we need to consistently send a large number of good quality photographs with a certain frequency, we don’t want to depend on the size of the windows in the apartment, the geographical place of residence, the time of year and simply the weather outside the window. But many find it quite difficult to make the transition from working with natural light to artificial lighting. And even more so when there are several flashes in the set.

I'll tell you about my equipment.
I have one fairly cheap set of artificial light RayLab AXIO 200 - 3. This is a set of three light sources of 200 J each, with 2 softboxes 50x70 cm. It has served me well, it seems, for 7 years.
It's far from perfect, and it's already old. But I actively use it for food photography and portraits. And I use all three sources very often. I, like Oksana, shoot on a low coffee table from Ikea, which quite often serves as a white background for me.
Last time Oksana wrote a lesson on working with one light source (it could be either an artificial light source or a window). And most importantly, Oksana talked about different types of lighting. Now we’ll try to add another light source, see how to work with them, and how to get similar types of lighting in this context.
What is the difference between working with 2 artificial light sources?
First of all, I want to say that using artificial lighting gives us much more control over light than using natural light. If with natural light we primarily operate on the location of the object in relation to the light and the reflectors, we have very limited influence on the power and nature of the lighting. Using artificial light, we can easily change the direction, character and power of light. If we use two sources, then with a certain scheme, without even rearranging the sources, we can obtain different types of lighting, operating only with powers.
Basic circuit and settings
Let's look at how the following schemes work in practice:

This is a common arrangement where two light sources are approximately opposite each other, diagonally. This is the position I often have my flashes in in the studio.
Let's start by setting our sources to the same power. Let's set approximately half the power on each source, shooting parameters: ISO 100, F/5.6, 1/160
Please note that since there are flashes with different powers and adjustability, you may need to select your own shooting parameters.

As you can see, in this case we don't have any obvious highlights or shadows. The grapes are illuminated fairly evenly. But the light is not very expressive and does not convey volume well.
Now let's see what happens if we change only the power of the sources. We set the power of the source closest to us to about 2/3 - this will be the main light, and the one farther to 1/3 - it will highlight the contours. The camera settings remain the same. As Oksana already said, this lighting model is quite common among beginners, even if it does not always illuminate the subject favorably. If you're shooting with a background in the background, it will also be quite heavily lit, as will the subject itself.

The next model, which I really love, is where the main light will be from the back and side . So we change the power - the distant source is 2/3, and the front source is 1/3. This is the result. This model depicts the grapes more favorably. The photo turns out much more voluminous.

In this case, to highlight the object a little from the front left, and let the grapes play a little, you get this pattern and this is the result.


This scheme is well suited for complex compositions with several elements, because it gives an excellent, moderately voluminous result, and we have the opportunity to highlight those elements that were not sufficiently illuminated by two softboxes.
Let's consider two more types of lighting, which Oksana also already talked about, only we will reproduce them with 2 light sources.
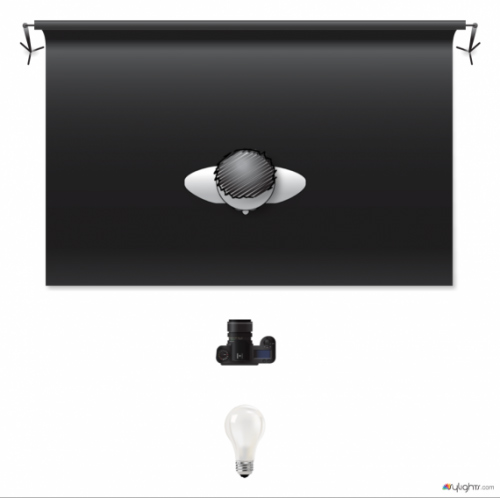
The key light is backlight . In this case, we place the distant photobox in front of the camera directly behind the subject. And we'll leave the second one in the same place. Here we will have to slightly adjust the light power and settings, since in this option much more light enters the lens and the photo will seem overexposed. I set the back light to 1/2 power, the fill light remained at 1/3 power. Camera parameters: ISO 100, F/8, 1/160


I often use this lighting scheme when I just need a white background in the background; this allows me not to use additional light sources to illuminate the background, since the softbox itself acts as the background. But as you can see, in this case the volume of the subject is not conveyed so well. And you need to take care of illuminating the front of the object.
The key light is side . We rearrange the softboxes on both sides of our subject. The capacities remain the same. Camera parameters: ISO 100, F/5.6, 1/160


Side light is best able to convey and emphasize the volume of most objects.
Power of sources
I would also like to draw special attention to the fact that by adjusting the difference in light power between the key and fill light, we can control the “drama” of the lighting. The greater the difference (the weaker the fill light), the more contrast the image will have, the shadows will be deeper, the image will be more dramatic.

The lighting scheme is the same as in the previous photo (Key light - side), only reduced the power of the fill light to a minimum.
It is the ability to adjust the power, and not just change the location of the light in relation to the subject, that opens up enormous opportunities for the photographer to create the mood and character of the photograph!
Assignment
Choose one dish or object and photograph it using different light schemes. Select camera settings and source power for your situation (start with the parameters I gave, see if they work with your light). Experiment with different flash powers.
In the comments to the post, show several photos with the results of your work. Write what kind of light you used, what camera and light settings are used in your case.
Basics: light source location
Mark Wallace this article to the location of the light source when shooting.
Light source position
Where you place your light source will greatly affect your photography. The position of the light source changes the contrast in your photo. Contrast is the difference between the lightest and darkest areas of your photo. Images with low contrast are evenly lit - there are almost no shadows. Images with high contrast are illuminated spasmodically, with both dark shadows and bright spots.
 |
 |
| ©Mark Wallace |
Three basic positions
There are three basic positions for a light source - front, side and back.
Front light can also be described as "light coming along the same axis." That is, the light source looks in the same direction as the lens and is in line with it. Consequently, the same amount of light falls on the left and right sides of the scene, so the lighting is very uniform. There are almost no shadows. This makes the image look “flat” and have low contrast.
 |
| ©Mark Wallace |
Sidelight is 90 degrees from your lens position. This type of lighting produces highlights on one side of the image and shadows on the other. Because one part of your image is bright and the other part is dark, this lighting makes the photo look high-contrast.
 |
| ©Mark Wallace |
Backlight is 180 degrees from your lens position. That is, the light source is looking directly at your lens. Typically, the subject you're photographing will block most of this light, creating a silhouette.
 |
| ©Mark Wallace |
Figure and Form
When we see a two-dimensional object and understand what it is, we call it a “figure.” When you see the silhouette of a tree, you instinctively know that it is a tree.
Form is when we see the “depth” of our object. If you look at a photograph of a tree with shadows that show that the trunk of that tree is large and round, then you are looking at “shape.”
By moving the light source from a front position (no shadows) to a side position (more shadows), you create a shape. When you move a light source behind an object, you create a shape. By playing with the position of the light source, you not only determine the contrast of your photo, but also select the bright areas of the figure or shape.
 |
| ©Mark Wallace |
Color vs black and white
“Figure is the enemy of color” - Josef Albers
Objects that look good as figures are drawn towards monochromaticity. If you want to create a dramatic black and white image, use side and back lighting. If you want to take beautiful color photos, use a front light.
Side light accentuates the shape - ideal for black and white photographs.
 |
| ©Mark Wallace |
 |
| ©Mark Wallace |
Front light accentuates colors.
Problem solving
Sometimes a simple shift in one single light source can transform an ordinary photo into something extraordinary.
 |
| ©Mark Wallace |
When taking this photo, I wanted to give it a "jazz club" vibe. I asked the agency to send me a model who, at 40, looks like she's been singing in clubs for days. They sent me a 17 year old model with almost flawless skin. But I needed a completely different type. To hide the age of the model and make the photo lighter, I photographed directly into the light. Thus, the direction of the light changed - now it was shining not from the left, but from behind the model. In addition, some light was reflected from the studio floor, which was enough to show some detail in the microphone.
 |
| ©Mark Wallace |
Creating images
 |
| ©Mark Wallace |
The strong side light creates contrast, giving the photo the mood and feel I was looking for.
 |
| ©Mark Wallace |
I used a large 4x6 softbox that was positioned about 50 degrees to the right of the camera. The monochromatic tones of this photograph play with the direction of light, creating an image brimming with figure and texture. If I had used front light, there would have been no shadows to give shape to the photo. I placed the light far to the side to accentuate the figure in the photo.
 |
| ©Mark Wallace |
This photo was taken with one Giant Reflector 300. It was so big that I was standing right in front of it. Thanks to this, it was possible to obtain ideal frontal light. Since the reflector was parabolic, the light was very directional - as a result, the shadows outlined the model's body. Colors and vignetting were added in post-production.
Now you know how light source placement affects your photos, you can try it yourself. You will be amazed at what you can achieve just by changing the position of the light source.