Tips for choosing the “perfect” white balance
How to adjust white balance in a camera
Many novice photographers who are just beginning their acquaintance with photographic equipment often encounter this problem: the colors in the pictures turn out unnatural and are very different from the real image. For example, in life an object looks rich and beautiful, but in a photograph its color fades or acquires yellowish/greenish tints.
What is the reason for such changes and how to eliminate it? How to adjust the ideal color rendition on your photo device? We will tell you about all the parameters responsible for the colors in your pictures!
Reasons for the appearance of deficiencies
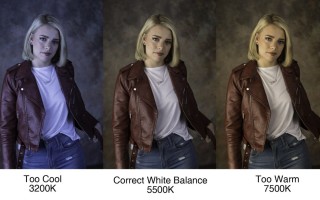
So, why does the camera change the colors of objects? It is important to understand that the lighting conditions under which we create a frame vary. Light can come in many shades depending on where it comes from: home lighting generally produces a yellowish glow, while fluorescent lights give a space a bluish or purple hue. Outdoors in the evening, the lighting can also be blue or purple (depending on cloudiness and the position of the sun), but dawn can provide the appearance of yellow, orange and red tones. This tint variety of light is called color temperature. As you may have guessed, each light source has its own color temperature, the value of which is measured in Kelvin (K). The lower the value, the more red tones predominate in the light. There is also an inverse proportion: the more Kelvins marked on the scale, the bluer the light will be.
Sometimes photographic equipment may not recognize the light source and, accordingly, determine the color temperature of the space. In such cases, errors occur. The camera may make a mistake and apply standard settings that do not equalize the white balance, resulting in the frame becoming too yellow or too blue.
White balance: adjusting options
The camera does not have intelligence, and therefore is not able to accurately analyze and determine what kind of scene and in what location we want to capture. However, we can always “tell” our device in the right direction. To do this, you need to adjust several parameters in the “white balance” cell.
White balance is a special parameter found in every modern photographic device. It determines which color the camera will consider neutral when shooting. As a rule, colors that do not have any shades are considered neutral. For example, white or grey. By identifying these colors as a starting point, filming equipment will be able to correct other colors, presenting them correctly in the image.
Often, determining the color balance in a camera involves correctly choosing the color temperature of the light source under which the photo is taken. To reduce the time required to set up the correct parameters and make it easier to use the equipment when shooting with different lighting fixtures or rapidly changing weather, device manufacturers have provided a set of necessary settings for the most common shooting conditions. For most locations and shooting situations, this is the best option. It is good because the photographer does not have to waste time setting all the light balance parameters manually; he simply selects the “daylight”, “incandescent”, “cloudy”, “shadow” or other types of cells depending on the actual shooting conditions. As a rule, the names of the settings determine the cases in which they are used, so you will not have any problems with this. The exact meaning of the settings presented may vary slightly depending on the model of your device, however, in general, they behave approximately the same on all cameras.
Known to any amateur photographer, NIKON has continued to improve the lighting settings in its devices, introducing additional parameters to existing functions.
For example, you can select not just the “fluorescent lamp” parameter, but also determine the type of this lamp itself (warm white daylight, white light, cool white daylight, sodium lamps, mercury lamps, etc.) This means that If desired, you can adjust the white balance almost perfectly.
Auto white balance
When you select Auto White Balance (or AWB), you give your device the ability to independently determine color temperature parameters within some spectrum of values that have been defined by the manufacturer. As a rule, this spectrum is limited to the range of 2000-7000 K. Most modern filming equipment produces excellent results with automatic white balance settings. Errors and shortcomings appear mainly in difficult cases, for example, when conducting an extraordinary photo shoot with a large number of different types of lighting devices, when shooting at night or shooting in a dimly lit room.
Automatic white balance will be extremely useful when shooting outdoors in bright and intense daylight conditions. The AWB setting will also be useful during dynamic photography, when objects move quickly and change their location, as a result of which the conditions of the photo shoot change. In such situations, automatic settings will not only ensure optimal image quality, but will also help prevent the loss of interesting shots due to constant adjustment of the equipment.
Setting parameters manually
If the automatic functions do not suit your needs, you can always resort to using manual white balance settings, which are provided in most camera cameras. This is a very useful function, especially if we are talking about any non-standard conditions, the color temperature of which we know exactly. For example, sometimes the color temperature of energy-saving lamps can be determined by a special mark on the product body. It is also always indicated in the characteristics and annotations for flashes and other professional lighting equipment.
We invite you to study the table with approximate temperature values for the most common light sources. It will help you set the correct coordinates when working with manual light balance settings.
Rules for determining white balance
In addition to all the above functions, you can simply tell your device which color should be considered neutral (which shade in the photo should be considered gray and white). This is quite easy to do: you just need to select a gray or white object in the frame and photograph it close so that the frame is filled exclusively with it. It's worth noting that in this case you don't even need focusing, which means you don't have to bother yourself with finding the focus for your photo.
Typically, an ordinary blank paper sheet or a special “gray card” is used as an object for setting white balance. Place the paper in front of the lens, take a couple of photos, and move the supporting object away. After that, we work with the resulting frames. We make the necessary settings and check the result of the work using several test shots.
This method can be called perhaps the most accurate of all those listed earlier, however, certain nuances of its use should be noted.
- If you are going to adjust the white balance using a gray subject, then one thing that is extremely important to consider is that the subject must be in the same lighting conditions in which you plan to shoot. Otherwise, errors may appear in your settings and you will not get the desired effect from the images. Manual adjustment of the light balance should be carried out immediately before the start of the shooting process, as well as before changing the lighting at the photo shoot or changing the location.
- Using a white sheet of paper for manual adjustment is unlikely to provide us with a 100% correct result. Even seemingly ordinary white paper has its own shades. It may be yellowish or bluish, which will not have the best effect on determining the white balance. The best option would be a gray card - an example of the ideal white color in the photograph. You can easily buy it in the photo department of any store.
White balance as a unique effect
Let's not forget that photography is an activity that is not without a creative component. Not in all cases, a perfectly adjusted white balance corrects a photo for the better; sometimes you can ignore the rules if this guarantees the appearance of a unique and interesting photo in your collection.
Very often, photographs with incorrect balance look much more expressive and interesting than the same frames with the correct settings. The bluish tint characteristic of high light temperatures sometimes perfectly complements photographs of snow, water or fog, and the slight yellowness of low values gives photographs of sunsets and sunrises a special charm. So, unusual experiments with equipment settings can sometimes lead to the appearance of real photo masterpieces; it all depends on your skill, creativity and imagination. Try different methods for adjusting white balance and find the perfect one for you.
Mixed lighting
As we have already said, there are isolated cases in which light is emitted by several objects of different formats. At such moments, novice photographers are faced with a serious problem - how to adjust the white balance? The answer sounds quite simple: try to make one light source the “main” and eliminate others as much as possible. If this is technically impossible, then you should move the model or subject to the place of maximum concentration of the main light source and focus the camera on it.
As you can see, taking a high-quality shot with the correct white balance is not so difficult. To do this, you just need to study the principle of its internal and external configuration. Train and create unique shots!
Tips for choosing the “perfect” white balance
White balance still raises questions among photographers, although, in theory, it should no longer be so. Here are just a few: “Should I shoot all my photos in RAW format and not bother with balance?” Or choose your own white balance for each frame?
In this article we will look at various techniques for setting white balance.
Equipment used in the article: gray card, camera with RAW format shooting function, ExpoDisc (special lens attachment) or white balance control function.
Difficulty level: beginner.
White balance still raises questions among photographers, although, in theory, it should no longer be so. Here are just a few: “Should I shoot all my photos in RAW format and not bother with balance?” Or choose your own white balance for each frame?
In this article we will look at various techniques for setting white balance.
Creative white balance
Before we begin to explain white balance, let's first learn one simple rule: not in all cases you should use the "correct" white balance - sometimes you need to deviate from the norm to get an interesting effect.
This rule is illustrated by two photographs of the sky. Both photographs were taken at the same time and in the same place. One (in warmer tones) – with automatic white balance (top photo). The other is using a professional digital filter for setting white balance ExpoDisc from ExpoImaging:
A photograph taken using an Expo disc shows one simple thing: if you set your mind to it, you can achieve the perfect white balance for the sky. But is this photo better than a photo taken in Auto White Balance (AWB) mode? There is no clear answer to this question. These photographs are different and serve different purposes. And this is one of the most important lessons to learn when it comes to white balance.
So, after this introduction, we can move on to mastering the “ideal” or “almost ideal” white balance.
Use RAW format
If you shoot in RAW format, then the white balance can be set at the photo processing stage.
The best way to achieve the “perfect” white balance is to take the photo in RAW format, and then select the white balance you want during processing.
Most people will give you exactly this advice. But some photographers are willing to argue with this, such as Outdoor Photographer photographer Rob Sheppard. He states that when you shoot in RAW format, the file somehow remembers the balance setting that was set at the time of shooting, and it is this setting that is saved in the JPEG file when you open the photo for preview in Photoshop, Lightroom or any other program.
The RAW file itself has no white balance information, but you can be misled when you preview the photo on the screen.
What to do then? As usual, the truth is somewhere in the middle. We take photographs in RAW format with the AWB setting (automatic selection of white balance by the camera), on the camera screen we make sure that we get more or less what we want (we check the image itself and the histogram), trusting our own eyes and instincts. Then we edit the white balance in post-processing.
One thing to remember, however, is that if you're shooting JPEG and you don't like what you get from the Auto AWB setting, you should set it to the setting that best suits your needs. This setting can then be changed in post-production, but it is much easier to do in RAW format.
Use a gray card
For many decades, gray cards from Kodak were the most common method for obtaining correct exposure and colors.
I have used gray cards for many years. Kodak Gray Cards, which come in a variety of sizes, are a tool for achieving perfect lighting. The gray card is placed in front of the camera. It reflects the light that falls on it (and therefore on the subject). You measure the light reflected from it, keeping in mind that the card reflects 18% of the light, and adjust the settings accordingly for that lighting.
To obtain an ideal result, the angle of incidence of light on the gray card should be the same as the angle of incidence on the subject. In addition, it is necessary to take into account that gray cards deteriorate due to prolonged use.
You can take a photo of a gray card and use it as a custom white balance
Use manual white balance
Each camera has a set of presets for white balance: daylight, shadow, tungsten, fluorescent light, etc. It is possible to set the color temperature, measured in Kelvin. You can also set a custom white balance.
There are different ways to set a custom white balance. Typically, you simply take a photo of the subject you intend to use as a reference and tell the camera to use that photo to create a custom white balance. If you take a photo of a gray card and set that photo as the source for generating a custom white balance, all subsequent photos will be taken at that white balance setting until you change it.
There is room for creativity here: you can photograph a colored wall or paper and set this frame as a reference. Experiment with different colors and see what happens. By doing this exercise, you will have a better understanding of how your camera works.
Use Live View
Live mode allows you to see in real time how a particular white balance setting affects a photo
If you change the white balance settings while looking at your camera's LCD screen, you will find that the colors change. This became possible with the advent of Live View in DSLR cameras.
This technique works especially well in cases where you don't know which white balance setting to choose.
Use Expo Disk
The best color results are obtained when using an Expo Disc in conjunction with measuring the incident light
ExpoDisk is a better solution than a gray card. This is a professional white balance filter that screws onto the lens and is like a dome that measures the incident light. It can be of different sizes. It is more profitable to buy a larger filter so that it fits all your lenses. This filter converts the camera's reflected light meter into an incident light meter.
This means that the camera needs to be pointed at the light source illuminating the subject, rather than at the subject itself. The exposure must be correct. Autofocus must be disabled, otherwise the camera will try to focus on the exposure dial. Next, you need to set a custom white balance according to your camera's instructions.
Once you've set your custom white balance, you can shoot with confidence.
The photo above is an excellent example of using the ExpoDisk under tungsten lighting. The green border at the plate indicates the correct transmission of tonality, which became possible only when using ExpoDisk. The standard Tungsten installation did not give the desired result.
Other adjustment options
The above examples of setting white balance, including with ExpoDisk, can be of serious help to some photographers. However, if you shoot mostly in normal lighting conditions, and you are quite happy with the automatic AWB (Auto White Balance) setting, then you can simply forget all these techniques and sleep well.
But if you're serious about creative photography, shoot in a variety of lighting conditions, and aren't always happy with your camera's standard white balance settings, then these techniques will undoubtedly serve you well.
How to learn photography from ZERO?. Learn to get EVERYTHING out of your camera.
“Digital SLR for a beginner, or how to take great photos. Level I
Secrets of creative photos for a beginner. Photography techniques and tricks. Level II
Photo kettle
White balance or correct colors in photos
Correct white balance - 6500K incorrect - 2500K
Greetings to you dear amateur photographers of my blog. Today we will talk about white balance (WB). What is this? What is it for?
White balance is a key parameter for getting the right colors in your photos .
To better understand what white balance is, it is necessary to dwell on the definition of the color temperature of light.
You've probably noticed that light has a different color tint: incandescent lamps are yellowish, fluorescent lamps are bluish, in the dark a blue tint predominates, etc.
To better understand what white balance is, let's turn to physics.
As you know, everything in our life has a wave structure. This means that when a completely black body is heated, electromagnetic waves begin to be emitted.
As the body heats up, it emits infrared waves, then enters the visible range.
For example, a black body heated to a temperature of 2800K will emit yellow light like an incandescent lamp.
As heat increases, the color temperature will begin to shift toward cooler tones.
To bring everything to a unified system, shades of light are indicated by color temperature measured in Kelvin.
Each color temperature corresponds to a specific light source:
- candle-1800-2000K
- tungsten lamp-2500-3000K
- sunrise and sunset (clear day) -3000-4000K
- fluorescent lamps-4000-5000K
- camera flash-5000-5500K
- sun at zenith -5500-6500K
- cloudy-6500-8000K
- shadow-7500K
- twilight-12000K
Human vision has chromatic adaptation, i.e. We always see white color as white, regardless of the lighting around us.
For example, if you walk into a room with the lights on on a sunny day, it will appear deep yellow.
Over time, vision adapts, the light becomes less saturated and familiar.
Likewise, the camera has its own color detection sensor - automatic white balance (ABB).
ABB independently adjusts the color parameters to the surrounding environment. It improves with each generation of cameras, however, in some cases it may not cope.
White balance presets or manual adjustments come to the rescue.
Most cameras have the same preset names: sunny, cloudy, shade, incandescent, etc.
Accordingly, on a cloudy day, select the preset “cloudy” or “cloudy”, etc.
If you have a more advanced camera, you can try to set the BB according to the photo.
When you take a photo of a white sheet of paper, the camera adjusts the BB based on this photo.
For the standard, it is recommended to take a “gray card”, because there is no ideal white color, and gray card manufacturers guarantee a 100% combination of black and white.
Which ultimately gives the reference gray color.
This method allows you to set the BB more accurately, but the disadvantage is its use under constant light conditions. Those. “gray card” is more suitable for studio work.
When the light changes, you need to set the BB again.
To summarize, to ensure colors appear correctly, be aware of your white balance and your surroundings. Adjust the BB according to the lighting conditions and then all your photo masterpieces or just family photography will always delight you.
If scenes and composition change quickly, it is enough to set automatic white balance.
Why setting the right white balance on your camera will save your photos?
Greetings! I’m in touch with you, Timur Mustaev. Do you like rich, bright colors in your photos? When every color and every shade is presented and they all create a very realistic image. Of course, external shooting conditions and the quality of the equipment itself play an important role, but not only that.
What's the main thing? – you ask me. Correctly defined white balance, that's all! This raises an important question: how to set the white balance? You will soon learn about this.
About camera settings
As you know, there are three “pillars” - three very important exposure parameters of the frame that any self-respecting photographer should know and be able to set. These are: aperture, shutter speed, light sensitivity (ISO).
People often forget about another setting that has no less influence on the final picture - White Balance (WH/WB). It is responsible for the transmission of colors and their shades and depends on the color temperature of the environment, which is measured in Kelvin. If the camera detects white color incorrectly, then other colors will be distorted!
The three primary colors from the combination of which all others are born are red, green and blue. They enter the zone of light visible to us and the camera lenses. If the color temperature is low, then the colors of the red region will be present, but if the color temperature is high, the colors will be blue.
The overall light tone of the image will depend on the sky, the terrain, and reflectors such as water, mountains, etc. Thus, quite a lot of factors influence white balance. If we trust the camera to determine this setting, then it will not necessarily choose the realistic option or the one that would suit us.
And color largely influences the perception of the entire photo and another important aspect - its atmosphere. So I always like to build the WB myself, using, if not completely manual mode, then at least something close to it - “clear”, “cloudy”, “incandescent”, “flash”, etc.
Working with white balance
In fact, the exact white balance is quite easy to set on the camera, but it still requires some time and effort. There are several ways to do this.
- Method No. 1 : On a white sheet, clean, without stains and even. First you need to take a white sheet, A4 size office paper works well. We remove the sheet so that it takes up the entire frame. We go to the camera menu, select the function of manually adjusting the white balance and proceed to take a picture of a white sheet. Click on “ok”: now the camera will focus on this white as a reference and you no longer have to worry about distortion in color rendition.
- Method number 2 : Using a gray card, medium-light shade. It is believed that this color is ideal for displaying BB, since only gray can be present in nature without shades, unlike the same white. The opinion is ambiguous. Here, in the same way as in option 1, you need to photograph a special gray card and find it among all the pictures on the camera, choosing it as the main color.
- Additional method : by hand. There are situations when there is neither a card nor a white sheet (or a white surface, for example, a wall), then you can use a photo of your hand taken in available lighting, that is, focus on skin color. This helps with portrait photography, but the method is still inferior in reliability to the previous ones.
Important to remember! If you hope to carry out such an event with white balance once, then you are in a hurry to be disappointed - as soon as the lighting or other photographic circumstances change, everything will need to be done again.
In cameras from different manufacturers, the process for setting the BB may differ slightly, but rarely. For example, on a Nikon we go to the “Shooting Mode Menu”, then “White Balance”: the “PRE” item and “use image”. All that remains is to select a frame from the gallery and click “ok”. The inscription on the display “Data received” indicates the success of the operation.
A simpler method involves using the information button “i”, then using the joystick we go to “WB” and the process is repeated. Only in this case we do not find the desired frame, but immediately take it.
BB in a graphic editor
Imagine that you took a series of photos, but unfortunately did not bother to check the white balance setting on the camera. Now all the frames are ruined? Not at all, everything can be fixed. Long live the almighty image processing programs! The most popular and widely functional among them are two – Lightroom and Photoshop.
In the first, you can easily edit a large volume of photos and correct small errors in terms of color, light, remove spots, reduce noise, etc., while the second is more difficult to use and is designed for detailed work with each picture, its possibilities are practically unlimited.
Let me tell you how to achieve ideal white balance in Lightroom, that is, when the colors in the picture match the colors of the photographed area or object. And for this, too, there are different ways, essentially leading to the same result:
- Adjustment of the “temperature” and “shade” sliders. As you can see, the range is from blue to yellow and from green to purple. Moving towards blue will make the image cooler, with less yellow, and yellow will therefore add warmth to the image. Enhancing green is good for grass and trees, but on a person's face it should be avoided, so you can go slightly towards purple.
- Choosing a “pipette”. By selecting this option and clicking on a light gray (or white) color in the image, you can automatically get the desired colors. Be careful, the program does not always cope with its task. Much depends on the color and its quality that you choose as a standard for determining other colors.
- Tone curve and working with each color. If, as it seems to you, you have come as close as possible to the natural (or desired) color balance using the methods above, but you are still not happy with something, try playing with the colors separately. Red, green and blue can be changed using curves: each of them can be strengthened or reduced in a certain area of the frame, highlights and shadows. Other colors such as crimson, orange are changed in the next section below. And here you can set their saturation, lightness and hue.
Color rendition on different cameras
Depending on the model of your camera, the colors in the photo itself may have a certain specific hue. For example, photos on canon often turn out too red, while nikon photos can turn yellow. Not too nice, right? But you shouldn’t be afraid, you just need to be prepared for it.
Knowing the features of your camera, you can create a preset, that is, a set of certain settings in the same Lightroom, and almost in one click transform the colors in the photo.
Therefore, my advice: if you do not want or cannot, due to external circumstances, immediately adjust the BB on the camera before shooting, take photographs in raw format. Such files will undoubtedly be large, but they will store the most complete information about the photo.
When shooting in raw format, setting the white balance is as easy as shelling pears, for example, in the Lightroom editor. To do this, you just need to select from the available list, as shown in the picture below.
Important! Here is my big recommendation: take photographs in raw format, preferably always. I even shoot every little thing in this format, and at the same time, I always control any photo.
Subsequently, this will play into your hands when correcting not only white balance, but also other image parameters in the photo editor.
This is where I will end my article, I hope that now you are fully aware of such a parameter as BB. If you are interested in learning more about the Lightroom program and how to work with it, I can recommend the video course “Lightroom - an indispensable tool for a modern photographer.” An excellent course for a young photographer. The entire course is based on examples of working in the Lightroom program. I highly recommend it!
Lightroom is an indispensable tool for the modern photographer
If you are a complete beginner and don't know much about your camera, the courses below are just for you. You will learn everything about a camera and learn how to take beautiful photos.
My first SLR - for users of a CANON SLR camera.
Digital SLR for beginners 2.0 - for users of NIKON SLR cameras.
Don’t forget to share the article on social networks, so that your friends will be aware of all the news in photography. So long, fellow photographers. See you again on my blog!
Popular about white balance
Studying white balance and color temperatures
In both photography articles and tutorials, information about white balance can be overly technical and difficult to understand. We want to present information about white balance here in an accessible form to help you master all the functionality of a digital camera without diving deep into technical terms and the physics of converting photons into bits of information. If you follow these steps, you'll have a good enough understanding of white balance, kelvins, and color temperatures to start experimenting with different settings and lighting. After a certain amount of experimentation, you will become a good master of photography.
1) Awareness of limitations.
The first thing you need to do is understand that shooting in RAW will not give you absolute white balance. Situations may arise when you are photographing under mixed lighting, for example - light from a tungsten lamp in a room and a fluorescent lamp, light from a window in a room with fluorescent lighting, any combination of the above lighting, etc. In a RAW image, this light will have a different temperature, and it will not be possible to equalize it with the white balance slider.
Understanding white balance and color temperature will help you reduce (or accentuate) the effects of mixed lighting and achieve the results you want.
The second thing to remember is that the more color correction required in post-processing, the longer your work will take. Therefore, we advise you to read this article and start mastering white balance and color temperature.
2) Find your white balance settings
Let's get started without remembering any definitions or complicated concepts. Our cameras are pretty smart these days, but AWB (automatic white balance) doesn't always achieve the results you want. In general, AWB works well at guessing daytime temperatures. However, at night or when shooting indoors, it is better to adjust it yourself. Each camera is a little different, but in general, white balance settings are always found in the main menu options.
3) Remember the icons
White balance icons always correspond to the current lighting situation. Most of the icons are self-explanatory: the sun icon represents sunlight, and the lightning bolt represents flash light.
These are ready-made presets for quickly selecting the light temperature; in most cases, they are enough to quickly change and shoot, and then level them to an ideal state during processing.
The table clearly shows how the temperature of the light changes from warm to cold. Almost any camera allows us to set the temperature manually (K 5300 icon), then we will look at this in more detail...
4) Experimenting with K
The K setting in your white balance settings is perhaps the most important white balance setting. Let's give an example so you can imagine the difficulties you may encounter when using gels to correct mixed lighting without understanding "Kelvins". Try turning the "K" parameter all the way, like in the picture on the left, and up to about 2500K. If you take a photo, the image will likely appear bluish (the degree of blueness depends on the current lighting situation). Now scroll in the opposite direction to 10000K and take a photo. Your image will most likely be orange. Simply put, the more you increase K, the more orange the image becomes, and the more you decrease K, the more blue tint there is in the image. The benefit of using the K option over others is that you can check your images and adjust accordingly, rather than having to settle for a preset.
5) Concept of temperature/color
Now let's look at the diagram on the left. On the graph, you will see that the lower the Kelvin level, the more orange the color of the light, and vice versa, the higher the Kelvin level, the bluer the color of the light. What does this mean?
This means that if we are shooting in a room with tungsten lamp lighting (3000K), setting the camera settings to 3000K will make the light “neutral” or white. If we lower to 2500K the light will become more blue, and if we increase to 3500K the light will become more yellow/orange.
For example, a photographer who prefers images a little warmer will set the tungsten lighting to approximately 3300K rather than 3000K. This way the overall color will be more yellow and warmer. In order for the daylight sun to appear warm, you will need to set the white balance to 200-250K more than 5500K.
Conversely, if someone prefers colder scenes, it is necessary to lower it by 200-250K. When lighting with tungsten lamps (3000K) or daylight (5500K), you need to set the white balance to 2800K or 5300K, respectively. Any temperature setting lower than the color temperature of the light in the scene will produce a bluer or “cooler” image.
6) Kelvin space
This is useful for practical application.
For example, you entered a hotel room and noticed that the light source was tungsten lamps. Try adjusting the K scale somewhere between 2500 and 3500 (depending on your warm or cool preference). What to do if the image is too orange? At this point, you should know how to fix this problem by going to Settings and decreasing the Kelvins. If the color is too blue, do the opposite - add. If you're shooting outdoors where there's a lot of sunlight, or if you're using flash (which is about the same as sunlight), set it to 5000 to 5500K and adjust until you get what you want to see. The 3000 and 5000 ranges are the two most common ranges you'll use, so they're worth remembering.
7) Elimination of mixed lighting
AWB works very well in flat lighting, with one light source without much contrast.
But you may encounter mixed lighting in the scene. When the flash is on, the AWB automatically transfers a temperature of 5500K to the white balance settings. So, let's see what we get when we shoot a scene indoors with tungsten lighting and the flash turning on the AWB mode - we take a picture, the flash illuminates the object with a temperature of 5500K, then the camera records it all with a temperature of 5500K, we look - the object looks good, no special questions no, but the problem with the background is that it’s orange.
Well, okay, you say, now we’ll correct the white balance in the editor and that’s it!
Nothing will work out for you, if you level the background by about 3000K, the object itself will turn blue like in the picture.
This is all due to the fact that in our frame there are two light sources with different temperatures, and their power is different, even structurally different - the flash lamp is gas-discharge, while the table lamp has an incandescent filament.
How to reconcile them?!
There is an exit! It is necessary to use color correction filters (gels).
The first thing you need to do is assess the situation and understand what kind of filter is needed in a given scene; such an experience does not come immediately, but there is nothing complicated here.
You can quite accurately determine by eye the type of main lighting in the room - warm or cold, the type of lamps, the light intensity. In our case (photo on the left), a table lamp with a tungsten bulb was used, and a flash with a Full CT orange .
This filter converts 6500K flash light to 3200K, about the same as a tungsten light bulb, so we get a light source that is the same temperature as our main light.
If you shoot in RAW, then no matter what WB settings are set in the camera, you can easily set the correct white balance in the RAW editor.
If you shoot in JPG or want to immediately evaluate the preliminary result, then set the “K” parameter in the WB camera settings to the same as your filter, this is also convenient because you will almost immediately see whether you have chosen the right filter for the main lighting.
For example, in the scene with the policeman, a Full CT orange with a temperature according to the passport of 3200K; accordingly, the temperature in the camera was set to 3000K in the WB settings; the photograph taken turned out to have an almost perfect white balance, so it was not even edited.
Correction filters are different for different light sources... but more on that in the following articles. Do not forget to compensate for the pulse power, because the filter is not transparent and part of the light flux is blocked. The characteristics of the filters contain all the information.
neshitoff
Photography, travel, cars and something else.
It's good to take pictures, but it's even better to take good pictures
Lesson 10. Aspects of setting white balance.
I was prompted to write this short and very simple lesson by my own observations obtained during the development of a new photolight in my practice based on fluorescent lamps. First of all, they touched on the features of setting white balance for shooting using such lighting. Modern digital cameras, when shooting with natural light in automatic mode, in most cases do a good job of determining color temperature, but in artificial lighting conditions they still give in. As a result, we get pictures with colors that are not exactly the same as we saw them in reality.
Let's start with a short theory. The light that illuminates our world is not uniform. Different light sources have different characteristics. The same sunlight is also fickle and changes throughout the day. In order to systematize light characteristics, the concept of color temperature was introduced, measured in degrees Kelvin - K. To make it clear, following the logic of measuring color temperature, lower temperature values correspond to warmer light. Using sunlight as an example, this means that starting at dawn, when the sun just appears over the horizon and has a red-orange color, the temperature of its light is approximately 3400K. At the zenith, the temperature of sunlight increases and is already 5000K. Light of this temperature, in our understanding, is practically white. If you continue to increase the temperature, the white color will begin to fade into a blue tone. For example, the sky in northern latitudes has a color temperature of approximately 15,000K. The difference in combustion color of wood and gas, for example, is explained in the same way. The combustion temperature of the gas is much higher, which is why we see blue flames. Our brain does a pretty good job of determining both the color of objects and color temperature. Thanks in large part to the built-in intuitive color balance and intuitive matching method. Cameras are not yet so advanced and therefore errors in determining color balance are inevitable. But we can help the camera.
What is white balance? White balance (BB or in the English version White Balance - WB) - adjusting the color display relative to the ideal white color. Modern cameras have several presets that adjust the BB depending on the shooting conditions, but they are frankly too rough and you can only normally use the preset for pulsed light or flash. For finer tuning, there is a function for manually setting the WB, which consists in the fact that we independently indicate to the camera what color is white under current conditions and, depending on this, the camera begins to understand what the other colors should look like.
I will show what this looks like in practice and why so much attention is paid to white balance using the example of a teddy bear, shot under lighting with special fluorescent photo lamps. So, let's sit our model on a dark brown sofa so as not to distract us with unnecessary details. To make it clear, in the original the bear’s fur is a warm milky color. We will be filming late in the evening, excluding natural light from the window, as well as with the room lighting completely turned off. Illumination is produced by lamps with lamps that, according to the manufacturer, have a temperature of 5000-5500K, i.e. close to midday sunlight. We take a picture with the camera in automatic BB mode and get this picture. To put it mildly, it is noticeably different from the natural scene.
Let's try to fix this by manually adjusting the white balance. There are several ways to configure this. The easiest way, which does not require any improvised means, is to adjust directly to the light source. True, it works if you use a light diffuser, for example, a photo umbrella. Shooting an open light source - the lamp itself - will not give the desired result. In our case, we have a photo umbrella and we shoot it so that nothing extra fits into the frame. As you can see, the umbrella, just like the bear, turned out to be the wrong color, although in reality it is white.
We switch the camera to manual WB adjustment mode and indicate the photo we took as the source of information about the WB. To check, remove the umbrella again. Thanks to the adjustments made, our camera began to display colors based on the information provided to it. Now the umbrella we removed has become white, just like in real life.
Let's try to shoot the bear with the new settings. Changes are evident here too. We could have ended it here. If we had halogen lamps as a light source, then these actions would definitely be enough to display colors correctly. But in the case of fluorescent lamps, everything turns out to be more complicated. Fluorescent lamps emit a greenish light that is invisible to the eye, which greatly spoils the colors in the resulting photo. By the way, it is noticeable on the bear’s fur. What is most unpleasant, the most detrimental effect of this green glow is on human skin color. In this case, there is a slight dip in yellow tones. It is quite difficult to suppress such distortions in the editor in the future.
For more precise BB settings, it is recommended to use the so-called neutral gray card. They are sold in photo stores. According to the manufacturer, such cards have a perfect gray color and can be used to fine-tune the BB. In nature, there are various versions of gray cards. I have at my disposal a universal set that includes, in addition to the gray card itself, a couple of tools useful for a photographer.
We shoot the map so close that there is nothing superfluous in the frame. Foreign objects can affect the correct color display and lead to inaccurate WB settings. In such conditions, the camera's autofocus will most likely not be able to focus and, depending on the settings of your camera, you will not be able to take a photo. To avoid this problem, just set the camera to manual focus.
We remove the bear again. The color changed again. We managed to get rid of the green tone and overall the colors look very natural. This method of setting up the BB is considered the most correct, if not ideal, and we have now confirmed this.
But what if you don’t have a neutral gray card at hand? There is another way to manually configure the BB. This is a clean white sheet setup. It is the most common method, but at the same time it cannot be said that it is accurate. The fact is that perfectly white paper does not exist. Office paper can be yellowish, bluish, pinkish. This is not always noticeable to the eye, but in the photo this subtle tone can have an impact. Nevertheless, this method of setting up the BB has a right to life and, in the absence of other options, it is quite possible to use it. It will not lead to serious mistakes. Let's try to demonstrate this. To do this, take a clean white sheet of paper and remove it in the same way as you removed the gray card. There should be only a white sheet in the frame and nothing more.
Let's shoot our model again. We evaluate the result. The bear's fur looks a little warmer than if the BB was configured using a gray card. In this case, no parasitic green tone is observed. Perhaps our sheet was almost perfect white, but the colors in the photo are closest to the original ones. Our bear in nature is exactly the color it turned out as a result of setting up the BB on a white sheet. Shooting people with these camera settings also gave very good results. The skin color turns out very natural and no additional steps are required to adjust it in the editor. I'll demonstrate this next time.
To summarize, we can say that experiments with luminescent light sources for shooting at home led me to the opinion that such light is quite suitable for photography, is a good budget solution for a home photo studio, but has its own subtleties, one of which is the correct setting of the BB . The correct setting of the BB seriously affects the shooting result and greatly facilitates subsequent photo processing.
What is white balance in photography?
Modern photographic equipment is so advanced, equipped with so many convenient and effective functions, that low-quality photographs with unnatural colors can only be obtained, probably, with an absolute reluctance to learn. A simple example. When shooting on a bright sunny day, faces have yellowish tints and the photo may have a blue tint. white balance was not found . Setting this function is a very significant moment in photography; it is what will allow you to achieve natural colors and shades in the picture.
Anyone who wants to become a true master of photography should be familiar with the concept of “white balance”; it refers to how the camera distinguishes the white color in the picture. The naturalness of the other colors also depends on this. In this matter, the influence of the light source and its temperature on the spectral composition of light is of great importance. The term “color temperature” refers to the quality of the light source. Unlike the human eye, which quickly adapts to changes in lighting conditions, film cameras cannot “adjust” relative to the temperature of the light source. That's why there is film for shooting in natural light and in artificial light.
Digital cameras can adjust white balance thanks to a special sensor. Achieving white balance is done before shooting, depending on the type of light source. This will allow you to achieve a natural color scheme. One of the important rules - adjusting white balance will affect all colors and shades of the image. And one more important point - every time you change the type of lighting, its temperature, a new balance adjustment should be made.
Lighting all objects with a neutral white color can only be achieved in a professional photography studio. In such rooms, the walls are specially painted white, and various additional equipment is also used when filming. Ideal white balance is difficult to achieve in other conditions. But even in the studio it is not always necessary, for example, when creating artistic photographs with a certain mood, or stylized portraits.
Digital cameras are equipped with a special function for adjusting white balance; it is included in the menu. But this setting is only sufficient if photography takes place in a studio with white walls, under standard lighting. If the photographer works on the street, for example, doing photo reporting, he will need other, additional techniques for adjusting the white balance. It's easy to adjust the balance in RAW format by editing the photo in Lightroom. You can also use the function associated with adjusting white from a photograph. According to the recommendation of experts, for this setting you need to use a sheet of white paper or any other white object. Some camera models have such a scheme - a photograph of a white object is taken, this photograph is used in the manual balance menu as a reference. Next time such a standard will already be ready.
Another effective technique is to use a gray (not white!) color card. It is a combination of white and black, and is also used only in a photo studio. It is the studio that provides the conditions for lighting stability. And using a gray card allows you to achieve the most precise white balance adjustment.
If the balance is adjusted manually, the camera is also pointed at a white object until it fills the entire frame with white. Then, using the white locking button, you need to secure this equivalent. Most photographers use the automatic setting, but if you are shooting indoors under incandescent or fluorescent lighting, you should enable the appropriate adjustment functions.
At the beginning of studying the art of photography, sometimes it is not possible to set the white balance correctly; some photographs are characterized by an unnatural color scheme and cause an unpleasant impression. The easiest way to correct the situation is to take the photo in black and white. Some photographers use Photoshop or Lightroom to correct “ BB ”; these programs help correct mistakes that were made during photography. About the site fotomtv.