Underwater photography
How to shoot underwater: choosing camera equipment
Any photo shoot, especially underwater, taking into account all the difficulties, requires careful preparation. One of the most important conditions that will help you achieve good results in underwater photography is the correct choice of photographic equipment. Currently, there is a huge variety of it, as they say, “for every taste and color.” However, it must be said that professional-level photographic equipment is far from cheap. A set of professional photography equipment can cost you several thousand dollars. So here everything depends, as you understand, not only on your desires, but also on the size of your wallet.
And if you are interested in underwater photography and want to learn how to shoot underwater, ask yourself the question: “Why do I need photographs of the underwater world, and what quality of images do I want to achieve?” You must understand that good photographs cannot be obtained using a cheap amateur point-and-shoot camera, both on land and under water.
If you do not strive for professional quality photos, and are going to shoot simply for your own pleasure and a family photo album, then you can easily get by with just one digital point-and-shoot camera for underwater photography, or an inexpensive camera in a special waterproof box.
Thus, the minimum that you will need for amateur photography at shallow depths is a cheap sealed camera or a camera in a waterproof box and a couple of underwater lights, or at least one. Inexpensive underwater point-and-shoot cameras are usually easy to use because they have a fixed focus and a minimal number of control buttons.
Before you start shooting underwater, you need to decide on the choice of underwater photographic equipment. Let's take a closer look and talk in more detail about what it is, what it relates to photographic equipment, and what types it comes in.
Underwater cameras
Naturally, the first thing that belongs to underwater photographic equipment is the camera itself. Today, all well-known photo manufacturers produce a number of camera models capable of shooting underwater, so their choice is quite large. All models for underwater photography can be divided into two groups.
The first group includes “amphibious cameras”. These are high-quality sealed cameras that are specifically designed exclusively for underwater photography. These cameras can take pictures underwater at a depth of up to sixty meters, but their cost is quite high.
The second group includes cameras designed for ordinary photography, but with a waterproof body. You don’t have to be afraid to submerge such cameras under water to a depth of about ten meters. The price of these cameras is several times cheaper than “amphibious cameras”, and somewhat more expensive than cameras designed for shooting on land.
But it is worth noting that many of these cameras are not designed for long-term exposure to water, which means their lifespan in a humid environment is very limited. Therefore, before shooting underwater, you need to carefully select the camera that will be used for underwater photography.
Video masks for underwater shooting
In addition to cameras for underwater photography, there are special video masks for underwater photography. Such video masks are capable of not only underwater photography, but also video shooting. They look like ordinary diving masks, but contain built-in equipment for video and photography.
Video masks are, of course, more convenient than cameras, since they completely free the diver’s hands, thereby giving convenience, greater freedom of movement and maneuverability than a camera. The disadvantage of a video mask is that it allows the diver to dive to a maximum depth of ten meters. In addition, for underwater shooting in a video mask at maximum depth, you will still need additional lighting equipment that can be attached to the mask itself. All video masks are designed for this.
Before you shoot underwater with a video mask, you should remember that you will not get professional, high-quality pictures from it, but the advantage of a video mask can be considered its relatively low cost.
Underwater Lenses
For underwater photography, as a rule, two types of lenses are used: a wide-angle, or better yet, an ultra-wide-angle and a macro lens.
A wide-angle lens is great for capturing large fish, marine mammals, coral reefs, shipwrecks, and underwater landscapes. Also, a wide-angle lens is suitable for shooting in underwater caves. A macro lens allows you to focus at close distances, meaning you can shoot objects very close, so this lens is great for capturing even the tiniest sea creatures in great detail.
Therefore, before you shoot underwater, or rather, before diving underwater for the purpose of photography, decide what you are going to shoot. The topic of choosing a lens is relevant for expensive professional cameras, and does not apply to cheap cameras that do not have the ability to replace the lens.
Lighting equipment for underwater photography
Lighting devices for underwater photography are photoflashes, which, like regular photoflashes, create additional lighting when there is a lack of natural light. They come in two types: built-in and external. Let's look at both. Built-in flashes are only suitable for shooting at shallow depths, provided there is sufficient natural light (during daytime in clear weather) and in clean, clear water.
For shooting at great depths, in the evening or at night, it is necessary to use external lighting devices. Without the use of lighting equipment, it is impossible to achieve high-quality photographs, and the weaker the environmental lighting, the more powerful artificial light sources should be.
For underwater photography, either one or several flashes are used, as well as diffusers, handheld flashes, digital or macro flashes, depending on the conditions. All external flashes for underwater photography have a durable, waterproof casing and are most often attached to the camera body with a long flexible rod that allows the diver to correctly direct the light onto the subjects being photographed, from almost any angle.
Such a flash can illuminate objects not only from the front, but also from the side, allowing you to achieve interesting special effects. But it should be noted that this is not a cheap option. Before shooting underwater, you should think about the choice of underwater lighting, and this, as you understand, will depend on the photographic conditions and the tasks at hand.
Accessories for underwater photography: protective boxes
Accessories for underwater photography primarily include underwater housings designed to protect the camera from water. Underwater boxes can be of two types: soft transparent cases made of polyvinyl chloride with built-in glass eyes for lenses and hard boxes made of plastic. Both of these types have their advantages and disadvantages.
Soft cases are relatively inexpensive, very convenient to use and suitable for any sized camera model. The disadvantages of soft protective cases include their low strength and the inability to connect additional devices. In addition, the use of a soft case does not allow photography at great depths. The maximum immersion depth with a soft protective case is about 10 meters.
Hard boxes , as a rule, are made of transparent hard plastic and have good strength and impact resistance. They are designed to connect an external flash and other additional devices to the camera. The advantage of hard boxes over soft cases is that they allow you to dive under water to a depth of 50 - 60 meters.
Most often, hard boxes are suitable only for specific camera models and allow manual adjustment of photographic parameters under water.
There are also “universal” hard boxes that are suitable for many camera models, but they are designed to use only the shutter button underwater. Hard cases are slightly more expensive than soft cases.
In addition to boxes for underwater photography, there are a huge number of other different accessories: these are various filters, protective gels and liquids, and much, much more. The choice of accessories, as well as photographic equipment, directly depends on how to shoot underwater, where to shoot and what photographic equipment to use. The choice is yours.
I would like to hope that this article will help you understand the complex issues related to shooting underwater, and also that without any problems you will be able to touch the amazing and mysterious underwater world, taking away from its depths the beautiful moments captured in the photo! After all, this is what underwater photography is for.
And if you want to understand the fascinating science of underwater photography, then these articles will help you with this:
About Photo
Reviews and tests, simply about the complex
Underwater photography. How to take pictures underwater.
If you haven’t taken photographs underwater yet, but really want to, first I suggest you familiarize yourself with important information - what you need to know about underwater photography. Even if you've tried deep-dive photography before and it didn't work out well and you're thinking you should buy a better camera, it wouldn't hurt to get familiar with the basics before you regret wasting your money.
Many people imagine that they are only a short distance away from underwater photography - just buy a waterproof camera, which is colorfully advertised:
Don't fall for this trick, you are being shamelessly deceived. All you can do with such a camera is effectively drop it into the water, which is exactly what is advertised.
Why do you buy equipment for underwater photography, be it an underwater housing or a waterproof point-and-shoot camera? Most likely, in order to photograph children, friends and other passing fish. All this is moving, and quickly. You can’t really photograph this with a soap dish even on land, and under water additional restrictions are imposed.
In photography, light is everything. Therefore, when there is little light, the photos turn out bad. Additional difficulties arise due to the fact that water absorbs light very well, so a lot of light is needed.
In addition, light is absorbed unevenly in water. For example, at a depth of 1m you will no longer have red, so almost all underwater photographs have a blue cast. In order to somehow compensate for the loss of red, you need to adjust the white balance. After 10m there will be no yellow. Below 20 you will be left without green, and at 30 meters the abyss will swallow the last rays of blue.
In addition to the depth and the bright sun overhead, there is also a problem with transparency. In a shallow pool with a light bottom at an expensive hotel, this may not be noticeable:
But if the hotel is simpler, the pool is deeper, and the bottom is dark, then everything becomes not so great:
It's still much worse at sea.
Therefore, to photograph underwater you will need a good digital camera, preferably a full frame one , a fast lens and a bright sunny day. Professional photos are taken with expensive equipment that costs tens of thousands of dollars, illuminating the subject with powerful spotlights. So forget about colorful photos of corals.
Now about optics. Due to refraction (or refraction), objects in water appear closer. Water acts as a natural zoom lens, this approximation is about 30%, which is quite significant. Therefore, due to refraction, opacity and absorption of light by water, it makes sense to go underwater only with a wide-angle lens. From personal experience I can say that a 50mm lens underwater is a completely useless thing, even if it is a Nikkor 50mm 1.8 .
Here is a clear example of the refraction of light in water:
But what about the flash, you say? To which I will remind you that even the bright rays of the midday sun have difficulty penetrating to a depth of several meters. And the effect of your flash will disappear at a distance of 2m, even if you set the maximum power. With the Nikon SB-400 , I could hardly see the difference at a distance of 1m to the subject.
Now the most important question is what to pack the camera in. Without a special device, you should not immerse the camera in water, you will ruin it. There are two options for underwater photography:
We immediately reject the first option, because the boxes are made only for certain models and are not suitable for others. Besides, $3000 is a normal price for hard boxing.
The second option is more humane and very much resembles a plastic bag with a trunk for the lens and a strap. This package costs $300-$500.
If you don’t want to go underwater, you can get by with a point-and-shoot camera, then you’ll have to limit yourself to shooting on the water:
So, what is needed for underwater photography:
- bright sunny day
- clear water
- underwater housing, underwater case or waterproof camera
- wide angle lens
- due to the previous point, the object is at a distance of 1-3 meters
Thank you for your attention.
If you liked the article and want to support the Pro Photo project, it’s easy to do so. Any help will be greatly appreciated.
Basics of amateur underwater photography
If you decide to take up underwater photography, then you need to have either a camera for underwater photography or an underwater aquabox for a regular camera.
Cameras that make it possible to shoot underwater have all the qualities necessary for this, but most manufacturers are apparently familiar with underwater photography only in theory, since most models have their own shortcomings. Therefore, you should take the choice of an underwater camera seriously.
When choosing an aquabox there are also some nuances that we will talk about later.
How to take photos underwater
Amateur underwater photography is not as difficult as it seems at first glance, you just need to remember a few rules when photographing underwater.
Continuous shooting
It must be remembered that underwater there is no time to adjust the frame and choose a good angle, since the inhabitants of the sea or ocean will not wait motionless to be photographed. For this reason, continuous shooting is an ideal solution to the problem. It is recommended to set the camera so that you can take at least 2 frames every second.
Lighting
It is recommended to turn off the flash as photos with natural light underwater will be clearer. A flash will only be needed in places where sunlight does not reach, for example when working in crevices.
It is recommended to remove only in the morning and only in clean water. It is not recommended to take pictures after noon. The place should be deserted. It is best to shoot from the shore at a distance of 20 meters or further. There is no need to constantly look at the camera screen; all the most interesting things are on the sides. You just need to get used to the camera in order to be able to evaluate its capabilities and shoot intuitively.
Take photos in RAW format so that you can carry out color correction in the editor, since even in good light the frames will still turn out pale.
Focusing
You won't be able to focus manually underwater, so you need to use auto focus. This function does not depend in any way on the professionalism of the photographer; everything here depends on the quality of the device or lens itself.
Use a macro lens so you can focus as closely as possible on the subject, this way you will achieve the highest quality.
Distance
You should swim close to what you want to photograph. Visibility in even the clearest water will be worse than when simply shooting. For the best quality that can be achieved when shooting underwater, the distance between the camera and the subject should be no more than 40 centimeters; you need to approach the target especially carefully, without making unnecessary movements.
Viewing angle
Use a wide angle. Corals undoubtedly look very beautiful, but the stones in the background give a special highlight. There is no need to try to take photographs like in the movies; for this you need to be a professional diver and have high-quality equipment. Use the correct background. To do this, you need to choose the right angle for shooting.
Underwater photography equipment
As we already wrote, you can buy a specialized camera for underwater photography. But if you do not plan to engage in underwater photography professionally, then there is no point in buying a camera separately for this. You can buy an action camera with an underwater housing. If you already have a regular camera, you can purchase an aquabox for it.
There are aquaboxes with soft and hard bodies:
- Soft water boxes are more universal - they are suitable for most cameras.
- Hard shell boxes only fit one specific model and are more expensive.
You can buy a universal aquabox for SLR cameras here.
Here are some simple rules that will help novice photographers get high-quality images when shooting underwater. In essence, there is nothing complicated, the main thing is to practice as much as possible, since theory alone is not enough.
Tips for underwater photography
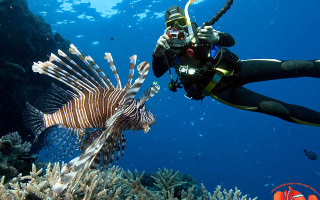
Who would argue that the camera is one of the greatest inventions. Thanks to him, today it is possible to capture not only our world, but also another - the underwater world. No less colorful and diverse, where life is vibrant and sometimes real magic happens.
Underwater photography is an art that, with the right approach, is accessible to everyone.
The history of the underwater universe in pictures
If earlier, in order to take a photo, it was necessary to perform a lot of manipulations, set up a bulky camera, and also develop the picture, then we started talking about underwater photography only in the middle of the 20th century. Needless to say, it wasn’t easy for underwater photographers back then. Bulky equipment, a heavy suit, inconvenient camera boxes and a technically complex filming process.
If William Thompson (who first took an underwater photograph in 1856) saw how today our tourists quickly take stunning pictures of their diving in the Red Sea with a camera (weighing 100 g), he would faint. It's hard to believe, but a lot has changed in 150 years. Today, the simplest “soap box” takes photographs that William Longley and Charles Martin never dreamed of even in their most colorful dreams (in 1923, these two took the first color photographs under water).
What to consider for a beginning underwater photographer
When going diving to warmer climes, it is considered a crime not to bring home photographs. Photos from an underwater trip are photographs of colorful fish, amazingly beautiful corals, exotic inhabitants of the deep sea, sunken ships and underwater riches. The photographs are designed to convey at least part of the magic of this underwater universe!
When going on such a trip, the main thing to ask yourself is not what swimming trunks and swimsuit to take, but what you will take photographs with. You can't just take your home digital camera and pack it in a plastic bag and hope it doesn't get wet.
How to choose the right camera for underwater photography
Please note, good camera:
• Withstands immersion up to 10 m (the lower this parameter, the higher the likelihood that the camera will leak when diving deeper)
• Has a sufficiently sized LCD display (it’s better to view the resulting photo on the spot, so as not to cry on the plane, discovering that after the first two frames “something went wrong”)
• Provides shutter speeds from 1/125 to 1/500 seconds (the fish doesn’t stand still), as well as an aperture mode of f/11-f/20 (for sharpening objects)
At the same time, you are required to be able to swim, dive and, in fact, use the camera.
Basic camera settings:
• The camera understands photographing underwater as the “scene” mode – in this position the camera compensates for the missing colors, making the pictures less cloudy and with the presence of red tints;
• For DSLR (or others that do not have an underwater mode) – set to RAW with the “sunlight” white balance mode;
• Lens selection. Luckily for you, there are only two of them: an ultra-wide-angle lens (for shooting underwater landscapes and large objects) and a macro lens (a kind of microscope - allows you to photograph the smallest objects).
Don't forget the waterproof box! It is worth considering that it is better not to skimp on this accessory. Then it will be very sad to pour the water out of the camera and realize that the fish posed for you in vain. Well-established manufacturers: Subal, Nexus, Sea&Sea, Ikelite, Sealux. They have a wide range of boxes for almost all camera models.
And learn how to use the camera in the box before diving, it will be extremely difficult to do this in water. And the sea inhabitants don’t have to listen to your swear words.
“Stop for a moment”: how to take good underwater photos
When diving underwater, turn off your brain. Make a fish swim in the right direction or not move at all - forget it, you’re not in a cartoon, this doesn’t happen.
Remember: even what should, in theory, “grow quietly” is swaying! This is the essence of water, the result of currents, waves and even your presence. Absolutely everything moves here. Therefore, the rules are:
- Absolute shutter speed – yours and the camera’s
- Setting the maximum resolution
- Get as close to the subject as possible - this will increase the chances of getting a colorful photo.
- Flash – you can’t do without it!
Techniques and tricks
Experienced photographers have been training to take truly talented pictures for years! Yes, yes, including those who work for National Geographic. There is no need to be upset that the first time you turned out “slightly” different photos. Start studying techniques and techniques that will allow you to take good quality pictures, train and gain experience.
If you are bored with banality and mediocre compositions, look for new approaches to the storyboard of your vacation. Try split photography, or shoot night diving. By the way, diving with sharks will also greatly diversify your vacation. Whether you will be able to take photographs is a question, but the shark’s mouth will be etched in your memory forever, that’s for sure.
The underwater world is a fairy tale. Give yourself the pleasure of taking with you the happiest moments of your journey. And share them with others!
Underwater photography: theory and practice
Our trip would be unthinkable without an underwater camera. We took with us the D10, Canon's first rugged camera designed for underwater photography.
The Japanese company, by the way, did not immediately catch the trend. Before this, only Olympus (known for its Mju series, now TOUGH) and Pentax produced amphibious cameras. Last year was rich in announcements, and Panasonic (Lumix) and Sony also presented rugged cameras. In 2011, the trend continues, and there are even more such models.
The Canon D10 camera stood out from its competitors with its extravagant appearance and - most importantly - excellent characteristics, because not a single camera could boast of trouble-free immersion of ten meters, frost resistance and shock resistance, although today other manufacturers have similar models.
Ten meters is a critical depth. If you're serious about getting into underwater photography without spending a lot of money, the first dives for new divers usually take place at a depth of 7-9 meters. Of course, by buying a DSLR camera and spending the same amount on a box, as well as paying money for a ring flash, you can achieve better photo quality, but this is unlikely to be rational.
So, a little about the camera. The D10 is chubby in appearance, takes pictures at 10 MP and has a 3x optical zoom lens. The dimensions of the body do not change when zooming, since the zoom lens is enclosed inside and covered with tempered glass with an oleophobic and anti-reflective coating.
The front part of the model is reinforced with a metal frame coated with soft touch, making it convenient to hold the camera under water without fear of dropping it. We strongly recommend that you still use a wrist strap or a branded carabiner accessory, which can be purchased separately at service stores (as well as interchangeable panels in camouflage colors, which will be relevant when shooting outdoors or in other conditions).
Since the chamber is sealed, there is no need to worry about tiny sand particles getting inside. Instead of carefully brushing grains of sand out of crevices and under buttons, simply rinse the device with water.
There are clip mounts on all four corners of the camera. The latter are easy and very simple to install, and they are also replaced quickly.
The convenience of the carbine is that with its help you can quickly reorient the camera for the required grip, and if on land this seems completely unnecessary, under water everything changes. Indeed, in addition to the fact that you need to take photographs, you also need to watch around so as not to catch one of the many sharp or poisonous corals, and when snorkeling (swimming on the surface of the water with a mask and snorkel) - do not get carried away and dive too deep, gaining a mouth full of sea water.
We recommend swimming without a safety strap only at depths of no more than 3-4 meters, since at greater depths it is problematic to catch a fallen camera from the bottom, and for untrained people it is completely impossible without special equipment.
Be sure to fully charge your camera before you start shooting underwater. For the first time, you will shoot everything that is visible, be it sand at the bottom, hot women or small fish, which means that after an hour and a half your device will be discharged.
The D10 camera also shoots videos in 640x480 resolution at 30 frames per second, with sound. The sound is not the best, but considering that most rugged cameras are not equipped with microphones at all, this decision is commendable. The sound is recorded through a small plastic membrane on the front of the device: the sound of water, bubbling bubbles and the enthusiastic screams of nearby divers are all captured perfectly.
The camera in question is equipped with an optical stabilization system, which is especially important when shooting in water - at a depth of 10 meters there is much less light. To shoot even at a short distance, you will have to use a flash.
In addition, the camera carries proprietary motion recognition technology (iSAPS). It distinguishes both hand movements and the movement of objects in the frame, followed by automatic correction of shooting parameters - shutter speed, aperture, ISO and autofocus.
It is understood that the D10 will not only be used underwater. The camera copes with above-water tasks excellently: it can withstand several hours in the snow, falls onto a hard surface from waist level, and will also be interesting when photographing extreme sports - both winter and summer.
In general, if you don’t want to worry about caring for your camera and protecting the device from adverse influences, buying an amphibious camera is probably the best choice.
The model is extremely easy to use. While, for example, other cameras have multiple stickers and warnings that the covers for the battery, memory card and output slots can only be opened when the device is dry, Canon does not have this. The camera electronics are protected by doors that have mechanical latches with a soft rubber gasket that, under pressure, hermetically fills all the cracks.
The D10 features an extra-bright 2.5-inch LCD display designed for outdoor use, so you can shoot relatively comfortably even in the blinding southern sun. The screen is protected by a thick 2mm panel made of high-quality scratch-resistant plastic. Its absence would make it impossible to shoot at great depths, where the thin display would not withstand water pressure, and without an anti-reflective coating, you would look at the screen when it deviates from the optical axis of the eyes (even at a small angle of 30-50°) as if it were a mirror.
What makes shooting underwater difficult? The refractive indices of air and water are different. Therefore, the passage of rays from an optically denser medium to a less dense one is accompanied by refraction. You all know this very well: an object in water seems closer than it actually is, which is easy to verify if you put your hands in a bowl of water.
The angle of view of the lens also decreases, meaning a shorter focal length appears longer. As strange as it may sound, one of the most important criteria for underwater photography is a wide-angle lens. A 28mm lens underwater will produce approximately the same image as a 35mm lens in air. That is why underwater it is common to use wider-angle optics, which makes the image more natural. In addition, wide-angle optics are characterized by a large depth of field, so even with some autofocus errors, the frames will be sharp.
With zoom lenses, two more factors come into play. At the minimum focal length, as a rule, the aperture ratio is higher, which gives the camera more light, which is so necessary at depth. Light is absorbed very well by aquatic environments, and short focal lengths also mean more light underwater. Finding the focal plane at a distance of 20 and 100 cm is a very big difference. Try looking at a rectangular aquarium first from the front and then from the side. You will see that even at a short distance the sharpness and illumination of distant objects drops significantly and fish at the far end of the aquarium are less visible than near the glass.
With a long focal length, the light will pass through the water column before hitting the lens: some will be lost, another part will be scattered, and the camera electronics will immediately set a lower shutter speed.
Considering the fact that while swimming you cannot remain motionless, the chance of getting blurry shots increases significantly. But fish are also mobile. Therefore, using telephoto lenses underwater is pointless - the quality of photographs and their detail will become worse, including due to light scattering.
The only hypothetical advantage of telephoto lenses is this: in order to level out the scattering of light in the atmosphere, they are coated with a coating that filters out part of the blue spectrum - to avoid the appearance of blue haze in photographs. But again, this advantage is leveled out much earlier than you notice the benefit, and the coating itself is used only on very expensive super-telephoto lenses. Due to the large distance of the focal plane from the diver, the lens will turn your photo into a colorless mess, and besides, swimming with an optical device weighing 2-5 kg is very problematic.
Water transmits much better the short-wavelength part of the daylight spectrum, which visually corresponds to green and blue colors. This characteristic is slightly different for seawater and freshwater, which is why the color in the lakes is different from the color of the seas. Because of this, when shooting in sunlight, the color of objects photographed underwater changes with depth. At a depth of 3-5 meters, novice divers can get bored: silver fish turn gray, and orange fish turn dull brown. And this is not a matter of natural selection.
At such a depth, the permeability of long-wave light, represented in life by the red and orange part of the spectrum, drops very significantly. With immersion, the world around you becomes low-contrast, and to get real colors you will have to use additional light sources, since at depth the entire frame is literally flooded with blue. In addition, triggering the flash reduces shutter speed and freezes even the most nimble fish.
You should be wary of the abundance of small bubbles, plankton and turbidity raised from the bottom. All this, when the flash is fired, will give the same effect as when shooting with flash during a snowfall or in a dusty dark room - “magic” white dots will appear. Captain Obvious notes: when using flash, the background is rendered worse the further it is from the diver.
Underwater photography: how to make friends with your lens
You want to shoot underwater, and you love photographing everything you might find there, from a whale shark to a tiny shrimp. What to choose from the variety of lenses that photo stores offer us?
For most underwater situations, you will need no more than three lenses: a fisheye, a zoom, and a macro lens.
Fisheye is the king of underwater lenses
If you decide to take up underwater photography, this type of lens is a must-have in your arsenal. They were named so because their angle of view is 180 degrees (along the diagonal of the frame): this is how fish and other underwater inhabitants see the world around them.
Fisheye is ideal for shooting landscapes and large objects: schools of fish, sea animals and sharks, groups of divers, sunken ships and caves. The water column scatters and absorbs light waves, reducing the contrast and color saturation of the image. Ultra-wide-angle lenses of this type allow you to get close to the subject at a minimum distance, thereby reducing the inevitable light loss under water. Another advantage of fisheyes is their large depth of field.
Features of the image produced by fisheye are perspective distortions. Identical objects placed near the camera and distant from it will appear very different in size to the viewer. The distance between them will appear much greater than it actually is. This is often used by underwater photographers when they want to take a dramatic photo with a “huge” coral or sponge in the foreground and a “small” diver above it. The viewer is very surprised when he learns that the sponge was no more than 30-50 cm, and the diver was not five meters from the photographer, but only one and a half meters above him.
Another feature of fisheyes is distortion. This is an image distortion that causes straight lines to become barrel-shaped at the edges of the frame. Try to shoot a horizon line, for example, a sunset on the sea: tilting the camera up will make the horizon convex, downwards - the sea will turn into a depression. In land photography, this is sometimes used as an artistic technique: for example, by bending the horizon line, you can create a “globe” effect. Due to distortion, many land photographers do not like fisheye and rarely use it. In underwater photography it's the other way around! “Fisheye” is the number 1 lens in every underwater photographer’s arsenal! This is where its full potential is revealed.
Underwater, distortion is not so noticeable, because the shooting takes place in the water column, where there are no straight lines and no horizon line. Even when removing the reef wall, it is difficult to subsequently “identify” the influence of distortion. Have you often seen a perfectly vertical wall underwater, without corals protruding from it or a bizarre pile of stones? All these natural irregularities gently “conceal” the distortions of the picture, and the viewer will not be able to understand where the rock really bends, and where this is the distortion effect. Just try not to place the divers' faces on the edge of the frame or shoot them from very close distance, as in this case you will get elongated and distorted, like in a funhouse, faces. When shooting natural objects, distortion, on the contrary, will emphasize the volume and shape of the object, making it convex and more expressive.
Wide Angle Sighting Technique
It is fisheye shooting that causes the greatest difficulties for beginners. Instead of a majestic panorama, the result is a pale blue picture with barely discernible details of the subject... Why?
The main mistake of a novice underwater photographer is that he tries to shoot fisheye from too great a distance. Imagine this situation: you are swimming with a camera in your hands and see a sunken ship; the picture fascinates you, you raise the camera and take a photo. The result is a featureless shot: the subject is too far away. Your angle of vision underwater is several times narrower than that of a fisheye. The lens will form the same image you see when you swim much closer to the ship!
The correct sighting technique with fisheye, and with other lenses too:
1) Press the viewfinder close to the glass of the mask to see the entire field of the frame.
2) Move closer to your subject while continuously looking through the viewfinder until you see the image you want.
3) Look at the entire area of the frame, from corner to corner diagonally.
4) Make sure that the picture is “filled” from edge to edge.
5) Pay attention to the corners. Inattention to the periphery of the frame and focusing on its center can lead to the “appearance” of unnecessary and foreign objects in the image. Your own fins, divers swimming past, someone’s head can get into the frame... Of course, a lot can be removed in Photoshop, but why do extra work if you can eliminate the problem during the shooting process?
Underwater photography on UWPRO.RU
New items
The resource is dedicated to underwater photography and belongs to the wholesale and retail company YUVI-PRO, which officially represents the following brands in Russia: Seashell, I-Pix, Fantasea, I-Divesite, I-Torch and Ultramax.
We strive to offer the customer the best service in the subsea equipment industry. This is our first priority.
We have three sections on our website:
- Equipment for underwater photography - this section is devoted to the equipment necessary for recording underwater photos or videos. Here you can choose the equipment you need, find out detailed information on the product, read reviews from other customers and get expert advice.
- Theory of underwater photography – this section is devoted to the study of underwater photography. Here you can gain theoretical knowledge, as well as suggest a topic for publication of the next material.
- Practice of underwater photography - this section is dedicated to discussing underwater photographs, here you can post your works, participate in the competition and vote for other authors. In this section, it is also possible to ask a thematic question to a professional photographer, a teacher of underwater photography courses.
We try to collect everything for underwater photography in one place
If you want to purchase any underwater equipment, even not presented on our website, just call us! We will definitely help you choose the right equipment for your camera.
Shooting underwater
The underwater world is amazing! It is almost impossible to convey in words the extraordinary beauty that we see underwater. For many years now we have been sharing our impressions with people around us through underwater photography.
Shooting underwater is different than shooting on land. With every meter of immersion, colors are lost, making photography more difficult. Underwater, the angle of view of the lens also decreases, which requires the use of special attachments. This occurs due to the refraction of light in water.
Develop your skills
One of the most important skills an underwater photographer needs is buoyancy control. It is almost impossible to get a good result if the photographer cannot control his position in the water column. First of all, you need to get used to the new conditions and only then start shooting underwater.
Use modern equipment
Additional equipment will be required for underwater photography. Most cameras and video cameras cannot operate in water without special protection. It uses underwater boxes made specifically for a specific camera model. Depending on the brand and manufacturer of the boxes, they vary greatly in price, appearance, functionality and reliability.
To create truly good photographs for the box, additional underwater equipment is required. These are primarily wide-angle lenses to capture most of the image in the frame and artificial light to compensate for color fading. There are other accessories too.
Make the right choice
For beginners, it can be difficult to sort through the wide variety of underwater photography gear that the market offers and immediately understand what they need. We recommend taking your time with the purchase. First, you should try shooting using equipment of different models and brands. We understand how important it is to make the right choice. To provide assistance in this important issue, our company works in the following areas:
- School of underwater photography based on RUDIVE GROUP and UWPRO;
- Rent boxes with a camera at the UWPRO rental center;
- Free testing of equipment based on AQUANAVTA (Olympic swimming pool);
- Consultations with specialists by phone and on our portal;
We are always happy to help! Join our society of underwater photographers!