Panoramic photography
Panoramic photography

- Find and arrange in the form of footnotes links to authoritative sources that confirm what is written.
 Photo Photo |
|
|---|---|
| Genres | Self-portrait • Architectural • Documentary • Lomography • Macro photography • Microphotography • Mobilography • Still life • Night photography • Nude • Panoramic photography • Landscape • Underwater photography • Portrait • Post-mortem • Advertising • Reproduction • Wedding • Street • Photo hunting • Photo report |
| Types of cameras | Single-lens reflex • Double-lens reflex • Rangefinder • Scale • Simplest • Large format • Medium format • Small format • Semi-format • Compact • Panoramic • Stereoscopic • Digital • Digital SLR • Pseudo-mirror digital • Mirrorless digital with interchangeable lenses |
| Terms | White balance • Bokeh • Vignetting • Main focus • Depth of field • Aperture • Distortion • Cropping • Crop factor • Illumination • Relative aperture • Spotlight • Working distance • Aperture • Flash synchronization • Focal plane • Focal length • Photographic latitude • Exposure |
| Manufacturers | Agfa • Canon • Casio • Eastman Kodak • Fujifilm • Hama • Konica • Konica Minolta • Leica • Minolta • Nikon • Olympus • Panasonic Lumix • Pentax • Polaroid • Ricoh • Samsung • Sigma Corporation • Sony • Tamron • BelOMO • Arsenal • KMZ • LOMO • FED |
| Technique | Autofocus • Adapter • Bayonet • Hood • Viewfinder • Rangefinder • Shutter • Sensor • Bellows • Mira • Eyecup • Attachment lens • Lens • Aperture repeater • Filter • Teleconverter • Zoom • Extension rings • Bayer filter • Photoflash • Photo recorder • Photogun • Tripod • Light meter |

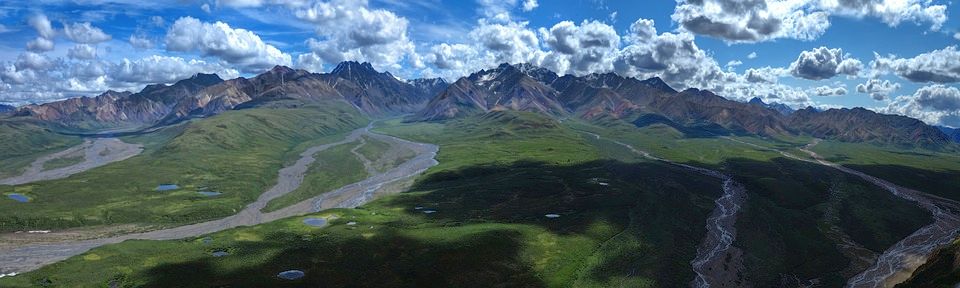
One of my New Year's resolutions was to "do more panoramic photography"... Not a very specific goal, but by the end of 2017 I had only taken five or six photos. This means about one shot every two months. I think we can at least double this number to 12. To get a good start, I started digging into the literature on panoramic photography. It didn't take long to learn that panoramic images used to be the exclusive privilege of the elite and the rich. In the days of film shooting, stitching together multiple 35mm slides was incredibly difficult. Therefore, to create a complete panorama, special lenses and cameras were required. During this era, photographers like Peter Lik became so famous because they had these cameras and were the only ones who could take impressive panoramic photographs. Combined with advanced printing technology, it becomes clear how Peter has achieved a place in the world of landscape photography that many have never even dreamed of. Luckily, modern digital technology has leveled the playing field. Yes, panoramic photography is important and can positively impact your photography career. I neglected her, but only until this moment. Basic techniquesI think it's worth starting with what a panoramic shot is. I'm guessing most people already know this, but for those just starting out in photography, a panoramic shot is one whose aspect ratio is larger than normal. However, standard rules apply to such photographs. They need a foreground and middle ground, as well as a background. They still need to have a subject, and they need to follow the rules of composition that I talked about in this article. Camera orientationWhen shooting panoramas, the camera must be installed in portrait orientation. There are several reasons for this. The aspect ratio of most modern DSLRs is 2:3. This means that the photo can be printed at 4 x 6″. If you make a panorama in landscape orientation, 2x3+2x3+... as many photos as you like will be stitched together. There will be only 2 inches vertically, and 3 horizontally, and as gluing progresses, the width of the frame will quickly increase, while the height will remain constant. As a result, it looks like a ratio of 2 x 6 or 2 x 9. In order for anything to be seen in the resulting image, it must be printed in a very large format. Now imagine a photo that is 8 x 24″ or 9 x 27″. It is unlikely to deserve attention, and printing will be very expensive. I'm not saying you can't print in these formats, but I don't encourage their use either. They have their place and are only useful in certain situations. As I said, the correct way to shoot a panorama is in portrait orientation. This gives a ratio of 3 x 2. Therefore, if you add two of these pictures, you get 3 x 4, and add another one - 3 x 6, which is equal to the ratio of 1:2. I'll talk more about this in the next section. In this case, you have more room for maneuver. Aspect RatiosProportion is what defines panoramic shots. As I mentioned earlier, a photograph can be called a panorama if its aspect ratio is wider (or longer) than the camera's aspect ratio. The camera has a 2:3 ratio. This means that if you multiply it and get a larger shot, it will still be divided by that ratio and the proportion will remain. For example, if you print a 16 x 24 photo, its ratio will be 2:3. With panoramic shooting you get an aspect ratio of 1:2, 1:3 or even 1:4. That is, if you print a photo measuring 9 x 18, its aspect ratio will still be 1:2. So what ratio do we need? From an aesthetic point of view, photos with a 1:2 ratio look best when printed. This ensures that proportions and sense of size are not lost as the print canvas size increases. One of the problems with working with more stretched proportions is that the photo ends up being low, but also incredibly wide. To see it properly, you need to print it at a very large size. The 1:3 ratio means the photo can be viewed in its full glory on a 16 x 48 canvas. This will cost $200 if printed on metal and even more if using synthetic fiber. By the way, 16 inches is not that much. I know because I've printed dozens of photos that size. Another point regarding panoramas is that the 1:2 ratio is often not suitable. If you combine 12 photos, 1:2 simply won't work. In such situations, the proportions will be custom-made. I usually try to crop to standardize the images a bit for the benefit of printers and buyers' wallets. The main thing is to try to maintain a 1:2 ratio or strive to get closer to it. Focal lengthsI paid the most attention to this part of the article. What focal length should I use? The answer is whatever is appropriate for the specific situation. I will give several examples so that you can clearly compare and understand what is best to choose. 20 mmWith the 20mm lens I got the most distortion. Of course I was close, but because of the wide angle I had to come within such a short distance. I didn't really like the effect. 30 mmHere I think there is still a bit of distortion in the sky. The clouds and ground look like they are tilted to the right. However, when shooting with 30 mm, the distortion is too small, so you can easily print and photograph most landscapes with this lens. When shooting at 50mm, the distortion completely disappears. With this focal length, all photos look flat in the way you want them to be. Addition from the author: A colleague contacted me and shared a photo he took at the same location in Utah. The aspect ratio of my version above is 1:2, but he took the photo at 1:3. This will allow you to see differences and differences in the processing style of almost one photo. 70 mmWhen using a telephoto lens, the perspective begins to shrink. The same thing happens when shooting panoramas with a narrower angle. The sense of distance between the mountains is lost and it seems as if the peaks are equally distant from the camera. 91 mmAt 91mm the photo becomes completely compressed, but in this example it worked very well. One thing to note when working with a narrower angle is that you often need to take more shots to fit the entire scene into the frame. This becomes a problem when gluing. The size of photos increases dramatically and it becomes difficult to achieve a 1:2 aspect ratio. By the way, the proportions of all these photographs are 1:2. Parallax problemOne of the terms that starts to appear when studying materials about panoramic photography is parallax. Parallax is a simple concept that we see throughout our lives when we open and close our eyes. Parallax is a phenomenon where we see objects from different perspectives depending on different distances/viewing angles. A simple way to visualize this is to look at an object that is close, squinting each eye in turn. So you'll notice that it moves a little bit. This is the parallax effect. Thanks to it we can see the three-dimensional world. How does he relate to panoramas? Typically, a tripod with a ball head or certain panoramic functions is used during shooting. As the camera rotates, it rotates around a center point that is not the front element of the lens. This causes the front element of the camera to move and distort the perspective. By closing your eyes one at a time, you see the object shift slightly, and the camera undergoes the same effect. In most cases this won't cause a problem, but the closer something is to the camera, the more noticeable the effect will be. This is why it is difficult to photograph panoramas with a very close front pan, because distortion appears due to parallax. This also explains why the clouds in my wide-angle shot were affected by distortion. How to deal with this?As with everything, equipment doesn't make you a better photographer, but it does allow you to take better pictures. Various companies offer a bunch of solutions to combat parallax. It’s not hard to guess that such devices are not cheap and the king in this market is Really Right Stuff. Almost all sites talking about panoramic tripod heads end up with products from this company. The first and simplest option is a panoramic gimbal head like the one below (Image credit: Really Right Stuff). Such devices allow you to set the nodal point. This is the point at which the camera is not affected by parallax. You can also purchase a more advanced version that provides more control and options for over $1,200. Models of the line can be found on the official website. Models from other companies have a similar design, but still perform the same function, except for some minor differences in functionality. If you want to work entirely with electronics, there are also several options for you. A quick browse through B&H and you'll come across a brand called GigaPan, which makes electronic gimbal heads for tripods. With these, you set the start and end points, then the device automatically pans the photo from left to right, up and down, taking a series of photos. Such devices cost more than $500, but are great for working with massive panoramas, especially when shooting in changing lighting. If you like to try new things, you can find them here. Another option is to purchase separate special heads for panoramic photography. The problem is that such devices still cannot get rid of the parallax problem. Frankly, you can use a regular ball head to achieve the desired result. ConclusionLet me know what you think and feel free to share your information in the comments if I missed anything. I'm sure I did it. Or, if you are a panoramic photography guru, contact me. I'd love to do an interview about the cool things you're doing. About PhotoReviews and tests, simply about the complexHow to take a panoramic photo
Even though panoramic photography is closer to rocket technology than photography, I will tell you how to make a simple panorama. If you do not plan to sell your panoramic photos, then the methods described below are quite suitable. Panoramic photography is a photograph stitched together from several frames. I won’t describe in detail how to stitch frames together, because there is a huge variety of programs that do this automatically. If you use Adobe Lightroom or Photoshop, then this function is there. I prefer the PTGui program, because it allows you to quickly stitch together a panorama in two clicks, which is what I like. The most difficult thing in the process of creating panoramic photography is how to photograph the landscape correctly, this will be discussed. The method of shooting a landscape for a panorama is slightly different from the usual methods. If you like quick results, then you can do a panorama on the go without much preparation. But there are significant limitations on quality. To achieve optimal results, take several vertical shots with good overlap, at least 50%. Vertical shots are more convenient, because you will lose resolution when gluing due to the fact that you won’t be able to turn evenly when shooting handheld. Then in the editor you will need to adjust the brightness of the frames, because it will turn out a little different for all frames due to automatic exposure. To make your task easier and the panorama not to turn out spotty, I advise you to lock the exposure with the AE-L/AF-L button. This method works when you take a panorama of 5 frames or less. Such a panorama can be made even with a telephone, and some smartphones have programs that will immediately stitch together the finished panorama. If you work hard, you can get a panorama from 20 frames, but you will need some skill:
If you want to make a panorama from a large number of frames, for example, stitching frames not only horizontally, but also vertically, then you start to have problems. The wider the viewing angle, the more problems. For the sake of experiment, I tried to make a large panorama of 122 frames, and this is what happened:
The panorama began to “dance”, gaps appeared here and there, in general, complete nonsense. And the more frames, the more difficult it is to fix. You will save a huge amount of processing time if you take the right photos. The first thing you will need is a tripod. The tripod must be fixed so that it does not swing. The camera must be positioned strictly horizontally. Therefore, you will need either a level or an expensive camera with a built-in gyroscope, like the Nikon D750, for example.
First, click everything horizontally, then, by turning the camera up or down, add horizontal stripes to increase the vertical resolution of your panorama. An overlap of frames of 30%-50% is considered good.
Click on the picture to view a larger version. It's not hard to see that a tripod significantly improved the result. 144 frames were used in the panorama. The result will be even better if you rotate the camera not randomly, but around the nodal point. The nodal point is a point that you can rotate the camera around to eliminate the parallax effect. If you are not afraid of physics, then you can read about it on Wikipedia. The nodal point is unique for each lens and is found experimentally. To rotate the camera around this point you will need a special device that is attached to a tripod:
Thus, the right panorama will cost you a pretty penny. Personally, I don’t see the point of investing a lot of money in something that doesn’t bring you profit, especially since you will be quite satisfied with a simple panorama without complications. Rules of panoramic photography that can be broken, but nothing good will come of it:
Now, according to the old tradition, a commentary on the title photo for our most attentive readers. Your suspicions are correct, this is indeed a panorama. At night I was shooting with a 50mm 1.8 prime and everything didn’t fit into the frame. I took two shots: on one there are orderly rows of defenders of the Motherland, on the other - the Spasskaya Tower. I glued two horizontal frames together and got almost a square. Well, as a bonus, some non-panoramic shots that I took while I was “sculpting” the Kremlin: https://lospopadosos.com/photos/heartofmoscow All. Look wider (literally)! If you liked the article and want to support the Pro Photo project, it’s easy to do so. Any help will be greatly appreciated. Panoramas
Graphic arts
Design
Icons
Logos
High resolution photos
Life of PixUnsplashArt UKIn total, the British national collection contains about 200 thousand oil paintings, of which, for example, 2.3 thousand paintings are stored in the London National Gallery. The website notes that the collection covers a 700-year period, and the collection includes paintings by the greatest painters of art history, as well as works by thousands of less famous artists. Some of the last to be posted on the site were paintings by Edgar Degas, Joshua Reynolds, Rubens, Riley Bridget and others. Your Paintings portal was launched in June 2011. Currently, the works of about 23 thousand authors are available for viewing on the site. DesignersPicsVirtual SevastopolUsed: Country 360It’s very easy to take a tour of the colorful places of the planet in a matter of minutes, because the site has navigation across continents and countries, including a map. A series of interactive 3D panoramas is a simple and visual way to take a walk in a virtual model of the real world, truly feeling the effect of presence. You can move using either the mouse or the keyboard. It’s easy to embed the look you like on another site - you need to use the “Embed” button and specify the parameters (width-height, language and transition type) to get the JavaScript code. Panoramic photographers have the opportunity to post their work on the site, which must be in equirectangular projection and JPEG/TIFF format (the format of ready-made SWF panoramas is not supported), by registering and receiving a personal page at their disposal. The site also has a forum where all those who are interested in panoramas communicate, including professional photographers and beginners fascinated by 3D views. Panoramic photography (part 1) Types of panoramas1. Single-row panorama
2. Double-row panorama
3. Horizontal panorama
4. Vertical panorama Usually this is 2, 3 or 4 frames. The focus for each frame is different, so the finished work is completely sharp. Such panoramas are assembled manually, but if the plans are clearly separated from each other, it does not take much time. This style is used when the emphasis is on the foreground. Under no circumstances should you shoot forest landscapes this way, as the tree trunks will then not be aligned.
5. Complex horizontal panorama
6. Long-focus panorama Panoramic photography
Every amateur photographer has probably ever wondered: how to make one panoramic photo from several photographs ? What is needed for this? Is it difficult? Read the step-by-step instructions with which you can take a panoramic photo (panorama) without a tripod and without much difficulty. Today I will tell you how to do this easily and simply. Making a panorama is not easy, but very simple! Step-by-step instruction. Modern programs allow you to make a panorama from pictures taken with any camera, as long as the frames overlap each other. To make sure you have no doubt about your camera's ability to take photos suitable for making a panorama, I took the photos for this tutorial with a phone camera. I invite you to repeat all the steps in this instruction with me, using these photographs that you can
If you use your own photographs, when shooting, make sure that there is at least a quarter of the total space between the photographs, and it is better that the horizon does not “run away” between frames. In fact, less overlap may be enough, but the best, as you know, is the enemy of the good, so it’s better not to overdo it with overlap.
To assemble the panorama we will use the latest version of Hugin. At the time of writing this tutorial, the latest version was 2011.4.0. Hugin is available in versions for Windows, Mac OS X and Linux. All instructions below are suitable for the version for any OS. Installing Hugin is easy; just download the installation package and follow the installer's instructions.
When opened, Hugin automatically creates a new project. Select photos for the panorama by clicking the corresponding button.
You can add all your photos at once in one fell swoop.
Hugin itself determines the properties of the lens.
Click “Merge. "and let's go have tea, especially if you don't have the most modern computer or a lot of high-resolution pictures.
As soon as Hugin combines the images, a panorama preview window will open.
To better view the result, turn off the grid by unchecking the checkbox at the top of the window.
The panorama preview has several tabs with settings, some of which are not interesting to us at all due to the fact that Hugin has already done the main work of combining images, and the other part of the tabs may still be useful to us. On the Projection tab we have the ability to change the way photos are projected and some other settings. For example, you can see what a panorama would look like if it were shot with a fisheye lens:
However, today our goal is not special effects, but a finished panorama, so we will choose the equidistant projection mode.
On the “Moving on the projection plane” tab, we have the opportunity to align the horizon on all frames, if suddenly it does not align automatically. We can also bend the horizon for greater effect:
To return the horizon to its original, even state, click the “Align” button:
On the next “Crop” tab, click the “Auto-crop” button to automatically crop the black edges of the panorama.
If you are not satisfied with the result of automatic cropping, you can pull the inner edge of the frame and crop it as we need it, for example, if we plan to complete the sky and the black fields do not bother us.
Close the preview window and click “Create panorama.” "
First, Hugin will prompt us to save the panorama project:
And then he will ask you to come up with a file name for the finished panorama:
We stock up on patience, tea, coffee, jam, cookies, etc., for about 5 minutes :)
Find the resulting panorama file:
We watch with any suitable viewer.
For publication, it is best to convert the panorama to JPEG. This can be done in any graphic editor or popular viewers. Panoramic photographyPanoramic photography is a special genre of photography that involves obtaining elongated images. Such panoramic images can be assembled from more than a dozen photographs into one composite image. Panoramic photography opens up completely new opportunities for the photographer to realize his creative ideas. Today, this type of photography is very popular when photographing landscapes, building interiors or significant architectural structures. What is panoramic photography? Panoramic photography produces an image that allows you to see a viewing angle of 180 degrees or more. Thanks to this, panoramic photography allows the photographer to fit much more space into one photo than can be seen with the naked eye. After all, in an ordinary photograph we can see only a small piece of space, occupying an angle of less than 30 degrees in a person’s field of vision.
Panoramic photography makes it possible to achieve maximum integrity in the visual perception of a beautiful architectural structure or landscape. A photograph in the form of a panorama can take on a completely unique look and be filled with new meaning. Original panoramic photographs allow the viewer to look in all directions around the shooting point. Such photographic images have high resolution and can be printed on almost any format. With panoramic photography, a photographer can manipulate perspective and demonstrate his ability to see “wide.” The panorama was used long before photography. In order to expand the boundaries of their painting, artists made the image semicircular or in the form of a cylinder. Thus, in particular, the famous panorama “Battle of Borodino” was created. To display such an artistic canvas, a separate structure had to be built. Artists could also unfold a kind of cylinder with an image on the entire wall of the exhibition hall. The history of panoramic photography began in 1843, when the first panoramic camera was created. This camera shot on flat photographic plates. However, thanks to the use of special lenses, it allowed the photographer to obtain a viewing angle of up to 150 degrees. The use of flat films at the same time led to a drop in the optical characteristics of the lenses at the edges of the frame. With the advent of film cameras, the problem of obtaining high-quality panoramic photographs was also not completely solved. To do this, it was necessary to use a tripod with a special head during shooting, and simply glue the panoramic images together. It was a complex and labor-intensive process that took a lot of time. A true revolution in the genre of panoramic photography occurred only with the advent of digital cameras. Frames captured digitally can now be easily combined in a graphics editor and the resulting panoramic image can be printed on a regular printer. The purpose of panoramic photography these days can be very diverse. Panoramic photography is often used to promote land and real estate, as well as to obtain overview images of towns or industrial enterprises. Panoramic photographs today are taken from above using aircraft, when flying at low speeds, which guarantees high image detail and ideal photo quality. Modern panoramic photography has changed the approach to promoting real estate by creating spectacular images of buildings that can be used as advertising banners or images in catalogs.
Using unique 3D technologies and panoramic images, you can create three-dimensional models of villages, residential complexes and entire areas. Combining such images allows you to organize a real virtual tour, with the help of which viewers can get acquainted with the interior interiors of a room or a certain area of the area. Interior photography is also a popular application for panoramic photography. It is this kind of shooting that makes it possible to show a wide room in full, provided that the photographer simply has nowhere to go. Panoramic images create the effect of presence at the shooting point. In addition, panoramic photography is widely used by builders and architects during the construction phase of a project. After all, with the help of overview images, they can easily identify any deviations from the project and promptly adjust the implementation of certain construction works. To obtain panoramic photographs today, digital cameras with a special panoramic shooting mode and lenses with focal lengths from 24 to 80 mm are used. Creating panoramic images consists of two main stages - the shooting of individual fragments of the overview image and their subsequent assembly using software. To obtain fragments, the camera is mounted on a tripod, controlling the strictly horizontal position of the optical axis along a real or imaginary horizon line through the viewfinder. Verify the verticality of the axis of rotation and produce vertically positioned frames. To assemble a panoramic image, you will have to shoot the required number of frames with an “overlap” of approximately half a frame. When shooting, it is important to maintain the absolute horizontality of the optical axis and the maximum possible identity of the shooting parameters from fragment to fragment. Otherwise, you will end up with pieces of the image that simply cannot be joined into a single panoramic image. Shooting fragments is usually not delayed so as not to encounter changes in lighting conditions. After receiving the fragments, the process of assembling the panoramic image on the computer begins. For this purpose, various graphic editors such as Adobe Photoshop are used today, which also allow you to eliminate some errors made during shooting. Obtaining a single compositional solution from individual fragments should be carried out according to the principle: the same distance from the optical axis - the same distortion. When assembling a panoramic image, it is important to ensure maximum accuracy of matching of all image details in terms of illumination, color, sharpness and depth. If there are small inconsistencies, graphic tools are used to retouch or blur the boundaries of individual fragments. As a result of such manipulations, a high-quality and interesting panoramic image is obtained. Modern digital technologies significantly expand the possibilities of panoramic photography to create unique and original images. Panoramic photographs sometimes allow us to look at familiar objects and landscapes in a new way. Therefore, panoramic photography opens up a wide field for the photographer to experiment and demonstrate his artistic taste. Panoramic photography Link to main publicationFor any suggestions regarding the site: [email protected]
| |


 Yandex.Maps.