White Balance Adjustment
Why setting the right white balance on your camera will save your photos?
Greetings! I’m in touch with you, Timur Mustaev. Do you like rich, bright colors in your photos? When every color and every shade is presented and they all create a very realistic image. Of course, external shooting conditions and the quality of the equipment itself play an important role, but not only that.
What's the main thing? – you ask me. Correctly defined white balance, that's all! This raises an important question: how to set the white balance? You will soon learn about this.
About camera settings
As you know, there are three “pillars” - three very important exposure parameters of the frame that any self-respecting photographer should know and be able to set. These are: aperture, shutter speed, light sensitivity (ISO).
People often forget about another setting that has no less influence on the final picture - White Balance (WH/WB). It is responsible for the transmission of colors and their shades and depends on the color temperature of the environment, which is measured in Kelvin. If the camera detects white color incorrectly, then other colors will be distorted!
The three primary colors from the combination of which all others are born are red, green and blue. They enter the zone of light visible to us and the camera lenses. If the color temperature is low, then the colors of the red region will be present, but if the color temperature is high, the colors will be blue.
The overall light tone of the image will depend on the sky, the terrain, and reflectors such as water, mountains, etc. Thus, quite a lot of factors influence white balance. If we trust the camera to determine this setting, then it will not necessarily choose the realistic option or the one that would suit us.
And color largely influences the perception of the entire photo and another important aspect - its atmosphere. So I always like to build the WB myself, using, if not completely manual mode, then at least something close to it - “clear”, “cloudy”, “incandescent”, “flash”, etc.
Working with white balance
In fact, the exact white balance is quite easy to set on the camera, but it still requires some time and effort. There are several ways to do this.
- Method No. 1 : On a white sheet, clean, without stains and even. First you need to take a white sheet, A4 size office paper works well. We remove the sheet so that it takes up the entire frame. We go to the camera menu, select the function of manually adjusting the white balance and proceed to take a picture of a white sheet. Click on “ok”: now the camera will focus on this white as a reference and you no longer have to worry about distortion in color rendition.
- Method number 2 : Using a gray card, medium-light shade. It is believed that this color is ideal for displaying BB, since only gray can be present in nature without shades, unlike the same white. The opinion is ambiguous. Here, in the same way as in option 1, you need to photograph a special gray card and find it among all the pictures on the camera, choosing it as the main color.
- Additional method : by hand. There are situations when there is neither a card nor a white sheet (or a white surface, for example, a wall), then you can use a photo of your hand taken in available lighting, that is, focus on skin color. This helps with portrait photography, but the method is still inferior in reliability to the previous ones.
Important to remember! If you hope to carry out such an event with white balance once, then you are in a hurry to be disappointed - as soon as the lighting or other photographic circumstances change, everything will need to be done again.
In cameras from different manufacturers, the process for setting the BB may differ slightly, but rarely. For example, on a Nikon we go to the “Shooting Mode Menu”, then “White Balance”: the “PRE” item and “use image”. All that remains is to select a frame from the gallery and click “ok”. The inscription on the display “Data received” indicates the success of the operation.
A simpler method involves using the information button “i”, then using the joystick we go to “WB” and the process is repeated. Only in this case we do not find the desired frame, but immediately take it.
BB in a graphic editor
Imagine that you took a series of photos, but unfortunately did not bother to check the white balance setting on the camera. Now all the frames are ruined? Not at all, everything can be fixed. Long live the almighty image processing programs! The most popular and widely functional among them are two – Lightroom and Photoshop.
In the first, you can easily edit a large volume of photos and correct small errors in terms of color, light, remove spots, reduce noise, etc., while the second is more difficult to use and is designed for detailed work with each picture, its possibilities are practically unlimited.
Let me tell you how to achieve ideal white balance in Lightroom, that is, when the colors in the picture match the colors of the photographed area or object. And for this, too, there are different ways, essentially leading to the same result:
- Adjustment of the “temperature” and “shade” sliders. As you can see, the range is from blue to yellow and from green to purple. Moving towards blue will make the image cooler, with less yellow, and yellow will therefore add warmth to the image. Enhancing green is good for grass and trees, but on a person's face it should be avoided, so you can go slightly towards purple.
- Choosing a “pipette”. By selecting this option and clicking on a light gray (or white) color in the image, you can automatically get the desired colors. Be careful, the program does not always cope with its task. Much depends on the color and its quality that you choose as a standard for determining other colors.
- Tone curve and working with each color. If, as it seems to you, you have come as close as possible to the natural (or desired) color balance using the methods above, but you are still not happy with something, try playing with the colors separately. Red, green and blue can be changed using curves: each of them can be strengthened or reduced in a certain area of the frame, highlights and shadows. Other colors such as crimson, orange are changed in the next section below. And here you can set their saturation, lightness and hue.
Color rendition on different cameras
Depending on the model of your camera, the colors in the photo itself may have a certain specific hue. For example, photos on canon often turn out too red, while nikon photos can turn yellow. Not too nice, right? But you shouldn’t be afraid, you just need to be prepared for it.
Knowing the features of your camera, you can create a preset, that is, a set of certain settings in the same Lightroom, and almost in one click transform the colors in the photo.
Therefore, my advice: if you do not want or cannot, due to external circumstances, immediately adjust the BB on the camera before shooting, take photographs in raw format. Such files will undoubtedly be large, but they will store the most complete information about the photo.
When shooting in raw format, setting the white balance is as easy as shelling pears, for example, in the Lightroom editor. To do this, you just need to select from the available list, as shown in the picture below.
Important! Here is my big recommendation: take photographs in raw format, preferably always. I even shoot every little thing in this format, and at the same time, I always control any photo.
Subsequently, this will play into your hands when correcting not only white balance, but also other image parameters in the photo editor.
This is where I will end my article, I hope that now you are fully aware of such a parameter as BB. If you are interested in learning more about the Lightroom program and how to work with it, I can recommend the video course “Lightroom - an indispensable tool for a modern photographer.” An excellent course for a young photographer. The entire course is based on examples of working in the Lightroom program. I highly recommend it!
Lightroom is an indispensable tool for the modern photographer
If you are a complete beginner and don't know much about your camera, the courses below are just for you. You will learn everything about a camera and learn how to take beautiful photos.
My first SLR - for users of a CANON SLR camera.
Digital SLR for beginners 2.0 - for users of NIKON SLR cameras.
Don’t forget to share the article on social networks, so that your friends will be aware of all the news in photography. So long, fellow photographers. See you again on my blog!
Setting manual white balance for the camera
Last update: 2019-10-24.
Do you know this picture when a photograph looks unnatural and the colors in the picture are greatly distorted? What does this mean? This indicates that the white balance in the camera was not adjusted and the digital automatic balance meter made an error; it did not correctly determine the color component of the frame and distorted the color settings.
If in Photoshop or any other graphic editor you select a conditionally white area, which our eye in the usual environment perceives as an area of white color (in the Blue Tit these are the “cheeks”), then you will notice that the color component in three RGB color channels will have the same values - R: 218, G: 218, B: 218 (for a photo with the correct white balance). In the bottom photo, these values will be noticeably different R: 162, G: 186, B: 237 (photo with incorrect white balance, with a clear predominance of blue).
If there are a lot of such white fragments in the frame, then the camera processor will be able, based on these areas independently, to automatically determine the balance and correctly convey the colors, and if there are few such white fragments in the frame or there are none at all, then the processor begins to “get confused” and transmits The color shades are wrong. All this, of course, is conditional; the measurement process in a camera is much more complicated and the camera’s processor can help with this.
How to fix this and set the correct white balance?
Theoretically, there are two such ways:
1) before shooting, teach the camera to understand white balance;
2) after shooting, process the image in a graphics editor.
Many people believe that processing photos in a graphics editor after taking a photo is easier and faster than setting manual white balance in the camera before the shooting itself, especially if you shoot not in JPEG, but in RAW (NEF). For RAW(NEF) you can agree only under certain conditions:
1) you need to shoot in RAW (NEF), and not in JPEG;
2) the photographs should contain supporting fragments of conventionally white (like the cheeks of a tit);
3) the number of photographs for processing should not exceed 20-50, because This is a rather monotonous and tedious task.
If you don’t know how to work with RAW (NEF), if there are suddenly no white fragments in the pictures, if the volume of photographs is very large, then processing in a graphics editor will turn into agony and take a lot of time, and in some cases, extracting the correct white balance from JPEG will be difficult extremely difficult or almost impossible.
Setting up the camera before shooting
All instructions write (and photographers themselves recommend) to adjust the balance with a white sheet of paper. This confuses many newbies, especially when filming takes place outside the home/office. Where can I get this piece of paper and how can I carry it with me? Forget about the white sheet of paper!
We take a regular grocery bag from the store. The package should be white, translucent enough to allow some light to pass through and should not contain colored impurities. If the walls of the bag have such transparency that you can clearly read the inscription on the camera strap, then you will need two such bags so that it would be difficult to read the inscription through the layers of the double bag. Next, temporarily set the AF-MF switch on the lens to the “MF” position and put the bag on the lens so that the front lens of the lens is completely covered by the bag and there are no inscriptions or drawings on the bag at this point. Then we point the camera in the direction where our subject is located and take one photo. Return the switch on the lens to “AF” mode and go to the camera menu.
In the camera menu, we find and select the “Manual WB” (Manual White Balance) option, select our last frame with the package as a reference white image and press the “SET” confirmation. Then in the Menu we find the “White Balance” option and change “Auto” to “Manual” as shown in the figure.
We put the bag in our pocket and take pictures until the lighting of the place where you are shooting changes, for example, the Sun has gone behind the clouds, fluorescent lamps have been turned on instead of incandescent lamps, you have entered a dense forest from a sunny clearing, etc. . In this case, repeat the entire procedure again:
1) lens -> “MF”;
2) put the bag on the lens;
3) pointed the camera at the object and took a frame;
4) put the package and lens back to “AF”;
5) in Menu -> “Manual BB”;
6) selected the last frame with the package;
7) in the Menu we check -> “White Balance”, “Auto” -> “Manual”.
Now you can shoot in both RAW (NEF) and JPG, the processor will have in its memory a reference, reference image of a white package as a sample and will already use it in its calculations, replacing the white cheeks of a tit with a white package.
How to fix white balance in Photoshop?
If something didn’t work out for you or you forgot to turn on the manual balance in the camera, then the situation can always be corrected if you shoot in RAW (NEF). It is enough to open the RAW (NEF) file in editing mode, select the White Balance Tool (I) option, the Ctrl + I key combination, a tool in the form of a pipette will appear, all you have to do is poke it into the area of the tit’s cheek, in the same area that our eye actually sees perceives life as the realm of white. As soon as you do this, the entire photo will immediately change its color, and the RGB values will become equal to each other - R: 218, G: 218, B: 218. In my case, this value is 218, you can have 224 or 188 or any other, the main thing is that all RGB values are the same - R: 224, G: 224, B: 224 or R: 188, G: 188, B: 188 .
What to do if there are no white objects in the photo?
If there is not a single object in the photo that contains a conventionally white color, then you need to look for fragments of the entire spectrum of gray, what in real life our eye perceives as pure gray, without admixtures of other colors - this could be asphalt or concrete , and stones, if we are talking about a landscape and there is no person in the frame. If we are talking about portraits of people and there is not a single piece of white or gray fabric on the clothes, then as a last resort you can use a fragment of the white area of the eyeball. If this doesn’t help, our model came from another planet and her eyes are yellow, then we move on to plan “B”.
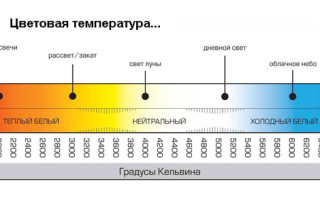
Plan “B” will require you to have basic knowledge of what color temperature is and what values exist in photographic conditions with standard or close to standard lighting. Below is a table describing lighting and color temperature in Kelvin. The values from the table will initially give you numerical guidelines by which you can adjust the value of the “Temperature” parameter and change the white balance close to the conditions at the time of shooting. From 5000K to 6000K - color temperature for typical street photography, from 2200K to 2800K - filming gatherings in the kitchen under incandescent light, from 3500K to 4500K - filming in an office where fluorescent lamps from Armstrong lamps are on, etc. By choosing one of the table values for the type of lighting, you can bring the color balance to the most natural, to the colors that our eyes perceived in the environment at the time of shooting.
What should I do if I shoot in JPEG?
Well, what can I say? All that remains is to envy you, you still have everything ahead! There is a very exciting path ahead of mastering the works of Dan Maruglis, I would say the bibles on Photoshop: “PHOTOSHOP for professionals” and “Photoshop LAB Color”. The volume of information from these works is not possible to reflect within the framework of this article; moreover, to master these techniques, you must have a professional calibrated monitor of 24″ with a matrix no worse than IPS and free time for study from 1 to 6 months.
In any case, you have to choose between an ordinary package from the store and mastering a whole science called “Color Space”, although you don’t have to bother and leave everything as it is, the titmouse doesn’t care what color her cheeks are in your photos :)
How to set white balance and what it affects in photography
While the human eye can easily adapt to changing shades of light, a camera has a little more difficulty. Because of this, you must let her know when she recognizes colors unrealistically. This is done by adjusting camera modes or auto white balance. How do you fine-tune the colors of a scene to match reality?
Digital photographs consist of information about hue (brightness) and colors. The tones in a photograph are controlled by the camera's exposure settings. The main tool for controlling the colors of a photo is adjusting the white balance.
Color of light
Different light sources have different shades. The human brain effectively adjusts its color perception to take this into account. For example, when light from an incandescent lamp shines on a piece of white paper, it “colors” the paper orange. The brain knows that the piece of paper is actually white, and therefore, in human perception, it automatically corrects the color cast caused by the light source.
But the camera doesn't work that way. It records the actual color of the light, so it needs some way to tell if the colors of the scene it's shooting have shifted.
The easiest way to see colors in individual light sources is to take an evening walk around the city. Your brain will be tuned to outside light, and when you look out the windows of apartments and houses, you will see orange light from incandescent light bulbs, blue light from any CRT TVs you may still encounter, and green light from fluorescent tubes.
Color temperature measurement
Color temperature is expressed in units of the temperature to which a “black body” (an object that does not reflect light) must be heated in order for it to emit light of that hue. Color temperature is measured in Kelvin. When you heat a black body, the heat gradually turns it into red, orange, yellow and white until it finally turns blue at its highest temperature.
Thus, the color temperature scale is the opposite of how we are used to perceiving colors. Warm shades (red, orange) have a lower color temperature than blue, which we usually consider cool.
When shooting, you need to tell the camera, directly or indirectly, what temperature in Kelvin your lighting is. The camera's processor then incorporates this information into the final colorization of the photos you take, so they look realistic without color casts. Although this sounds quite complicated, in practice it is simpler.
To "warm up" your images, set the Kelvin temperature to a higher temperature in the settings. To “cool down”, set the temperature to a lower temperature. Keep in mind that some cameras do not have a Kelvin scale option in the white balance setting. If so, you can use the white balance presets we'll talk about below.
Adjusting white balance (setting the correct color temperature)
- Auto white balance
Normally, with factory settings, your camera uses AWB (automatic white balance). These sophisticated built-in systems in cameras automatically detect the color temperature of the current light and set the white balance based on this. As with automatic exposure settings, this method is successful about 90% of the time and you can usually rely on it. In challenging lighting situations, you have several ways to influence your white balance settings.
Using AWB. The camera's automatic white balance assessed the scene and set the white balance "correctly" to produce a blue sky. However, the colors of the photo lack the mood that was originally there. Canon EOS 7D, EF-S 15-85/3.5-5.6, 1/640s, F16, ISO 100, 42mm focus (67mm equivalent)
The easiest way to influence white balance is to use the camera's presets. Standard white balance presets have names such as daylight, cloudy, shade, tungsten (or incandescent), fluorescent, and flash. By using one of these presets, you select a color temperature that the manufacturer believes is appropriate for the situation it describes. They are quite sufficient for everyday photography. But when you need to set the white balance more accurately, there are special tools for this.
Same scene as in the previous photo. The white balance was set to Cloudy. Now the moody colors of the sunset were captured correctly. Canon EOS 7D, EF-S 15-85/3.5-5.6, 1/640s, F16, ISO 100, 42mm focus (67mm equivalent)
Let's look at each of the white balance presets.
"AWB" is an automatic white balance setting. Select this preset to allow the camera's light sensor to select the best white balance setting based on the color of available light. AWB helps in mixed lighting conditions.
Custom - Select this option to set a custom white balance value for the color of the available light.
Kelvin (K) - You can select white balance based on the temperature scale in Kelvin. Choose a higher number to remove cool color cast from your images (add warmth), or choose a lower number to remove warm color cast (add blue).
Tungsten - Select this preset if you are shooting with household light bulbs as your light source. Or, if you notice that your images have an orange tint, select this option to remove it.
“Fluorescent” - used when shooting under fluorescent lighting. Or, if you find that your images have a green tint, select this option to add magenta to balance it out.
“Daylight / Sun” - When shooting on a bright sunny day, select this preset. Or if your images have a slight blue or orange tint, select this option to balance it out.
Flash - This preset is the same as the Daylight/Sun option, but it's here so people using flash know exactly what to select.
Cloudy - If you're shooting on a cloudy day, choose a preset to balance out the light. Or, if you find that your images have a cool color cast, select this option to add warmth to them.
Shade - When shooting in the shade or heavily cloudy conditions, select this preset. Or if your images have a strong blue tint, this option will help balance it out.
- Fine white balance settings (gray card, exposure disc)
Each camera processes images a little differently; You'll need to know how to do this specifically for your model, so check your owner's manual for details. A gray card (cheap solution) or, for example, a special white balance filter (expodisc) works well.
- White balance bracketing
If you're not sure which white balance is best to use, some cameras can help with white balance bracketing. In this mode, pressing the shutter button causes the camera to take three photos. One based on the white balance setting, one cool shot and one warm shot. Then you can choose the frame you like best.
White balance bracketing on a Canon EOS 60D DSLR camera. Bracketing can also be combined with white balance correction
- Difficult lighting conditions (mixed lighting)
Working with white balance settings is easy if you are working with a single light source or multiple sources that have the same color temperature. But photographers have to work under lighting conditions from multiple sources with different color temperatures. Solutions for such situations vary. For example, if you're photographing a concert, the colored lights are part of the show, so it's best to balance out the daylight and capture the chromatic atmosphere of the show.
If you're shooting in a room with a mixture of fluorescent light and daylight coming in through a window, you'll need to balance both sources... something that can't be done in-camera. In difficult situations like these, you will have to turn to a photo editor. The simplest and most popular solution is to convert the photo to black and white. To actually preserve the colors in a photo, you need to use local color changes.
White balance on a computer
All of the information above about white balance settings is especially important if you're shooting in JPEG format. JPEG files come out of the camera compressed and with the colors captured by the camera. If you shoot in RAW format, you can change the white balance without losing quality, you have a lot more freedom.
White balance from the creative side
You don't always need to use white balance settings to get technically correct colors. You can also use them to deliberately shift the tone of an image towards warmer or cooler tones to give the picture an unusual atmosphere.
One popular trick among portrait photographers when shooting during the day is to deliberately set the white balance to Cloudy. This gives a warmer picture, which is a plus for portraits. Warmer skin colors make the portrait appear more vibrant.
There are many tools available for precise white balancing. The simplest of them are the standard gray cards.
Photogora video channel
White balance: how to achieve correct color rendition in digital photography
You often see or hear that people who do not understand photography techniques take pictures with some incorrect color tone: blue, yellow, or even green. What is the cause of this problem?
Have you probably noticed that one lamp bought in a store has a yellowish tint of light, while the other is pure white, sometimes bluish?
The fact is that any source of visible light has a so-called color temperature, which is measured in Kelvin. Color temperature depends on the wavelength of the emitted light. In physics, there is the concept of “absolute black body” - this is a body that completely absorbs all rays falling on it. Color temperature, accordingly, denotes the temperature to which a black body must be heated in order for it to emit light of a given wavelength. A longer wavelength means red, while a shorter wavelength means blue and even violet. So, oddly enough, a high color temperature denotes a cool color, while a low color temperature denotes a warm color.
The human visual system has adapted to this, and we do not notice that when the sun's rays fall on a white surface, it turns yellowish. For us, green grass always remains green: at sunset when the sky turns red, at dusk, in cloudy weather and in direct sun. At the same time, the photograph shows that this is far from true: the color of objects in the photograph differs at different times of the day or under different light sources.
Unlike our visual system, color information in digital cameras is composed of three colors. Their matrix consists of light-sensitive sensors - pixels, each of which has a color filter of one of the colors: red, green or blue (there are other options for the matrix design, but they all use the RGB space, where R is red, G is green, B - blue). Therefore, all shades of lighting are directly recorded in the photographs. In order for the color image in a photograph to be without distortion, there is such a setting as white balance, or simply “white balance”. This setting adjusts the color temperature of the photo to make it look natural. To do this, the camera or photographer must determine the color temperature of the light source. For example, setting the color temperature to 10000K means that the light has a blue tint and the camera adds red-yellow color. If this setting is incorrect and the light is not actually that cold, the photo will take on a warm tone. Thus, when we increase the temperature, the photo turns yellow, when we lower it, it turns blue.
In addition, the white balance setting also contains the so-called “green shift”, since light sources such as fluorescent lamps introduce a greenish or, conversely, purple tint into the image.
Examples of white balance effect
Correctly adjusted white balance:
Color temperature too high:
Color temperature too low:
So, the algorithm for automatically determining white balance by the camera is as follows: the camera tries to find an object in the photo that has a neutral color (white or gray), and adjust the temperature of the image so that it is truly neutral in color. Under good conditions, this algorithm works quite well. But we can do the same thing manually if we don’t trust the camera or we’re not satisfied with the result of its automation.
However, the moment at which the white balance is adjusted differs depending on the format in which the image is saved. For example, the “raw” RAW format, intended for subsequent processing of photographs, although it retains the white balance setting that the camera used, allows you to change it for the finished photograph in a processing program on a computer, or in the camera, if it supports this function. At the same time, for compressed formats such as JPEG, it is no longer possible to correctly change the white balance of the finished image.
How to work with this setting and how to achieve correct color rendition in photographs?
As a rule, you can choose one of the options for setting white balance in your camera:
1) Automatic selection . Here the camera independently determines the color temperature in accordance with the algorithm specified by the manufacturer. The determination occurs within a certain range. It can be recommended when you are absolutely sure that the machine will work adequately or shooting conditions change very often.
For automatic white balance to work correctly, there must be at least one neutral-colored object in the frame.
2) Selecting a lighting source . Here the type of light source is selected, and the image is given a fixed color temperature value characteristic of that source. For example, Canon cameras use the following presets:
-
Incandescent lamp - 3200K. This setting is designed to neutralize the warm tint that everyone gives with a heated tungsten filament. Naturally, the heated metal has a pronounced red-yellow color. You can use it when you want to give a photo a distinctly cool tone, like in the photo below.
3) Manual selection . You can independently select the color temperature in certain steps. Lamps often indicate their color temperature directly. Obviously, you can use the camera screen or electronic viewfinder to monitor changes in white balance when setting manually.
4) Custom white balance . This is a white balance adjustment based on a neutral colored surface (ie white or grey). What is it and how is it used?
Let’s say we don’t know the exact temperature of the light source and at the same time we don’t trust the automation, but we want the most correct color rendition in the pictures. How to adjust white balance as accurately as possible? There are two main approaches.
Pre-adjustment for colorless surface . The first option is suitable when you need to set the white balance before shooting. This is useful if you don't plan to edit the photo later or if you're shooting video. The sequence of actions is as follows:
a) Find the so-called gray card. This is a card with 18% gray color, but you can use any white surface without glare (sheet of paper, white equipment).
Compact Gray Card:
Studio gray card:
b) Take a photo of the selected sample (you need it to occupy the entire photo). You can even turn off autofocus and hold the lens up to the sample without focusing on it.
c) Select a photo with a gray card (or its replacement) as a reference for a custom white balance.
d) Use this white balance setting for subsequent photographs taken under the same lighting conditions as the “reference” gray card photograph.
The second option is to adjust the white balance in post-processing .
The sequence of actions in this case:
- Enable shooting in RAW format in the camera
- When photographing, take a photo of the gray card at the main shooting location.
- When post-processing in a RAW converter, use the white balance dropper on a gray card to achieve correct color reproduction. Naturally, there should be no digital noise in the picture, since it has color.
- Apply this setting in the program for finished photographs taken under the same lighting.
In both cases, it is important for us that the white balance is measured under the same lighting as the other photographs for which it is used. So, for example, if we are shooting outdoors and the weather has changed, then we need to re-adjust the white balance using a gray card. The same is true when changing shooting locations.
When using a white surface (a sheet of paper or something similar), you must remember that even white paint contains colored dyes. And the amount of these dyes may differ from one manufacturer to another. So it’s better to use a gray card purchased from a photo store.
Instead of a gray card, a device manufactured under the EXPODISC trademark can be used. This is a special white translucent attachment that is placed on the front of the camera lens.
Next, all that remains is to turn off autofocus, point the lens at the light source and measure the white balance. Here we measure incident rather than reflected light, and this method is more accurate.
The problem occurs when light from light sources with different color temperatures enters the frame, for example when mixing natural and artificial lighting. In this case, automatic white balance will tend to “average” the color temperature. This may not be the best option.
If one light source predominates and the other sources do not differ much from it in temperature, then you can adjust the white balance based on it. You can also prioritize a natural light source, if available. However, it happens that the difference is too pronounced and frankly spoils the photo. In this case, no amount of white balance adjustment will help; you need to work with the light sources themselves. So, if you are photographing with an on-camera flash that has a color temperature of 5500K, the light of which enters the frame along with ambient light that differs in color temperature, you need to use appropriate color filters on the flash to even out this difference.
With all this, the ideal white balance setting is not always the most correct. For creative purposes, you can also use a slightly offset white balance to give a particular tone to the photo. For example, shooting at sunset or sunrise can make your photos look warmer, while winter shots with snow may look better with a slightly colder feel. It all depends on your taste, because you should never “overdo” with color rendering.
What is white balance in a camera?
White balance is a parameter that helps to correctly convey a color image.
In short, it is simply called BB (white balance) , in English-language literature you can find WB (White balans) , which does not change the essence.
This is a very important parameter when creating color photography . He is responsible for the correct color rendering . Roughly speaking, white objects should be white and not have different shades of yellow or blue.
White Balance helps the camera determine what light is considered white. Indeed, a camera is not a human eye, which makes adjustments with a powerful (or less powerful) brain and sets the color white. The camera needs to somehow figure out what it considers white. In this difficult task, the camera is helped by knowledge of the laws of physics.
Let's superficially reveal the essence of the issue: from thick textbooks it is known that white is the color produced by an absolute black body (usually platinum is used) heated to a certain temperature. A certain temperature will give a certain wavelength, and the wavelength determines what we call color. Temperature is measured in Kelvin and, for example, the temperature of daylight white light is said to be 6500 K.
What happens if the temperature is less than 6500? Then we will get a lower temperature, and it will correspond to light of a more yellow color - for example, a candle has a temperature of around 1800 K. Therefore, the candle gives off a yellowish warm light.
What if you heat it up more? There will be light with a temperature corresponding to different types of lamps with a bluish tint.
White balance - different WB settings
Why is it so important to monitor BB? The answer is very simple: by setting the correct white balance you can achieve the “correct colors” in your photo. For example, for a portrait, the skin should have a natural color. If the BB is not installed correctly, the color will be mixed with yellowness or, even worse, with a tint of blue. You can see for yourself in the test pictures that are in this article and compare the appearance of the picture with different BB settings. The flowers are illuminated on the left by daylight from the window and on the top right by an incandescent lamp, due to this, light is obtained from different sources with different color temperatures and it is difficult for the camera to correctly set the BB. Please note the difference between automatic balance and white sheet balance (preset).
White Balance Adjustment
How to set up the WB in the camera? Setting white balance in your camera is as easy as shelling pears; almost all regular digital or DSLR cameras have this feature. Typically, the camera offers one of the preset WB profiles, for example, “sunny”, “cloudy”, “indirect light”, “incandescent”, “flash” and, of course, “auto”. These standard settings are usually in the form of icons and are intuitive. For example, outdoors on a sunny day, it would be wise to set the WB to the “sunny” mode and thereby let the camera know that the WB is shifted to the hotter side. Likewise, in the evening, with incandescent lamps, you need to use the appropriate setting.
More advanced cameras have the ability to set color temperature in Kelvin . The task is quite interesting and useful for visually studying the BB.
White balance using a template and manual temperature setting
How to set up WB in Nikon cameras? Just press the WB button and use the multi selector to select a preset option. Or select the PRE option, press the WB button again, point the camera at a white object and take a photo. The photo will not be recorded on the card, but information about the color that is considered white will be taken from it. After successful installation of the BB, the camera will write Good, but if the camera was unable to correctly read the BB, the message No Good will appear, and you will have to repeat the procedure again. You can also store BB samples in the camera’s memory and turn them on as needed. Only the instructions for the camera will help you in more detail, which I strongly recommend studying.
Interesting thoughts: if you have an advanced camera and have the opportunity to choose to set the color temperature manually, I advise you to conduct an experiment - take the same picture at the lowest temperature allowed by the camera and at the highest possible temperature, as shown in the examples. After comparison, most likely, you will very quickly understand how this parameter works.
How to configure the BB as correctly as possible? It's very simple, you just need to tell the camera what exactly is considered white. To do this, you need to take a test shot in a special mode (measuring the shot), placing a white object in the center. Typically, this method of setting the WB is called white balance on a white sheet . This is the best option. But, in my opinion, it has a drawback. Personally, I often forget that I made a preset white balance and continue to shoot further as the location and light for shooting change.
Do I need to constantly remember about BB? It all depends on the situation - when there is a lot of time and there is a desire to take the most “correct” picture - then white balance is an irreplaceable thing. But if scenes and compositions are changing at great speed, then I recommend using Auto White Balance. Modern cameras, especially digital SLRs, do an excellent job of this task. But still, in low light, it will be difficult for the camera to choose the right color temperature. For most people, automatic white balance is sufficient , since it is sometimes very difficult to distinguish between pictures with different WBs.
If the white balance was not set correctly, the photo can still be saved. To do this, you need to use a photo editor such as Photoshop or any other. In the editor you can set the color temperature, this is especially easy to do by selecting a white object in the photo and using an eyedropper to “take” a white sample. It's very easy to pull BB out of RAW . I use a little trick when I shoot people, portraits, etc. and I want to get the correct white balance from RAW, then I set the BB using a pipette metering over the white areas of the eyes.
By the way, professional cameras have a separate BB button for quick settings, just like ISO or image quality. That is, the manufacturers themselves place great emphasis on setting the correct color temperature.
Conclusion : in almost all cases, when adjusting the white balance, you can rely on the automatic mode; in extreme cases, you can correct it using the editor. Ideally, it is better to set the BB using a preset on a white sheet or area.
Thank you for your attention and don’t forget to +1, tweet and like. Arkady Shapoval.
Setting the white balance. Simple guide.
How do you think the three photographs below are different?
Of course - white balance! It is not difficult to notice that in the first photo the white balance is shifted to the warm part of the spectrum (this is the name for this color distortion - when the image (including napkins, which should be white!) seems to “turn yellow.” In the second photo, the white balance is close to normal But in the third photo, the BB is shifted to the cold - violet side of the spectrum, so the napkins no longer look completely white, but rather bluish...
Without delving into the jungle of terminology, let’s try to define white balance. So, we can say that white balance is a measure of the correctness of the color characteristics of an image. Often, instead of the phrase “white balance”, the abbreviation BB is used; we can also use this abbreviation in the text of this site.
So, now it has become clear that if you see that the photo is a little more yellowish than it should be, or, on the contrary, “cool,” then you should look for the reason for this in incorrect white balance settings!
Why do inaccuracies occur in the white balance settings? The answer is simple: different light sources have so-called different color temperatures! For example, the Sun gives a rather “warm” light, and so does an incandescent lamp. But the light of fluorescent lamps is quite “cold”. You probably yourself have noticed that, for example, the same green dress can look bright green in sunlight, and almost blue in the light of sodium street lighting lamps. And if it’s not always easy for human eyes to adjust to the color temperature of a light source, then what can we say about cameras? In addition, there may be several light sources of different color temperatures in the frame, for example, sunlight from a window and incandescent lamps from a home chandelier - in this case, the camera is unlikely to be able to “guess” which light source to focus on when adjusting colors, what value BB install! In such cases, the camera's automation is not effective, and manual white balance adjustment is used.
First of all, the BB can be influenced by changing the camera settings. Let's look at these settings using the example of the menu of Canon cameras. More precisely, using the example of the Canon 600D camera, its menu is in many ways similar to the menu of such popular models as 450D, 500D, 550D, 650D.
As you can see in the picture, using this menu you can change the BB - either using ready-made presets, or choosing your own parameters for this value. I would not recommend using the existing white balance presets unless absolutely necessary, because... Most often, the camera works correctly with this parameter - in automatic mode, especially outdoors - in natural light - taking into account all its nuances.
However, it is possible to adjust the white balance – manually! This type of adjustment is most often referred to as white-sheet white balance adjustment. This makes it possible to precisely “adjust” to a specific light source. This is how this procedure is described in the instructions for the Canon 600D camera:
You can find information on how to use a similar feature on cameras from other companies or models in the operating instructions for your device.
But that's not all! Some cameras (for example, the same Canon 600D) have the ability to adjust the color tone of a photo - without using a white sheet! In this case, the effect is similar to that as if you were sorting through color filters. The following illustration shows an example of such a setup:
Some cameras also have “white balance bracketing ,” which means that three photographs taken in a row will have different white balances (if you allow this in the settings) so that at least one of the frames “hits the spot.” " This mode is used when you are not sure that the BB settings are correct.
But... and that's not all! If you take photographs with a DSLR, then it probably has a function for shooting in RAW format! This wonderful format is distinguished by the fact that when shooting in it, you don’t have to worry about the white balance while shooting, because it can be changed as you like - later, using a special program. Typically, such programs are included with any SLR camera. I would recommend using the Adobe Camera Raw ( ACR ) program, but more details about it will be written in another article.
That’s all for today 🙂 Let your white color remain white in your photos!
How to adjust white balance in a camera
Many novice photographers who are just beginning their acquaintance with photographic equipment often encounter this problem: the colors in the pictures turn out unnatural and are very different from the real image. For example, in life an object looks rich and beautiful, but in a photograph its color fades or acquires yellowish/greenish tints.
What is the reason for such changes and how to eliminate it? How to adjust the ideal color rendition on your photo device? We will tell you about all the parameters responsible for the colors in your pictures!
Reasons for the appearance of deficiencies
So, why does the camera change the colors of objects? It is important to understand that the lighting conditions under which we create a frame vary. Light can come in many shades depending on where it comes from: home lighting generally produces a yellowish glow, while fluorescent lights give a space a bluish or purple hue. Outdoors in the evening, the lighting can also be blue or purple (depending on cloudiness and the position of the sun), but dawn can provide the appearance of yellow, orange and red tones. This tint variety of light is called color temperature. As you may have guessed, each light source has its own color temperature, the value of which is measured in Kelvin (K). The lower the value, the more red tones predominate in the light. There is also an inverse proportion: the more Kelvins marked on the scale, the bluer the light will be.
Sometimes photographic equipment may not recognize the light source and, accordingly, determine the color temperature of the space. In such cases, errors occur. The camera may make a mistake and apply standard settings that do not equalize the white balance, resulting in the frame becoming too yellow or too blue.
White balance: adjusting options
The camera does not have intelligence, and therefore is not able to accurately analyze and determine what kind of scene and in what location we want to capture. However, we can always “tell” our device in the right direction. To do this, you need to adjust several parameters in the “white balance” cell.
White balance is a special parameter found in every modern photographic device. It determines which color the camera will consider neutral when shooting. As a rule, colors that do not have any shades are considered neutral. For example, white or grey. By identifying these colors as a starting point, filming equipment will be able to correct other colors, presenting them correctly in the image.
Often, determining the color balance in a camera involves correctly choosing the color temperature of the light source under which the photo is taken. To reduce the time required to set up the correct parameters and make it easier to use the equipment when shooting with different lighting fixtures or rapidly changing weather, device manufacturers have provided a set of necessary settings for the most common shooting conditions. For most locations and shooting situations, this is the best option. It is good because the photographer does not have to waste time setting all the light balance parameters manually; he simply selects the “daylight”, “incandescent”, “cloudy”, “shadow” or other types of cells depending on the actual shooting conditions. As a rule, the names of the settings determine the cases in which they are used, so you will not have any problems with this. The exact meaning of the settings presented may vary slightly depending on the model of your device, however, in general, they behave approximately the same on all cameras.
Known to any amateur photographer, NIKON has continued to improve the lighting settings in its devices, introducing additional parameters to existing functions.
For example, you can select not just the “fluorescent lamp” parameter, but also determine the type of this lamp itself (warm white daylight, white light, cool white daylight, sodium lamps, mercury lamps, etc.) This means that If desired, you can adjust the white balance almost perfectly.
Auto white balance
When you select Auto White Balance (or AWB), you give your device the ability to independently determine color temperature parameters within some spectrum of values that have been defined by the manufacturer. As a rule, this spectrum is limited to the range of 2000-7000 K. Most modern filming equipment produces excellent results with automatic white balance settings. Errors and shortcomings appear mainly in difficult cases, for example, when conducting an extraordinary photo shoot with a large number of different types of lighting devices, when shooting at night or shooting in a dimly lit room.
Automatic white balance will be extremely useful when shooting outdoors in bright and intense daylight conditions. The AWB setting will also be useful during dynamic photography, when objects move quickly and change their location, as a result of which the conditions of the photo shoot change. In such situations, automatic settings will not only ensure optimal image quality, but will also help prevent the loss of interesting shots due to constant adjustment of the equipment.
Setting parameters manually
If the automatic functions do not suit your needs, you can always resort to using manual white balance settings, which are provided in most camera cameras. This is a very useful function, especially if we are talking about any non-standard conditions, the color temperature of which we know exactly. For example, sometimes the color temperature of energy-saving lamps can be determined by a special mark on the product body. It is also always indicated in the characteristics and annotations for flashes and other professional lighting equipment.
We invite you to study the table with approximate temperature values for the most common light sources. It will help you set the correct coordinates when working with manual light balance settings.
Rules for determining white balance
In addition to all the above functions, you can simply tell your device which color should be considered neutral (which shade in the photo should be considered gray and white). This is quite easy to do: you just need to select a gray or white object in the frame and photograph it close so that the frame is filled exclusively with it. It's worth noting that in this case you don't even need focusing, which means you don't have to bother yourself with finding the focus for your photo.
Typically, an ordinary blank paper sheet or a special “gray card” is used as an object for setting white balance. Place the paper in front of the lens, take a couple of photos, and move the supporting object away. After that, we work with the resulting frames. We make the necessary settings and check the result of the work using several test shots.
This method can be called perhaps the most accurate of all those listed earlier, however, certain nuances of its use should be noted.
- If you are going to adjust the white balance using a gray subject, then one thing that is extremely important to consider is that the subject must be in the same lighting conditions in which you plan to shoot. Otherwise, errors may appear in your settings and you will not get the desired effect from the images. Manual adjustment of the light balance should be carried out immediately before the start of the shooting process, as well as before changing the lighting at the photo shoot or changing the location.
- Using a white sheet of paper for manual adjustment is unlikely to provide us with a 100% correct result. Even seemingly ordinary white paper has its own shades. It may be yellowish or bluish, which will not have the best effect on determining the white balance. The best option would be a gray card - an example of the ideal white color in the photograph. You can easily buy it in the photo department of any store.
White balance as a unique effect
Let's not forget that photography is an activity that is not without a creative component. Not in all cases, a perfectly adjusted white balance corrects a photo for the better; sometimes you can ignore the rules if this guarantees the appearance of a unique and interesting photo in your collection.
Very often, photographs with incorrect balance look much more expressive and interesting than the same frames with the correct settings. The bluish tint characteristic of high light temperatures sometimes perfectly complements photographs of snow, water or fog, and the slight yellowness of low values gives photographs of sunsets and sunrises a special charm. So, unusual experiments with equipment settings can sometimes lead to the appearance of real photo masterpieces; it all depends on your skill, creativity and imagination. Try different methods for adjusting white balance and find the perfect one for you.
Mixed lighting
As we have already said, there are isolated cases in which light is emitted by several objects of different formats. At such moments, novice photographers are faced with a serious problem - how to adjust the white balance? The answer sounds quite simple: try to make one light source the “main” and eliminate others as much as possible. If this is technically impossible, then you should move the model or subject to the place of maximum concentration of the main light source and focus the camera on it.
As you can see, taking a high-quality shot with the correct white balance is not so difficult. To do this, you just need to study the principle of its internal and external configuration. Train and create unique shots!