The best weather for photography
The best weather for photography
There is an opinion among some photographers that light is either “bad” or “good”. That is, having looked out the window in the morning and made sure that in “this weather” there is no favors to be expected from the lighting, they immediately express everything that they think about “this weather”, and, finally cursing bad luck, they put the camera in the closet. Wait with your conclusions! After all, light is not “good” or “bad” - it can be suitable or unsuitable for a given subject.
Light is one of the most important elements of a photograph, and this phrase should not be considered a hackneyed phrase.
After all, even if you have all the necessary photographic equipment, you won’t get good pictures without the right light. The word “photography” itself is derived from two Greek roots: “photos” (light) and “grapho” (writing). That is, together it turns out something like “I paint with light.” Yes, these are the words that can describe the essence of photography. One way to learn to feel light is to constantly pay attention to its nuances. Even if you don't intend to photograph anything right now, pay attention to how beautifully the back wall of the house is lit, how the rays pass through a small attic window or how they are scattered by the foliage of the trees. Collect, memorize, save pictures in your memory - this knowledge will be useful to you during shooting.
The most wonderful quality of light is that it is always different. Its main parameters - intensity, contrast, hue and angle of incidence - are rarely repeated. And that's great! There is one rule regarding light: quantity in this case does not turn into quality. Much does not always mean good, in fact, quite the opposite. It is better when there is little light, but it is correctly directed, than when there is a lot of it and it is randomly scattered.
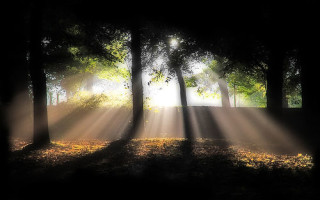
Many people think that the best time for shooting is on sunny summer days, because the bright sun allows you to use small apertures and fast shutter speeds. But during the midday hours, everything is flooded with direct sunlight, which means there are no shadows, and therefore the image turns out flat and dull. That is why try not to take photographs at midday, when the shadows are not only small, but also very deep. It's best to photograph early in the morning or evening, when the sun's rays hit at a sharper angle and produce longer, more photogenic shadows.
During the winter months, the sun is low throughout the day - this lighting brings out textures and patterns well. This is the time to start photographing various architectural monuments, both as a whole and their individual details (for example, stone carvings). The same applies to landscapes. In winter there is no foliage and grass, so it is at this time of year that you can perfectly record the features of the landscape. The way the light falls on the subject is also very important: the sharper the angle of incidence, the more detailed the photo will be.
Also keep in mind that midday light, while seemingly neutral, can have a cool bluish tint, especially if you're shooting in the shade. The closer to dawn or sunset, the warmer the shade of light, and the more clearly details such as stonework will be drawn. Remember that the light in the frame completely determines the mood of the photo. Notice how the exposure meter changes as the camera moves from one corner of the composition to another.
How to take photos in sunny weather
We are often asked “how to take photographs in sunny weather?”
The difficulties of photography are quite understandable - most often people go to be photographed at the most convenient time for them - during the day, in sunny weather, when it is pleasant to walk through the park or sit on the shore of a pond.
well, and take some memorable photos. And everything would be fine, but! is shining during the day . We take a camera, take a photo, look at the camera screen and everything seems to suit us. However, we come home, copy the photos onto the computer and see that there are wild overexposures on our faces, deep shadows in the shadows of the trees, and often the camera was unable to capture sharpness at all due to the sun’s rays entering the lens.
What is the problem and what can be done about it?
The reason for many overexposed frames taken in sunny weather is approximately the same as why we do not see relief in the sun - the range of capabilities of the camera (and the human eye) is limited - the range of brightnesses that the camera can record is called dynamic range. And this range has certain limits. Therefore, if you have 2 objects in your photograph that have too much variation in brightness, it will be difficult for you to photograph both objects without losing the detail of one of them. One of these objects will be within the dynamic range of the camera (and will be well displayed in the photo - with all the details), the second object will be outside these limits, which means in the photo it will be just a white or black spot without details.
In sunny weather this is exactly the situation. Those areas of the photograph that are illuminated by direct sunlight have too high a brightness, and the shadows are too deep. Of course, technology does not stand still and the dynamic range of cameras is now quite large, but often this range is not enough.
The answer is simple: we need to make sure that the spread of brightness of all objects in the frame is not so great.
How to do it?
There are 2 options for solving this problem: either make the shadows lighter, or dim the lights.
We cannot dim the sunlight, but we can make the shadows lighter - but this only applies to portraits - to make all the shadows in the frame, if nature enters there (shadows under trees, shadows from houses, etc.), we, alas, do not Can. That is why knowledgeable photographers photograph landscapes, as a rule, at dawn or sunset, when the sun is no longer shining so strongly and the spread of brightness in the frame is less than at noon.
Let's return to portraits. How to photograph a person in sunny weather without overexposure or deep shadows on the face?
In order not to bother yourself with labor-intensive processing of overexposed faces in photographs, try to make the lighting on the model’s face uniform during the photo shoot. Let's try to do this due to one or another location of the model relative to the sun. In some cases we will use additional photographic equipment.
So, the most undesirable option is to position the model facing the sun.
Firstly, deep shadows appear under the model’s nose and chin, and secondly, the sun shines on the model’s face and it is often visible in the photograph that the model is squinting. That is why this option of positioning the model relative to the sun is rarely used.
Second option. Position the model sideways to the sun.
Features of this arrangement of the model:
- one side of the face is illuminated, the other is almost completely in shadow (half of the face is visible, half is not),
- the shadow from the nose is even larger than in the previous example,
- the neck area is strongly darkened by the shadow from the chin,
- the eyes are partially in deep shadow, which greatly affects the overall perception of the photograph (remember that the model’s gaze is the semantic center of the portrait and it should be clearly visible).
Here there is a strong variation in the brightness of the illuminated and unlit parts of the face. As a solution to problems with deep shadows, we can suggest the following: highlight the unlit part of the face using a reflector or off-camera flash.
The shadows of the nose and chin will become less deep - the light-shadow transitions will be softer. This photo will look much nicer.
Third option: photograph the model with her back to the sun.
This position of the model relative to the sun is more preferable (although there is a popular opinion that this should not be done). Sometimes focusing on the model in this case will be difficult, however, if you manage to focus, then the photograph will have a clear advantage - the model’s face will be evenly illuminated, and the sun’s rays will highlight the model’s silhouette. Sometimes interesting rainbow highlights also appear in a photograph (although not everyone likes them). In any case, you will not have to align the light-shadow pattern on your face (highlight the shadows), which means you do not need to take additional photo equipment with you to the photo shoot.
As we have already said, with this positioning of the model, it may turn out that the sun will fall into the camera lens - focusing in this case will be difficult (sometimes, of course, a lens hood helps, but not always), and the photo will lose contrast and rainbow highlights will appear . Despite this, such photographs look very interesting.
The simplest solution to the problem of photographing in sunny weather is to place the model in the shade of a tree or house - the sun's rays will not fall on the model's face at all, which means there will be no need to equalize the brightness of individual areas of the face.
But in order for the frame to have the feeling of a sunny day, it is important that the part of the composition illuminated by the sun is included in the frame. This way you get an evenly illuminated model and the feeling of a sunny day. Let us note that this solution to the problem is also beneficial in that you do not need additional photographic equipment for the photo shoot.
By analogy, you can place the model in the shadow of any other object - for example, a tree. But from experience we will say that it is not always easy to find a tree under which there is a place where there would be a continuous shadow - usually rays break through the leaves of the trees, which will leave spots of light on the model's face - such portraits are difficult to edit, and light glare makes the face models are less attractive.
Well, the most time-consuming way to make the illumination of the model’s face uniform is to place a large white translucent material between the sun and the model - then it will no longer be the sun that shines on the model (the sun is hard light), but the matter - and it will be soft light. But it is quite difficult to build such a structure, so this option is implemented when organizing large commercial photo and video shoots.
As you can see, taking photos during the day in the sun is not always easy. Therefore, for beginning photographers, it is still better to start learning to photograph in more favorable conditions, when the sky is overcast or during the photographer’s golden hours (closer to dawn or sunset).
Time to shoot
Not every beautiful scene looks truly beautiful all the time Moreover, we usually have to put in a lot of effort, patience and observation to show the subject at its best.
With studio photography, when you are in complete control of the situation, you can afford to photograph at any time convenient for you or your subjects. When you go outside, you must take into account the external lighting, which changes dramatically within one day.
The following two photographs were taken 12 hours apart:
What an amazing change! It seems that these are two completely different landscapes, but the pictures were taken from almost the same point.
Times of Day
Noon is not the best time for photography. The sky above is faded, pale blue, and near the horizon it is almost white, which is especially noticeable if there is a lot of dust in the air. Blinding sunlight produces flat, inexpressive colors, bright highlights and black shadows devoid of detail. The contrast is so great that people’s faces turn into whitish masks with black eye sockets in the photographs. About two hours before sunset, the air tends to become clearer, the sky becomes richer blue, the sunlight takes on a warmer hue, the contrast softens, and all colors appear more intense and vibrant. At this time, and also an hour or two after sunrise, the landscapes in the photographs will look exactly the way you want them to look in clear sunny weather.
If the weather is cloudy during the day and the sky is overcast, you can use this soft diffused light for portraits or macro photography, i.e. where the lower the contrast, the better. Among landscape subjects, in cloudy weather it is especially good to shoot a forest thicket, where direct sunlight breaking through the interweaving of branches would turn delicate chiaroscuro into an unimaginable jumble that would dazzle the eyes. The general rule for shooting on a cloudy day is to avoid the sky. Most of the time it comes out as a white overexposed spot, so be careful.
The last hour before sunset is called the Golden Hour. In the morning it corresponds to approximately half an hour after sunrise. This is the best time to shoot landscapes, architecture, portraits, and indeed anything that can be shot outdoors. The contrast is relatively soft, the colors are rich and saturated, the shadows are long, emphasizing the relief and texture, but not so dark as to fall into blackness. The old barn looks like a palace when illuminated by these magical golden rays. Take a photo of a vacant lot with rusty trash cans and people looking at your photos will want to live there. If you are shooting something really spectacular - mountain slopes covered with fir trees, a rocky seashore, a picturesque forest lake or a photogenic model posing against the background of the above beauties, then you definitely risk getting a photo that will be worth the time and effort spent on it.
With sunset or dawn everything is relatively simple. If the sunset is beautiful, which is not nearly as often as we would like, you take it off; if not, you wait to see what happens next. Sunset or sunrise, if conditions are favorable, is the peak of color and its beauty is evident. It is much more important not to sleep through the dawn and eat the sunset, as most people do. If you are waiting for beautiful flowers, make adjustments to your schedule. Pay attention to the clouds. If the sky is completely clear, you will probably see the sunset, but there is a high probability that it will be dull. If the weather is cloudy, then most likely you will not see the sunset, but if the clouds in the west part and let in the departing sunlight, you will have the opportunity to observe a picture that is grandiose in its drama. The most colorful, stunning sunsets require a sky that is not clear, but not cloudy either - a combination of light transparent clouds and ragged gaps between them is necessary.
In the morning, everything happens approximately the same, only in the reverse order, except that the colors at dawn are somewhat cooler, since the air in the morning is cleaner and scatters red rays to a lesser extent. In addition, in the morning you have a better chance of catching fog that collects in the lowlands and spreads over the water.
After sunset the fun can begin. The clouds, illuminated from below by the sun that has just disappeared behind the horizon, demonstrate an amazing richness of shades of red. Purple light, replacing the golden dawn, flares up at the western edge of the sky and goes out about half an hour after sunset. This light is especially bright in dry weather when there is a lot of dust in the air. If at this time you turn 180 degrees and look to the east, you can see a softly lit landscape of a crimson hue, almost indistinguishable in brightness from the sky, pink below and turning higher into lilac, violet and, finally, blue. The pink band visible in the eastern sky is called the Belt of Venus. The bluish edge just above the horizon is the shadow of the Earth in the atmosphere.
Twilight is the ideal time to photograph man-made landscapes and architecture. The time after sunset (or before dawn), when the brightness of the sky is comparable to the brightness of objects illuminated by artificial light, is called “regime” time. What is important for us here is primarily a low level of contrast and a balance between natural and artificial lighting. This allows you to perfectly detail the details of the scene and, more importantly, get stunningly saturated colors. To get beautiful pictures of night landscapes, take them not at night, but during special hours, which can last up to an hour after sunset.
At dusk, the wind is your worst enemy if the scene contains trees and other objects that can be blurred at long shutter speeds. What can I recommend? Wait until it's calm, shoot buildings that don't care about the wind, or return to a windless studio.
It's difficult to shoot at night. The contrast between the lantern lights and the shadows is too high to fit into a single exposure. In addition, excessively long shutter speeds (more than 30 seconds) generate noticeable noise due to the heating of the camera sensor. This is a significant drawback of digital equipment. If you are interested in multi-minute or even multi-hour exposures, switch to film. However, there are also plenty of problems there.
There are benefits from long exposures. Random passersby caught in the frame will be invisible in the final photograph, or will turn into barely noticeable ghosts. The headlights of passing cars will leave beautiful stripes in the picture, turning city streets into rivers of fire.
And yet, it’s best to use the night, oddly enough, for sleep, and if you’re not a big fan of astrophotography, then it’s better to save your energy for morning shooting. If you love sunrises, get ready for early rises.
Geographic latitude
I am writing these lines in the most temperate climate, being at fifty-four degrees north latitude. In the southern regions, the light, both in the morning and in the evening, changes much faster. The golden hour can last not an hour, but only half an hour, darkness comes suddenly and you have to act quickly, trying to catch the light you need, and also take a flashlight with you so as not to jump on rocks in the darkness, risking breaking your neck.
In the north, from sixty degrees and above, the sun moves in a gentle arc, stretching the time favorable for photography. The closer the polar region, the more light there is in the summer. And also mosquitoes and midges. If you are lucky with the weather, which is rare luck, then the lighting can be photogenic all day long, since sunset smoothly flows into sunrise, bypassing the phase of absolute darkness, and during the day the sun does not rise so high that the contrast becomes uncontrollable.
Weather and long wait
Weather has a huge impact on the appearance of a scene and the overall mood of a photograph. While shooting in clear weather is pleasant and manageable, extreme weather conditions can sometimes result in incredible lighting and fantastically beautiful images. There's nothing like the evening sun suddenly peeking out from behind a storm cloud, its golden rays making the landscape glow against the dark sky. Keep an eye on the weather forecast, learn to see photographic opportunities in every state of nature, observe repeatable patterns in atmospheric phenomena and use this to plan your shooting strategy. It doesn’t matter if you have to wait an hour or two until the sun peeks out from behind the clouds. Sometimes you have to wait for several days for the right light, and it’s good if you have such an opportunity and are not in a hurry. Thunderstorms, fogs, rainbows, frost on trees do not happen every day. Sometimes you have to wait much longer. The combination of weather, time of year and a bunch of other factors you need can only happen once a year, and you will be very lucky if you can be in the right place at the right time. This requires patience and observation. Good photographs are obtained after a long, sometimes even many years, study of the subject, which allows you to understand how, and under what conditions, it can be captured from its best side, and then catch it at the peak of its beauty.
Thank you for your attention!
Post scriptum
If you found the article useful and informative, you can kindly support the project by making a contribution to its development. If you didn’t like the article, but you have thoughts on how to make it better, your criticism will be accepted with no less gratitude.
Please remember that this article is subject to copyright. Reprinting and quoting are permissible provided there is a valid link to the source, and the text used must not be distorted or modified in any way.
Poetry and prose of landscape photography: part 6
How many times, not being an extreme photographer, have I found myself in situations where it’s scary not only to take pictures, but also to stick my nose out into the street. But the craving for art almost always wins over reason, and here you are, barely standing under the hurricane wind and trying to find endurance for the next snowstorm.
Text: Alexander KITSENKO
Danil Korzhonov (Russia, Shatura). "Coral"
Nikon D80, Tamron 17–55/2.8, f/13
Lake Svyatoe. The most beautiful winter spectacle - frost - is wonderfully complemented by the bizarre geometry of the tree and the texture of coastal stones.
There is no bad weather. For the photographer.
For myself, I have long ago transformed the well-known saying “What is good for a Russian is…” into the proverb “What is good for a photographer is not so good for others.”
The most vivid, emotional and memorable photographs are taken precisely in “bad” weather, be it fog, frost, snowfall, frost below minus 20, or strong wind.
Or a more typical situation: you have to wander for several hours in the terrible cold under the drizzling rain, consoled by the only thought that you don’t always have to be lucky with the weather.
In the summer, when shooting during periods of severe thunderstorms, keep in mind that before and after a thunderstorm the sky can be surprisingly beautiful and spectacular.
Of course, you don’t always have to film in such difficult weather conditions. I still remain deeply impressed by the Easter morning on the water meadow, when the chimes of churches could be heard through the fog, and the rays of the sun breaking through the young foliage could be touched with my hands.
You can also remember the quiet May evenings, the sunset light gently enveloping the surrounding landscape - you probably couldn’t imagine a more beautiful and comfortable weather for photography.
According to my many years of observations, periods of sudden weather changes are most suitable for landscape photography, but, unfortunately, they are very fleeting.
Established states are usually more boring and banal - for example, cloudless summer days or prolonged cloudy weather.
Remember that one of the most important recipes for getting a good photo is having a beautiful sky (or effective lighting for shots that don't include the sky).
A little about color
Equally, and perhaps to a greater extent, than composition, color influences the viewer’s perception. Conventionally, each color is attributed a number of properties: calming, stimulating, tonic and many others.
Depending on the predominance of one of the color schemes, the photograph seems to take on a certain character. In addition, colors can also be characterized by color temperature: warm, cool, neutral.
Since the photographer, unlike the artist, does not create the color in the photograph himself, his main task is the ability to see the combination of colors that nature itself created, to highlight the most harmonious scenes, or vice versa - to play up color contrasts.
For example, a photograph with warm yellow birch leaves and grass covered with cold frost looks amazingly beautiful. Color was written in more detail in one of the previous issues of the magazine, so I propose to consider its complete absence.
Black and white magic
Nowadays, most landscape photographs are created and published in color. But color photography is rarely as laconic and at the same time eloquent as black and white.
If color can somehow veil the flaws of a composition and distract attention, then a black and white photograph immediately presents us with all its strengths and weaknesses. Therefore, to create a good black and white landscape, you need to be able to see the world without colors and make every effort to create the perfect composition.
The world of multi-colored shades gives way to the play of light and shadow, ghostly images or, conversely, high-contrast expressiveness. For a black and white landscape, it is very important to have various shapes and textures in the frame; for example, the sky covered with textured clouds looks especially beautiful.
Often black and white photographs have a more philosophical component than an artistic or documentary one.
Urban and rural views
A person often loves what he creates himself, what he has remembered and absorbed since childhood. Of course, I mean our native places, where our lives mainly pass: cities, villages, villages.
City parks, squares, architectural ensembles, village outskirts, village streets - everything can serve as material for creating urban landscape photographs.
Even factory outskirts and industrial giants can serve as a source of inspiration for a photographer. And despite the huge differences in comparison with the natural one, the urban landscape (as well as its other subspecies) is subject to the same laws of image construction.
One of the biggest difficulties when photographing populated areas is the ever-increasing number of vehicles and passers-by, trying to “get in” and destroy the difficult-to-find frame.
So, how to take a landscape photo?
So, we have come to the end of our story about landscape photography. Of course, there is still a lot left that I would like to tell, that I could still share. There would be enough material for an entire book!
I catch myself thinking that I couldn’t even imagine how difficult it is to try to literally “cram” beauty and soul into these lines. A deeper study of the theory did not bring me one step closer to nature, and I am very grateful to the authors of the photographs for the wonderful landscapes that diluted the insipid text with songs and fairy tales.
“Then how do you take a landscape photo?” - you ask? The recipe for a good landscape is quite simple: you need to take as much love for nature as possible, mix it with poetry, painting and music, look at it all through the eyes of a child - and photograph it.
Danil Romodin (Russia, Southern Urals). "Gold of Big Satka".
Canon EOS 50D, EF 17–40L/4.0 USMB, f/6.3, 1/150 s
An ice-free place on the Bolshaya Satka River, and, of course, the accompanying minus 35 - what else is needed for an excellent landscape photo?
Danil Korzhonov (Russia, Altai). "Shavlinskoye Lake".
Nikon D80, Tamron 17–55/2.8, f/13
The picture was taken under the most “favorable” conditions for a landscape photographer: thunderstorm, rain, slippery stone underfoot.
Andrey Shumilin (Russia, Siberia). "Under the Stars"
Nikon D200, Nikkor 12–24/2,8
Four frames with different exposures. In addition to the magnificent enchanting spectacle, this photograph combines titanic work and skill of the author. If you don't believe me, try again.
PS
I hope this review of landscape photography will help beginning photographers collect and systematize the necessary material, without which it is quite difficult to take their first steps in landscape photography.
In parting, I wish everyone success in their creativity and to be in the right place at the right time as often as possible.
Sincerely yours, Alexander Kitsenko.
Thank you very much for the photos you provided:
Danil Korzhonov, Anton Petrus, Danil Romodin, Andrey Shumilin, Leonid Titu.
Winter is coming: the best places for a photo shoot in bad weather
Winter is coming: the best places for a photo shoot in bad weather
Summer is over, the last days of autumn are passing. All the foliage has fallen off, the rains have started to fall, and the thermometer is rapidly creeping down. And you have a wedding. And of course I want to get beautiful photos! Unfortunately, in such weather conditions it will be difficult to do this, because... it will be cold for the bride to be photographed only in a dress, and for the groom only in a suit. Photos in outerwear do not look so impressive. What to do? The answer is simple - move the photo shoot or wedding walk to an indoor, warm room, where it will be beautiful and comfortable! And then the question arises - where? This is exactly what I will try to answer and help you decide on the right choice of place.
The best places for a wedding photo shoot
Here I offer you a selection of top places for photography in Moscow. I think everyone will find a place and an interior to their liking. But whatever the interior and location, the issue of the professionalism of the photographer is still very important here. A prerequisite for a photo shoot in these interiors is an experienced photographer with an assistant with professional lighting. After all, an inexperienced photographer without the necessary equipment, with only a flash on the camera, will simply nullify all the beauty and luxury of any interior. In my work, I use several sources of professional film light with different color temperatures, as a rule, these are 1-2 sources of constant light. With them, interior photographs take on an artistic look. I also additionally use colored flashes with various spectacular attachments - of course, where it is appropriate and helps decorate the interior and the photograph itself. And, of course, work is underway with the couple. My approach is somewhat different from the mass ones; I am closer to classical productions than crazy reporting everywhere. Therefore, photo sessions take place in a calm, cozy and leisurely environment. And the final author’s artistic processing already places all the necessary accents and brings the photograph to a finished form, bringing it to perfection, making it worthy of placement on the spreads of your wedding photo book.
And I always recommend, no matter what place or interior you like, be sure to go there and see everything live in order to understand how close, comfortable and convenient it is for you when planning your wedding day route.
1. Turandot Palace
Moscow, Tverskoy Boulevard, 26, building 3, metro station Pushkinskaya
One of the best, most luxurious and my favorite places for photography! You always get amazingly beautiful photos here. The variety of rich interiors and true luxury make this place truly unique. Photos are always recognizable, produce a wow effect and will be an excellent decoration for your wedding photo album. And even after many years, looking through your wedding album, you will enjoy these photographs, because fashion is changeable, but classics are eternal!
But all this is possible only if certain conditions are met: a professional photographer with high-quality photographic equipment, as well as artistic film lighting and an assistant. Without all this, all this magic will not work, and this will greatly affect the quality of the photographs, because all the halls of Turandot are very dark, and without good light and an assistant there is simply nothing to do there.
The Turandot Palace will be especially convenient for those who have a registry office nearby, for example, Griboyedovsky. Photography is carried out on weekends from 10 to 13, it is paid, and costs about 15,000 rubles (you can always check the current price and time on the official website or by calling Turandot), but a huge plus is that you are given a unique certificate, and in addition photo shoots, you can also have lunch/dinner for 6 months with this money, which is very cool! And what desserts are there! =)
Since there are many different locations in Turandot, you can and should spend as much time as possible here, therefore, it is ideal to arrive at Turandot by 10 o’clock and finish filming around 13:00. This is enough time to get great photos. Another tip of mine, or rather several: there is a limit on the number of people here, so I always recommend coming here for a photo shoot only together, the photographer and his assistant, and the second piece of advice is that I don’t recommend booking a videographer here, because... this will eat up the lion's share of time in the photo, because... everyone will need their own time to work with the couple, and there is very little time here, and already from 12 o’clock the first visitors begin to arrive and take their places in the halls.
What is the “golden hour” when taking photos, or what time of day is it better to take photos on the street?
The term “golden hour” is used by professional photographers to refer to the time of day with the most favorable lighting. Light is a very important aspect of photography. You can capture the most stunning landscape or model, but without the right lighting the picture will end up flat, dull and featureless.
When shooting outdoors, you can't use artificial lighting to illuminate your subject and have to rely on natural light. This is why it is important to choose the right time for outdoor photography. Fortunately, professional and amateur photographers have found a great solution to this problem since the advent of the first camera - the so-called “golden hour”.
What is "golden hour"
The "golden hour", also called the "magic hour", is the first hour before sunrise and the last before sunset, although the exact length of this time period depends on the season. At this time, the sun is low in the sky, providing soft, diffused light that is more favorable than the harsh daylight in which many of us are used to shooting. Diffused light reduces contrast and makes the photo more pleasing, while long shadows help highlight details, giving the photo texture and depth. In addition, there are usually far fewer people at dusk and dawn, which makes it possible to shoot in a more relaxed environment.
When does the golden hour rule apply?
The golden hour rule can be used for any outdoor shooting. In addition to landscapes and cityscapes, this rule is great for shooting portraits, plants, and even cars. Professional photographers firmly believe in this rule, some even adhere to it so strictly that they refuse to shoot at any other time of the day. You don't have to be so principled, but remember that it's worth listening to the advice of experts; as a rule, these people know what they are doing.
How to determine the "golden hour"
The easiest and fastest way to calculate the most favorable hours for shooting is to use the Golden Hour Calculator. This program determines the golden hour using more complex algorithms than those described above, but is easy to use and offers very accurate data. If you prefer to determine the “golden hour” yourself, pay attention to the local sunrise and sunset times; you can use an online finder for this. Next, you need to make simple calculations: the first “golden hour” begins before sunrise and lasts almost an hour, the second - about an hour before sunset and ends almost immediately after it.
iPhone photographers can take advantage of the amazing Golden Hour One app.
Shooting Tips
Once you've chosen the time to shoot and the subject of the photo, take your time to grab your camera and rush to take great photos. Before you do, pay attention to a few tips that will help you shoot flawlessly and make the most of your allotted time.
Use a tripod
Around sunrise or sunset it will be quite dark outside, but it would be a shame to miss out on the incredible hues and textures by waiting until it gets lighter outside. Mount your camera on a tripod, set your camera's ISO sensitivity to low, and use a slow shutter speed.
Take the time to install your camera
The “golden hour” begins quite unexpectedly, so you should prepare for shooting in advance. Come to the location with plenty of time, even if you have to wake up in the middle of the night.
Keep shooting
During the golden hour, the lighting changes quite quickly and the shooting scene can take on a completely different look within minutes. Don't go home after taking one or two photos, but keep shooting to capture the full range of lighting effects.
Bring a flashlight and a hot drink
In the pre-dawn and pre-sunset hours it is often quite dark and cold. These are obvious things that many people forget, especially if they go shooting in the middle of the day. Bring a flashlight with you that will help you navigate the space, and a hot drink will save you from the cold while you wait for the right moment to take a photo.
How to take photographs in sunny weather with a DSLR camera
Owners of SLR cameras often have questions about how to take photographs correctly in certain conditions, what shooting modes to use, and in general how to make better photographs.
I propose to go through several of these issues and figure out how to set up the camera so that it turns out at least well. Let's start with something simple, let's look at different situations when shooting during the day.
How to take photographs in sunny weather?
The main problem when shooting in sunny weather is the presence of sharp shadows in the pictures. You can correct them using a flash or reflector (for important events these are almost mandatory conditions). There are also several recommendations for those who shoot without a flash; they are more suitable for those who take photos for themselves and do not want to bother with light
Shooting with flash in sunny weather
If you use a flash (I recommend using only an external flash), then you need to take photographs in manual mode M, and in sunny weather you will definitely have a problem with overexposure of the frame, because when shooting with a flash, shutter speeds are shorter than 1/250 or in rare cases 1/500 non-working (explanation why), so you will have to close the aperture to such a value that the shutter speed would be 1/250 or longer. If closing the aperture is not an option for you, for example, you want the background to be well blurred behind the subject, then a dark filter will come to the rescue, which, like a closed aperture, will let in less light, but at the same time the aperture will be fully open. Also, if you have a good flash, there may be a high-speed sync mode; this mode will allow you to reduce the shutter speed on the camera to shorter than 1/250 without defects in the pictures.
Here is an example of how it works with and without light:
(thanks for photo examples max-photo.org.ua)
Taking photographs without flash in sunny weather
If you decide to take pictures of your friends or family, but don’t want to fool yourself with flashes, then it will be enough to follow some rules. The first thing that will help to significantly reduce the number of hard shadows is choosing the right shooting position. The light source, in this case the sun, should be behind us or to the side, so the subject will be well illuminated (I highly do not recommend taking photographs without a flash at noon, when the sun is at its zenith, nothing significant will most likely come of it). Sometimes, in order to realize commercial ideas, you can shoot so that the sun shines into the lens, but this is in some cases.
Of course, post processing in Lightroom will help to slightly reduce harsh shadows. To prepare photographs for this, I recommend shooting with a minus exposure of -0.7, -0.1 (ideally, there should be no illuminated parts in the frame, for example: the sky, parts of the face), it is advisable to take photos in RAW format with a minimum ISO value .
What is all this for? Firstly, the RAW format saves more information about colors than JPEG, we are especially concerned about the light and dark parts of the frame. Secondly, low ISO and quiet photographs will allow us to decently extend dark places without losing the quality of the image.
You probably already realized that the top frame is without processing, and the dark places in the bottom are noticeably brightened. Definitely, with photo processing it looks much nicer, so in any situation you should not forget about this tool for improving your photos.
Using these simple recommendations, you will definitely be able to make your photos better, maybe even a little more professional.
Soon I will tell you how to photograph sports events and moving objects.