How to photograph a crowd of people with a long exposure.
Long exposure in photography
Many photographers, including professionals, use different shutter speeds to create all kinds of artistic effects in their photographs. Everyone, even novice photographers, of course, knows that a short shutter speed is needed so that the object in the frame does not turn out blurry (for example, a person depicted in a portrait taken with a long shutter speed may end up with not two, but four eyes - or your hand will tremble, or the person being portrayed will move). And if you shoot a moving object at a long shutter speed, then in the resulting image there will be a characteristic trail behind this object.
But, in this case, why do you need a long shutter speed at all? Does it really have its advantages? Well of course there is! And these advantages are no less than those of a short shutter speed.
Let's talk about these advantages and talk in more detail.
1. Long exposure in landscape
Long exposure landscape photography has become quite popular in recent years. Nature photographed in this way looks completely different in the photograph than in reality; it appears in a completely different, unusual and unusual form. Using long exposures in photographs, it is easy to see the dynamics of the movement of water, stars in the black night sky and clouds in the blue sky during the daytime. A long shutter speed will show us the trajectory of raindrops and – you won’t believe it – even the sun’s rays! And what stunning landscapes you get when you shoot them with long exposures at night!
2. Long exposure in portrait photography
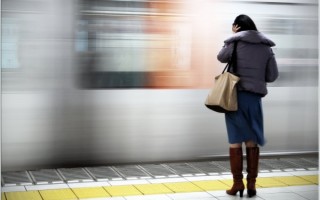
Believe it or not, long shutter speeds can also be used when shooting portraits. When is this possible or even necessary? First of all, long exposure portraits can be taken in low light conditions. In this case, the luminous flux to the matrix increases significantly and the image becomes noticeably brighter. But this is far from the only case of using long shutter speeds in portrait photography. With this shutter speed you can shoot a portrait with a partially dynamic plot. For example, a beautiful girl against the backdrop of a moving train in the subway. The train will be beautifully blurred, and the model herself will look great against the background of the blurred train that the train will turn into.
It’s also good to use a long shutter speed when shooting with the multiple exposure effect.
3. Capturing motion with long shutter speeds
Most often, of course, long shutter speeds are used to convey the movement of various objects. The dynamics of movement depend on the duration of the shutter speed used. For example, a shutter speed of 3 seconds will make the movement of any object transparent, gentle, airy, and a shutter speed of 30 seconds will externally change this object beyond recognition.
4. Create different effects when using long shutter speeds
Freezelighters, for example, take photographs using long exposures. After all, what is the main thing for freezelighting? Of course, complete, or at least relatively complete darkness. In those 20-30 seconds during which the camera shutter is open, an experienced freezelighting master can easily draw any interesting picture with light and, having finished his job, will have time to calmly exit the frame. What will he get in the end? As a result, he will receive a beautiful light pattern that is impressively shaded in the dark. You can also use various objects and items in freezelighting, for example, balloons, vases, bottles, books, trees. Even a human figure can be used. It all depends on your idea.
Long exposures are also used in photography using a technique called “light brushing.”
So what is long exposure?
Not a single book, not a single reference book says exactly and definitely what a long exposure is. For some, a long shutter speed will be 1/15 or 1/10 of a second. For some – 1/30... Each photographer gives this definition for himself, based on his own experience, the features of the camera and much more. But, nevertheless, we can definitely say that you will get a beautiful spill of water in your photo when shooting with a shutter speed of 1/6 of a second, and with a shutter speed of 45 seconds, exactly the same water will appear to the viewer looking at your photo as a sandy breeze.
How to shoot with long exposure correctly?
The first thing you need to say is that at long shutter speeds you need to shoot exclusively from a tripod, and use a cable to release the shutter. This is necessary in order to prevent camera shake (after all, camera shake is what leads to blurred images!).
Secondly, in order to make the expressive effect of movement more beautiful in the photograph, some scenes need to be shot at a very long shutter speed and at a low sensitivity value (for example, 100 or 200 ISO). As a last resort, if the subject is not clearly depicted in the frame, the light sensitivity can be increased slightly - up to 400 ISO units.
Well, and third. To make the effect even stronger and more noticeable, you can use filters when shooting at long shutter speeds. For example, neutral.
How to photograph a crowd of people with a long exposure.
A blurred subject in a photo is usually considered a technical error on the part of the photographer, but in some cases, blur is the best way to convey movement in the frame. In addition to the “wiring” often used to photograph cars, there are many subjects that tend to blur elements in a photograph, and today we will look at them.
Remember that long exposure is key for many of these subjects.
1. Trains
The movement of the train can be easily blurred even with fairly fast shutter speeds. However, for subway photography, it is better to use a tripod.
2. Coast
Blurred waves are a favorite subject for photo tours. The higher the waves and the more obstacles in their path (piers, rocks), the more expressive the movement will be.
No less expressive are the blurry figures of people on the beach:
3. Spin the child
When shooting such shots, the main thing is not to forget and be careful with the child so as not to harm him. For a photo shoot, you will need two people: one to spin the child around, the other - a photographer - to photograph him in motion at the waist level of the first adult.
4. Playgrounds
Carousels and swings are one of the best places to shoot scenes with a blurry background. To take such a shot, you need to sit in the carousel yourself, but interesting results can be achieved even by filming the carousel from the side.
5. Bicycles
Cyclists are one of the best subjects for capturing movement in the frame. Moreover, you can shoot both cyclists and from a bicycle.
When shooting like this, it's good to use a short burst of flash to blur the background and freeze the subject at the same time.
6. Cars
Cars are a very popular subject. Again, as with bicycles, you can shoot both inside the car and outside:
7. Attractions
In addition to moving elements, attractions have another undeniable advantage - beautiful lighting. Various slides and rockets are also a great way to master wiring techniques.
8. Dance
Dance is an interesting movement in itself. When combined with a long shutter speed and dexterity, you can get some very interesting shots.
9. Birds
The wingspan of a bird is an excellent subject for conveying movement in the frame. The main thing is to choose a shutter speed such that even with blurry wings the bird itself remains sharp.
10. Stars
It’s common to think of stars as the last thing to think about as a subject for long exposures, but they are one of the most expressive types of movement in the frame.
11. Escalators
Escalators are a great place to shoot motion scenes.
12. Umbrellas
An old but proven method for an interesting portrait is to twirl an umbrella behind the model's back.
13. Streets
On a busy street, traffic never stops. To capture it, you need an interesting angle and a long shutter speed.
Photo business. Advanced shooting techniques. Long exposure
You may have seen photographs of water in which it seems to have frozen, as if it were thick, like milk or jelly. Particularly fascinating are the pictures of lakes in the mountains against the backdrop of sunset or dawn, taken in a similar way. The surface of the water is never completely calm - there is always a slight disturbance. What if you increase the shutter speed so that this disturbance merges into one smooth image?
To obtain a significant effect, the shutter speed should reach several seconds for more or less calm water, such as a lake, or a quiet river, and be 0.5-1 second for fast-flowing water, such as waterfalls and waterfalls, or rapid rapids. In particularly advanced extreme cases, it is worth trying to increase it to several tens of seconds.
In addition to photographing flowing water, this technique can be used in other cases - I will talk about them at the end of the article.
Under normal shooting conditions, shutter speed is on the order of hundredths or thousandths of a second. An obvious way to lengthen the shutter speed while maintaining the same exposure is to close the aperture (we talked in detail about the sensitivity - shutter speed - aperture triangle and the influence of each parameter on the final image in the Exposure article). So what is next? After the diaphragm potential is exhausted? Here are some recommendations:
- Direct sunlight is more of a hindrance than a help. If possible, choose a time of day for shooting with natural, subdued lighting - just after dawn or before sunset. In addition to increasing the exposure time, they will add a special charm to the photo by changing the color temperature of the light - usually towards a reddish, even purple, or yellowish side;
- Use the lowest sensitivity setting (ISO). In this case, difficulties may arise in determining the correct exposure, especially when the shutter speed is longer than the 30 seconds that the camera can display. Long gone are the days when you had to write scribbles on the back of a film box on your knee. Today, 90% of the work is done for us by the device. Do this: increase the sensitivity a lot, for example to ISO1600, meter the exposure, and then simply calculate the desired shutter speed. For example, at ISO1600 the shutter speed was 4s. We calculate: 4s at ISO1600 = 8s at ISO800 = 15s at ISO400 = 30s at ISO200 = 60s at ISO100.
- For complete control over the camera settings, in my opinion, it is more convenient to switch to manual mode ;
- close the aperture to such an extent that it does not interfere with the creative intent due to the increase in depth of field (this usually does not interfere with landscapes);
- Filter. In bright conditions, you can increase exposure time by using filters. A polarizing filter , for example, will increase the shutter speed by two stops - for example, from ¼ sec to 1 sec. A special neutral gray filter allows you to increase shutter speed from one to ten stops. There are such filters on sale both with a constant dimming value, which allows you to increase the shutter speed, for example, by 2, 4, 8 times, and with a continuously adjustable value. There are models of a higher class ( read more expensive ), and there are models of a lower class. But those that are three simpler can suffer from uneven tone (by and large, not so bad), the introduction of additional coloring (can be removed later, during post-processing), uneven coloring, poor-quality glass and other bad things. That is, to shoot for sale, apparently, you will have to fork out for good glass .
- Do not forget to close the viewfinder window with a lid when shooting with a long shutter speed to prevent excess light from leaking through it. Not only will this light lead to a change in exposure, but it will also add a lot of unnecessary noise.
- You'll be surprised how much darker the viewfinder image becomes after applying the filter. Before the advent of LiveView , any change in composition required you to remove the filter, make adjustments, sharpen the focus, put the filter back on, trying your best not to shake the camera. If the camera position did change, we had to start all over again. Now on the monitor we see a bright image - and the same as the camera sees it. One problem is that a screen that is always on simply drains electricity, so stock up on an extra charged battery.
- Obviously, the use of a tripod . Moreover, in the case of long exposures, special requirements are placed on the tripod in terms of stability. When installing the tripod on sand, make sure that the legs are deepened all the way. Add weight to it - hang a photo bag, a bag of stones, etc. In windy conditions, position the tripod as low as possible.
- A tripod is, of course, wonderful and correct, but if you don’t have it with you, you won’t miss an interesting story! In any case, you will have to take special measures to secure the device . If it is possible to use a lower shooting point, try simply placing the device on a stationary surface - a stone, a log, a hood, a photo bag, a bucket, etc. You can hang the camera by the strap on a nail or branch.
- To minimize camera shake, set the shutter delay mode . You can often come across advice to even raise the mirror before releasing the shutter (there is such a special menu item). Using the remote control is also quite convenient. Apart from a branded one - usually quite expensive - anyone can easily make their own remote control using improvised materials. Its device is completely simple - just a button to connect to the wire, recommendations on thematic forums - the car, who knows what. For example, I made myself a remote control from an ordinary mouse by slightly re-soldering the wiring. The right button is responsible for focusing, the left button for releasing the shutter.
- After filming at sea, do not forget to immediately thoroughly blow and wipe the device from salt spray and sand dust.
It turns out that the main advice is to use special filters. What if they weren’t with you? (“What kind of photographer is that?” an attentive reader will ask. “I went to shoot a long exposure and didn’t take a tripod or filters...”). There is another interesting method for creating a long exposure effect in bright daylight - multiple exposure . Unfortunately, not all cameras have such a built-in function, and if they do, the burst length may not suit you. For example, the Pentax K-5 and Canon 70d can automatically combine from two to nine frames, and the Pentax K-3 can automatically combine up to 1999 frames. The principle, I think, is clear: the lowest sensitivity, closed aperture, and forward - a dozen frames in multiple exposure mode. Read the instructions for your camera about the features of this mode.
Combining the resulting series of frames taken at shutter speeds of the order of 1/20 - 1/60s creates a very similar blur effect . With the right settings, you will get quite interesting results. Of course, it is different, however, firstly, “something” is still better than “nothing”, and secondly, you get a new interesting way of shooting moving objects. Moreover, you don’t need any additional equipment except a tripod. I think you should definitely try it. At least in order to say to myself next time: “Yes, I wish I could!” Yes again!
Shooting with a very long shutter speed is useful not only for water experiments, but also in windy weather.
For example, it’s impossible to suddenly remove a flower that’s being blown over by the wind. So, maybe try to lengthen the shutter speed on the contrary? Try it, in the worst case you will know whether you like it or not. What about the summer steppe grasses swaying in all directions? A very interesting result is obtained when shooting clouds . True, the clouds should move quite quickly, there should be quite a lot of them, and the required shutter speed should be quite long - from tens of seconds to a couple of minutes.
Another application of the technique. Filming in a place where you can’t escape crowds of people, for example, in historical centers, tourist-active places. A slow shutter speed blurs fast-moving figures, leaving the subject itself clear. It is clear that the technique is applicable when there are not too large crowds of people.
Long exposure
Filmed through welding glass.
No duplicates found
and welding glass
I came in to write exactly this comment and you beat me to it.
I was drinking beer and came to read the comments. bitch.ahhh.
The vomit is salty. Just in time for beer.
Sour - gravy for pasta!
Snack on the vinaigrette, it’s also aesthetically pleasing.
Two kumi sit at the table and pray to each other and feed:
- Who are you going to eat the pot with?
- Yak chim lard. What?
– It’s not like it’s already outdated, as if in the countryside.
- What will you have for lunch?
- I’ll have some vinaigrette: a shot glass and vinaigrette, a shot glass and vinaigrette.
- Well, yak. I go out onto Vranci Street, there is snow all around, it’s white. I'm so desperate for snow - and there's VISHIVANOCHKA.
This scene must be watched in its entirety and with sound!
https://www.youtube.com/watch?v=lOjo74RAOX4
Centrifuge for separating skin from bones
yeah, and for larger ones, a centrifuge for separating fat from meat
So this is where the wind blows.
I even imagined how the little people scattered.
https://www.youtube.com/watch?v=3HvUtlVi6hk
The credits show that several people pointed hoses from compressors at him.
a fan like this would come in handy
Is it a joke about welding glass? How did you get an unexposed photo? I can only take pictures with my phone
original and what it was shot with, iso 100, f/1.7, shutter speed 30 seconds, processing in Lightroom
The main disadvantage of welding glass is color distortion; dense gray ones would cope without such a shift into green.
So such a decent filter will cost from 5-6 rubles, and a piece of glass will cost a couple of hundred rubles, why not take it for a play?
Um, a set of filters of tolerable quality in the amount of 20 pieces, you can take from one Chinese site within a thousand. Made for the cookie system.
I ordered it already two months ago.
I have a set like this for cokin-p, pieces of multi-colored plastic for playing with. For normal shooting, I have a B+W ND1000, which was rare in retail at one time.
I have it for travel, when it’s a pity to drag an expensive system to the mountains, it works quite normally with black and white
that case when he really “took it off”
f/1.7?
o_O Maybe f/17?
You have a kit lens, ef-s, most likely 18-55mm, where the aperture is at least 3.5.
Welding glass was used because it was removed during the day? It’s just that in the photo of the camera you can see the flash and that it was taken in a dark time. Although it may have been filmed by a specialist for this comment at home.
my fault is not 1.7 but 7.1
Something really turned everything green on you, it’s cool that you managed to pull it out. I was taking photos a long time ago, the sky as a whole suited me in cyan, and I didn’t work with the ravs at all.
May I ask how exactly the image was processed in Lightroom? At least superficially. You ended up with very natural colors.
From the beginning, in the main tab, I take the white balance dropper and poke at the white colors, when the result suits me, I go to the tone curve tab, there is an RBG channel, red, green, blue - with this tool I remove the greens (bring it to the acceptable level), in the input, I try HSL bring it to mind.
Where can I get such a big piece? I get all 10 by 3-4 cm.
I bought it from where they sell power tools and went to 7 stores myself.
To where, so that it is 30 seconds during the day? Up to f 150-200, or what?)) Only ND filters or welding glass.
not overexposed precisely because of the welding glass.
Nd filter for weird ones.
In Photoshop you can get a similar result from many frames. But their number should be under 100 or more, so that it would be impossible to tell the difference. The easiest way is to shoot a 30s video and use frames from it.
For long exposures to light, special filters are used to reduce the amount of light transmitted. These filters are called neutral gray or ND. These filters are attached to the lens itself. Using ND filters you can get longer shutter speeds to blur moving objects and paint with light.
Instead of the factory ND filter, TS used welding glass, which also reduces the amount of transmitted light, which made it possible to make a very long shutter speed.
yeah, I filmed it with an electrode
How will the HDR mode help you take a non-overexposed photo during the day with a shutter speed of 30 seconds?)
HDR is the stitching of multiple frames with different exposures to expand the dynamic range of the image. This has nothing to do with long exposure.
not competent - keep quiet
Did you film it with a welding machine?
Eh, I can’t wait for my LP filters to arrive from China! :)
The edge should be red
From overheating. The wheel parts rub a lot when it is spun like this.
Well, yes, plus the blood of extreme sports enthusiasts
Well then it’s definitely not the end
Is this an attraction to return funds taken offshore?
Now I know how welders see the world.
I liked the previous carousel better. This one, with closed booths, is not the same at all.
Am I the only one who sees the girl's face to the top left of center?
yes, there are only bangs and an eye from it)
Uh-uh, my friend, you have pareidolia!
In Anapa last week I rode on a similar wheel.
Only at “standard” speed 😉
From a 70-meter height there is an excellent view of the city and the sea.
And the photo is funny. 👍
70-meter height on the 9th century?
Carousel for adults)
- Stop, stop. Vitya, Vitya needs to go out
Witte needs to leave the building.
Let the gramophone finally be silent -
Witte waltzes, Witte carouses!
About the community
In the community you can share good pictures with photo shooters, get criticism, help, and also learn a lot of interesting things from the world of photography.
1. Photos must contain the tag [mine] and be of good quality .
Not allowed: soapy photographs; photographs containing a lot of noise; Photos that are too dark or too light (overexposure).
All such photos will be transferred to the general feed.
A special note about photos from phones - photos viewed on a phone may differ significantly from photos on a computer or laptop monitor (as a rule, problems are not visible from a phone).
Please check your phone photos on devices with larger screen sizes.
2. It is advisable to indicate a minimum set of information about the equipment on which the photograph was taken. If it is a system camera – camera + lens, if it is a compact camera or phone – model.
More detailed information is welcome.
3. A description of the shooting process, shooting conditions, shooting location, etc. is welcome.
4. If you want to receive criticism or advice on your photography, add the tag I want criticism . Without this tag, explicit criticism (especially offensive and inappropriate) will be removed.
5. Rough discussion of models ( fat, scary, thin, etc. ) is prohibited in the community
All comments of this kind will be deleted.
6. Direct or indirect insult of community members and their works, sarcastic tone, obscenities are prohibited. All such comments will be deleted.
7. Posts about photographers, exhibitions, techniques, genres, equipment, as well as various lessons (your own, copied, translated) are an exception to points 1-3.
Articles and lessons about photography and photo processing
Free Photoshop tutorials. Tips for choosing photographic equipment. Advanced shooting techniques.
Advanced shooting techniques. Long exposure.
Perhaps you have seen photographs of water in which it seems to have frozen, as if it were thick, like milk or jelly. Particularly fascinating are the pictures of lakes in the mountains against the backdrop of sunset or dawn, taken in a similar way. The surface of the water is never completely calm - there is always a slight disturbance. What if you increase the shutter speed so that this disturbance merges into one smooth image?
To obtain a significant effect, the shutter speed should reach several seconds for more or less calm water, such as a lake, or a quiet river, and be 0.5-1 second for fast-flowing water, such as waterfalls and waterfalls, or rapid rapids. In particularly advanced extreme cases, it is worth trying to increase it to several tens of seconds.
In addition to photographing flowing water, this technique can be used in other cases - I will talk about them at the end of the article.
Under normal shooting conditions, shutter speed is on the order of hundredths or thousandths of a second. An obvious way to lengthen the shutter speed while maintaining the same exposure is to close the aperture (we talked in detail about the sensitivity - shutter speed - aperture triangle and the influence of each parameter on the final image in the Exposure article). So what is next? After the diaphragm potential is exhausted? Here are some recommendations:
- Direct sunlight is more of a hindrance than a help. If possible, choose a time of day for shooting with natural, subdued lighting - just after dawn or before sunset. In addition to increasing the exposure time, they will add a special charm to the photo by changing the color temperature of the light - usually towards a reddish, even purple, or yellowish side;
- Use the lowest sensitivity setting (ISO). In this case, difficulties may arise in determining the correct exposure, especially when the shutter speed is longer than the 30 seconds that the camera can display. Long gone are the days when you had to write scribbles on the back of a film box on your knee. Today, 90% of the work is done for us by the device. Do this: increase the sensitivity a lot, for example to ISO1600, meter the exposure, and then simply calculate the desired shutter speed. For example, at ISO1600 the shutter speed was 4s. We calculate: 4s at ISO1600 = 8s at ISO800 = 15s at ISO400 = 30s at ISO200 = 60s at ISO100.
- For complete control over the camera settings, in my opinion, it is more convenient to switch to manual mode ;
- close the aperture to such an extent that it does not interfere with the creative intent due to the increase in depth of field (this usually does not interfere with landscapes);
- Filter. In bright conditions, you can increase exposure time by using filters. A polarizing filter , for example, will increase the shutter speed by two stops - for example, from ¼ sec to 1 sec. A special neutral gray filter allows you to increase shutter speed from one to ten stops. There are such filters on sale both with a constant dimming value, which allows you to increase the shutter speed, for example, by 2, 4, 8 times, and with a continuously adjustable value. There are models of a higher class ( read more expensive ), and there are models of a lower class. But those that are three simpler can suffer from uneven tone (by and large, not so bad), the introduction of additional coloring (can be removed later, during post-processing), uneven coloring, poor-quality glass and other bad things. That is, to shoot for sale, apparently, you will have to fork out for good glass .
- Do not forget to close the viewfinder window with a lid when shooting with a long shutter speed to prevent excess light from leaking through it. Not only will this light lead to a change in exposure, but it will also add a lot of unnecessary noise.
- You'll be surprised how much darker the viewfinder image becomes after applying the filter. Before the advent of LiveView , any change in composition required you to remove the filter, make adjustments, sharpen the focus, put the filter back on, trying your best not to shake the camera. If the camera position did change, we had to start all over again. Now on the monitor we see a bright image - and the same as the camera sees it. One problem is that a screen that is always on simply drains electricity, so stock up on an extra charged battery.
- Obviously, the use of a tripod . Moreover, in the case of long exposures, special requirements are placed on the tripod in terms of stability. When installing the tripod on sand, make sure that the legs are deepened all the way. Add weight to it - hang a photo bag, a bag of stones, etc. In windy conditions, position the tripod as low as possible.
- A tripod is, of course, wonderful and correct, but if you don’t have it with you, you won’t miss an interesting story! In any case, you will have to take special measures to secure the device . If it is possible to use a lower shooting point, try simply placing the device on a stationary surface - a stone, a log, a hood, a photo bag, a bucket, etc. You can hang the camera by the strap on a nail or branch.
- To minimize camera shake, set the shutter delay mode . You can often come across advice to even raise the mirror before releasing the shutter (there is such a special menu item). Using the remote control is also quite convenient. Apart from a branded one - usually quite expensive - anyone can easily make their own remote control using improvised materials. Its device is completely simple - just a button to connect to the wire, recommendations on thematic forums - the car, who knows what. For example, I made myself a remote control from an ordinary mouse by slightly re-soldering the wiring. The right button is responsible for focusing, the left button for releasing the shutter.
- After filming at sea, do not forget to immediately thoroughly blow and wipe the device from salt spray and sand dust.
It turns out that the main advice is to use special filters. What if they weren’t with you? (“What kind of photographer is that?” an attentive reader will ask. “I went to shoot a long exposure and didn’t take a tripod or filters...”). There is another interesting method for creating a long exposure effect in bright daylight - multiple exposure . Unfortunately, not all cameras have such a built-in function, and if they do, the burst length may not suit you. For example, the Pentax K-5 and Canon 70d can automatically combine from two to nine frames, and the Pentax K-3 can automatically combine up to 1999 frames. The principle, I think, is clear: the lowest sensitivity, closed aperture, and forward - a dozen frames in multiple exposure mode. Read the instructions for your camera about the features of this mode.
Combining the resulting series of frames taken at shutter speeds of the order of 1/20 - 1/60s creates a very similar blur effect .
With the right settings, you will get quite interesting results. Of course, it is different, however, firstly, “something” is still better than “nothing”, and secondly, you get a new interesting way of shooting moving objects. Moreover, you don’t need any additional equipment except a tripod. I think you should definitely try it. At least in order to say to myself next time: “Yes, I wish I could!” Yes again!
Shooting with a very long shutter speed is useful not only for water experiments, but also in windy weather.
For example, it’s impossible to suddenly remove a flower that’s being blown over by the wind. So, maybe try to lengthen the shutter speed on the contrary? Try it, in the worst case you will know whether you like it or not. What about the summer steppe grasses swaying in all directions? A very interesting result is obtained when shooting clouds . True, the clouds should move quite quickly, there should be quite a lot of them, and the required shutter speed should be quite long - from tens of seconds to a couple of minutes.
Another application of the technique. Filming in a place where you can’t escape crowds of people, for example, in historical centers, tourist-active places. A slow shutter speed blurs fast-moving figures, leaving the subject itself clear. It is clear that the technique is applicable when there are not too large crowds of people.
I'm really looking forward to your examples of using long exposures in the comments.
How to photograph a crowd of people with a long exposure.
To come in
Long exposure photography (+ calculator)
Long exposure photography is one way to shoot in low light. This is a great opportunity to show movement, such as water, crowds, carousels, etc. Exposures of half a second or more can make waterfalls look silky and waves turn into surreal drifting mist. A slow shutter speed can be used to highlight a stationary subject against a background of movement, such as a person standing among a bustling crowd.
For long exposure photography you will need a tripod. It is advisable to use a tripod that has a fairly strong construction and good weight. Don't forget to turn off the stabilizer on the lens (if you have one).
A useful but not essential accessory is a cable release or remote control .
The remote control will prevent camera shake when pressing the shutter button. If you don't have a cable release, use the camera's self-timer (for example, 10 seconds).
For daytime photography, you will need a neutral density filter (translucent glass of different densities - three, four, six, nine and ten stops). The filter reduces the amount of light that enters the sensor.
And of course, a camera that you can work with in manual mode.
1. Looking for the perfect shooting location
Take the time to find a good shooting location. Your motives could be:
— Flowing water, waterfalls
— Waves near the shore on the sea, ocean, lake
— Ice drift
— Wind: trees, fields, fluttering fabric
— People against the background of architecture
— Movement of people who will look like ghosts in the photograph
— Thunderstorm
— Clouds floating across the sky
— Road with cars
- Glowing moving objects (carousels.)
- Illuminated buildings
- Stars in the sky and much more.
2. Preparation and shooting
— Put the camera on a tripod
— Select a motif
— Select a suitable aperture
— Focus
— Take a test shot and adjust the settings
— Switch the camera to manual mode
— Turn off autofocus
— Set a new shutter speed (see the calculator - description below)
— Start the timer or press the remote control
- We are waiting
- We look at the image
Focusing is often a problem in low light conditions. For clear shots, try to focus on a contrasting or well-lit subject. For example, on road markings or on bright windows of a building. The main thing is not to focus on a homogeneous object (walls, sky, asphalt). You can use a flashlight to focus.
It's enough to just focus in LiveView mode. In this mode, click 2 times on the image magnification, now you can manually focus at 10x magnification. This method is much more accurate than any autofocus or viewfinder focus.
If your camera has such a feature as preliminary lifting of the mirror (Mirror lockup), use it. The mirror will be raised well before the start of shooting and thus reduces the risk of the slightest vibration.
ISO - To avoid noise, we recommend working with ISO 100 or ISO-50. You are working with a tripod, so low ISO values are possible. In any case, you should not raise the ISO value above 400. Higher values, as a rule, lead to a sharp drop in picture quality.
Aperture - responsible for depth of field. Choose your depth of field depending on your creative needs.
Exposure also depends on your creative goals.
If you want to shoot at slow shutter speeds, you will have to use your intuition when choosing the shutter speed, or you can use this calculator (use Google translate if you don't understand German).
It can be very disappointing if you take pictures with a shutter speed of more than a few minutes, for example, when shooting stars and the pictures did not turn out because you made a mistake in calculating the shutter speed. Converting on the spot is not an easy task, so a calculator can be very useful. You can use it on your Iphone/Smartphone.
Selecting the aperture. We increase the ISO on the camera to such a value that you can take a picture with a fairly short shutter speed. We control the image on the camera screen, we control the histogram. If, in your opinion, you have received a normally exposed photo, set ISO 100 on the camera, enter your aperture, ISO, and shutter speed values into the calculator and calculate the new values (i.e., the shutter speed value that you should set with ISO 100).
For example, you took a photo with ISO3200 - look at the display and check the histogram.
If the exposure is suitable, we recalculate. Values: ISO 3200, Aperture 4, Shutter speed 10 seconds enter into the calculator to get the shutter speed value.
The longest shutter speed available on most DSLR cameras is 30 seconds. “Bulb” mode allows you to take pictures with shutter speeds of several minutes. For example, for a seascape, a 30-second shutter speed may not be enough; the movement of the water will not be blurred enough. In this case, you must use the “Bulb” mode. When using this mode, a cable or remote control will be necessary since you would have to keep your finger on the camera's shutter button, but then vibrations and shakes cannot be avoided, and the picture will be blurred.
White balance is quite difficult to adjust when shooting at night. A large number of light sources, for example in a city, can greatly change the color temperature. It's best to leave the white balance on auto and correct it in post-processing.
When shooting at long exposures, it is best to shoot in RAW format. This has a number of advantages. RAW will allow you to capture more detail in the highlights and shadows, and you can change and adjust the WB (white balance in post-processing). Pictures taken in RAW format are easier to convert to black and white.
— Regular time
— Sunset and dawn
— On a cloudy day
— During the day (for example, for shooting architecture or landscapes with moving clouds)
Long exposure. Features Long exposure photography.
Let's talk about shutter speed, which can create incredible effects in your night photos!
For successful night photography, you will need a tripod and a DSLR or mirrorless camera that has the ability to manually adjust the shutter speed. This is everything a beginner needs to take night landscape photography to the next level.
Taking pictures of the Ferris wheel
This is what the Ferris wheel looks like at night with long exposure. Impressive? For this shot you will need a wide angle lens. Having installed the camera on a tripod, set the aperture parameters within f/11-f/32, because... We are interested in the maximum area of the frame in focus. You will have to work in manual mode, or shutter priority mode, setting the value from 1 to 30 seconds. It is better to use a timer or remote control.
Photographing star trails
Photos of star trails can be made much more spectacular thanks to foreground objects.
(trees, etc.) For such shooting, you need to set the shutter speed on the camera to “Bulb” mode and set the aperture to f/2.8 - F/4 to achieve optimal results. Use the remote control to activate the shutter button and set the ISO sensitivity to its minimum setting. This will allow your Star Trail Photos to be as sharp and grain-free as possible. After the desired period of time has passed, press the button on the remote control again, thereby completing the photo creation process. In this case, at least 15 minutes should pass, or even better, it should be several hours.
Headlight blur
With a long shutter speed, such a popular effect from the light of car headlights is created. It is advisable to set your aperture to around f/16, this way most of the frame will be in focus and sharp. Be sure to use a tripod, as any hand shake will result in a blurry shot. Then set the shutter speed. The longer the shutter speed you set, the longer the lines from the headlights you will get.
Sea waves blur
By photographing a sea wave with a long shutter speed, you will get a beautiful “fog” effect of the wave. For this type of work, professionals recommend taking photographs in the last hour before sunset. A tripod is a must for this work. Use a wide-angle lens with its smallest aperture and focus at infinity. Turn the camera mode dial to manual mode, and use a slow shutter speed (5-30 seconds). The longer the exposure, the more sea water will look like fog. A remote control, cable release or timer will help avoid even the slightest blur of the frame. If, despite the night time, there is light around, then the shutter speed can be set lower, or the aperture can be closed larger. In any case, to create blur effects, it is recommended to set the shutter speed to about 1/2 second.
Let's summarize.
If the shutter speed is too slow at a wide aperture, the photo may turn out to be too blown out and image details will be lost. Use shutter priority mode starting at 1 second and based on the result, increase it to 2 seconds, etc. until you achieve results. Change the aperture value along with the shutter speed and you will definitely get the desired result. As we have already said, for this kind of filming you will need a tripod; without it, there is practically nothing to do during night photography. Your camera should also have the ability to manually set shutter speed and aperture.
In conclusion, I would like to note that practice in night photography is your main friend and advisor. Practice and over time you will learn to navigate the settings based on information about the surrounding lighting, and as a result, after some time, you will get a collection of original photos.