Making reflectors for product photography with your own hands
8 Reflectors from scrap materials
Reflectors are the easiest way to soften, diffuse, or redirect light. You may never have thought about it, but almost any white thing can work to reflect light, be it clouds in the sky or a model's light shirt. In this article I have compiled a short list of items that can be used as reflectors. There are no intricate diagrams or detailed instructions on how to make a reflector with your own hands. This is a list of those things that you may already have in your home and that you don’t need to spend money on!
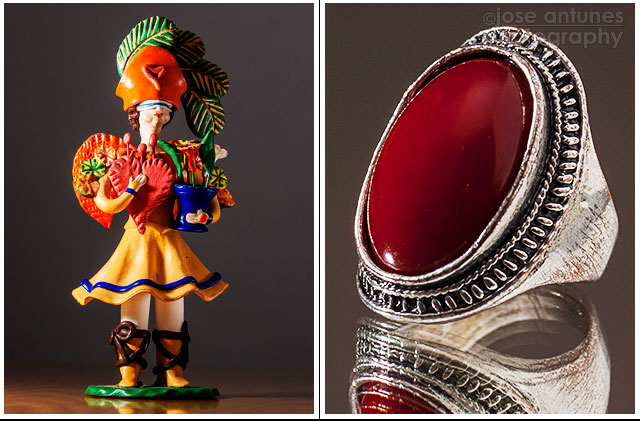
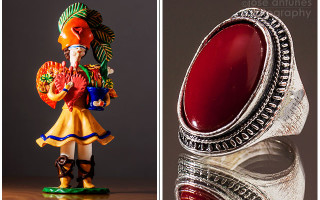
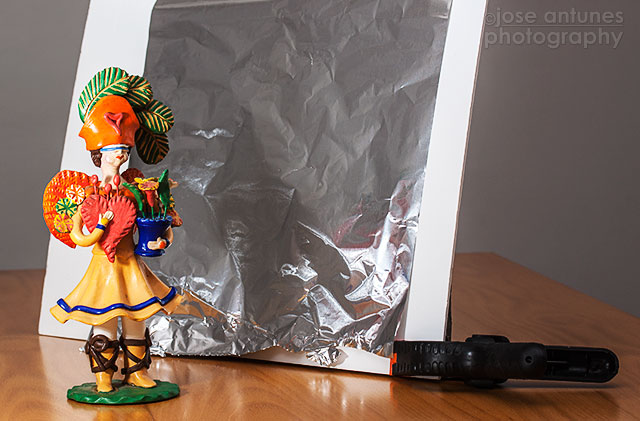
Examples of using reflectors. Kitchen foil was used for the left image, and a wall mirror and white cardboard were used for the ring image.
All situations using budget reflector options presented here as examples were photographed using flash.
But you can just as easily take advantage of the natural light coming through the window. The main thing is to decide on the correct position of the subject, the reflector and yourself.
1. Walls and ceiling
White walls and ceilings are great reflectors that can be found in almost every home.
If you are photographing with flash indoors with a low white ceiling, you can safely use it as a reflector. This option works just flawlessly. Also don't forget about the walls. If you need to photograph a group of people (read more about group photography here) and there is a white wall directly behind you, use it as a large reflector or screen, which is usually used to soften the light in group photos. To do this, set the flash to full power and rotate it 180 degrees towards this wall.
2. White sheet
Whether you're shooting with flash or using only natural light, you can always use a plain white sheet as a reflector. At the same time, note that you do not need to make anything with your own hands. Everything is easy and simple: place your subject close to the window, and hang the sheet on the opposite side, voila - and you already have soft, muted light without harsh shadows and contrasts.
3. Small mirror
Small mirrors can be very useful for product photography, especially if you need to photograph a very small subject. The best way to reflect light and redirect the sun's rays is a mirror. Remember that white sheets and walls not only reflect, but also scatter light, and mirrors only reflect, so they are simply irreplaceable if you need to concentrate light at one point, for example, to emphasize some facial features or highlight one object from a row like him
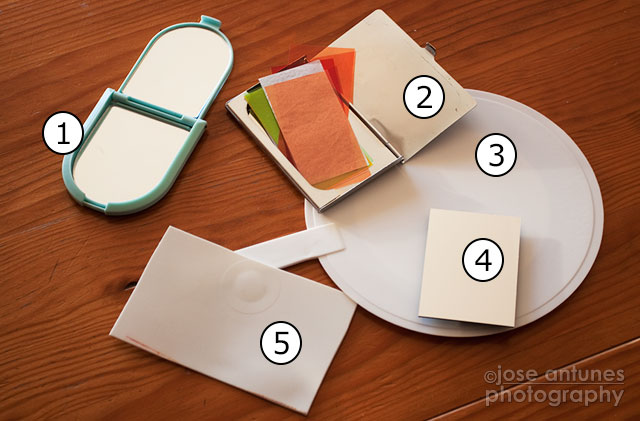
A small mirror (1), a metal card box (2) in which I store colored gels, a white plastic fan (3), a small plate with a mirror surface (4) and a plastic container lid (5) are the reflectors I use for photographing small objects.
4. Wall mirror
Large wall mirrors also make good reflectors, but they can also serve as a great base when photographing jewelry. They reflect light and at the same time double the image of the subject, resulting in quite interesting compositions.
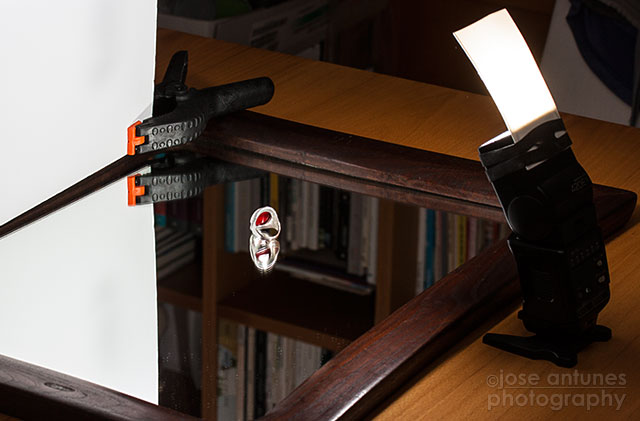
A wall mirror or any other large mirror can be used as a base for photographing small objects. A reflector like this can give you much more than just reflecting light.
5. Kitchen foil
Kitchen foil, which looks like metal, is not always the best option for some types of shooting. If you use smooth and even foil, then in action it will be no different from a mirror. But, if you wrinkle or crumple it a little, you will be pleasantly surprised at how unusual images can turn out with such a simple and fairly easy-to-use reflector. You can use it when shooting both small and large objects, but be careful, such a reflector may not give the photo the exact mood you originally intended. Either way, it's worth a try!
6. White shirt
Even your friend in a white shirt can be a good reflector. Just ask him to move around a little so you can get the position and angle you want. If your model is wearing a white shirt, great! The light reflecting off her light clothing will perfectly fill and even out all the shadows under her chin.
7. White cardboard or paper
If suddenly you don’t have any of the listed items at hand, don’t rush to give up the idea of learning how to make a reflector from improvised materials. I am sure that an ordinary white sheet of paper or cardboard can be found in any home. You'll be amazed at what you can achieve with a little patience and just a few sheets of white paper.
8. Plastic container lid
My favorite and most commonly used reflector is a rectangular piece of plastic that I cut from a white Tupperware container lid. I use this reflector either to direct light when photographing small objects, such as flowers, or as a reflector for flash. The bottom photo gives a great idea of how to make a flash reflector: all you need is a small piece of white plastic and a wide rubber band to attach it to.
How does a reflector work?
Finally, it should be noted that knowing what you can make a reflector from at home is not the most important thing. It is much more important to learn how to apply it correctly in practice. The principle of operation of any reflector is quite simple: light hitting its surface is reflected in the opposite direction at the same angle.
So, you already know which items in your home can be used as reflectors and how it works. Now it’s time to test their operating principle in practice, and then try to look for other options; I’m sure you will find a lot of them.
DIY diffusers and reflectors
In order to make the light more diffuse and remove too sharp shadows when photographing objects, it is necessary to use special diffusers and reflectors. The larger the working area of such devices, the more even the light pattern will be and the softer the shadows. Diffusers and reflectors today are produced by various manufacturers, but you will have to pay a considerable amount for them. Considering that a photographer already has to spend money on purchasing replacement optics, an external flash and other photo accessories, it makes sense to think about making a diffuser or reflector with your own hands from available materials. Often, such homemade reflectors and diffusers cope with the tasks much better than those that can be purchased in a store.
Diffusers are designed to eliminate harsh light and shadows to give your subject a more natural, pleasing appearance in your photographs. Such devices can come in a wide variety of shapes and designs, depending on what kind of flash or light source the photographer uses. Making a diffuser with your own hands usually does not cause any particular difficulties; the main thing is to use white, undarkened materials as a working surface. Otherwise, the light, which is colored in a certain light, will fall on the object being photographed, as a result of which a shade of this color will remain on it, which can ruin the photo.
The simplest diffuser can be made from a regular A4 sheet of paper. A circle is cut out at the bottom of the sheet for the camera lens, then this sheet is simply put on the lens and the simplest light diffuser is ready. Another simple way to make a diffuser is to take some white, undarkened cardboard and rubber band it to the flash. Next, you should put a white bag on the cardboard and the camera flash, which will scatter the light. It turns out to be a fairly decent diffuser in terms of functionality.
As an excellent addition to the built-in flash, you can use a diffuser made from a simple film can. In such a jar, it is enough to cut a rectangular hole to the size of the built-in flash, so that the diffuser does not subsequently dangle and holds firmly enough. The jar scatters pulsed flash light well, making it weaker, which allows you to get rid of thick shadows and highlights.
In order to control the amount of light passing through such a homemade diffuser, you can make several partitions at once from exactly the same jars. Although such cardboard boxes and jars turn out to be very effective in terms of dispersing light, you must agree that this is not very “presentable” or beautiful. Therefore, you can use slightly more complex tips for making diffusers at home.
Reflectors are very often used in photography; they help to avoid direct harsh light and harsh shadows, thereby softening the light pattern. Reflectors make it possible to obtain diffused, soft lighting, which is optimal for both subject and portrait photography. Structurally, any reflector is a base, that is, a certain frame on which a reflective screen is placed. As a frame, you can use photo frames, hoops, as well as self-made bases made of plastic or cardboard.
As for the reflective screen, a wide variety of materials can be used here. At least a white sheet of Whatman paper, which is a universal white reflector. You just need to take into account the reflectivity of a particular material. Here it is advisable to be guided by the following rule - the more the texture of the material is similar to a mirror, the better your homemade design will work to reflect light.
For an external flash, you can make a simple reflector with your own hands in literally a matter of minutes. In particular, you can fold a sheet of whatman paper into several layers and attach it with an elastic band to the flash body. This reflector is usually shaped like a cone and attached to the narrow side of the external flash. Using the same principle, you can make a reflector from a white plastic stationery folder, which is sewn with a piece of thick fabric or genuine leather for greater rigidity.
The most popular reflectors, as you know, are photo umbrellas. They can be purchased at the store, or you can make them from a regular umbrella by covering its inside with crumpled foil.
Another “recipe” for making a reflector for an external flash is as follows. Take a regular plastic bottle of a cylindrical or cubic shape, in which vinegar or liquids for caring for various surfaces are usually sold. This bottle must be cut so that the bottom part is enough for a reflector of a suitable size. Next, you need to securely attach such a homemade reflector to the flash, using two-part Velcro for fabrics. A reflector made from a plastic bottle is quite enough to seriously change the quality of a photograph for the better.
If you plan to use the reflector as a background, then it can be made manually from two aluminum tubes that will serve as a frame. The white fabric will act as a reflective surface. You just need to cut a piece of fabric of the required size, then the bottom and top of the fabric are simply folded and stitched. Then the aluminum tubes are inserted and the reflector is ready. All that remains is to figure out how to mount the reflector on the wall.
If a simple, convenient reflector with a white reflective surface made of fabric, plastic or cardboard is not enough for you, then you can experiment. In particular, a very interesting reflector is obtained from pieces of a mirror. It can be used to reflect bright patterns of light onto your subject and at the same time illuminate it with glamorous sparkle.
This homemade reflector uses mirror parts located at the grid nodes. They reflect many bright “bunnies” of light onto the subject. The main difficulty in making such an unusual reflector is to cut the mirror into separate small pieces. You need to be careful and wear gloves when performing this operation, as the edges of the mirrors are very sharp.
The purpose of cutting a mirror is to obtain pieces that are a few centimeters in size. Then these pieces of mirror are glued onto polystyrene foam in the form of a kind of mesh pattern. However, here you can experiment and create a wide variety of patterns from pieces of mirror. Please note that in order to get the greatest effect from using such a reflector, you will need a fairly powerful light source. A reflector with mirror pieces, for example, works well when shooting outdoors in bright daylight conditions.
Such homemade gizmos sometimes make the owners of professional diffusers and reflectors, which are widely available for sale, literally turn green with envy. Of course, because “homemade” ones not only do their job perfectly, creating a soft light pattern, but also have such qualities as compactness, mobility and an interesting appearance.
Finally, it is worth noting that making a good diffuser or reflector is not everything. It is important to learn how to use it correctly in practice. To do this, you will have to delve into the settings of your camera and flash, and also understand the principle of operation of the reflector on several test frames.
Source: Photokomok.ru - tests and reviews of cameras (when quoting or copying, an active link is required )
Inexpensive and effective. How to upgrade your camera with your own hands
We recently published a two-part comprehensive guide to photography accessories. The first episode dealt with non-electronic gadgets, and the second part was exclusively dedicated to electronic devices. Some of the accessories cannot be created from improvised means, but there are also those that, with some diligence, are quite possible to make yourself. We have collected just such cheap, but no less effective solutions in our truly life hacking collection. It even includes solutions that professionals will not disdain. All “photo hacks” are inexpensive, elegant in implementation, and highly useful.
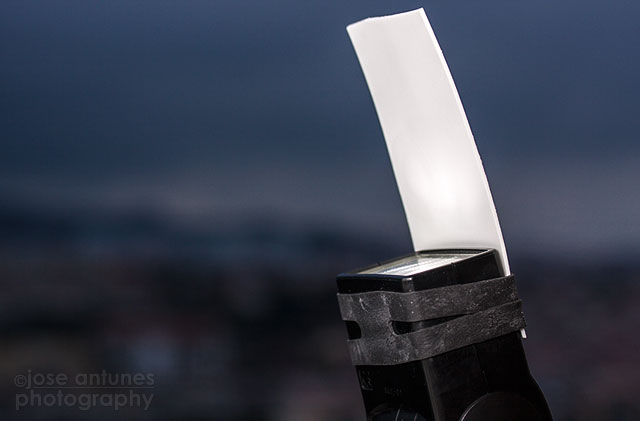
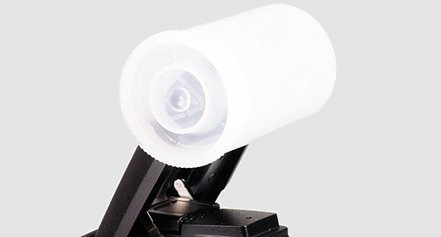
Flash diffuser
A classic of the genre - a homemade flash diffuser made from improvised means. The diffuser gives softer light, eliminates the unhealthy shine of faces in the frame and too harsh shadows. Building a diffuser is very simple, and there are many ways to make such a flash attachment. Even a piece of paper attached to a flash with an elastic band or tape can already be called a diffuser. A coffee or yogurt cup, instant noodle tray, plastic shampoo bottle, table tennis ball, white cloth or any other translucent white material are ideal. The mounting method depends on the flash and the manufacturability of the entire structure. The diffuser can be disposable, or you can try and design a durable accessory with a durable frame and reliable fastening to the flash head.
The simplest table tennis ball diffuser
Instant noodle container as a diffuser
A cigarette pack easily turns into a diffuser
Here it is worth talking about the so-called honeycombs. An excellent result can be obtained using ordinary cocktail straws, preferably black. The light pulse of the flash, passing through such cells, acquires a clear direction and is ideal for shooting portraits in a dark room. In this case, the light turns out to be softer, and the resulting spot has a small diameter, just sufficient to illuminate the face in the frame.
Honeycomb made from cocktail tubes
Constructing a honeycomb is not difficult - a rectangular box is made from cardboard, which is tightly filled with cocktail straws. Long tubes should be trimmed, but cuttings that are too short will not work. The optimal length of the tubes is 5 cm. The shorter the tubes, the brighter and larger the light spot will be and the larger the area of illumination of the subject will be.
Art filter
It is very easy to imitate Lomographic filters using transparent film. All you need to do is secure the film to the end of the lens with an elastic band or hood, make a small hole in the center, and paint the space around it with markers of the desired color. The result is especially high-quality if only the subject is captured through the hole, while the space around the frame takes on different colors depending on the coloring of the film. When coloring film, it is best to limit yourself to 2-3 colors. As a result, you should end up with something similar to this:
Art filter made from painted film
To make a filter, you can also use colored transparent plastic bags. By the way, colorless film does not need to be painted. Check for yourself what comes of it.
Demonstration of how the filter works
Rotating platform from a kitchen timer
Time lapse shooting has gained particular popularity since even inexpensive compact cameras and action cameras began to be equipped with the function of interval shooting and video gluing. To shoot such a video in motion, you will need guide rails or a platform on wheels, and to evenly rotate the camera around its axis and capture the panorama, you can use a simple mechanical kitchen timer. For example, at IKEA a timer in a metal case can be purchased for only 200 rubles. It is more profitable to choose a timer with a flat top for convenient placement of the camera. Of course, a bulky DSLR cannot be placed on such a platform, but a lightweight action camera will fit perfectly.
GoPro camera on IKEA kitchen timer
Once the timer is set, the platform will begin to rotate until the set time has elapsed. Thus, the camera will rotate uniformly around its axis and take pictures at a given period of time, say every 5 seconds. The result is smooth panning in the video.
Petrolatum
The Vaseline trick should be called “dirty” and not very popular. The idea is that clear Vaseline can simulate background blur when the camera sensor and optics don't allow it to do so effectively. Of course, you won’t be able to get high-quality, uniform blur as when using high-aperture optics on a full frame, but a certain charm in using Vaseline is obvious. Just under no circumstances should you apply Vaseline directly to the front lens lens. Use a protective filter or, at worst, a transparent plate. In general, the method has a right to life, judge for yourself:
Vaseline filter in action
Something similar happens when using the creative filter made from unpainted film, which we discussed above.
Protective filter with a layer of Vaseline applied
Figured bokeh
This is perhaps the most impressive homemade effect of the entire collection. Bokeh is a pattern that forms in the out-of-focus area. Simply put, light points outside the sharpness zone are blurred and turn into round spots. The diaphragm opening gives them their round shape. A homemade lens attachment seems to add another aperture, but with an arbitrary hole. It could be a star, heart, triangle, or any other pattern. This method works best with high-aperture optics when the lens aperture is maximally open and its diameter exceeds the size of the cut out pattern. Using a compass, draw a circle on cardboard with a diameter equal to the diameter of the lens. In the very center of the circle (this is where the mark from the compass needle comes in handy) a pattern is cut out.
Nozzle with curved cutout
Bokeh in the form of hearts
The cardboard attachment is attached to the lens and the bokeh takes on the intended shape. For lenses with different apertures, the size of the cut out pattern may be different, and the optimal value is selected experimentally.
Polarizing filter
A polarizing filter allows only direct light rays to pass through, blocking reflected ones with a specific polarization. Rotating the filter achieves the desired effect and eliminates glare. As a result, the grass becomes greener, the sky bluer, the water clearer, and the clouds acquire a mesmerizing volume. It is impossible to make a polarizing filter at home; you can only borrow it from other devices. Without delving into physics, a polarizing filter is installed on any liquid crystal display. From there it can be removed, although the process is quite labor-intensive. Typically, a polarizing filter is glued to the outside of the display glass. Without such a filter, the display will simply glow with white pixels. To remove the filter, a display from an old non-working gadget, for example, a long-broken smartphone or a defunct camera, is suitable. After removing the filter, you should carefully remove any remaining adhesive from it. You can cut a circle from the resulting piece and attach it, for example, to a mount from any other filter.
Making reflectors for product photography with your own hands
Using reflectors in photography is an easy way to take advantage of the light available to you and direct it to different areas of your image. This can be done using any surface that reflects light, such as a wall, mirror, cardboard, polystyrene or aluminum foil.
Reflectors used in photography come in a variety of colors, shapes and sizes. Silver, golden, white, and there are also so-called zebras - reflectors that combine several common colors. There are 5-in-1 reflector kits that include a black surface to absorb light and a translucent surface to soften the light.
Form
The shape of the reflector depends on the subject you want to photograph. Round reflectors are the most used because they are easy to fold and transport, but triangular and rectangular ones are also popular.

The size depends on the area you need to highlight. And when it comes to small objects, it's not so simple, because standard reflectors are large enough to produce small spots of light. In this article, I'll show you how to make your own small reflectors for tabletop photography.
Materials
You can use regular sheets of paper and attach them to other objects used as a holder, but this simple technique will definitely give you more control when it comes to installing your reflectors.
To get started, you'll need a few sheets of metallic paper. The one I will use is sold at office supply or craft stores and is available in different sizes and colors. I bought 50x70cm sheets, or about 20x28 inches, which allowed me to make a nice selection of reflectors in different sizes and shapes.
A nice feature of this paper is that the back side is white, so you can use the shiny side or just flip it over to the white side to get a different type of reflector. In addition to standard silver and gold, you can buy texture sheets for special light reflection effects.

Cut to size
Now it's time to cut the paper to size. This depends on the size of the reflector you want to make; in this case I'm making a reflector measuring 8x13 cm (3x5 inches).

Now draw lines with a ballpoint pen and fold the paper along these lines. You will end up with something like this.

I use magnets to secure the intersecting edges at the back. You can use duct tape, Velcro, or even reusable glue, but magnets will allow you to adjust the angle of the reflection as you search for the right direction of the light.

Magnets are also very useful if you are using some sort of reflector holder rather than mounting it on a table.

Installing reflectors
Now that we've made some great reflectors, let's put them to the test.
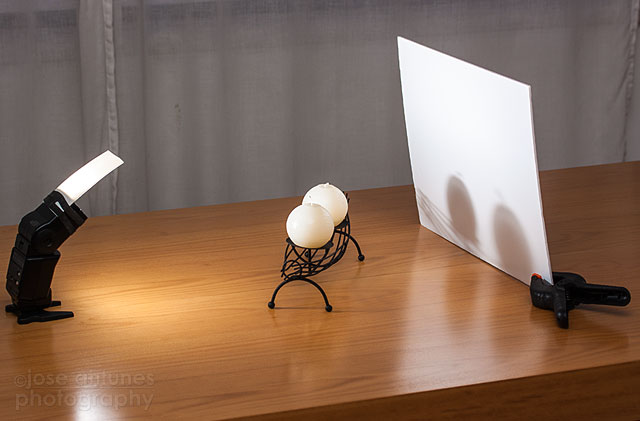
I've used high quality lighting equipment throughout my career as a professional photographer, but I have to say that I'm always amazed what you can do with a simple window light or a table lamp and a couple of reflectors. The following image is an example.

Here's how it was done:

Start with a table lamp and a backlit diffuser.

Now the same lamp with a diffuser plus a reflector on the left.

Now with another reflector on the right.
So here's a simple and effective method that's guaranteed to give you more control over the lighting of your photos.
How to Make Simple Photography Reflectors from Cutting Boards and Aluminum Foil

Today I want to share with you simple tips on how to quickly and easily make reflectors for photography with your own hands at home, without spending a lot of time, effort and money on it.
What are reflectors used for? It's an affordable way to enhance the quality of your photos by bringing in extra lighting. You can use any reflective surface, such as a mirror, a sheet of white Whatman paper, foil, or professional reflectors that can be purchased at photography stores.
Reflectors come in different shapes and sizes and have surfaces of different shades. They are compact, convenient and quick to fold/unfold. For shooting at home, medium-sized round reflectors are suitable. For neutral illumination, a silver surface of the reflector is used, for warm illumination, a golden surface is used. But if you don’t want to spend money on buying reflectors, make them yourself from scrap materials. This is exactly what we will talk about today.

So, you will need:
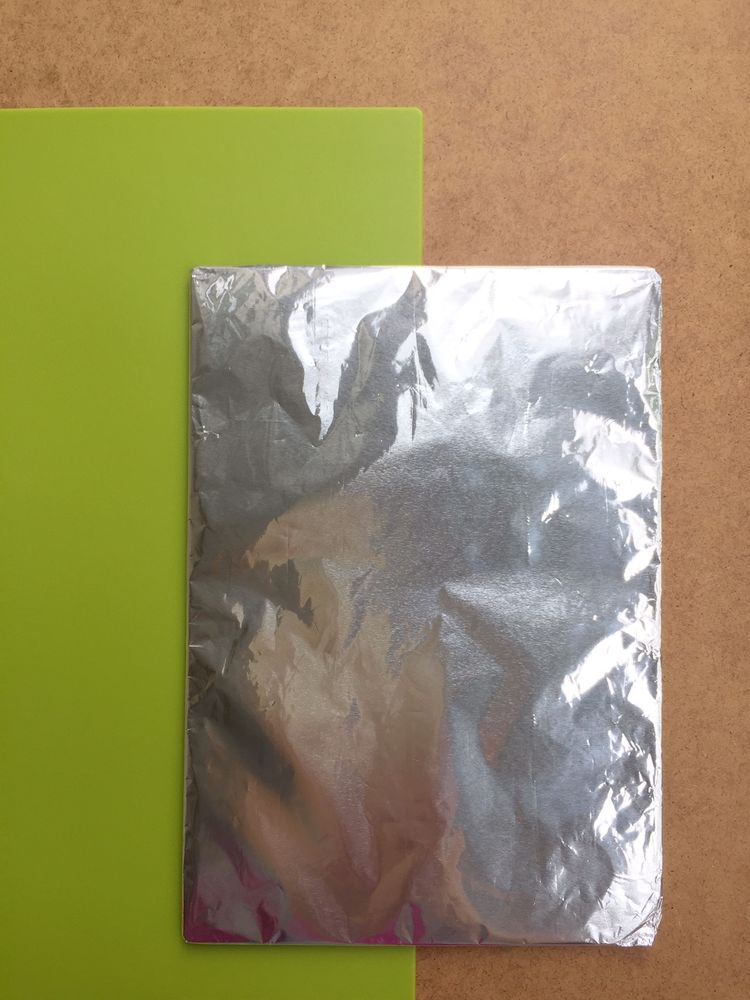
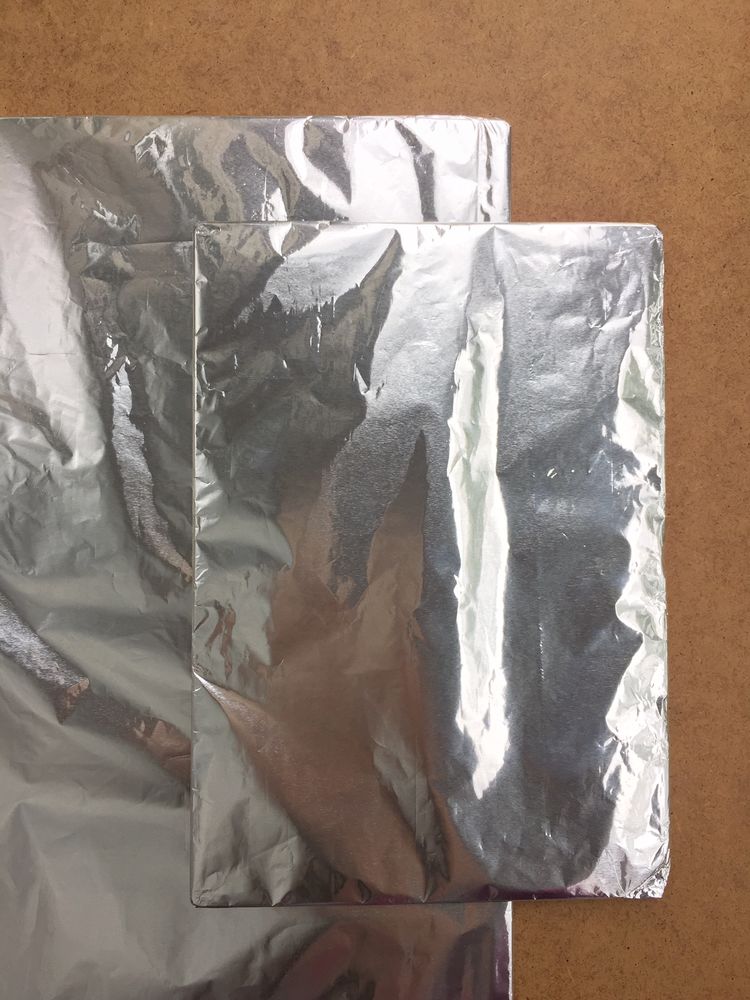
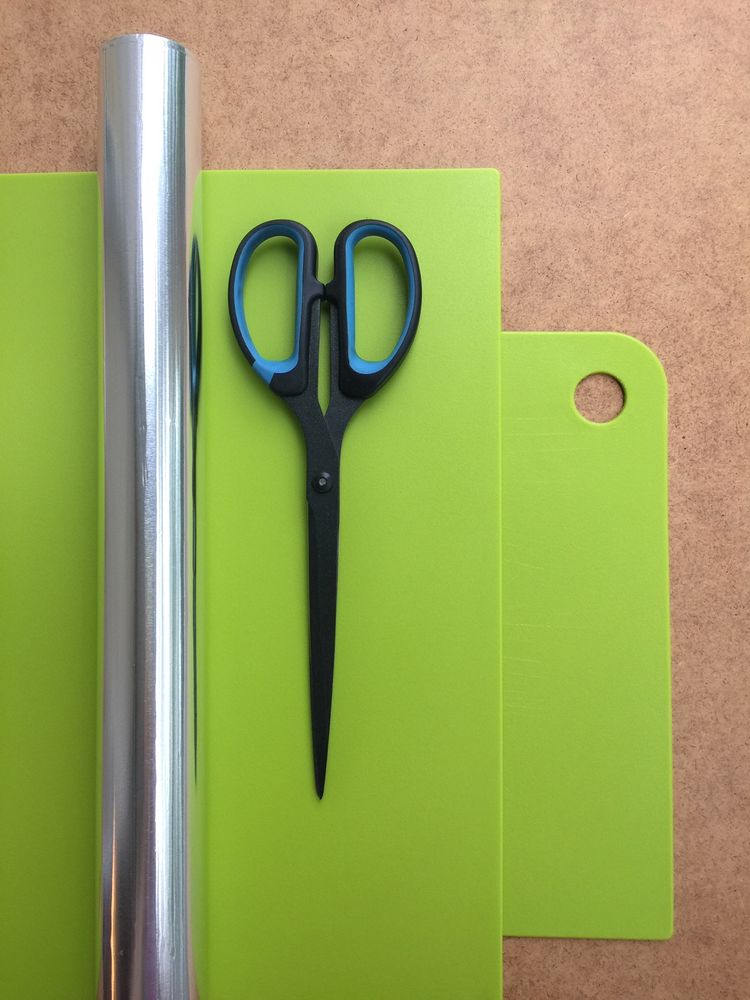
- Any hard surface of different sizes. I used the most ordinary cutting boards, which any housewife has in her kitchen, as materials at hand.
- Aluminum foil, which is also likely to be found in any home, because without it we can no longer imagine the process of storing and preparing food.
- Stationery scissors. You can do without them altogether :)
Then everything is simple.
1. Wrap the board in foil. You can use either a shiny or matte foil surface. A shiny surface will give more reflected and hard light, a matte surface will give less and soft light. The silver color of the foil will not add additional color to the objects in the photo, and therefore will not affect the overall color scheme of the photo as a whole.
2. Repeat the same with the second board. You can use round, square, rectangular boards of different sizes - it all depends on what you are going to highlight. The size depends on the area you need to highlight. This is why when it comes to small objects in photography, highlighting them is not so easy, since store-bought reflectors are large enough to produce small spots of light.
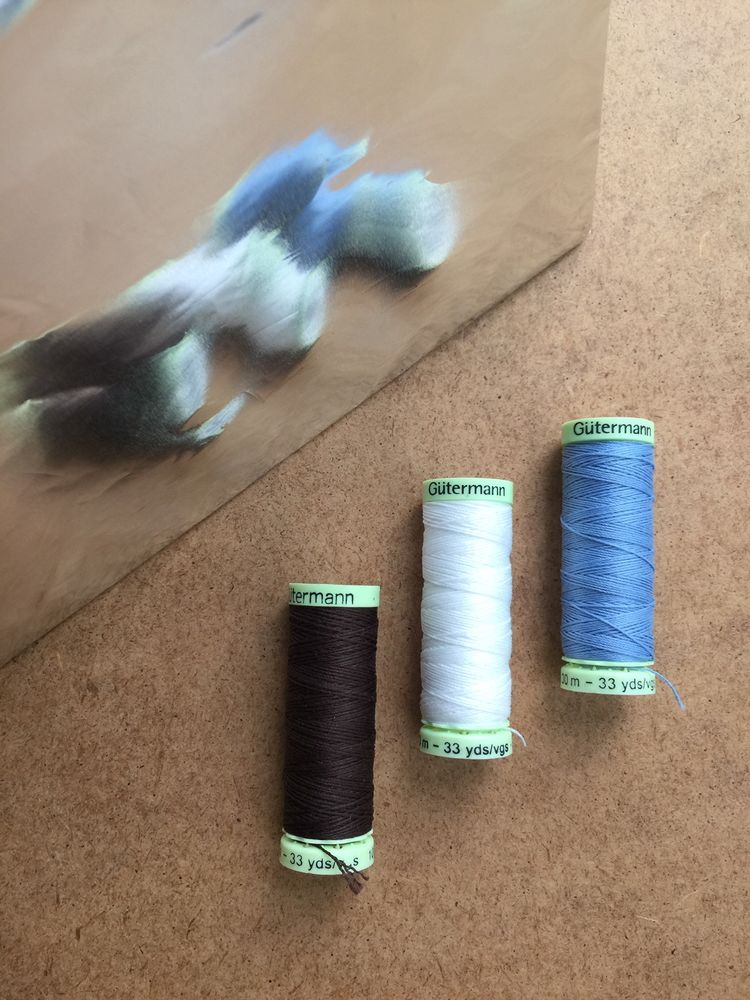
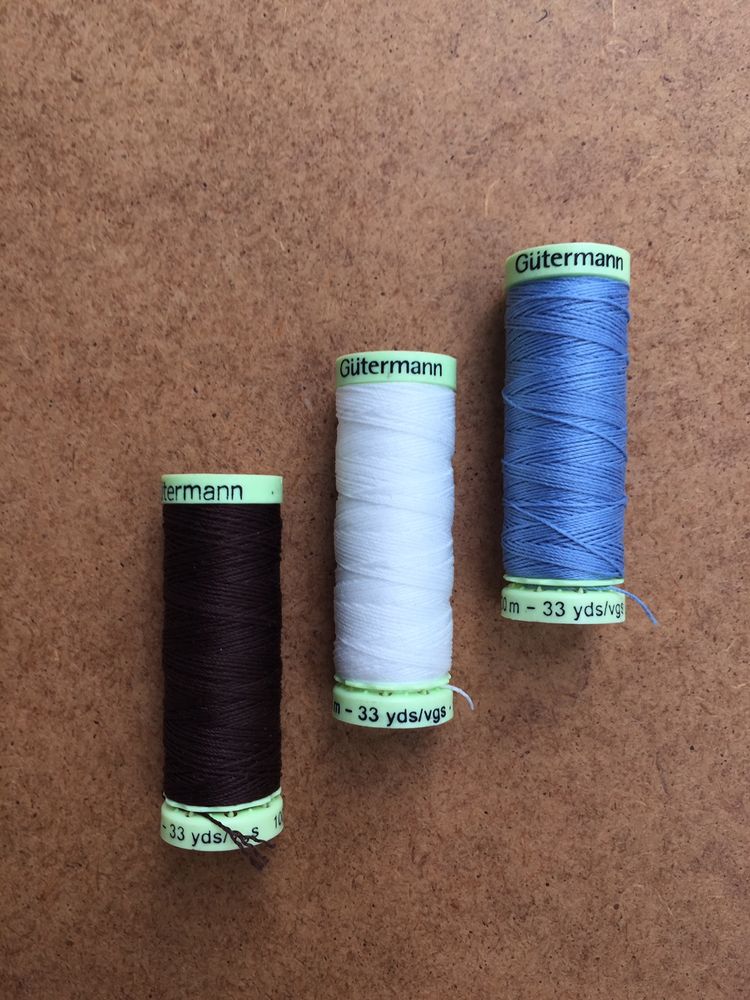
3. Now place your subject (in this case spools of thread) between the light source (mine is the window on the right) and the reflector (I used a small reflector since my subjects in the photo are small). Direct the reflected light towards the shadow area of the subject. Take a photo.

4. This is what I got. Even light over the entire surface of the image, shadow areas are highlighted, details on the white reel are not lost. That is, everything was done correctly. It should be noted that I did not edit the photo in a graphics editor to get a fair comparison picture. Thus, I saved time on processing the image, and using a reflector allowed me to immediately get an image ready for instant publication.

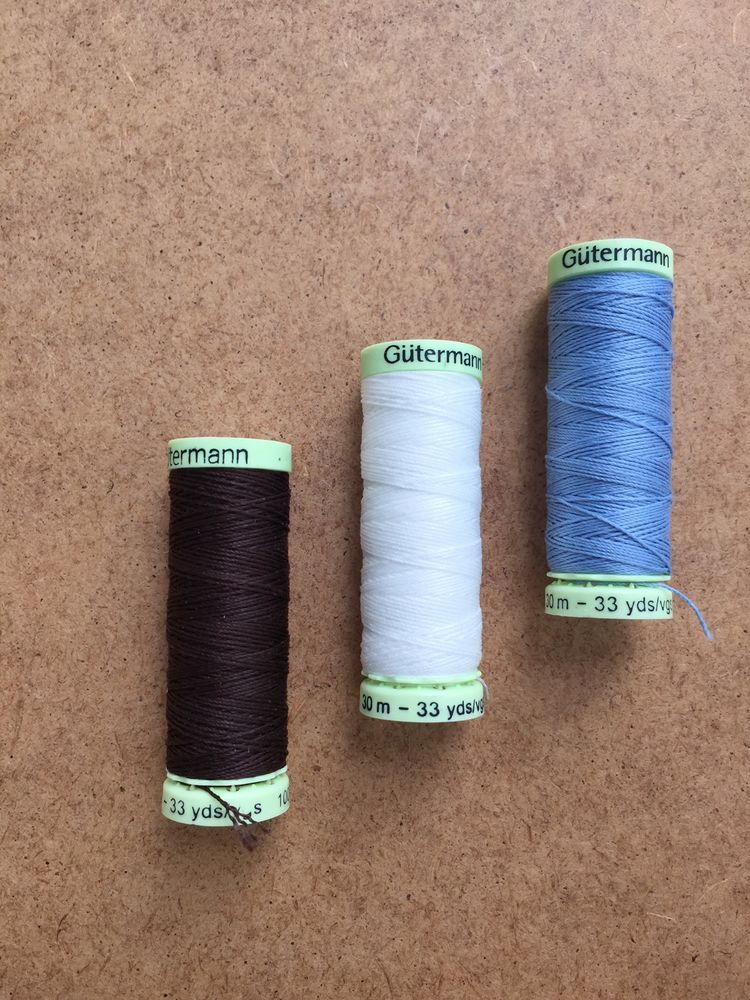
5. For clarity, I will show you the same photo, but only taken without a reflector. Look how much darker and dull it is. By the way, I took pictures on my phone, but even pictures taken on a mobile phone give a clear idea of how a reflector helps to cope with shadow areas, and how important it is to use reflectors when shooting, even if you made them yourself at home :)

I hope this small and simple master class was useful to you. And now the photos of your work will be even more attractive. I wish you beautiful pictures and success in your creativity!
How to make a reflector with your own hands
Branded reflectors are not cheap, so among amateur photographers there are many who prefer not to spend money on professional equipment, but to make a reflector with their own hands from improvised materials. Moreover, there are plenty of materials for this - in fact, any thing can work as a reflection, as long as it is not black.
 To make the simplest reflector, you don’t need to invent anything. Take a sheet of white paper and secure it where you need it. But this is a one-time design, and it will not solve all problems. In order not to waste time each time, it is more advisable to make a reflector from a frame and a cover.
Frame for reflector.
As a frame, you can use a small children's plastic hoop or photo frames, or you can make a frame yourself from corrugated cardboard or plastic, wire of a suitable stiffness, or aluminum tubes. The main thing is that the frame is as light as possible . The shape of the reflector can be round, rectangular, or square - it depends on what you will use as the base. In principle, the form does not play a big role.
Reflective surface.
The simplest and most accessible material is a sheet of white Whatman paper or white paper glued to cardboard.
The result is a universal reflector. If you need a sharper light, use food foil, which must first be crushed well. Another option is to combine both reflective surfaces , making a 2 in 1 reflector. Attach white Whatman paper to a sheet of cardboard on one side and crumpled foil on the other . If you want to get soft light of warm colors, then you can spray gold paint onto silver foil - there will be a golden-colored reflector that will change the color temperature to a warmer tone.
In general, the choice of materials for a homemade reflector is huge; you need to choose taking into account the ability of the material to reflect or absorb light. The following rule applies here: the closer the texture of the material approaches mirror-like, the better the design will work for reflection.
Options for homemade reflectors.
If the reflector will be used as a background , then it can be made from two aluminum tubes, which will be the frame, and white fabric, which will be the reflective surface. Everything is simple here - a piece of fabric of the required size is cut, the bottom and top are folded and stitched. The tubes are inserted and the reflector is ready. All that remains is to figure out how to hang it on the wall. The same principle is used to create a background of any color.
A photo umbrella reflector can be made from a regular umbrella by covering its inside with crumpled foil.
 For an external flash, a reflector is made from whatman paper and a thick rubber band in five minutes. A sheet of whatman paper is folded into several layers (the shape is chosen depending on the direction of the light) and attached with an elastic band to the flash body. Most often, the reflector is made in the form of a cone and attached to the narrow side of the flash. But you can twist it as you like, shoot in a horizontal or vertical position, depending on the photographer’s imagination. Using the same principle, the reflector is made from a white plastic stationery folder, but for rigidity, the soft plastic is sewn with a piece of thick fabric or genuine leather. They are secured like paper ones - with an elastic band.
Even if you choose professional reflectors, in any case, the photographer will need the ability to make do with available materials. You won’t always have the entire arsenal of photographic equipment at hand, and that’s when homemade devices will come to the rescue.
PHOTOGRAPHY STUDIO. Reflectors for photography - we make it ourselves
What are reflectors used for? It's an affordable way to enhance the quality of your photos by bringing in extra lighting. You can use any reflective surface, such as a mirror, a sheet of white Whatman paper, foil, or professional reflectors that can be purchased at photography stores.
Reflectors come in different shapes and sizes and have surfaces of different shades. They are compact, convenient and quick to fold/unfold. For shooting at home, medium-sized round reflectors are suitable. For neutral illumination, a silver surface of the reflector is used, for warm illumination, a golden surface is used. But if you don’t want to spend money on buying reflectors, make them yourself from scrap materials. This is exactly what we will talk about today.
So, you will need:
- Any hard surface of different sizes. I used the most common cutting boards, which any housewife has in her kitchen, as materials at hand.
- Aluminum foil, which is also likely to be found in any home, because without it we can no longer imagine the process of storing and preparing food.
- Stationery scissors. You can do without them altogether :)
Then everything is simple.

2. Repeat the same with the second board. You can use round, square, rectangular boards of different sizes - it all depends on what you are going to highlight. The size depends on the area you need to highlight. This is why when it comes to small objects in photography, highlighting them is not so easy, since store-bought reflectors are large enough to produce small spots of light.

3. Now place your subject (in this case spools of thread) between the light source (mine is the window on the right) and the reflector (I used a small reflector since my subjects in the photo are small). Direct the reflected light towards the shadow area of the subject. Take a photo.
4. This is what I got. Even light over the entire surface of the image, shadow areas are highlighted, details on the white reel are not lost. That is, everything was done correctly. It should be noted that I did not edit the photo in a graphics editor to get a fair comparison picture. Thus, I saved time on processing the image, and using a reflector allowed me to immediately get an image ready for instant publication.
5. For clarity, I will show you the same photo, but only taken without a reflector. Look how much darker and dull it is. By the way, I took pictures on my phone, but even pictures taken on a mobile phone give a clear idea of how a reflector helps to cope with shadow areas, and how important it is to use reflectors when shooting, even if you made them yourself at home :)
I hope this small and simple master class was useful to you. And now the photos of your work will be even more attractive. I wish you beautiful pictures and success in your creativity