5 Tips to Make Your Food Photography Special
5 Tips to Make Your Food Photography Special
Perhaps now food photography has become more popular than ever. The blogosphere is exploding with food photos, and social networks like Pinterest and Instagram provide you with a never-ending stream of food photos 24/7. Creating food images that stand out in this sea of content is no easy task. Here are five tips to help you take photos that stand out.
Don't be afraid of shadows, they are useful in food photography
Shadows add realism to a scene, give food texture and set the mood, so don't be afraid to make them a part of your photos. To create a nice, dark shadow, the light should hit the food either from behind or from the side at a fairly low angle, slightly above the surface of your scene. Use reflectors sparingly or not at all. Reflectors bounce light onto areas that the light source does not reach, in other words in the shadows. So keep the shadows dark, don't reflect the light.
In the salted caramel candy photo you see above, the light hits the stage from behind at a slight angle and no reflector is used.
Imply action
The action gives your viewer the feeling that they are part of the scene; this type of interaction is always good. The action can be literal, like a hand holding a hamburger or pouring syrup on a stack of pancakes, but there are other (and actually simpler) ways to make it seem like something is happening in a photo. One example is a glass that has just been filled with beer. Your viewer must know that the head of foam only lasts for a minute, so seeing fresh beer indicates that someone was just present in the scene and poured the beer.
Take a low angle for tall and stacked food
Shooting from an angle just below the food is unusual for food photography; but it can create truly impressive images of tall foods like cakes, compound dishes like burgers, or, as in the photo below, shards of toffee. The food will be elevated in the eyes of the viewer and this will make it look large and impressive. Needless to say, this method doesn't work for flat food, so don't skim the pizza this way.
Create visual contrast when photographing food
Contrast can be varied and can make your food photography interesting. You can create contrast by using different shapes in your photo - circle, rectangle or square. You can create contrast by including colors that are on the opposite side of the color wheel (complementary), such as red and green, blue and orange. The lettuce cup salad in the photo below demonstrates both concepts, with the square bowl of dressing contrasting with the round lettuce cups and the red dressing providing contrast to the green leaves.
Leave negative space in the image
Don't feel like you have to fill every inch of the frame with food or props. A little negative (empty) space gives the food room to breathe and will keep your viewer from feeling overwhelmed and claustrophobic. There are no hard and fast rules that dictate exactly where negative space should be in food photography, but it's always a good idea to start with the rule of thirds. Mentally divide the photo into three parts vertically and horizontally and place the subject at or near one of the four intersection points of the lines. Leave the rest of the space empty and take a test shot. Do you think the scene looks good or too boring? If you feel like something is missing, add more elements to the frame one at a time along imaginary lines until you are satisfied with the composition. This is how I created the composition for the Thai curry ingredients in the photo below.
I hope these tips help inspire you to come up with some new food photography ideas.
5 Tips to Make Your Food Photography Special
October 06, 2017
Author: Vadim Zakirov
Food photography is perhaps one of the most challenging areas in photography. Just like fine art, you start with a blank canvas and build a picture. You start with a dish, add props, backgrounds, and dishes. Then you frame, then move everything in the frame, and so on. Until the arrangement of objects and color combinations satisfy you. Layer by layer, you build up the photograph until you achieve the perfect balance of reality and art.
Sometimes those who have learned to more or less control the camera begin to get frustrated. What's next? Why don't my photos look as beautiful as those of top food bloggers and food photographers? I'll give you some tips to help you improve your food photography.
Tip #1 – Tell a Story in Your Food Photography
Whether it's a dinner party at a fancy restaurant or a Sunday breakfast of country eggs and freshly baked bread, photography should tell a story. The history of how a particular dish was prepared. The story of what the table looks like before someone starts their meal. Or, for example, a story of fun gatherings with friends.
Why tell a story? Yes, simply because the story, the narrative in the photograph - they stimulate the viewer’s interest. The viewer asks questions, his imagination begins to complete situations, people, their habits and mood.
For example, this photo of homemade ice cream. This doesn't show a full, untouched cup of ice cream or a perfect, doughy scoop of this dessert.
On the contrary, the photo tells a small story. It was as if the person had just gotten up from the table. He left the spoon in the cup of ice cream and will be right back. Perhaps he pours himself lemonade or another drink.
Or maybe he is already sitting at the table? After all, you can see slightly melted ice cream on the plate. Who is this man? Man or woman? Perhaps he (she) made this ice cream. For whom? For your other half? Maybe it's a young girl? And she decided to spend the whole day at home, dedicating it to herself. And a good portion of popsicles for dessert will make her life a little sweeter and more interesting.
Tip #2 – Choose the right angle to photograph your food
In fact, there are only a few food photography angles that you can see over and over again in photos by different authors. But depending on your specific situation, you need to decide where you will place the camera. This will affect the type of story you are trying to tell.
Think about your shoot in advance. What kind of food are you filming? What is its size, shape, height and uniqueness? Then, place the camera where you think it best highlights the quality of the dish. Some foods look great when you shoot directly above the food (90 degree angle), while others look best when shot from the side (45 degree or 0 degree angle).
Take a look at the lasagna above: this photo doesn't tell you anything about the contents of each layer of this dish. If I had not indicated that this is lasagna, one might consider it, for example, a pie.
In this photo you can already see all the ingredients (Bolognese sauce, cheese, layers of pasta) and realize that this is lasagna.
Tip #3 – Surround the main dish with props
When you're shooting food from a forward angle, try playing with the foreground and background. Use white space to tell more of the story. Surround the main dish with ingredients and props that relate to the food. Ingredients, sauces, butter, bread and cooking utensils can indicate how a dish was prepared or what it is usually served with.
Jars, herbs, fabrics and even linens can speak to the origin of a dish or the situation in which it is served. Placing a few of them in the foreground and background will definitely enhance your story and add depth to the shot.
Tip #4 Create lines in the frame
You can use props or ingredients to create lines and layered effects in your images.
It is a compositional technique used by photographers to lead viewers' eyes to the main theme of the frame. You can use various props to create lines. Like the back of a chair in the background that frames the smoothie jar, or the knife in the foreground that draws the viewer's eye toward the drink.
That is, with backgrounds and cutlery, you can (and should) create such a composition so that the secondary (props) leads to the main (the semantic center of the frame).
Since shooting from above always gives you more graphics in your images, you have a better chance of focusing on the main dish by creating lines in the frame. Like, for example, this Borodino bread, pieces of which tend to the plate of thick soup. Or cilantro leaves, again facing the main dish.
Tip #5: Use neutral backgrounds to highlight your dish.
It's certainly great to have colorful props, but if you're not careful with your use of bright colors, a backdrop that's too bright can easily draw all the attention away from the food you're filming and towards it.
Choosing a neutral backdrop, like this black metal tray, enhances the red and yellow plum color inside this open-faced cake. Thus, attention is focused on the filling and on the pie itself as the main object in the frame.
Do you photograph food? If you have any other food photography tips, please share them in the comments below.
If you want to delve deeper into the topic of food photography, we invite you to take a course in our online photography school on food photography. There will be classes, advice, homework and their analysis by teachers.
MARIA ALTYNBAEVA
FOOD PHOTOGRAPHER
COMPOSITION IN FOOD PHOTOGRAPHY: 7 RULES THAT WILL MAKE YOUR FRAME BETTER
What defines the beauty of food photography?
My conclusion is the composition and appetizing nature of the dish.
What is an ideal composition? This is when every object in the frame is in its place. When nothing can be removed or added to a photo without disturbing the harmony and overall impression of the photo.
Composition is divided into aesthetic (idea, design of the photograph) and technical (frame geometry, color combination and light).
The main rule of aesthetic composition is that the picture must have one idea (plot) that is understandable to the viewer.
Before composing a frame, you need to understand what story you want to tell in the photograph. An idea often suggests which composition rule is best applied to implement it.
7 rules of composition that will make your shot better
1. Golden ratio
This is a basic rule of composition that has existed in art since ancient times. Let's not go deeper into his explanation. Let's just see that according to this rule, the frame area is divided by two vertical and two horizontal lines as follows.
The main objects in the frame should be placed along these lines or at their intersection points. The intersection points are called “visual centers.” It is believed that they attract a person's attention first.
In this photo by Rob Grimm, the shrimp lie on a horizontal cut line, and the most delicious top part of the right shrimp is located at the intersection of the two lines. In Linda Lomelino's photo, the ice cream scoops are arranged along the vertical grid lines, with two scoops lying at the intersection points of the lines.
2. Rule of diagonals
One of the most frequently used rules in food photography. Its essence is the location of the main objects in the frame diagonally. This technique is good because it creates dynamics in the photo. Here are some examples of diagonal compositions.
Photo credits: Diana Nagornaya, Beth Kirby, Marta Greber
In the first and second photos, the diagonal is set by two plates of soup. In the third picture, the diagonal is very succinctly and effectively indicated by a knife.
During the filming process, I found several features of constructing diagonal compositions:
- Rectangular cutting boards, plates, boxes, trays, etc. - a good basis for a diagonal composition.
- The diagonal can be set not only by objects, but also by color.
In this photo there is a diagonal of green created by the pesto in the jar and the sprig in the background.
- The diagonal in the frame can be set by the lines of the background boards or the location of the edge of the table.
- The diagonal can be set or emphasized with cutlery.
- There are often diagonals in the food itself, and this can and should be shown.
3. Rule of triangles
This is also a very popular rule in food photography. Its essence is that the main objects form a triangle. Let's look at examples.
Photo credits: @lumadeline, @_foodstories_, Linda Lomelino Photo credits: 1 - Monica Pinto, 2, 3 - Alexander Slyadnev
4. Spiral
Surprisingly, this rule of harmony was derived through mathematical calculations. Let’s not go into scientific complexities, but simply agree that photographs with a spiral composition look very interesting. The composition can be constructed so that the viewer's gaze twists or unwinds in a spiral, coming to the main object in the frame. This technique makes the frame dynamic.
Photo by Katie Quinn Davies
5. Fibonacci numbers
A very useful, but for some reason not often mentioned compositional technique. It helps determine the number of objects in the frame.
Mathematician Leonardo Fibonacci derived a number harmony series 1 1 2 3 5 8 12 ... Remember these numbers and use them when decorating dishes and composing compositions.
Photo credits: Nik Sharma, Monica Pinto
In the first photo we see 1 cupcake decorated with 1 fig. 3 pieces of cake were cut off; 4 pieces would have looked less harmonious. In the second picture we see 3 burgers, 2 glasses of beer. Near each burger there are 2 halves of a cucumber. These are all small details, but often the feeling of harmony in the frame depends on them.
6. Rhythm or pattern
This is the repeated repetition of the same or similar objects in the frame. This is a simple but very effective compositional technique.
Photo credits: @gkstories, @tata_cher, @localhaven Photo credits: @ditsen, @linda_lomelino, @tata_cher
Rhythm always makes a photograph more lively and interesting. Therefore, try to notice the rhythm in food, interior, dishes and add it to your photos.
In the photographs below, rhythm is not the main compositional device. But in the first photo there is rhythm in the back of the chair, in the sliced avocado and the tomato branch. The second photo shows very rhythmic waffles. In the third photo, the rhythm is set by the stack of pancakes itself and the lines of the grid.
Photo credits: @whatforbreakfast, @ditsen, @a_violet_dream
7. Different heights
An interesting compositional technique is the arrangement of objects at different heights. This prevents the viewer from getting bored and adds dynamics to the frame.
Photo credits: Ditte Ingemann, Linda Lomelino, Monica Pinto
The viewer unconsciously reads information from the photograph from left to right and from top to bottom. Therefore, for a more comfortable perception, it is better to make the top and left side of the photo lighter, i.e. leave more space and more light there.
P.S. to practice a lot. Then they will move to the subconscious level, and you won’t even have to think about them.
We'll talk about other important parts of a harmonious composition - color and light - in the following posts.
PPS I always enjoy reading comments on my posts!
On November 21, my master class “Building stylish food compositions” will take place in Moscow. Read more at the link.
9 secrets of a food photographer, or how to photograph delicious food!
I also want to learn how to take juicy photographs of food that, just by looking at them, will make you want to eat them right away. Therefore, when I had the chance to talk with Nikolai Mirsky, a professional food photographer, I agreed without hesitation.
At the very beginning of the meeting, Nikolai explained where the tendency to photograph and draw food came from. It turns out that food photography actually has a lot in common with classical fine art: it concerns the basics of composition and lighting. So food photographers are a kind of modern still life artists!
In fact, good food photography is achieved with the right combination of two components: light and composition. Light can be either natural or artificial. So, the first rule of good food photography is:
1. A light photograph is more appetizing than a dark one.
Which photo tastes better?
The lack of light can be compensated with a longer shutter speed. But for this we need to fix our camera. Based on this, the second rule follows.
2. Use a tripod! There are a great many of them. Classic tripod, a tripod that is attached to the table surface, a flexible articulated tripod:
or, as a last resort, an ordinary bag of buckwheat or any other cereal:
And don't forget to use the delayed start of shooting. This will eliminate the shaking of your hand and the camera when you press the button, since every camera has this function.
3. The light should be soft, not hard. Plus it should be located on any side except the front. The head-on light fills in all the irregularities and makes the picture flat and unattractive. Compare the same slice of pizza, but under different lighting.
Hard light:
Soft light:
4. Food doesn't have to be perfect. It should look edible and natural. It’s no secret that for advertising food photography they often use dummies, cover the food with varnish, add chemical bubbles, assemble sandwiches on skewers, etc. But this is all the prerogative of commercial photography and the domain of the food stylist. We are considering shooting at home, so don’t get carried away with perfectionism. Try to determine whether this burger is edible or not?
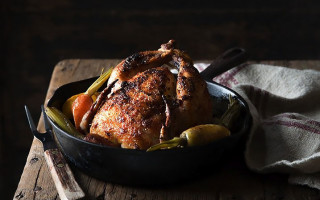
5. Build an interesting composition. If possible, place an object near the subject to help you understand the size of the food. Agree, a chicken hanging on a knife looks more interesting than just lying on a cutting board:
6. The front subject should always be sharp and tasty.
The mistake is to focus on food, which is located in the background, because... our eyes will not immediately pay attention to it. And this is unacceptable in food photography. Wrong:
Right:
7. Play with food cuts. Sometimes interesting insides are hidden behind a boring shell :)
8. Modern digital cameras allow you to zoom in on objects, so don’t forget about the texture of food and take macro photographs if possible:
9. It is best to photograph liquids in the light or in backlight (when it is directed from below into the frame). If the liquid is cloudy and not transparent, then you can try to photograph the moment the liquid is poured from glass to glass. Place the glass on the table, pull a background from behind, place a light source behind it, and take photographs using a series of frames. With proper skill you should get something similar. And don't forget rule #2, use a tripod!
If you follow these tips, your food photos will be delicious, get a lot of likes, and will stand out among the huge number of other food photos. And most importantly, eat delicious and beautiful food! Let not only your stomach rejoice, but also your eyes! :)
For the advice and holding the master class, I would like to thank Nikolai Mirsky, the Le bon gout company, in whose office all the action took place and who make all their products only from meat and spices, as well as the mosblog , which invited me to the event!
Well, friends, I ask you to repost the post. Let's make the world a little better, and let's start with our photographs!
Little tricks for great food photography
Photographers who engage in food photography often encounter the fact that during photography, products deteriorate or lose their “marketable appearance.” Such a regularly recurring nuisance forced the photography geniuses to come to terms with reality and resort to some tricks so that the viewer would in no way suspect that the shooting was carried out for several hours in a row, and that a beautiful shot is most often the result of painstaking preparation, rather than the successful spontaneity of the moment.
The American creative team, which includes art director Sandy Suffield, photographer Dan Matthews and food stylist Jack Sargeson, set out to create a photo project called Faking It, where they reveal many secrets of product photography and selflessly share their findings with everyone who cares. has a passion for such creativity, is passionate about creating food still lifes, or is interested in wholesale deliveries of food photo masterpieces on Instagram.
We cannot lag behind progressive humanity and also wanted to look behind the scenes of the creative process to understand how it is done.
If you look at what is located in each image around the finished composition, you can see that the background for the photo shoot on which the products will be located plays an important role in obtaining excellent food photography. We have already written that for still lifes and food photography it is best to use a plastic background. If you missed such important information, we recommend that you read the material.
Now pay close attention to the pictures below. You will see many strange and inedible things. What are they for? Let's find out together.
Using real champagne for photography is a thankless, drunken and expensive task. Fake champagne is created using water, soy sauce and Alka Seltzer for the bubbles. The portions of meat are propped up with blue plastic Lego figures for added stability.
Ice cream is most often made from mashed potatoes using lard, powdered sugar and natural food coloring. For example, pumpkin or beet juice.
The thin layer of waxy coating that covers grapes, called pruin, is reproduced with the help of talc. The entire structure is held in the desired shape with the help of toothpicks and fishing line.
The cake will look bright and appetizing if decorated with spray paint. Whipped buttercream is actually shaving cream (it doesn't melt under studio lights).
Motor oil is used to make the cut of boiled pork shiny and fresh. And with the help of shoe polish, the veins are darkened to give volume. Hairspray is used on vegetables. Give it a few sprays and the carrots will look fresh and moist.
Remember! Instead of milk, food photographers use PVA glue.
There are also a number of inedible things that make food photographs appetizing and beautiful. Do you know about these? Share your secrets with us.
Photogora video channel
Food Photography: 5 Simple Tips for Better Food Photos
Photographing food is not as easy as it seems at first glance. I've been photographing people for 10 years, and I think photographing food is much more difficult. Some of you will laugh at this because food doesn't move around like people do, but when photographing food, you have to set the scene so that the food looks appetizing. I've been getting serious about photographing food for my blog and have put together some tips that I hope will help you in the process.
1. Place the food in the props.
When studying the images of my favorite food bloggers, I noticed the props they use. They often use plates of different colors, shapes and textures, as well as different spoons and mugs.
Of course, they use standard table decorations, but often they add colorful fabrics or paper napkins, sheets of paper and more. Sometimes the props are not even very noticeable, but they help raise the plate higher. One of my favorite and most versatile props is a brown wood cutting board. Often certain colors in an image reflect the seasonality of the recipe. Therefore, when I am sure that a given dish can be eaten all year round, I limit the colors in my photography. Color has a huge impact on the mood of an image, so I usually use a simple background and focus on the colors of the food. Although some people want their images to be seasonal. Here I used three different bowls, ingredients, fabrics, and hands as props for this recipe.
2.Use additional components to create interest.
If I make my nut egg rolls, which are pictured, I add nuts to the background of the food itself. I either sprinkle them around the stove or place them in a jar next to the plate. This adds a little interest to the image and gives an indication of what is inside the dough.
3. Use a wide aperture to focus on details.
Using a wide aperture allows the lens to focus on a small area of the image, leaving everything else out of focus. If you look at this picture of my Parmesan Ham Swiss Bagels, you'll see that the front of the image is in focus but the rest of the image is out of focus.
4. Change your shooting angles.
I'm a big fan of shooting the same subject from different vantage points. Shoot close, far, high and low. People never get tired of food photos, so experiment. You'll find some camera angles and scenes that work best for you - others will begin to recognize your photo.
5. Share the process step by step.
When I blog about new recipes, I love sharing every step. This way, with a quick glance, the reader will realize that the recipe is not that complicated - they can see all the steps to prepare it. Here's an example: if you look at a dish, it seems difficult to prepare, but it's not! I showed that I simply take a pan, cut the bread, add berries, stir and serve.
Using these tips will help spruce up your food photos, especially for blogs and recipe sites. Plan ahead because it's not as easy as it seems - you have to put thought into your photography.
Source: New York Institute of Photography website.
Seven Simple Tips to Improve Your Food Photos
Whether you're using a regular compact camera or a high-end DSLR, these simple tips and tricks will dramatically improve the quality of your photos.
1. Avoid using the built-in flash.
Shoot using natural light whenever possible. Unfortunately, the flash built into your camera leaves a lot to be desired. It produces a very short, very bright pulse of directional light that does not make the food any more attractive. As an example, compare these two photos:
The photo on the left used automatic camera settings (including flash). Notice the dark, sharp shadow under the tomato. You may also see a reflected flash on the surface of the fruit, which looks like a sharp glare. This makes the entire photo look flat, two-dimensional, blurry, and unappetizing. The photo on the right used only natural light coming through the curtain. Notice how much softer the shadow under the tomato is and how the highlights are not as pronounced.
The quality of light is one of the significant factors influencing the attractiveness of your photos. Avoid shooting in direct sunlight, as this can cause shadows as harsh as those produced by your camera's built-in flash. The best results with natural light can be achieved by shooting on a cloudy day near a window with sheer curtains. Curtains and clouds will help create the perfect diffused light that will noticeably improve the quality of your photos.
2. Use macro mode and choose an interesting angle when shooting with a regular compact camera.
Most modern compact cameras have a built-in macro mode. By zooming in very closely on an object, you can show detail and convey texture. Also try creating interesting angles, either by getting very close to the subject, using a three-quarter angle, or shooting from top to bottom. Try not to remove food from the typical angles in which you are accustomed to seeing it. An image of an Oreo cookie bitten in half will look much more interesting if you photograph it close-up so that the bite fills the entire frame than if it is shot without the plate from top to bottom. Why? Because your brain has already seen Oreo from this perspective 1000 times.
3. Place the camera on a stack of books or mount it on a tripod.
When shooting at very close distances, any movement of the camera (even pressing the shutter button with your finger) will result in a slight loss of “clarity.” Always try to keep your hand pressed against something, and if possible, shoot with a tripod, using a remote shutter release or, as a last resort, the camera's timer function.
4. Use fluorescent lamps when shooting late in the evening or at night.
Light from a regular lamp or from a hood over the stove will not make the photo better. This lighting creates harsh shadows and, worse, can create strange colors in your photos. For example, fluorescent lights can give off a strange bluish tint, and there aren't many products that look attractive in blue. Replace your regular bulbs with daylight or full spectrum bulbs.
5. Add a homemade light to your “natural” light.
If you have to shoot in the evenings or indoors, make several simple and inexpensive light sources that you can attach in any desired place. Buy an inexpensive hanging lantern with an aluminum reflector and a high-power, full-spectrum lamp from a hardware store. Cut a circle from an old white dish towel or sheet and stretch it over the front of this lantern using tape or an elastic band. Ready! For mere pennies you get a source of directional diffused light of the full spectrum. Experiment with this lighting by pointing it directly at the plate of food (watch out for harsh shadows) or, for best results, bouncing the light off the ceiling.
The photo above was taken using this type of lighting. Notice the natural appearance and color of the food, as well as the slightly diffused shadow (though as you can see, the shadows are still a little harsher than in natural light).
6. Use post-processing in any popular photo editor
When you're a new photographer, it can be very difficult to get the results you want using camera settings alone. Therefore, use any famous photo editor to correct your images. You can use techniques such as “duplicating” and “simulating depth of field”
For this technique you need to use Adobe Photoshop. Open your photo in this editor. Create a copy of your photo's background layer by dragging it onto the Copy Layer icon or going to Layer>Duplicate Layer. On the newly created layer, change the Blend Mode to Overlay and then reduce the Opacity if the resulting image has too much contrast. In just two steps, you've made your photo more attractive by increasing contrast and color saturation.
"Simulation of depth of field"
Shooting a subject with the background slightly blurred is called “shallow depth of field” photography. This can give your photos a special appeal; however, many simple "compacts" tend to keep everything in focus, which can make your photos look flat. The free Google Picasa photo editor will help you get out of this situation.
Open your photo in Picasa and select the Soft Focus filter from the Effects tab. Increase the "size" of the effect to the maximum and use it until the edges of your photo are slightly out of focus. Use this effect sparingly. The result you can see the photos of banana salsa above
7. Provide complete control over light and shadow
Want to shoot at any time of the day or night without harsh shadows? For a fraction of the cost, you can buy freestanding fixtures with full-spectrum and color-corrected bulbs, as well as regular “clear” umbrellas in white. You can use umbrellas to reflect light from a lamp onto food, or to diffuse light. This method will allow you to take more natural and attractive product photos:
In the above diagram, two things happen: light is scattered as it passes through the umbrella, then a piece of inexpensive foam reflects that same light back, softening the shadow on the tomato. You can also replace the foam with another diffused light source, which will almost completely dissolve the shadow. As a general rule, remember that for every light you create, you need an additional light source or reflector to fill the shadow. Don't be afraid to experiment!